2016 MERCEDES-BENZ G-CLASS SUV fuel filter
[x] Cancel search: fuel filterPage 13 of 261

Front-passenger seat
Display message ............................ 154
Fuel
Consumptio nstatistic s................. .134
Displayin gthe range ...................... 134
Drivin gtips. .................................. .115
Fuel gauge ...................................... .26
Important safety notes .................. 250
Low outsid etemperature s.............2 51
Premium-grade unleade dpetrol ..... 251
Problem (malfunction) ................... 110
Quality (diesel )............................... 251
Refuelling ....................................... 108
Tank content/reserve fue l............. 251
Fue lfille rflap
Closing ........................................... 109
Emergency release ........................ 110
Opening ......................................... 109
Fue lfilter (white display message) .. 148
Fue llevel
Calling up the rang e(on-board
computer) ...................................... 134
Gaug e.............................................. 26
Fue ltank
Capacity ........................................ 251
Problem (malfunction) ................... 110
Fuel/wate rseparator
Service ........................................... 216
Fus eallocatio nchart ........................ 233
Fus ebox
Dashboard ..................................... 233
Front-passenger footwell ............... 233
Luggage compartment ................... 233
Transmission tunne l....................... 233
Fuses
Allocation chart ............................. 233
Before changing ............................. 232
Dashboard fus ebox ....................... 233
Fus ealloc ation chart ..................... 233
Fus ebox in the front-passenger
footwell .......................................... 233
Fus ebox in the luggage compart-
ment .............................................. 233
Fus ebox in the transmissio ntun-
nel ................................................. 233
Important safety notes .................. 232 G
Genui neMercedes-Benz parts ...........20
Glove compartment ..........................199
GPS reception ................................... .181 H
Hazard warnin glamps ........................ 76
Head restraints
Adjusting ........................................ .69
Adjusting (rear )................................ 70
Fitting/removing (rear ).................... 70
Headlamp
Cleaning system (function) .............. 75
Cleaning system (notes) ................ 254
Headlamp flasher ................................ 76
Headlamps
Misting up ........................................ 76
see Automati cheadlamp mode
Heating
see Climate control
High-pressure cleaners .................... 218
HOL Dfunction
Activating ....................................... 123
Activation conditions ..................... 123
Deactivating ................................... 123
Function/note s............................. 122
Genera lnotes ................................ 122
Horn ...................................................... 25 I
Ignition lock seeK ey positions
Immobiliser .......................................... 56
Indicator and warning lamp
Restrain tsystem ............................ 161
Indicator and warning lamps
Coolan t......................................... .162
Engin ediagnostics ........................ .162
Indicator lamps
Display message ............................ 145
Insectp rotection on the radiator .... 212
Instrument cluster
Overview .......................................... 26
Warning and indicator lamps ........... 26
Instrument cluster lighting .............. 13110
Index
Page 112 of 261
nozzle. Thi
sdischarge sany electrostatic
charge tha tmayhave buil tup.
Do not get back into the vehicl eduring the refu-
elling process ;otherwise, electrostatic charge
could buil dupagain. G
WARNING
If yo umix diesel fuel with petrol, the flash
point of this fuel mixture is lower than that of pure diesel fuel .When the engine is running,
components in the exhaust system may over-
heatu nnoticed. There is arisk of fire.
Never refue lwith petrol. Never add petrol to
diesel fuel.
! Do not use petrol to refue
lvehicles with a
diesel engine. Do not switch on the ignitio nif
you accidentally refue lwith the wrong fuel.
Otherwise, fuel can enter the fuel system.
Even smal lamounts of the wrong fuel could
result in damage to the fuel system and the
engine. The repair costs are high .Notify a
qualified specialist worksho pand have the
fuel tank and fuel lines drained completely.
! Overfilling the fuel tank coul
ddamage the
fuel system.
! Take care not to spil
lany fuel on painted
surfaces. You coul dotherwise damage the
paintwork.
! Use
afilter when adding fuel from afuel can.
The fuel lines and/or the fuel injection system coul dotherwise be blocked by particles from
the fuel can.
If you overfil lthe fuel tank, some fuel may spray
out when you remove the fuel pump nozzle.
Further information on fuel and fuel quality
(Y page2 50). Refuelling
General information Observe the important safety notes
(Y
page 108).
If you unlock/lock the vehicle from the outside, the fuel filler flap also unlocks/locks.
The positio nofthe8 fuel filler cap is dis-
played on the instrument cluster. The arrow next to the filling pump indicates the side of the vehi-
cle.
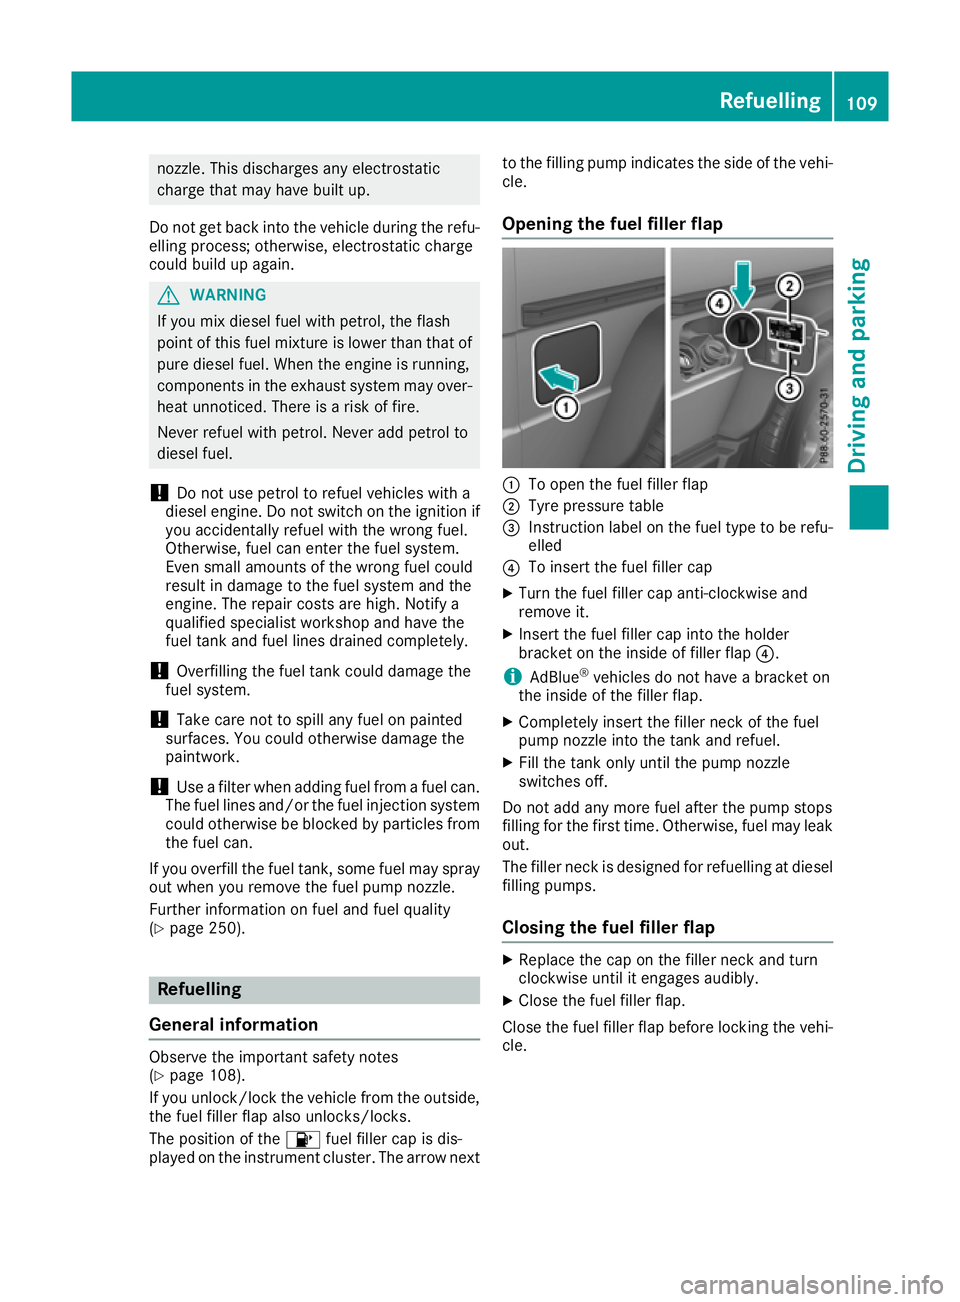
Opening the fuel filler flap :
To open the fuel filler flap
; Tyre pressure table
= Instruction label on the fuel type to be refu-
elled
? To insert the fuel filler cap
X Turn the fuel filler cap anti-clockwise and
remove it.
X Insert the fuel filler cap into the holder
bracket on the inside of filler flap ?.
i AdBlue ®
vehicles do not have abracket on
the inside of the filler flap.
X Completely insert the filler neck of the fuel
pump nozzle into the tank and refuel.
X Fill the tank only until the pump nozzle
switches off.
Do not add any more fuel after the pump stops
filling for the first time. Otherwise, fuel may leak out.
The filler neck is designed for refuelling at diesel
filling pumps.
Closing the fuel filler flap X
Replace the cap on the filler neck and turn
clockwise until it engages audibly.
X Clos ethe fuel filler flap.
Close th efuel filler flap before lockin gthe vehi-
cle. Refuelling
109Driving and parking Z
Page 118 of 261

X
To apply: pull parking brake lever ;up
firmly.
Whe nthe ignition is switched on, the red J
indicator lamp in the instrument cluster lights up.
X To release: pull parking brake lever ;
slightly.
X Press release button :and guid eparking
brake ;down to the stop.
The J indicator lamp in the instrument
cluster goe sout.
The vehicl ecan also be braked during an emer-
genc ybyu sing the parking brake.
X To brake in an emergency: press and hold
release button :and carefull ypullp arking
brake lever ;upwards.
If yo udrive on we troads or dirt-covered surfa-
ces, roa dsalta nd/or dirt could get into the
parking brake.
In order to prevent corrosion and areduction in
the braking powe rofthe parking brake, observe
the following:
R pull the parking brake upwards with release
button :depresse dfrom time to time before
beginning ajourney
R drive for approximatel y100 ma tamaximum
speed of 20 km/h Parkin
gupthe vehicle
If you leave the vehicle parked up for longer than
four weeks, the battery may be damaged by
exhaustive discharging.
If you leave the vehicle parked up for longer than
six weeks, it may suffer from lack of use.
X Contact aqualified specialist workshop and
seek advice.
i You can obtain information on trickle charg-
ers from aqualified specialist workshop. Driving tips
General drivin
gtips
Important safety notes G
WARNING
If you switch off the ignition while driving,
safety-relevant functions are only available wit
hlimitations, or not at all. This could affect,
for example, th epower steerin gand th ebrake
boosting effect .You will requir econsiderably
mor eeffort to steer and brake. Ther eisarisk
of an accident.
Do not switch off th eignitio nwhile driving.
Drive sensibly –savef uel Observe the following tips to save fuel:
X The tyre sshould always be inflated to the rec-
ommended tyre pressure.
X Remove unnecessary loads.
X Remove roof carriers when they are not nee-
ded.
X Warm up the engine at low engine speeds.
X Avoid frequent acceleration or braking.
X Have all service and maintenance work car-
ried out at the specified intervals.
Fuel consumption also increases when driving in
cold weather, in stop-start traffic, on short jour- neys and in hilly terrain. Short journeys
! Vehicles with
adiesel particle filter: if the
vehicle is mostly driven for short distances, it
is possible that malfunction smay occur dur-
ing the automatic cleaning of the diesel par-
ticle filter. This may lead to fuel collecting in
the engine oil and cause engine failure. There- fore, if you frequently drive short distances,
you should take a20minute trip on amotor-
way or rural road at least every 500km. Brakes
Imp ortant safety notes G
WARNING
If you shift dow nonaslippery road surface in
an attempt to increas ethe engine's braking
effect, the drive wheels coul dlose their grip.
This increases the risk of skidding and having
an accident.
Do not shift downf or additionalengine brak-
ing on aslippery road surface. Drivingt
ips
115Driving an dparking Z
Page 151 of 261
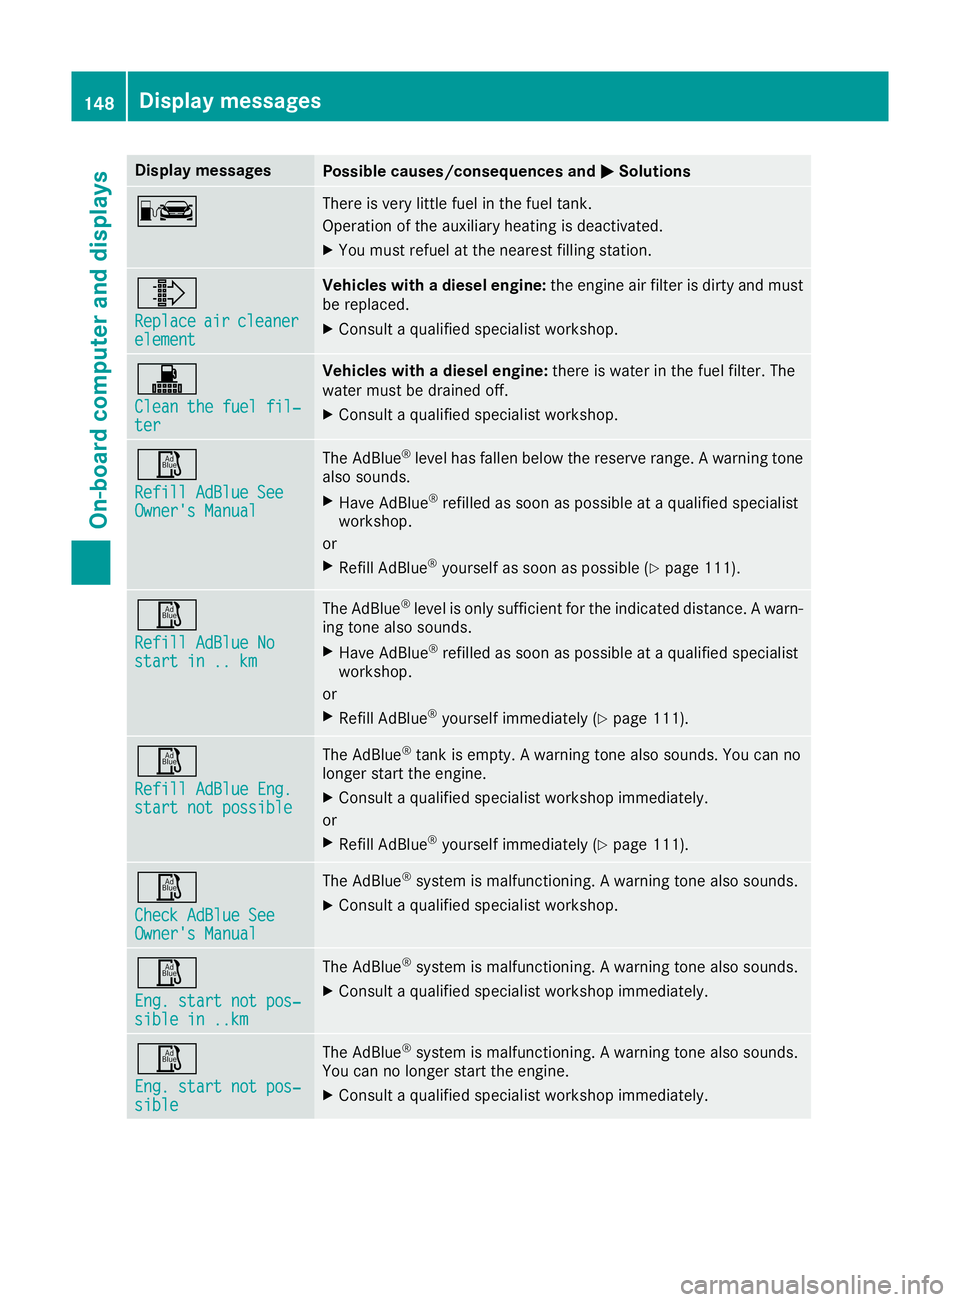
Display messages
Possible causes/consequence
sand M
MSolutions C There is very little fuel in the fuel tank.
Operation of the auxiliary heating is deactivated.
X You must refuel at the nearest filling station. ¸
Replace Replace
air
aircleaner
cleaner
element
element Veh
icleswithad ieselengine: the engine ai rfilter is dirty and must
be replaced.
X Consult aquali fied specialist workshop. !
Clean the fue
lfil‐
Clean the fuel fil‐
ter ter Veh
icleswithad ieselengine: there is water in the fue lfilter. The
water mus tbed raine doff.
X Consult aquali fied specialist workshop. Ø
Refill AdBlue See Refill AdBlue See
Owner'
sManual
Owner's Manual The AdBlue
®
level has fallen below the reserve range. Awarning tone
also sounds.
X Have AdBlue ®
refilled as soon as possible at aqualified specialist
workshop.
or X Refill AdBlue ®
yourself as soon as possible (Y page 111).Ø
Refill AdBlue No Refill AdBlue No
start in .. km start in .. km The AdBlue
®
level is only sufficient for the indicated distance. Awarn-
ing tonea lso sounds.
X Have AdBlue ®
refilled as soon as possible at aqualified specialist
workshop.
or
X Refill AdBlue ®
yourself immediately (Y page 111).Ø
Refill AdBlue Eng. Refill AdBlue Eng.
start not possible start not possible The AdBlue
®
tank is empty. Awarning tonea lso sounds. You can no
longer start the engine.
X Consult aqualified specialist workshop immediately.
or X Refill AdBlue ®
yourself immediately (Y page 111).Ø
Check AdBlue See Check AdBlue See
Owner's Manual Owner's Manual The AdBlue
®
system is malfunctioning. Awarning tonea lso sounds.
X Consult aqualified specialist workshop. Ø
Eng. start not pos‐ Eng. start not pos‐
sible in ..km sible in ..km The AdBlue
®
system is malfunctioning. Awarning tonea lso sounds.
X Consult aqualified specialist workshop immediately. Ø
Eng. start not pos‐ Eng. start not pos‐
sible sible The AdBlue
®
system is malfunctioning. Awarning tonea lso sounds.
You can no longer start the engine.
X Consult aqualified specialist workshop immediately. 148
Display messagesOn-board computer and displays
Page 216 of 261
Note
sono illevel Depending on your drivin
gstyle ,the vehicle
consumes up to 0.8 litres of oi lper 1,000 km.
The oi lconsumption ma ybehighe rtha nt his
when the vehicl eisnew or if yo ufrequentl ydrive
at high engine speeds.
To check the oi llev el:
R park the vehicl eonalevel surface
R the engine shoul dbeswitched off for approx-
imatel yfivem inute sifthe engine is at normal
operating temperature
R if the engine is not at normal operating tem-
perature, e.g .ifthe engine wa sonlys tarted
briefly, wait approximately 30 minute sbefore
carrying out the measurement
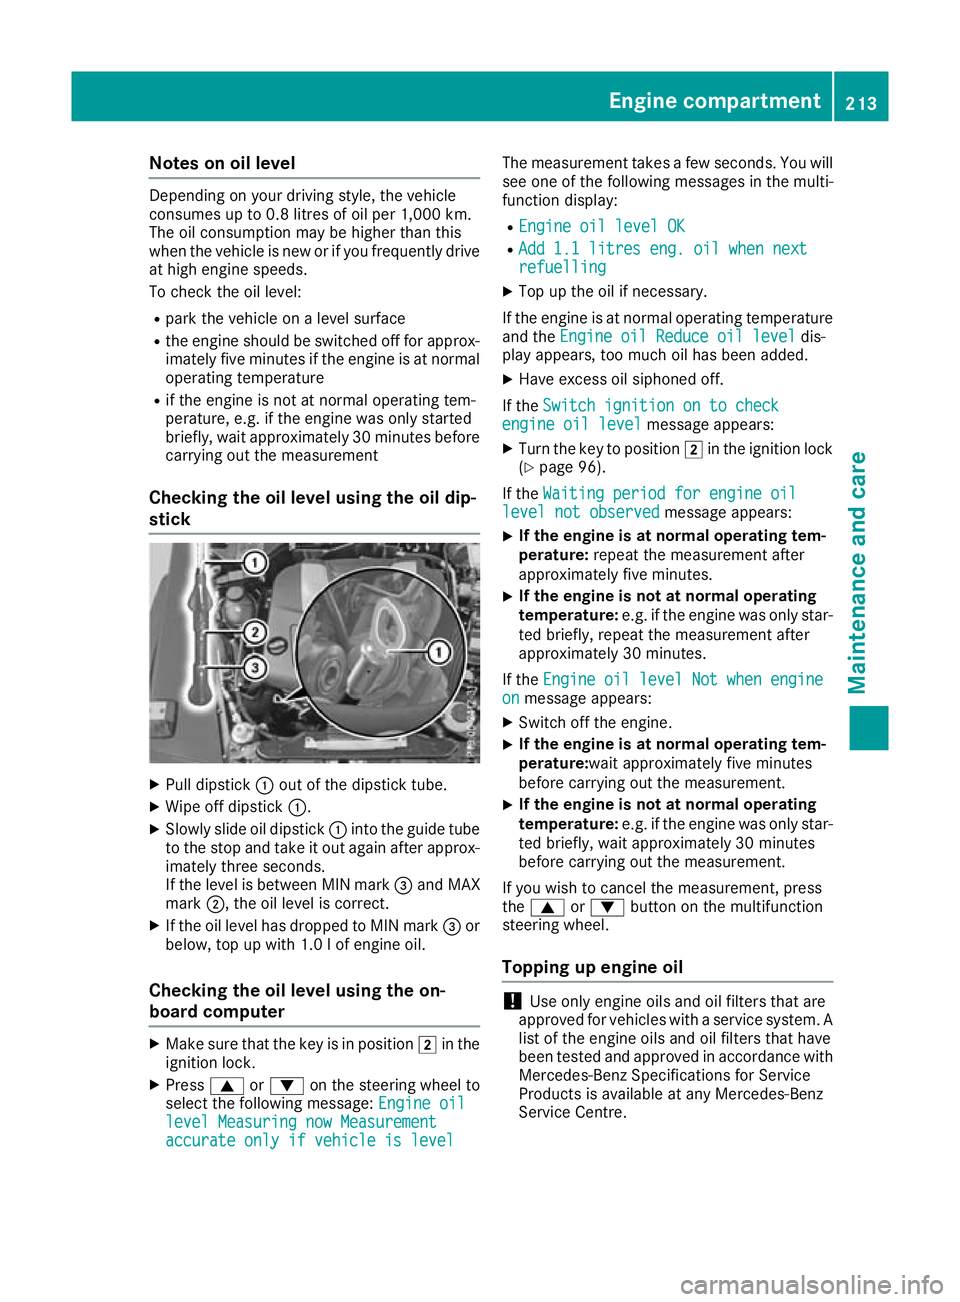
Checking the oil level using the oil dip-
stick X
Pull dipstick :out of the dipstick tube.
X Wipe off dipstick :.
X Slowly slide oil dipstick :into the guide tube
to the stop and take it out again after approx- imately three seconds.
If the level is between MIN mark =and MAX
mark ;,the oil level is correct.
X If the oil level has dropped to MIN mark =or
below, top up with 1.0 lofe ngine oil.
Checking the oil level using the on-
board computer X
Make sure that the key is in position 2in the
ignition lock.
X Press 9or: on the steering wheel to
select the following message: Engine oil Engine oil
level Measuring now Measurement level Measuring now Measurement
accurate only if vehicle is level accurate only if vehicle is level The measurement takes
afew seconds. You will
see one of the following messages in the multi-
function display:
R Engine oil level OK Engine oil level OK
R Add 1.1 litres eng. oil when next
Add 1.1 litres eng. oil when next
refuelling refuelling
X Top up the oil if necessary.
If the engine is at normal operating temperature and the Engine oil Reduce oil level
Engine oil Reduce oil level dis-
play appears, too much oil has been added.
X Have excess oil siphoned off.
If the Switch ignition on to check
Switch ignition on to check
engine oil level
engine oil level message appears:
X Turn the key to position 2in the ignition lock
(Y page 96).
If the Waiting period for engine oil
Waiting period for engine oil
level not observed
level not observed message appears:
X If the engine is at normal operating tem-
perature:
repeat the measurement after
approximately five minutes.
X If the engine is not at normal operating
temperature:
e.g. if the engine was only star-
ted briefly, repeat the measurement after
approximately 30 minutes.
If the Engine oil level Not when engine Engine oil level Not when engine
on
on message appears:
X Switch off the engine.
X If the engine is at normal operating tem-
perature:wait approximately five minutes
before carrying out the measurement.
X If the engine is not at normal operating
temperature:
e.g. if the engine was only star-
ted briefly, wait approximately 30 minutes
before carrying out the measurement.
If you wish to cancel the measurement ,press
the 9 or: button on the multifunction
steering wheel.
Topping up engineo il !
Use only engine oils and oil filters that are
approved for vehicles with aservice system. A
list of the engine oils and oil filters that have
been tested and approved in accordance with
Mercedes-Benz Specifications for Service
Products is available at any Mercedes-Benz
Service Centre. Engine compartment
213Maintenance and care Z
Page 219 of 261
The ASSYST service interval display inform
syou
of the next service due date.
If as ervice due date has been exceeded, you
also hear awarning tone.
The multifunction display shows aservice mes-
sage for afew seconds, e.g.:
Service Ain999,999 km
Service Ain999,999 km
Service Ain..d ays
Service Ain..d ays
Service Adue
Service Adue
Service Aoverdue by 999,999 km
Service Aoverdue by 999,999 km
Service Aoverdue by .. days
Service Aoverdue by .. days
Maintaining the time-dependent service sched-
ule:
X Call up and noted own the service due date
before disconnectin gthe battery.
or X After reconnecting the battery, subtract the
battery disconnection periods from the ser-
vice date shown on the display.
The symbol and the letter indicate which type of service is due:
¯ Minor service A
A
± Major service B B
The ASSYST service interval display does not
take into account any periods of time during
which the battery is connected.
Hiding service messages X
To hide the service message, press the %
back button on the multifunction steering
wheel (Y page 132).
Displaying service messages Use the buttons on the multifunction steering
wheel.
X Switch the ignition on.
X Press =or; to select the standard
display menu on the steering wheel
(Y page 133).
X Press 9or: to select the ASSYST ser-
vice interval display.
The ¯ or± service symbol and the ser-
vice due date are displayed. Special service requirements The prescribed service interval is based on nor-
mal operation of the vehicle. Servic ework will
need to be performed more often if the vehicle is operated under arduous conditions or increased
loads, for example:
R regular city driving with frequent intermediate
stops
R if the vehicle is primarily used to travel short
distances
R for frequent operation in mountainous terrain
or on poor road surfaces
R if the engine is often left idling for long periods
In these or similar operating conditions, have,
for example, the air filter, engine oil and oil filter changed more frequently. The tyres must be
checked more frequently if the vehicle is oper-
ated under increased loads. Further information can be obtained at aqualified specialist work-
shop, e.g. aMercedes-Benz Servic eCentre. Fuel/water separator
! If you continue driving without having the
fuel/wate rseparato rserviced, this could
caus edamag etotheengine. An yresulting
damag eisnotcovered by th ewarranty. H
Environmenta
lnote
Dispose of servic eproduct sinane nviron-
mentally-responsible manner.
If th efuel/water separator needs servicing:
R the ! Clean
Clean the thefuel
fuel filter
filter message
is shown in th emultifunction display
R aw arning tone sounds
X Consult aqualifie dspecialist workshop. Care
General notes
! For cleaning your vehicle, do not use any of
the following:
R dry ,rough or hard cloths
R abrasive cleaning agents
R solvents
R cleaning agents containing solvents
Do not scrub. 216
CareMaintenanc
eand care
Page 254 of 261
vapours. Keep fuel
sout of the reach of chil-
dren.
If you or others come into contact with fuel,
observe the following:
R Wash the fuel off any affected area sofskin
with water and soap immediately.
R If you get fuel in youre yes, rinse them thor-
oughly with clea nwater immediately. Seek
immediate medical attention.
R If fuel is swallowed,s eek immediate medi-
cal attention. Do not induce vomiting.
R Change any clothing that has come into
contact with fuel immediately.
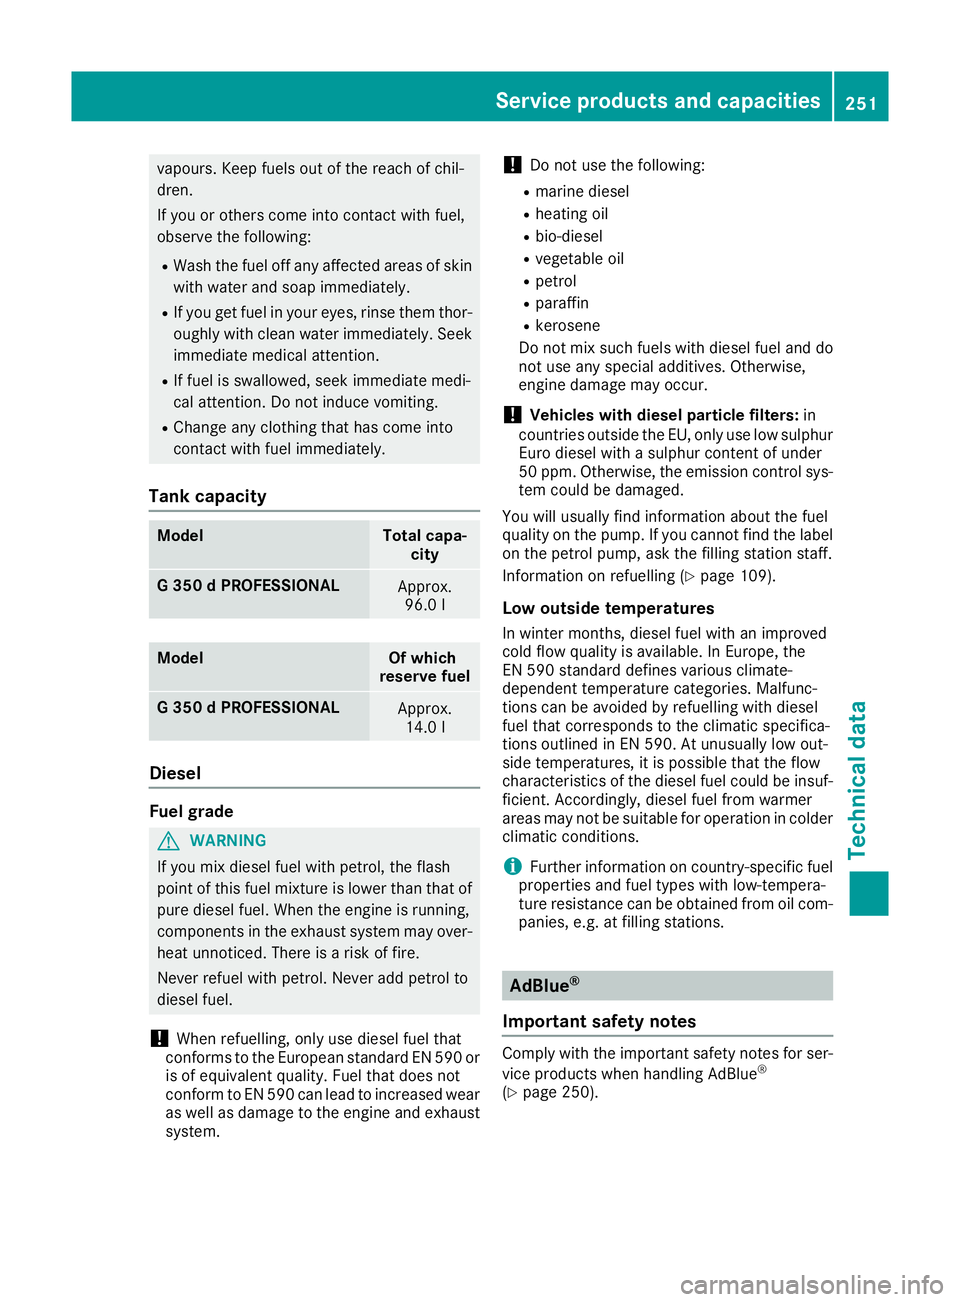
Tank capacity Model Total capa-
city G3
50dPROFESSIONAL Approx.
96.0 l Model Of which
reserve fuel G3
50dPROFESSIONAL Approx.
14.0 l Diesel
Fuel grade
G
WARNING
If you mix diesel fuel with petrol, the flash
point of this fuel mixture is lower than that of pure diesel fuel.W hen the engine is running,
components in the exhaust system may over-
heatu nnoticed. There is arisk of fire.
Never refue lwith petrol. Never add petrol to
diesel fuel.
! When refuelling, only use diesel fuel that
conforms to the European standard EN 590 or is of equivalent quality .Fuel that does not
conform to EN 590 can leadtoi ncreased wear
as wellasd amage to the engine and exhaust
system. !
Do not use the following:
R marine diesel
R heating oil
R bio-diesel
R vegetable oil
R petrol
R paraffin
R kerosene
Do not mix such fuels with diesel fuel and do
not use any special additives. Otherwise,
engine damage may occur.
! Vehiclesw
ith diesel particle filters: in
countries outside the EU, only use low sulphur
Euro diesel with asulphurc ontent of under
50 ppm. Otherwise, the emission control sys- tem could be damaged.
You will usually find information aboutt he fuel
quality on the pump. If you cannot find the label
on the petrol pump, ask the filling station staff.
Information on refuelling (Y page 109).
Low outside temperatures In winter months, diesel fuel with an improved
cold flow quality is available. In Europe, the
EN 590 standard defines various climate-
dependent temperature categories. Malfunc-
tions can be avoided by refuelling with diesel
fuel that corresponds to the climatic specifica-
tions outlined in EN 590. At unusually low out-
side temperatures, it is possible that the flow
characteristics of the diesel fuel could be insuf- ficient. Accordingly, diesel fuel from warmer
areas may not be suitablef or operation in colder
climatic conditions.
i Further information on country-specific fuel
properties and fuel types with low-tempera-
ture resistance can be obtained from oil com- panies, e.g. at filling stations. AdBlue
®
Important safety notes Comply with the important safety notes for ser-
vice produc tswhen handlin gAdBlue ®
(Y page 250). Service products and capacities
251Technical data Z