2016 MERCEDES-BENZ G-CLASS SUV turn signal
[x] Cancel search: turn signalPage 14 of 261

Interior lighting
.................................. .77
Automatic contro lsystem ................ 77
Delayed switch-off (on-board
computer) ...................................... 139
Luggage compartment lighting ........ 78
Manua lcontro l................................. 77
Overview .......................................... 77
Reading lamp ................................... 78
Rear interio rlighting ........................ 78
iPod ®
and iPhone ®
Audio playback .............................. 178
ISOFIX chil dseats ecur ings ystem .... 40 J
Jack Declaration of conformity ................ 22
Pump leve r.....................................2 44
Storage location ............................ 223
Using ............................................. 244
Jump starting (engine) ......................227 K
Key Changing the battery ....................... 59
Checki ngtheb attery ...................... .59
Display message ............................ 155
Doo rcentral locking/unlocking ....... 57
Emergency key element ................... 58
Important safety note s.................... 57
Los s................................................. 60
Modifying the programming ............. 58
Overview .......................................... 57
Positions (ignition lock) .................... 96
Problem (malfunction) ..................... 60
Starting the engine .......................... 96
Ke yp ositions
Key .................................................. 96 L
Language (on-board computer) ........ 138
Lashin geyelets ................................ .203
Licenc eplate lamp (display mes-
sage) ................................................... 145
Light sensor (display message) ....... 145Lights
Activating/deac tivating th einte-
rior lighting delayed switch-off ...... .139
Automatic headlamp mode .............. 75
Combination switch ......................... 76
Dipped-bea mheadlamps ................. 74
Driving abroad ................................. 74
General notes .................................. 74
Hazard warning lamps ..................... 76
Headlamp flasher ............................ .76
Light switch .....................................74
Main-beam headlamps ..................... 76
Misted up headlamps ....................... 76
Parking lamps ..................................75
Rear foglamp .................................. .75
Sid elam ps ....................................... 75
Switching the daytime driving
lights on/of f(on -board com-
puter) ............................................. 138
Switching the daytime driving
lights on/of f(switch) ....................... 74
Switching the exterio rlighting
delaye dswitch-off on/of f(on-
board computer) ............................ 138
Switching the surround lighting
on/of f(on -board computer) .......... 138
Turn signal s..................................... 76
see Interior lighting
see Replacing bulbs
Loadin gguidelines ............................ 198
Locking
see Central locking
Locking (doors)
Automati c........................................ 62
Emergency locking ........................... 62
From inside (central locking but-
ton) .................................................. 62
Locking centrally
see Central locking
Locking verification signal (on-
board computer) ............................... 139
LO WR ANGE off-road gear ................ 124
Luggag ecom partment cover
Fitting/removing ........................... 204
Important safety notes .................. 203
Notes/function .............................. 203
Opening and closing ...................... 203 Index
11
Page 17 of 261
Station list ..................................... 176
Storing stations manually .............. 176
Switching on .................................. 176
Switching to alternative frequen-
cie s................................................ 177
Radio aerial
Assembl ytool ................................ 210
Removing ....................................... 210
Removing the radio aeria l.............. 210
Securing ........................................ 210
Securing the radio aeria l................ 210
Radio-based vehicle components
Declaration of conformity ................ 22
Rear benc hseat
Folding forward .............................. 202
Rear compartment
Setting the ai rvents ........................ 94
Rear door
Displa ymessage ............................ 153
Important safety notes .................... 63
Rear foglamp
Changing the bulb ............................ 81
Displa ymessage ............................ 145
Switching on/of f.............................. 75
Rear seat bench
Folding into an upright position ..... 202
Rear windo wheating
Problem (fault) ................................. 88
Switching on/of f.............................. 88
Rear windo wwiper
Replacing the wipe rblade ................ 82
Switching on/of f.............................. 82
Refuelling
AdBlue ®
......................................... 111
Fue lgauge ....................................... 26
Important safety notes .................. 108
Refuelling process ......................... 109
see Fuel
Remote control
Auxiliary heating/ventilation ............ 90
Changing the batteries (auxiliary
heating) ........................................... 92
Replacing bulbs
Brake lamp ...................................... 80
Important safety notes .................... 78
Overview of bulb types .................... 79
Rear fog lamp .................................. 81
Reversing lamp ................................ 81 Tai
llamp .......................................... 80
Turn signal (rear) .............................. 80
Turn signals (front )........................... 80
Rescue card ......................................... 24
Reserve (fuel tank)
see Fuel
Reserve fuel
Display message ............................1 47
Warning lamp ................................. 162
Residual heat
Switching on/off .............................. 89
Restrain tsystem
Display message ............................ 144
Introduction ..................................... 31
Warning lamp ................................. 161
Warning lamp (function) ................... 31
Rev counter ........................................ 131
Reversing lamp
Replacing bulbs ............................... 81
Reversing lamp (display message) .. 145
Roof carrier ........................................ 206
Roof lining and carpets (cleaning
instructions) ...................................... 221
Roof load (maximum) ........................ 254
Route
Creating ......................................... 184
Deleting ......................................... 186
Display route info ........................... 189
Displaying alternative route s......... 186
Editing ........................................... 185
Setting route options ..................... 189
Route guidance
Changing aroute ........................... 185
Displa y........................................... 187
Lane recommendations ................. 188
Route info ...................................... 189
Traffi creports ................................ 196
Route guidanc eactive ...................... 135 S
Safety Children in the vehicl e..................... 38
see Occupant safety
Safety net
Detachinga nd storing .................... 206
Important safety information ......... 204
Releasing ....................................... 206 14
Index
Page 20 of 261
Towin
geye
Front .............................................. 230
Rear .............................................. .230
Traffic reports
Overview lis t.................................. 188
Showing on the map ...................... 188
Switching on/of f........................... 196
Trailer
7-pi nconnecto r............................. 130
Power supply ................................. 129
Trailer coupling
see Towing atrailer
Trailer loads
Technica ldata. .............................. 256
Trailer towing
Cleaning the traile rtow hitch ......... 220
Coupling up atraile r...................... 129
Decoupling atraile r....................... 129
Driving tip s.................................... 128
ESP ®
................................................ 55
Important safety notes .................. 127
Lights display message .................. 145
Shift rang e..................................... 104
Trailer load s................................... 256
Transfer case
Genera lnotes ................................ 124
Shift rang e..................................... 124
Shifting .......................................... 124
Shifting (general notes ).................. 124
Shifting (important safety notes )... 124
Shifting to neutral .......................... 125
Switching off the off-road gear
rati o............................................... 124
Switching on the off-road gear
rati o............................................... 124
Transmission
see Automati ctransmission
Transmissio npositions .................... 103
Transport (vehicle) ............................ 231
Travellin guphill
Brow of hill ..................................... 122
Trim piece s(clea ning instruc-
tions) .................................................. 220
Trip computer (on-board com-
puter) .................................................. 134
Trip meter
Calling up ....................................... 133 Reset
ting(on-boar dcom puter) ...... 134
Turn signal lamp
Replacin gbulbs (rear) ...................... 80
Turn signals
Replacin gbulbs (front) .................... .80
Switching on/of f.............................. 76
Two-wa yradio
Frequencie s................................... 248
Installation ..................................... 248
Transmission outpu t(maximum) .... 248
Type identificatio nplate
see Vehicl eide ntification plate
Tyre pressure
Calling up (on-board computer) ..... 239
Displa ymessage ............................ 150
Recommended ............................... 238
Tyre pressure monitor
Checking the tyre pressure elec-
tronically ........................................ 240
Function/note s............................. 239
Genera lnotes ................................ 239
Important safety notes .................. 240
Radi otypea pproval for the tyre
pressure monitor ........................... 241
Restarting ...................................... 241
Warning lamp ................................. 164
Warning message .......................... 240
Tyres
Changing awheel .......................... 243
Checking ........................................ 235
Directio nofrotation ...................... 243
Displa ymessage ............................ 150
Important safety notes .................. 235
Information on driving .................... 235
Replacing ....................................... 243
Service life ..................................... 236
Snow chains .................................. 237
Storing ........................................... 243
Summer tyre sinwinter ................. 237
Tyre size (data ).............................. 246
Tyre trea d...................................... 236
Wheel and tyre combinations ........ 246
see Fla ttyre U
Unlade nweight .................................2 54 Index
17
Page 29 of 261
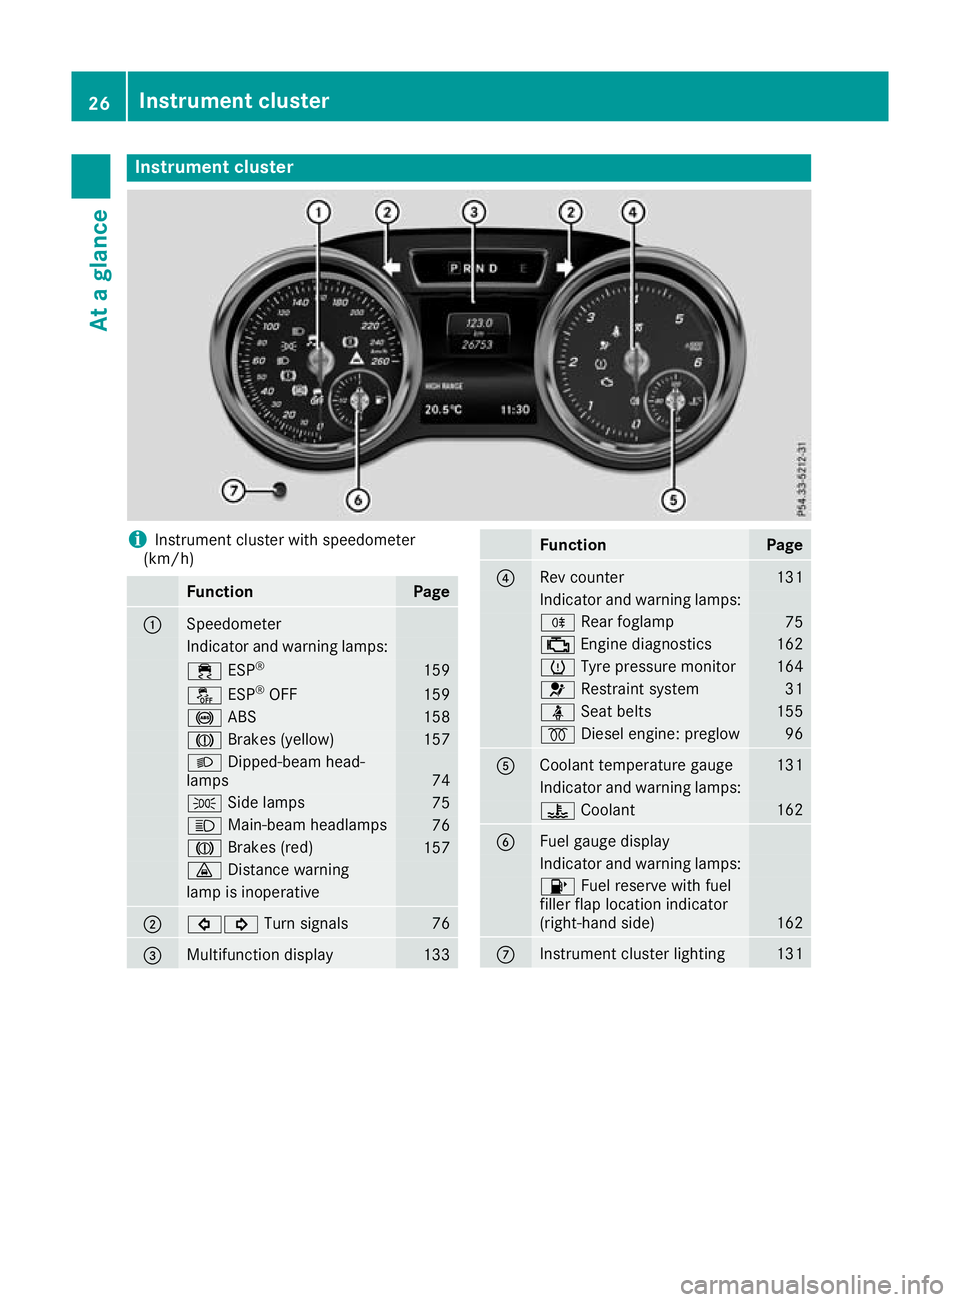
Instrumen
tcluster i
Instrument cluste
rwith speedometer
(km/h) Function Page
:
Speedometer
Indicator and warning lamps:
÷
ESP® 159
å
ESP®
OFF 159
!
ABS 158
J
Brakes (yellow) 157
L
Dipped-bea mhead-
lamps 74
T
Sidelam ps 75
K
Main-beam headlamps 76
J
Brakes(red) 157
·
Distance warning lamp is inoperative
;
#!
Turn signals 76
=
Multifunctio
ndisplay 133 Function Page
?
Rev counter 131
Indicato
rand warning lamps: R
Rear foglamp 75
;
Engine diagnost ics 162
h
Tyre pressure monitor 164
6
Restraint system 31
ü
Seat belts 155
%
Diesel engine: preglow 96
A
Coolant temperature gauge 131
Indicator and warning lamps:
?
Coolant 162
B
Fuel gaug
edisplay Indicator and warnin
glamps: 8
Fuel reserve with fuel
filler flap location indicator
(right-hand side) 162
C
Instrument cluster lighting 13126
Instrument clusterAt
ag lance
Page 61 of 261
The key centrally locks/unlocks:
R the doors
R the rear door
R the fuel filler flap
X To unlock centrally: press the%button.
If you do not open the vehicle within approx-
imately 40 seconds of unlocking:
R the vehicle locks again
R protection against theft is reactivated
X To lock centrally: press the&button.
i If the
& button is pressed when the driv-
er's door is open, the rear side door on the
driver's side is not locked either.
During unlocking, the turn signals flash once.
During locking, they flash three times.
You can also set an audibl esignal to confirm
that the vehicle has been locked. The audible
signal can be activated or deactivated using the
on-board computer (Y page 139).
Only when all the components have been locked is the visual or audibl elockingc onfirmation
issued.
When the surround lighting is activated via the
on-board computer, it lights up when it is dark
after the vehicle is unlocked with the key
(Y page 138). Changing the settings of the locking
system
You can change the settings of the lockin gsys-
tem. This mean sthato nlyt he driver' sdoor and
th ef uel fille rflap are unlocked when th evehicle
is unlocked. This is useful if you frequently travel
alone.
X To change th esetting: pressand hold down
the % and& buttons simultaneously
for about six seconds until th ebattery indica-
to rlamp flashes twice (Y page 59).
If th esettin goft helockin gsystem is changed
within th esignal range of th evehicle ,pressing
the & or% button:
R locks or
R unlock sthe vehicle The key now func
tions as follows:
X To unlock the driver's door and fuel filler
flap:
press the %button once.
X To unlock centrally: press the%button
twice.
X To lock centrally: press the&button.
X To restor ethe factory settings: press and
hold down the %and& button ssimul-
taneously for approximately six seconds until the battery check lamp flashes twice
(Y page 59). Emergency key element
Genera lnotes If the vehicl
ecan no longer be unlocked with the
key, use the emergency key element.
If you use the emergency key element to unlock
and open the driver's door, the anti-theft alarm
system willbet riggered. Switch off the alarm
(Y page 56).
If you unlock the vehicle using the emergency
key element, the fuel fillerf lap willnot be
unlocked automatically.
X To unlockt he fuel fillerf lap:insert the key
into the ignition lock.
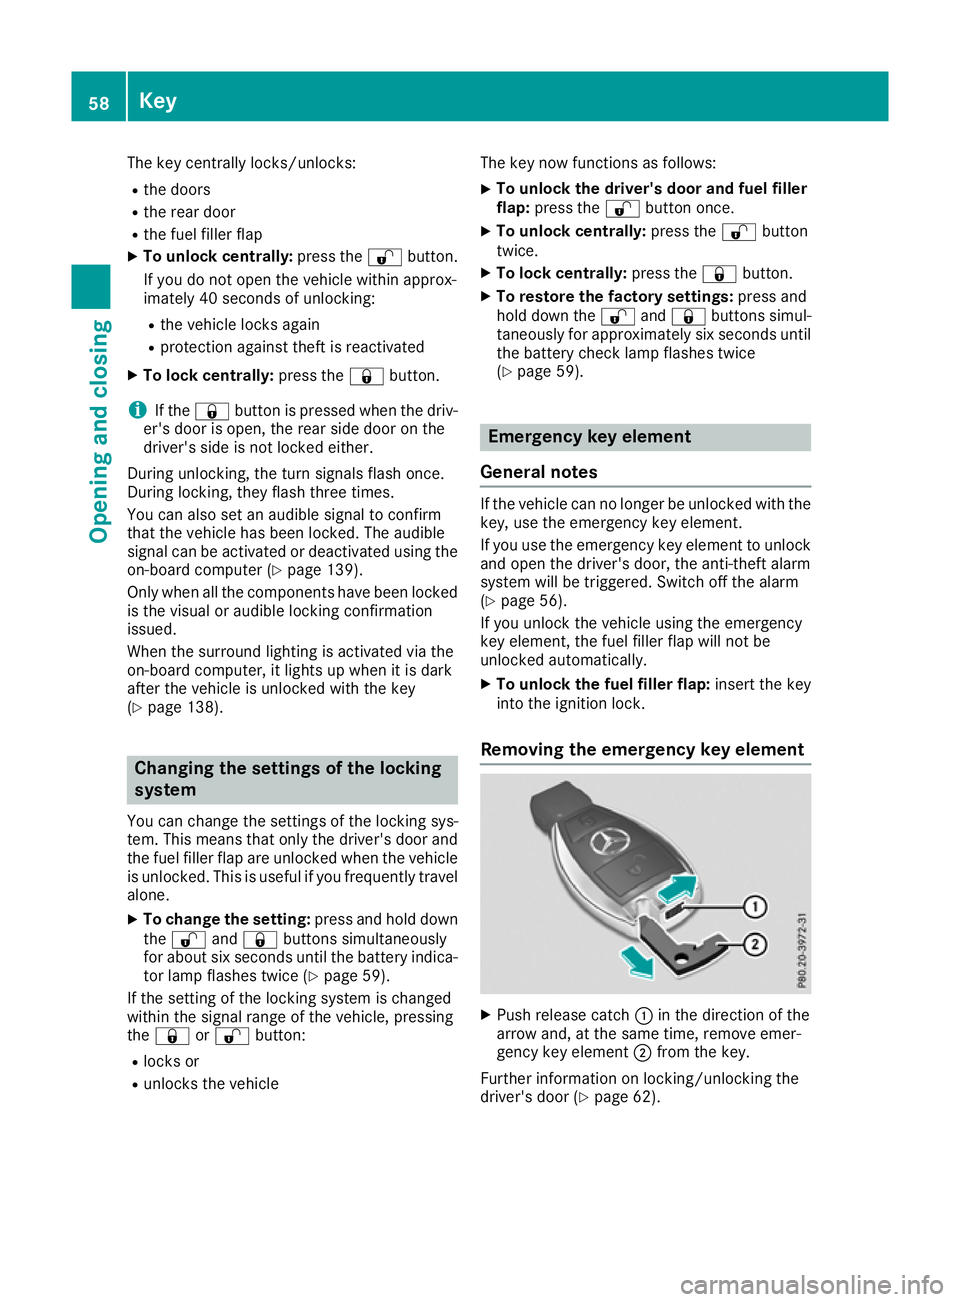
Removing the emergency key element X
Push releasec atch:in the direction of the
arrow and, at the same time, remove emer-
gency key element ;from the key.
Further information on locking/unlocking the
driver's door (Y page 62).58
KeyOpening and closing
Page 79 of 261
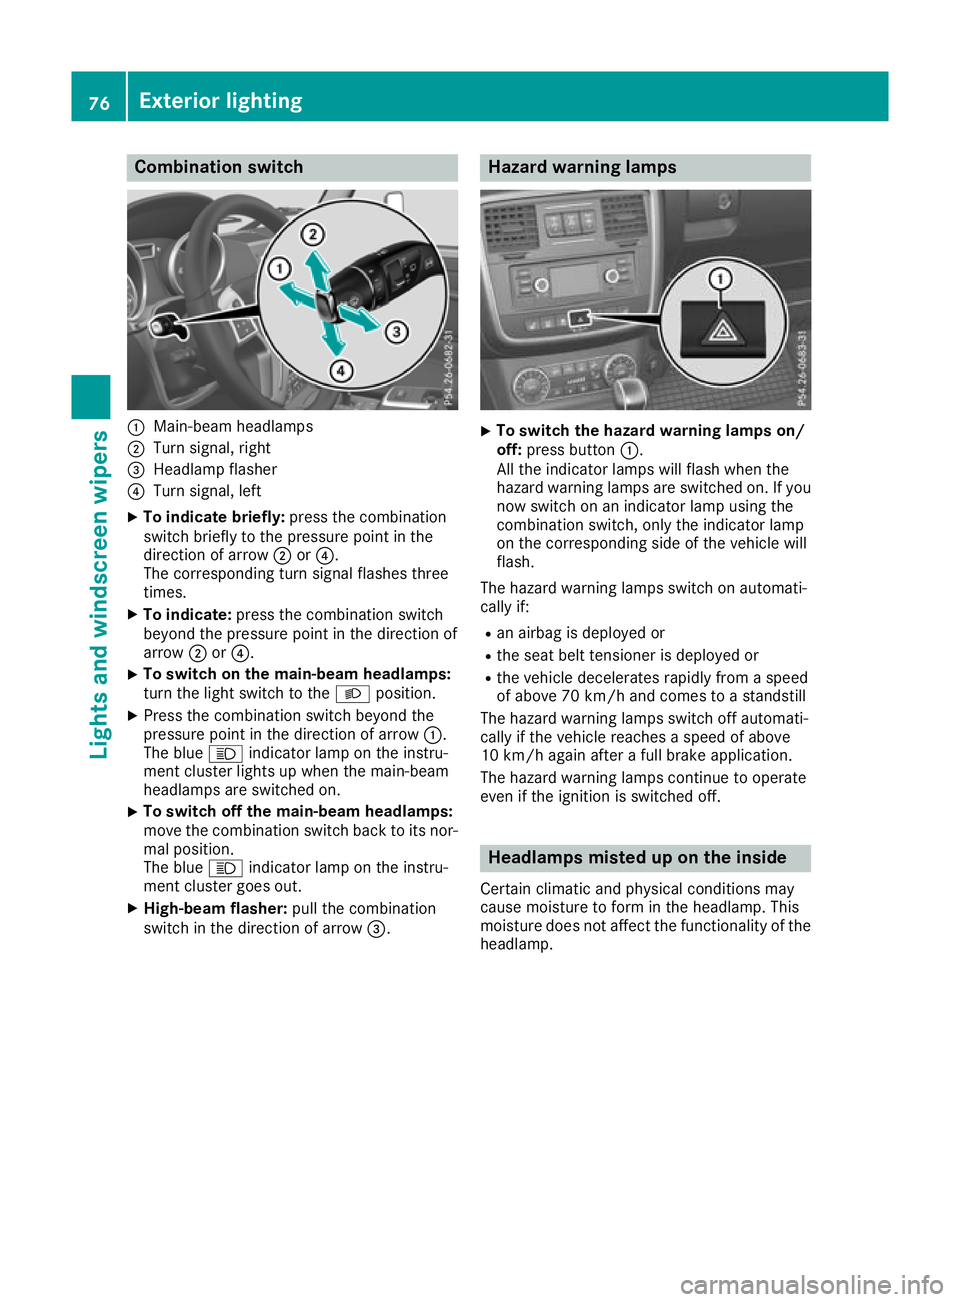
Combination switch
:
Main-beam headlamps
; Turnsignal, right
= Headlamp flasher
? Turn signal, left
X To indicate briefly: press the combination
switch briefly to the pressure point in the
direction of arrow ;or?.
The corresponding turn signal flashes three
times.
X To indicate: press the combination switch
beyond the pressure point in the direction of
arrow ;or?.
X To switch on the main-beam headlamps:
turn the light switch to the
Lposition.
X Press the combination switch beyond the
pressure point in the direction of arrow :.
The blue Kindicator lamp on the instru-
ment cluster lights up when the main-beam
headlamps are switched on.
X To switch off the main-beam headlamps:
move the combination switch back to its nor-
mal position.
The blue Kindicator lamp on the instru-
ment cluster goes out.
X High-beam flasher: pull the combination
switch in the direction of arrow =. Hazard warning lamps
X
To switch the hazard warning lamps on/
off: press button :.
All the indicator lamps will flash when the
hazard warnin glam ps are switched on. If you
now switch on an indicator lamp using the
combinatio nswitch ,onlyt he indicator lamp
on the corresponding side of the vehicl ewill
flash.
The hazard warning lamps switch on automati-
cally if: R an airba gisdeploye dor
R the sea tbeltt ensioner is deployed or
R the vehicl edecelerates rapidly from aspeed
of above 70 km/h and come stoastandstill
The hazard warning lamps switch off automati-
cally if the vehicl ereache saspeed of above
10 km/h agai nafteraf ullb rake application.
The hazard warning lamps continue to operate
eve nift he ignition is switched off. Headlamps miste
duponthe inside
Certain climatic and physical conditions may
caus emoisture to form in the headlamp. This
moisture does not affect the functionality of the headlamp. 76
Exterior lightingLigh
tsand windscreen wipers
Page 82 of 261
the xeno
nbulbs carrie doutataq uali fied spe-
cialist workshop. G
WARNING
Bulbs, lamp sand plugc onnectors can
become very hot during use. When replacing a bulb, you coul dburn yourself on these com-
ponents. There is arisk of injury.
Allow these components to cool downb efore
replacing the bulb.
Do not use abulbifith as been dropped or if its
glass has been scratched.
The bulbm ay explode if:
R you touch it
R it is hot
R you drop it
R you scratch it
Use bulbs only in closed lamp sthat have been
designed for this purpose. Fit only spar ebulbs of
the same type and the specified voltage.
Marks on the glass reduce the service life of the bulbs. Do not touch the glass tube with your
bare hands. If necessary, clea nthe glass tube
when cold with alcohol or spiri tand rub it off
with alint-free cloth.
Protect bulbs from moisture during operation.
Do not allow bulbs to come into contact with
liquids.
Xeno nbulbs and LED modules: you cannot
replace xenon bulbs or LED modules yourself.
Have the following bulbs replaced at aqualified
specialist workshop:
R third brake lamp
R side lamps/parking lamp s(front)
R main-beam/dipped-beam headlamps (xenon
headlamps)
R daytime driving lights
R licence plate lamp
i Individuals
egments of the licence plate
lamp LEDs may fail without adisplay message
appearing in the multifunction display.R egu-
larl ycheck the licence plate lighting. If nec-
essary, visit aqualified specialist workshop.
You can replace the following bulbs: R turn signa llamp (front)
R brake/tai llamp
R turn signa llamp (rear) R
tail lamp/parking lamp
R reversing light
R rear foglamp
Replace only the bulb sliste d( Ypage 79).
Hav ethe bulb stha tyou cannot change yourself
replaced at aquali fied specialis tworkshop.
If yo urequire assistance replacing bulbs, con-
sult aquali fied specialis tworkshop.
If the new bulb still does not light up ,consul ta
qualified specialis tworkshop.
Headlamps and lights ar eanimportant aspect of
vehicl esafety .You must therefore make sure
tha tthese functio ncorrectl yatalltimes .Have
the headlamp setting verified regularly. Overview of bulb types
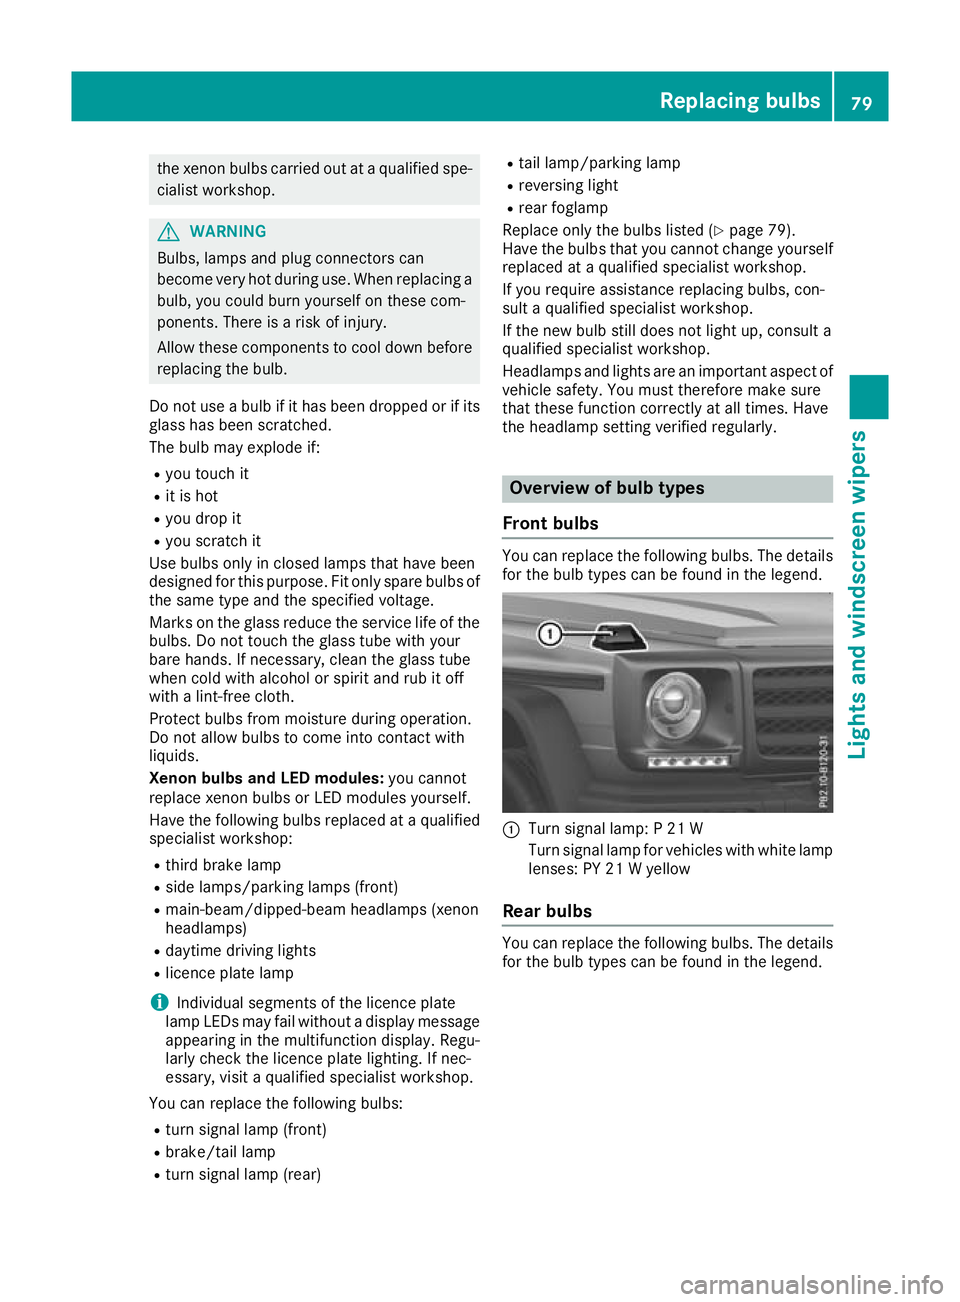
Fron tbulbs You can replace the following bulbs. The details
for the bulb types can be found in the legend. :
Turn signal lamp: P21W
Turn signal lamp for vehicles with white lamp lenses: PY 21 Wyellow
Rear bulbs You can replace the following
bulbs. The details
for the bulb types can be foun dinthe legend. Replacing bulbs
79Lights and windscreen wipers Z
Page 83 of 261
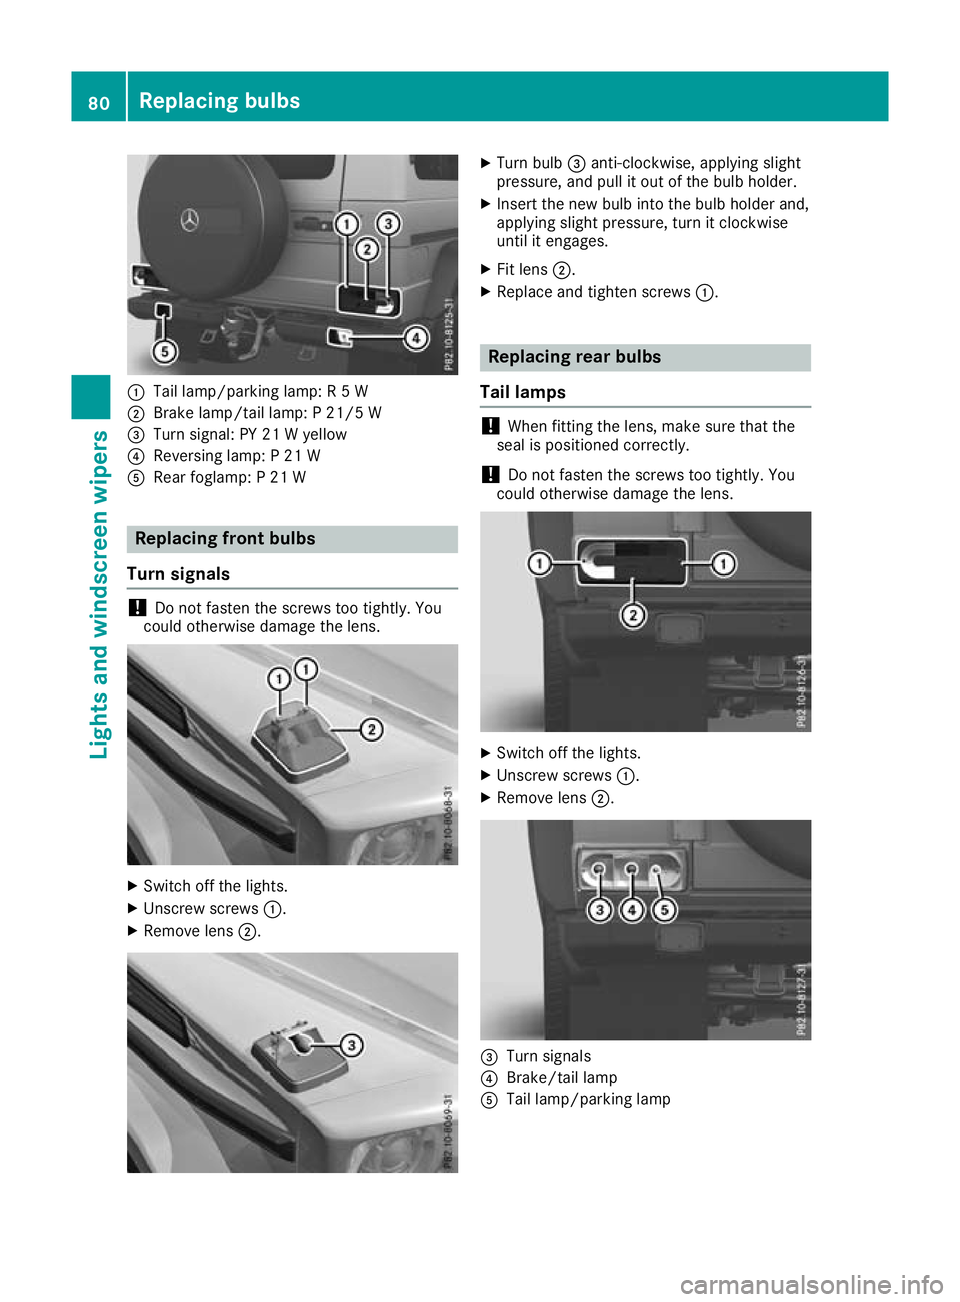
:
Tail lamp/parking lamp: R5W
; Brake lamp/tail lamp: P21/5 W
= Turn signal: PY 21 Wyellow
? Reversing lamp: P21W
A Rear foglamp: P21W Replacing fron
tbulbs
Turn signals !
Do not fasten the screws too tightly. You
coul dotherwise damage the lens. X
Switch off the lights.
X Unscrew screws :.
X Remove lens ;. X
Turn bulb =anti-clockwise, applying slight
pressure, and pull it out of the bulb holder.
X Insert the new bulb into the bulb holder and,
applying slight pressure, turn it clockwise
until it engages.
X Fit lens ;.
X Replace and tighten screws :. Replacing rear bulbs
Tail lamps !
When fitting the lens, make sure that the
seal is positioned correctly.
! Do not fasten the screws too tightly. You
could otherwise damage the lens. X
Switch off the lights.
X Unscrew screws :.
X Remove lens ;. =
Turn signals
? Brake/tail lamp
A Tail lamp/parkin glamp 80
Replacing bulbsLightsa
nd windscreen wipers