2016 MERCEDES-BENZ G-CLASS SUV buttons
[x] Cancel search: buttonsPage 19 of 261

Stations
Saving ............................................ 176
Saving manually ............................. 176
Setting ...........................................1 76
Steering (display message) .............. 154
Steering wheel
Adjusting (electrically). .................... 72
Buttons (on-board computer) ......... 132
Cleaning ......................................... 220
Gearshift paddle s........................... 104
Important safety notes .................... 71
Steering whee lgearshift paddles .... 104
Stowag eareas ................................... 199
Stowag ecom partment
Door stowag ecompartment .......... 200
Ma pp ockets .................................. 200
Stowag ecom partments
Armrest (underneath) .................... 200
Cu ph olde r..................................... 206
Glove compartment ....................... 199
Important safety information ......... 199
Stowag enet....................................... 200
Stowag espace
Stowag enet ................................... 200
Summe rtyres
In winter ........................................ 237
Sun visor ............................................ 207
Surround lighting (on-board com-
puter) .................................................. 138
System language
Setting ........................................... 173
System settings
Bluetooth ®
settings ....................... 174
Date ............................................... 171
Displa y........................................... 172
Displaying information ................... 173
Languag e....................................... 173
Sel fdiagn osis................................ 173
Time ............................................... 171
Systems settings
Audio source volume s.................... 173
Butto ntones .................................. 172
Standby time ................................. 172 T
Tail lamp Replacing bulb s............................... 80 Tail lamps
Display message ............................ 145
Technical data
Capacities ...................................... 250
Drawbar load (maximum) ............... 256
Information .................................... 248
Trailer load s................................... 256
Vehicl edata. .................................. 254
Telephone
Accepting acall. ............................ 136
Accepting acall( multimedia sys-
tem) ............................................... 179
Call disconnectio n......................... 179
Call lists ......................................... 181
Emergency cal l112 ....................... 179
Important safety notes .................. 178
Menu (on-board computer) ............ 136
Numbe rfrom the phone boo k........ 136
Phone boo k.................................... 180
Redialling ....................................... 136
Rejecting acall( multimedia sys-
tem) ............................................... 179
Rejecting/ending acall. ................ 136
Using the telephone ....................... 179
see Mobil ephone
Temperature
Coolant .......................................... 131
Outsid etemperature ...................... 131
Setting (climate control ).................. 86
Tilt/slidin gsunroof
see Sliding sunroof
Ton esettings
Balance and fader .......................... 171
Top Tether ............................................ 41
Total distanc erecorder .................... 133
Tow-starting
Emergency engine starting ............ 232
Important safety notes .................. 229
Towing
Important safety notes .................. 229
In the event of malfunctions .......... 231
Towin gatrailer
Axle load ,permissibl e.................... 256
Pulling away with atraile r................ 97
Trailer tow hitch ............................. 256
Towin gaway
With both axles on the ground ....... 230 16
Index
Page 61 of 261
The key centrally locks/unlocks:
R the doors
R the rear door
R the fuel filler flap
X To unlock centrally: press the%button.
If you do not open the vehicle within approx-
imately 40 seconds of unlocking:
R the vehicle locks again
R protection against theft is reactivated
X To lock centrally: press the&button.
i If the
& button is pressed when the driv-
er's door is open, the rear side door on the
driver's side is not locked either.
During unlocking, the turn signals flash once.
During locking, they flash three times.
You can also set an audibl esignal to confirm
that the vehicle has been locked. The audible
signal can be activated or deactivated using the
on-board computer (Y page 139).
Only when all the components have been locked is the visual or audibl elockingc onfirmation
issued.
When the surround lighting is activated via the
on-board computer, it lights up when it is dark
after the vehicle is unlocked with the key
(Y page 138). Changing the settings of the locking
system
You can change the settings of the lockin gsys-
tem. This mean sthato nlyt he driver' sdoor and
th ef uel fille rflap are unlocked when th evehicle
is unlocked. This is useful if you frequently travel
alone.
X To change th esetting: pressand hold down
the % and& buttons simultaneously
for about six seconds until th ebattery indica-
to rlamp flashes twice (Y page 59).
If th esettin goft helockin gsystem is changed
within th esignal range of th evehicle ,pressing
the & or% button:
R locks or
R unlock sthe vehicle The key now func
tions as follows:
X To unlock the driver's door and fuel filler
flap:
press the %button once.
X To unlock centrally: press the%button
twice.
X To lock centrally: press the&button.
X To restor ethe factory settings: press and
hold down the %and& button ssimul-
taneously for approximately six seconds until the battery check lamp flashes twice
(Y page 59). Emergency key element
Genera lnotes If the vehicl
ecan no longer be unlocked with the
key, use the emergency key element.
If you use the emergency key element to unlock
and open the driver's door, the anti-theft alarm
system willbet riggered. Switch off the alarm
(Y page 56).
If you unlock the vehicle using the emergency
key element, the fuel fillerf lap willnot be
unlocked automatically.
X To unlockt he fuel fillerf lap:insert the key
into the ignition lock.
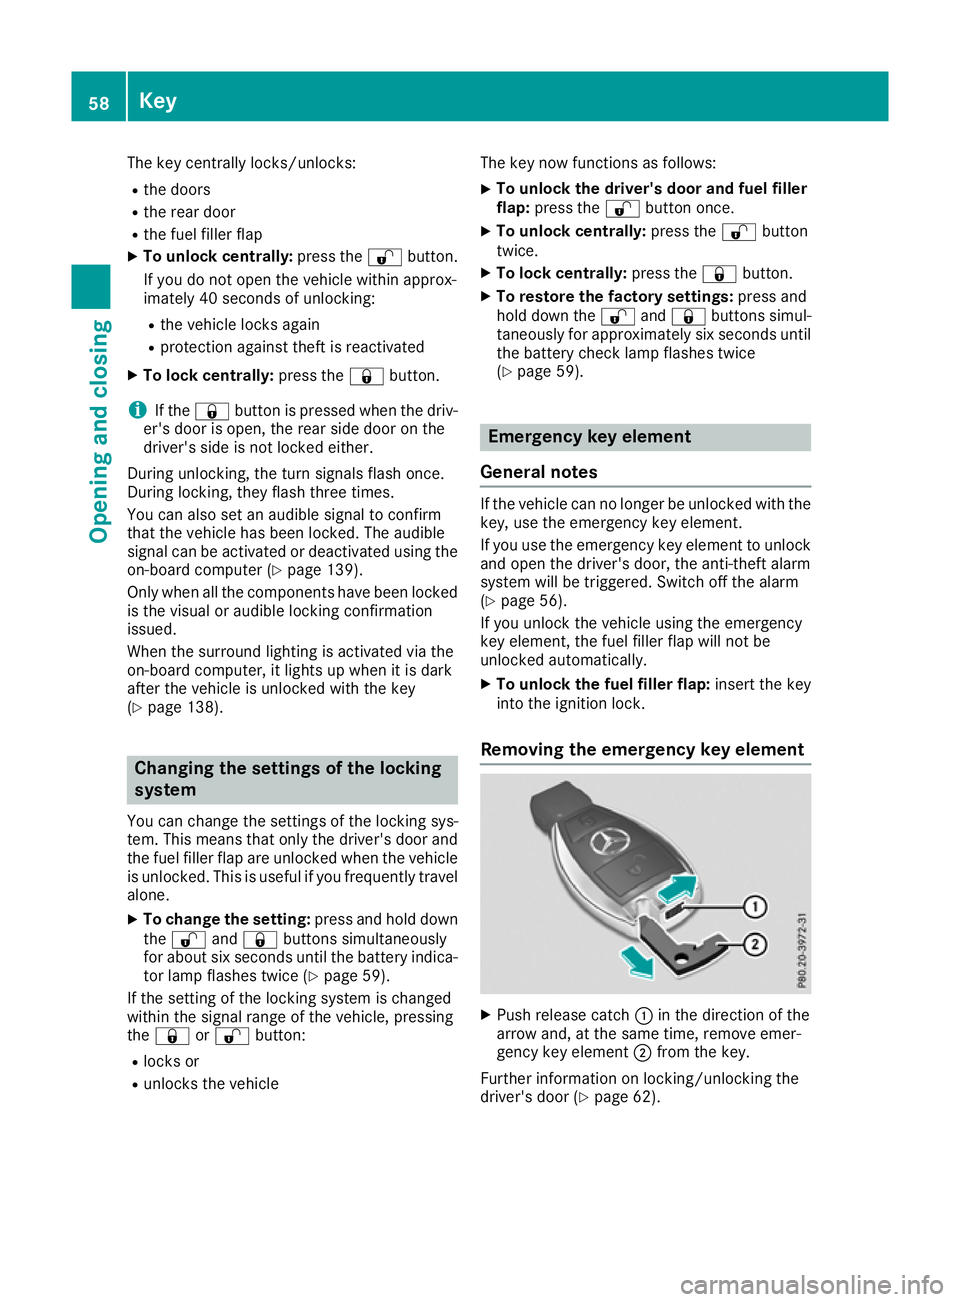
Removing the emergency key element X
Push releasec atch:in the direction of the
arrow and, at the same time, remove emer-
gency key element ;from the key.
Further information on locking/unlocking the
driver's door (Y page 62).58
KeyOpening and closing
Page 63 of 261
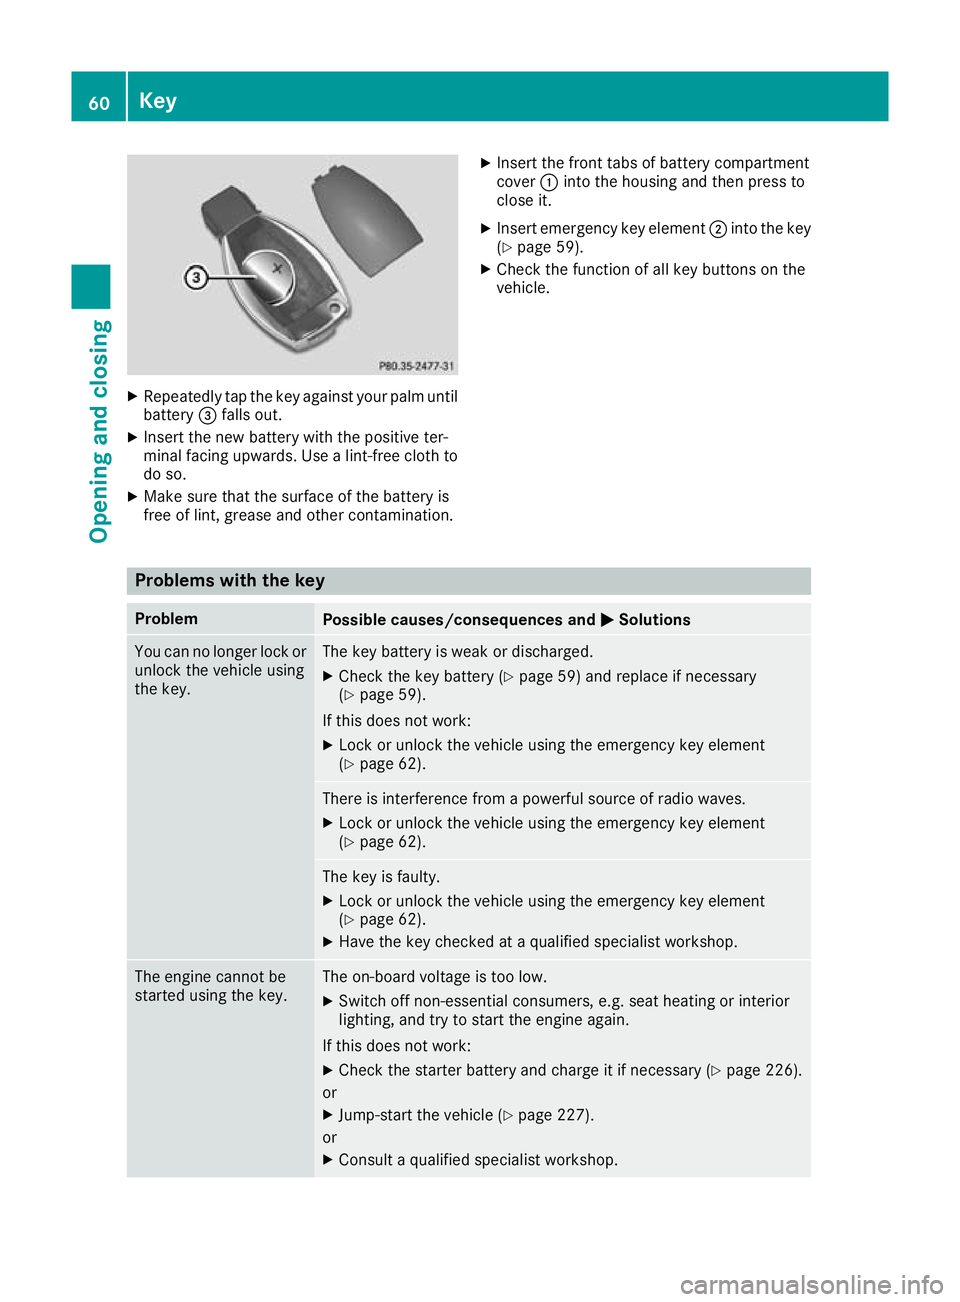
X
Repeatedly tap th ekeyagainst your palm until
battery =falls out.
X Inser tthe newb attery wit hthe positive ter-
minal facing upwards. Use alint-free cloth to
do so.
X Mak esuret hatthe surfac eofthebattery is
free of lint, grease and other contamination. X
Insert th efront tabs of battery compartment
cover :into the housing and then press to
close it.
X Insert emergency key element ;into the key
(Y page 59).
X Check the function of all key buttons on the
vehicle. Problem
swith the key Problem
Possible causes/consequences and
M MSolutions You can no longer lock or
unlock the vehicle using
the key. The key battery is weak or discharged.
X Check the key battery (Y page 59) and replace if necessary
(Y page 59).
If this does not work: X Lock or unlock the vehicle using the emergency key element
(Y page 62). There is interferenc
efrom apowerful source of radio waves.
X Lock or unlock the vehicle using the emergenc ykey element
(Y page 62). The key is faulty.
X Lock or unlock the vehicle using the emergenc ykey element
(Y page 62).
X Have the key checked at aqualified specialist workshop. The engine cannot be
started using the key. The on-board voltage is too low.
X Switch off non-essential consumers, e.g. seat heating or interior
lighting, and try to start the engine again.
If this does not work:
X Check the starter battery and charge it if necessary (Y page 226).
or X Jump-start the vehicle (Y page 227).
or X Consult aqualified specialist workshop. 60
KeyOpening and closing
Page 65 of 261

Centrally lockin
gand unlocking the
vehicle from th einside
You can centrally loc korunlock th evehicle from
th ei nside.
The butto nfor th ecentral lockin gdoes no tlock
or unlock th efuel fille rflap.
The switch for th ecentral lockin gisonthelower
sectio nofthecentr econsole. X
To unlock: press button :.
X To lock: press button ;.
United Kingdom only: if thevehicl ehasbeen
locked with the key ,the double lock functio nis
activate dasstandard. It is then not possibl eto
open the doors from insid ethe vehicle. Yo ucan
deactivate the double lock functio nbydeacti-
vating the interio rmotion sensor (se eDigital
Owner' sManual) .Opening/closing doors is
then possibl easfollows :the doors can be
opene dfrom inside. Yo ucan onl yopent he rear
side doors from insid ethe vehicl eifthey are not
secured by the child-proof locks (Y page 51).
i It is onl
ypossibl etol ockt he vehicl ecen-
trally if the driver's door is closed.
i The doors unlock automaticall
yinthe event
of an accident if the force of the impact
exceed sapredetermined level. Automatic locking feature
X
To deactivate: press and holdbutton :for
approximatel yfives econds unti latone
sounds.
X To activate: press and hol dbutton ;for
approximatel yfives econds unti latone
sounds.
If yo upress one of the two buttons and do not
hea rat one, the relevant setting ha salready
been selected.
The vehicl eislocked automaticall ywhent he
ignition is switched on and the wheels are turn-
ing.
Therefore, yo ucould be locked ou tif:
R the vehicl eisbeing pushed
R the vehicl eisbeing towed
R the vehicl eisbeing teste donadynamometer
Yo uc an also activate and deactivate the auto-
matic locking functio nusing the on-board com-
puter (Y page 139). Locking/unlocking the driver's door
with the emergenc
ykey 62
DoorsOpening and closing
Page 71 of 261
G
WARNING
You coul dlose control of the vehicl ewhile
driving if you:
R adjust the driver's seat, steering whee lor
mirrors
R fasten the seat belt
There is arisk of an accident.
Adjust the driver's seat, headr estraint, steer-
ing whee land mirrors and fasten yours eat
beltb efore starting the engine. G
WARNING
The headr estraints cannot provid ethe inten-
ded protection unless they are fitted and
adjusted correctly. There is an increased risk of injury to the heada nd neck in the event of
an accident or sudden braking, for example.
Always drive with the headr estraints fitted.
Ensure that the centre of the headr estraints
support the back of each vehicl eoccupant's
headate ye levelbefore driving off.
Make sure that you do not interchange the head restraints of the front and rear seats when
adjusting the headr estraints. Otherwise, you
cannot adjust the height and angle of the head
restraints correctly.
Adjust the headr estraint so that it is as close as
possible to yourh ead. G
WARNING
If the driver's seat is not correctly engaged, it coul dunexpectedly move while driving. This
coul dcausey ou to lose control of the vehicle.
There is arisk of an accident.
Always ensure that the driver's seat is
engaged before starting the vehicle. G
WARNING
If you adjust the seat height carelessly, you or other vehicl eoccupants coul dbetrappe dand
thereby injured .Childre ninparticular could
accidentally press the electrica lseat adjust-
ment buttons and become trapped. There is a
risk of injury.
Whil emoving the seats, make sure that your
hands or other body parts do not get under the lever assembly of the sea
tadjustmen tsys-
tem. G
WARNING
Whe nadjusting aseat, you or another vehicle
occupant coul dbecome trappe dbythe guide
rail of the seat, for instance. There is arisk of
injury.
Make sure that no one has any part of their
body withi nthe swee pofthe seat when
adjusting it. G
WARNING
If the seat beltisn ot in the seat beltg uide, it
no longer offers the intended leve lofprotec-
tion. An incorrectly fastened seat beltc an also
caus eadditiona linjuries. This poses an
increased risk of injury or even fatal injury.
Before starting ajourney ,alwaysm ake sure
that the seat beltisint he seat beltguide and
all vehicl eoccupants have fastened their seat
belts properly.
! To avoi
ddamage to the seats and the seat
heating, observe the following information:
R do not spil lany liquidsont he seats. If liquid
is spilled on the seats, dry them as soon as possible.
R if the seat covers are damp or wet, do not
switch on the seat heating. The seat heat-
ing should alson ot be used to dry the seats.
R clea nthe seat covers as recommended;
see "Interio rcare".
R do not transport heav yloads on the seats.
Do not place sharp objects on the seat
cushions, e.g. knives, nail sortools. The
seats should only be occupied by passen-
gers, if possible.
R when the seat heating is in operation, do
not cover the seats with insulating materi-
als,e .g. blankets, coats, bags, seat covers,
child seats or booster seats.
! Make sure that there are no objects in the
footwel lunder or behind the seats when mov-
ing the seats back. There is arisk that the
seats and/or the objects coul dbedamaged.
! When the rear bench seat is folde
dfor-
wards, the front seats cannot be moved to 68
SeatsSeats
,steering wheela nd mirrors
Page 75 of 261
When leaving the vehicle, alway
stake the key
with you and lock the vehicle. Never leave
children unattended in the vehicle.
The electrically adjustable steerin gwheel can
still be adjusted when there is no key in the igni-
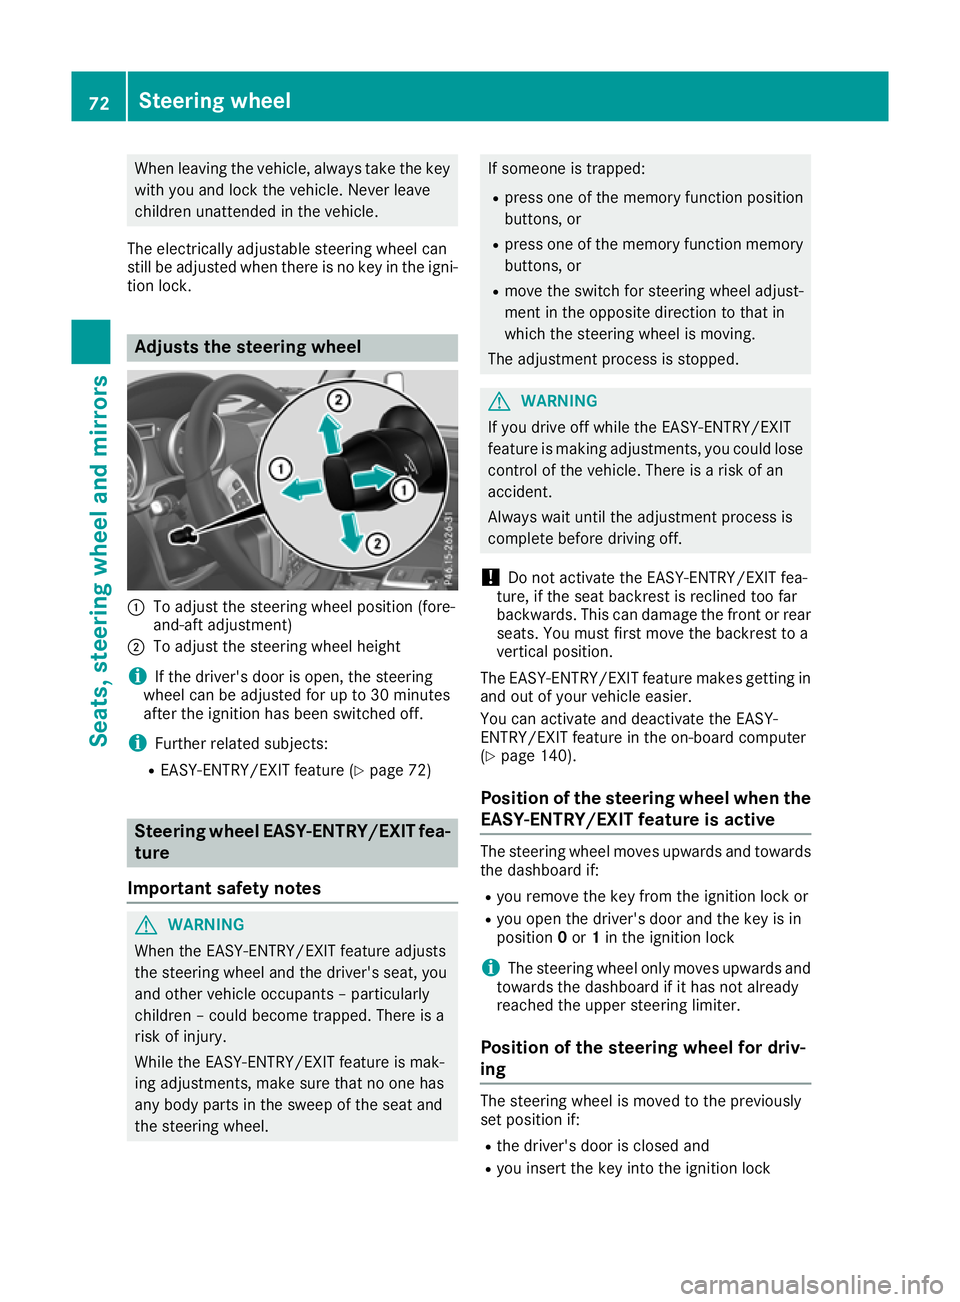
tion lock. Adjust
sthe steering wheel :
To adjust the steeri ngwheel position (fore-
and-aft adjustment)
; To adjust the steerin gwheel height
i If the driver's door is open, the steering
wheel can be adjusted for up to 30 minutes
after the ignition has been switched off.
i Further related subjects:
R EASY-ENTRY/EXIT feature (Y page 72)Steering wheel EASY-ENTRY/EXIT fea-
ture
Important safety notes G
WARNING
When the EASY-ENTRY/EXIT feature adjusts
the steering wheel and the driver's seat, you
and other vehicle occup ants –p articularly
children –couldb ecome trapped. There is a
risk of injury.
Whil ethe EASY-ENTRY/EXIT feature is mak-
ing adjustments, make sure that no one has
any body parts in the swee pofthe seat and
the steering wheel. If someone is trapped:
R press one of the memory function position
buttons, or
R press one of the memory function memory
buttons, or
R move the switch for steering wheel adjust-
ment in the opposite direction to that in
which the steering wheel is moving.
The adjustment process is stopped. G
WARNING
If you drive off while the EASY-ENTRY/EXIT
feature is making adjustments, you coul dlose
control of the vehicle. There is arisk of an
accident.
Always waitu ntil the adjustment process is
complete before driving off.
! Do not activate the EASY-ENTRY/EXIT fea-
ture, if the seat backrest is recline dtoo far
backwards. This can damage the front or rear seats. You must first move the backrest to a
vertical position.
The EASY-ENTRY/EXIT feature makes getting in
and out of yourv ehicleeasier.
You can activate and deactivate the EASY-
ENTRY/EXIT feature in the on-board computer
(Y page1 40).
Position of the steering wheel whent he
EASY-ENTRY/EXIT feature is active The steering wheel moves upwards and towards
the dashboard if:
R you remov ethe key from the ignition lock or
R you open the driver's door and the key is in
position 0or 1in the ignition lock
i The steerin
gwheel only moves upwards and
towards the dashboard if it has not already
reached the upper steerin glimiter.
Position of the steering wheel for driv-
ing The steerin
gwheel is moved to the previously
set position if:
R the driver's door is closed and
R you insert the key into the ignition lock 72
Steering wheelSeats, steering wheel and mirrors
Page 88 of 261
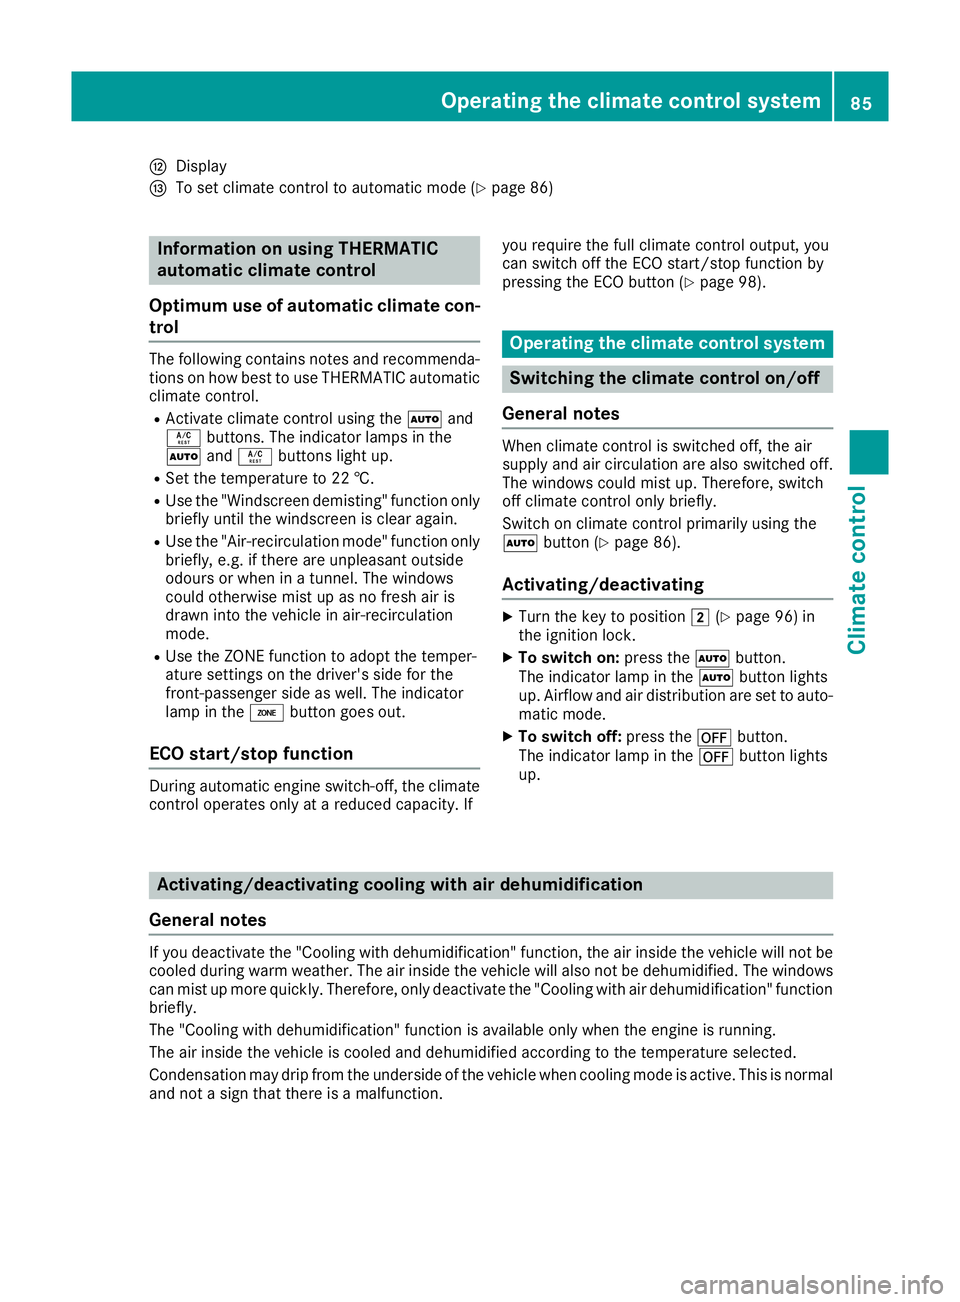
H
Display
I To set climate contro ltoautomatic mod e(Ypage 86) Information on using THERMATIC
automatic climate control
Optimum us eofautomatic climat econ-
trol The followin
gcontains notes and recommenda-
tions on how best to use THERMATIC automatic
climate control.
R Activate climate control using the Ãand
Á buttons. The indicator lamps in the
à andÁ button slight up.
R Set the temperature to 22 †.
R Use the "Windscreen demisting" function only
briefly until the windscreen is clear again.
R Use the "Air-recirculation mode" function only
briefly, e.g. if there are unpleasant outside
odours or when in atunnel. The windows
could otherwise mist up as no fresh air is
drawn into the vehicle in air-recirculation
mode.
R Use the ZONE function to adopt the temper-
ature settings on the driver's side for the
front-passenger side as well. The indicator
lamp in the ábutton goes out.
ECO start/stop function During automatic engine switch-off, th
eclimate
contro lope rates onl yatareducedcapacity. If yo
ur equire th efull climat econtro loutput ,you
can switch off th eECO start/sto pfunction by
pressing th eECO butto n(Ypage 98). Oper
ating the climat econtrol system Switching the climate control on/off
General notes When climate control is switched off, the air
supply and air circulation are also switched off.
The windows could mist up. Therefore, switch
off climate control only briefly.
Switc honc limate control primarily using the
à button (Y page 86).
Activating/deactivating X
Turn the key to position 2(Ypage 96) in
the ignition lock.
X To switch on: press theÃbutton.
The indicator lamp in the Ãbutton lights
up. Airflow and air distribution are set to auto-
matic mode.
X To switch off: press the^button.
The indicator lamp in the ^button lights
up. Activating/deactivating cooling with air dehumidification
General notes If you deactivate the "Cooling with dehumidification
"function, the air inside the vehicle willn ot be
cooled during warm weather. The air inside the vehicle willa lso not be dehumidified. The windows
can mist up more quickly. Therefore, only deactivate the "Cooling with air dehumidification" function briefly.
The "Cooling with dehumidification" function is available only when the engine is running.
The air inside the vehicle is cooled and dehumidified according to the temperature selected.
Condensation may drip from the underside of the vehicle when cooling mode is active. This is normal
and not asign that there is amalfunction. Operating the climate control system
85Climate control
Page 135 of 261
the engine compartment, leav
ethe bonnet
close dand notify the fir ebrigade.
The coolant temperatur egauge is in the instru-
ment cluste ronthe right-hand side (Y page 26).
Under normal operating conditions and with the specifie dcoolant level ,the coolant temperature
ma yriseto1 20 †.
At high outside temperatures and when driving
in mountainou sterrain, the coolant temperature
ma yrisetot he end of the scale. Operatin
gthe on-board computer
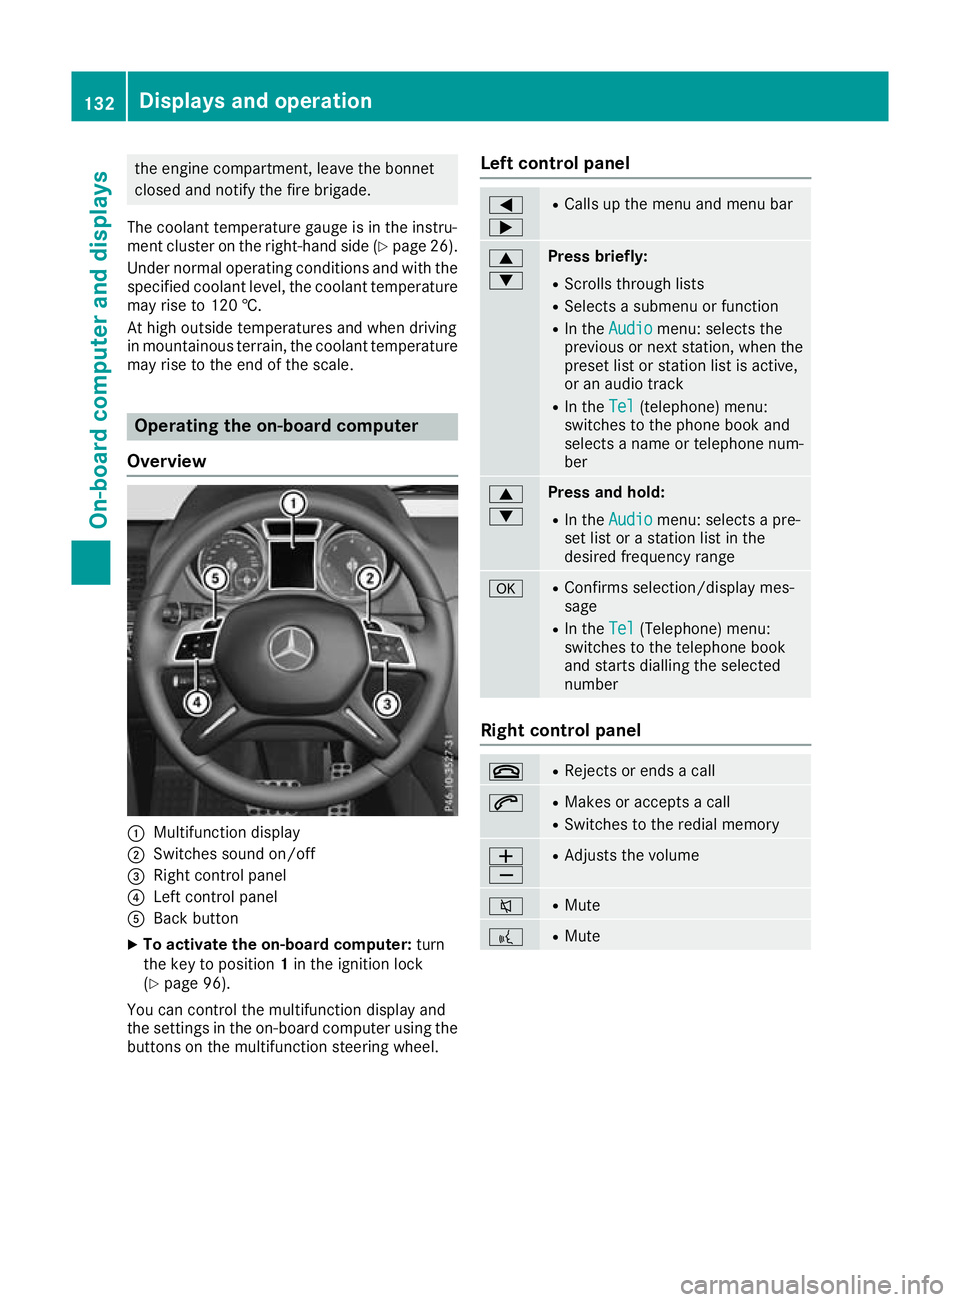
Overview :
Multifunction display
; Switches sound on/off
= Right control panel
? Left control panel
A Back button
X To activate the on-board computer: turn
the key to position 1in the ignition lock
(Y page 96).
You can control the multifunction display and
the settings in the on-board computer using the buttons on the multifunction steering wheel. Left control panel =
; R
Calls up the menu and menu bar 9
: Press briefly:
R Scrolls through lists
R Selects asubmenu or function
R In the Audio Audio menu: selects the
previous or next station, when the preset list or station list is active,
or an audio track
R In the Tel Tel(telephone) menu:
switches to the phone book and
selects aname or telephone num-
ber 9
: Press and hold:
R
In the Audio Audio menu: selects apre-
set list or astation list in the
desired frequency range a R
Confirms selection/displaym es-
sage
R In the Tel
Tel(Telephone) menu:
switches to th etelephone book
and start sdiallin gthe selected
number Right contro
lpanel ~ R
Rejects or end sacall 6 R
Makes or accept sacall
R Switches to the redial memory W
X R
Adjusts the volume 8 R
Mute ? R
Mute 132
Displays and operationOn-board computer and displays