2016 MERCEDES-BENZ G-CLASS SUV clock
[x] Cancel search: clockPage 11 of 261
Door
Automati clocking (on-boar dcom-
puter) ............................................ .139
Automatic locking (switch) .............. .62
Central locking/unlocking (key) ...... 57
Display message ............................ 153
Emergency lockin g........................... 62
Emergenc yunlocking ....................... 62
Important safety note s.................... 61
Opening (fro mthe inside )................ 61
Doors
Overview .......................................... 61
Drive program
Displa y........................................... 101
Drive programs
Automati ctransmissio n................. 104
Driver's door
see Door
Driver's seat
Displa ymessage ............................ 154
Drivin gabroad
Symmetrical dipped beam ............... 74
Drivin gdownhill ................................ 122
Drivin ginm ountainous terrain
Approach/departure angle ............ 121
Driving downhil l............................. 122
Gradient-climbing capability
(maximum) ..................................... 122
Drivin goff-road
Driving downhil l............................. 122
see Off-road driving
Drivin gonfloodedroads .................. 117
Drivin gsafety system
EBD (electroni cbrake force distri-
bution) ............................................. 55
Drivin gsafety systems
ABS (Anti-lock Braking System) ....... 52
ADAPTIV EBRAK E............................. 56
Adaptive brake lights ....................... 53
BAS (Brake Assist System) .............. 53
ESP ®
(Electronic Stability Pro-
gram) ............................................... 53
Important safety guideline s............. 52
Overview .......................................... 52
Drivin gsystems
Displa ymessage ............................ 149
HOLD function ............................... 122 Driving tips
Aquaplaning ................................... 117
Automatic transmi ssion ................. 103
Brakes .......................................... .115
Downhill gradient ........................... 116
Driving abroad ................................. 74
Driving in winter ............................ .118
Driving on flooded road s................ 117
Driving on sand .............................. 121
Driving on wet road s...................... 117
Driving ove robstacles ................... 121
Fue l................................................ 115
Genera l.......................................... 115
Gravel roads .................................. 121
Icy roa dsurfaces ........................... 118
Important safety notes .................... 95
Limite dbraking efficiency on sal-
ted roads ....................................... 116
New brake disks ............................ 116
New brake pads/linings ................ 116
Off-road driving .............................. 119
Off-road fording ............................. 117
Pulling away on slippery surfaces .. 117
Running-i ntips. ................................ 95
Snow chains .................................. 237
Subjecting brakes to aloa d. .......... 116
Symmetrical dipped beam ............... 74
The first 1500 km ............................ 95
Towing atraile r.............................. 128
Travelling uphill .............................. 121
Tyre ruts ........................................ 121
Wet roa dsurface ........................... 116 E
EASY-ENTRY feature Activating/deactivatin g................. 140
Function/notes ................................ 72
EASY-EXI Tfeature
Function/notes ................................ 72
Switching on/off ........................... 140
EBD (electronic brake force distri-
bution)
Display message ............................ 143
Function/notes ................................ 55
ECOs tart/stop function
Deactivating/activating ................... 98
General information ......................... 97 8
Index
Page 66 of 261
X
Insert the emergency key element into the
lock of the driver's door as far as it willg o.
X To unlock: turn the emergency key element
anti-clockwise as far as it willgotop osition
1.
X To lock: turn the emergency key element
clockwise as far as it willgotop osition2.
Right-hand-drive vehicle: turn the emergency
key element in the opposite direction in both
cases.
If you use the emergency key element to unlock
and open the driver's door, the anti-theft alarm
system willbet riggered. Switch off the alarm
(Y page 56). Rear door
Im
portant safety notes G
WARNING
Combustion engine semit poisonous exhaust
gase ssuch as carbon monoxide .Ifthe rear
door is open when the engine is running, par- ticularly if the vehicl eismoving, exhaust
fumes coul denter the passenger compart-
ment. There is arisk of poisoning.
Turn off the engine before opening the rear
door. Never drive with the rear door open. G
WARNING
If objects, luggage or loads are not secure dor
not secure dsufficiently ,they coul dslip,tip
over or be flung around and thereby hit vehicle
occupants. There is arisk of injury ,especially
when braking or abruptly changing directions.
Always store objects so that they cannot be
flung around. Secure objects, luggage or
loads against slipping or tipping before the
journey. G
WARNING
Do not leave children unsupervised in the
vehicle. They coul dopen the rear door from
insid ethe vehicl eand endange rthemselves
and others. !
The tailgat
eswings out to the side when
opened. Therefore, make sure that there is
sufficient clearance.
Do not leave the key in the luggage compart-
ment. You may otherwise be inadvertently
locked out.
Stow luggage or loads preferably in the luggage
compartment.O bserve the loading guidelines
(Y page 198). Opening from the outside
The rear door must be unlocked before it can be
opened.
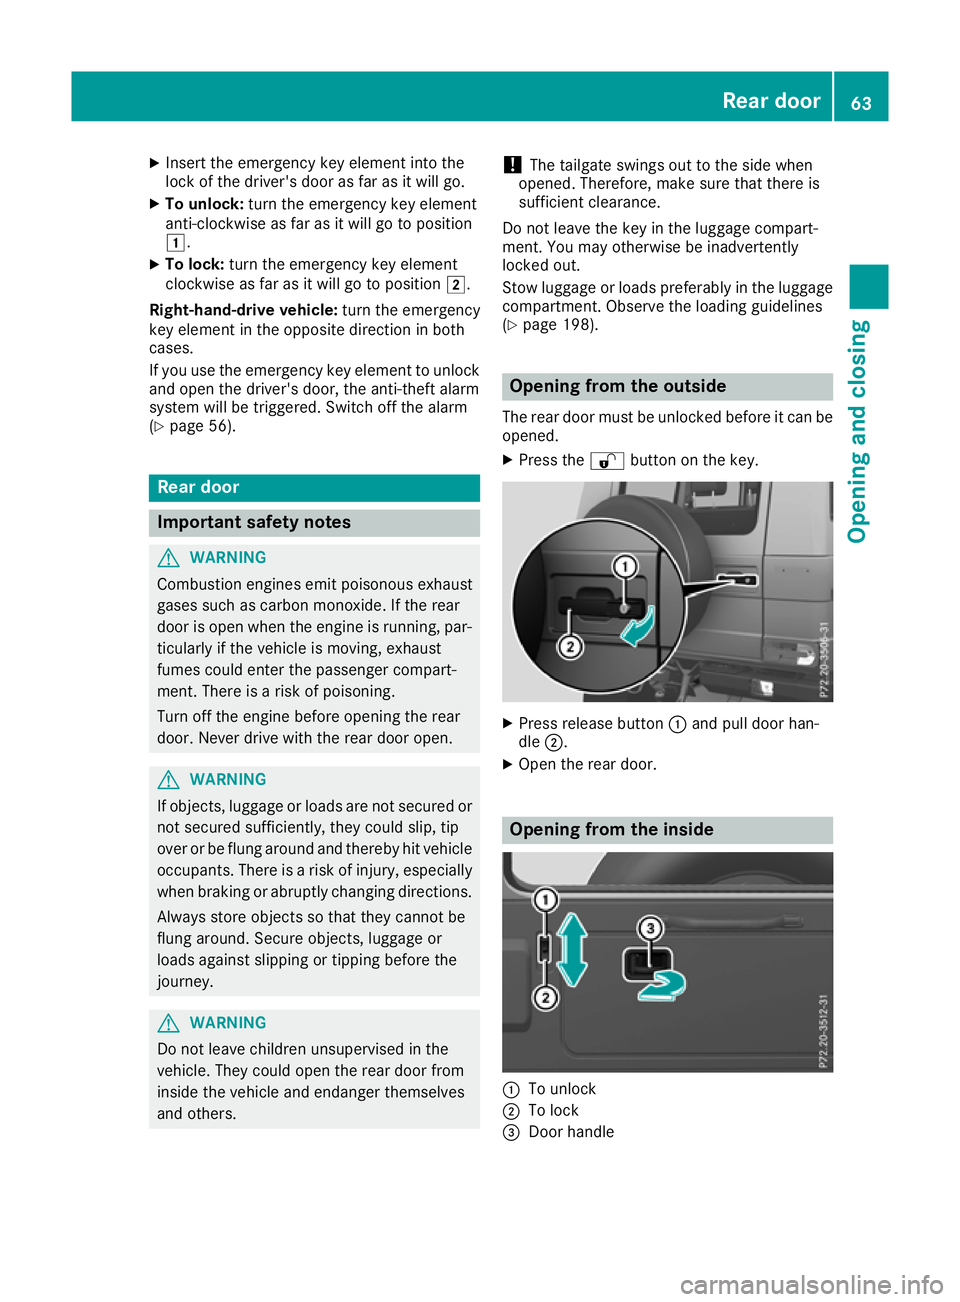
X Press the %button on the key. X
Press release button :and pull door han-
dle ;.
X Open the rear door. Opening from the inside
:
To unlock
; To lock
= Door handle Rea
rdoor
63Openinga nd closing Z
Page 67 of 261
X
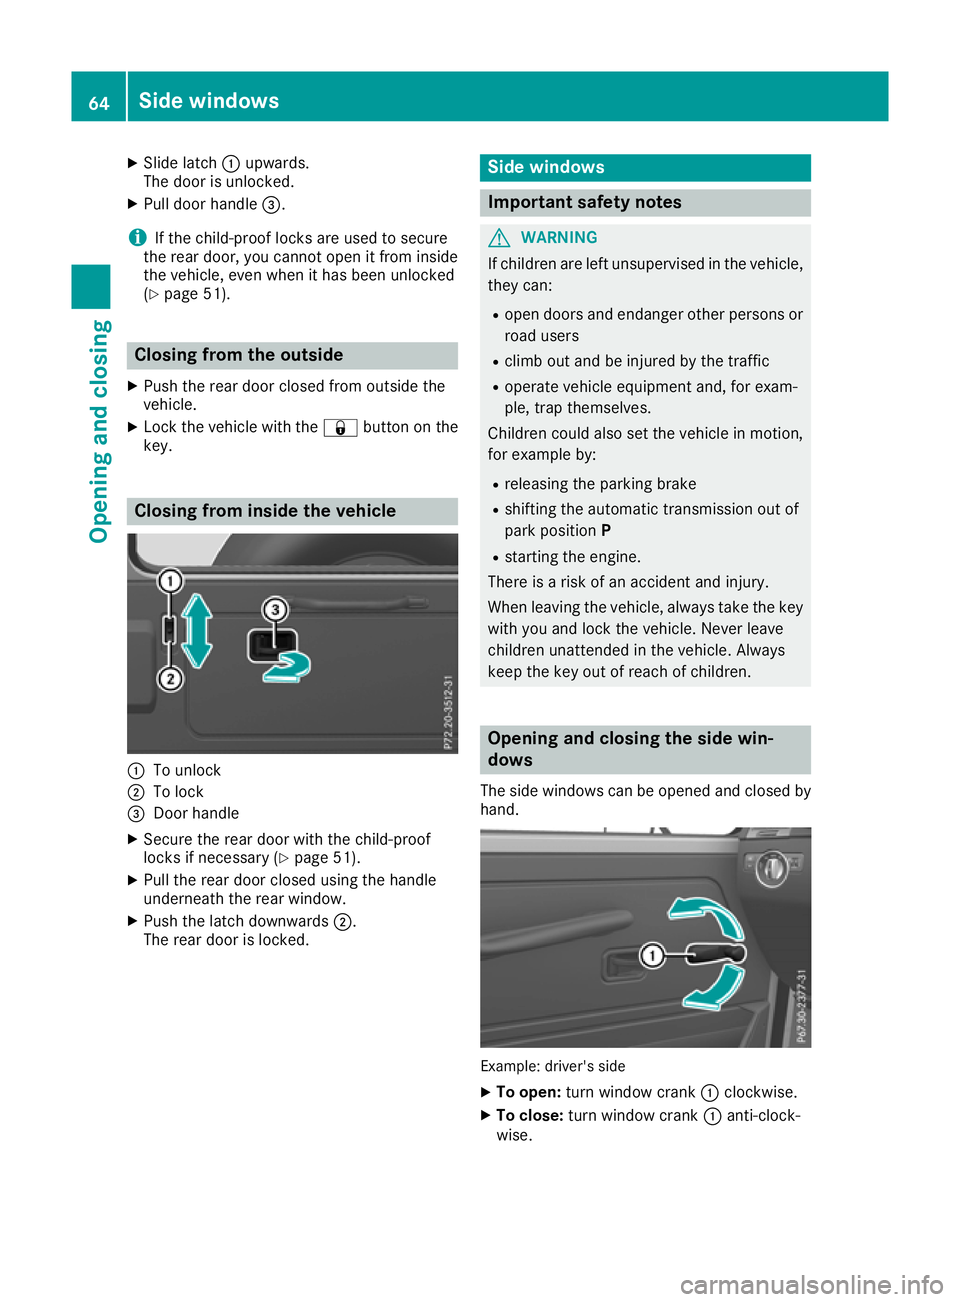
Slide latch :upwards.
The doo risunlocked.
X Pull doo rhandle =.
i If the child-proof locks are used to secure
the rea rdoor, yo ucanno topenitf rom inside
the vehicle, eve nwhenith asbee nunlocked
(Y page 51). Closin
gfromt heoutside
X Push th erear door closed from outside the
vehicle.
X Loc kthe vehicle wit hthe & buttonont he
key. Closing from insid
ethe vehicle :
To unlock
; To lock
= Door handle
X Secure the rear door with the child-proof
lock sifn ecessary (Y page 51).
X Pull the rear door closed using the handle
underneath the rear window.
X Push the latch downwards ;.
The rear door is locked. Side windows
Important safety notes
G
WARNING
If children are left unsupervised in the vehicle, they can:
R open doors and endanger other persons or
road users
R climb out and be injured by the traffic
R operate vehicle equipment and, for exam-
ple, trap themselves.
Children could also set the vehicle in motion, for examp leby:
R releasing the parking brake
R shifting the automatic transmission out of
park position P
R starting the engine.
There is arisk of an accident and injury.
When leaving the vehicle, alwayst ake the key
with you and lock the vehicle. Never leave
children unattended in the vehicle. Always
keep the key out of reach of children. Opening and closing the side win-
dows
The side windows can be opened and closed by hand. Example: driver's side
X To open: turn windo wcrank :clockwise.
X To close: turnw indo wc rank :anti-clock-
wise. 64
Side windowsOpeninga
nd closing
Page 69 of 261
Removin
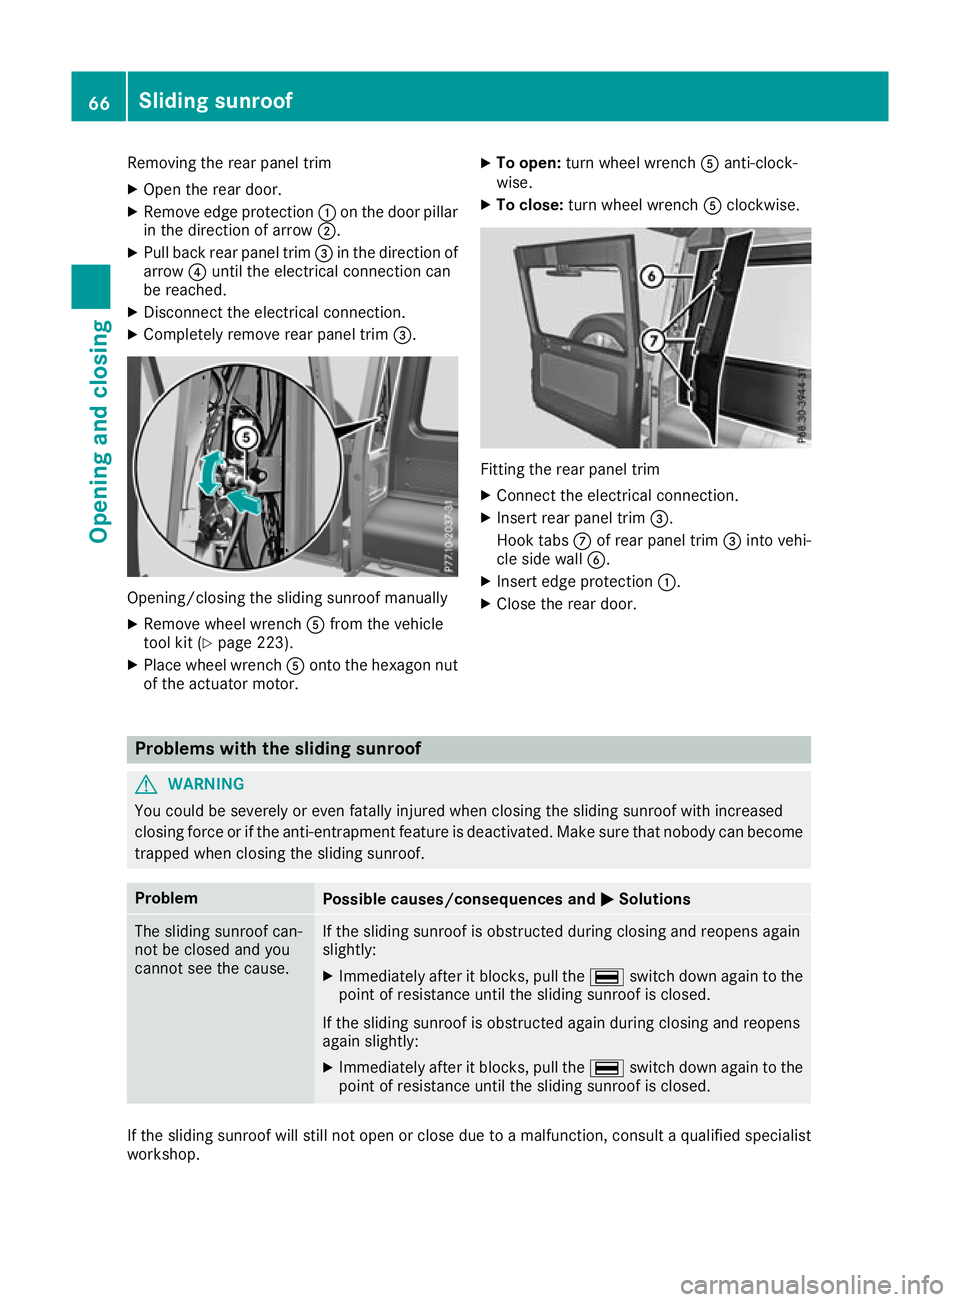
gthe rear panel trim
X Open th erear door.
X Remove edge protection :on th edoor pillar
in th edirection of arrow ;.
X Pull bac krear panel trim =in th edirection of
arrow ?until th eelectrical connection can
be reached.
X Disconnect th eelectrical connection.
X Completely remove rear panel trim =.Opening/closing the slidin
gsunroof manually
X Remove wheel wrench Afrom the vehicle
tool kit (Y page 223).
X Place wheel wrench Aonto the hexagon nut
of the actuator motor. X
To open: turnw heel wrench Aanti-clock-
wise.
X To close: turn wheelwrench Aclockwise. Fitting the rea
rpanel trim
X Connect the electrica lconnection.
X Insert rea rpanel trim =.
Hook tabs Cof rea rpanel trim =into vehi-
cle sid ewallB.
X Insert edg eprotection :.
X Close the rea rdoor. Problems wit
hthe sliding sunroof G
WARNING
You could be severely or even fatally injured when closing the sliding sunroof with increased
closing force or if the anti-entrapment feature is deactivated .Make sure that nobody can become
trappe dwhen closing the sliding sunroof. Problem
Possible causes/consequences and
M
MSolutions The sliding sunroof can-
not be close
dand you
cannot see the cause. If the sliding sunroo
fisobstructed during closing and reopens again
slightly:
X Immediately after it blocks, pullt he¡ switch down again to the
point of resistance until the sliding sunroof is closed.
If the sliding sunroof is obstructed again during closing and reopens
again slightly: X Immediately after it blocks, pullt he¡ switch down again to the
point of resistance until the sliding sunroof is closed. If the sliding sunroof wills
till not open or close due to amalfunction, consult aqualifieds pecialist
workshop. 66
Sliding sunroofOpening and closing
Page 83 of 261
:
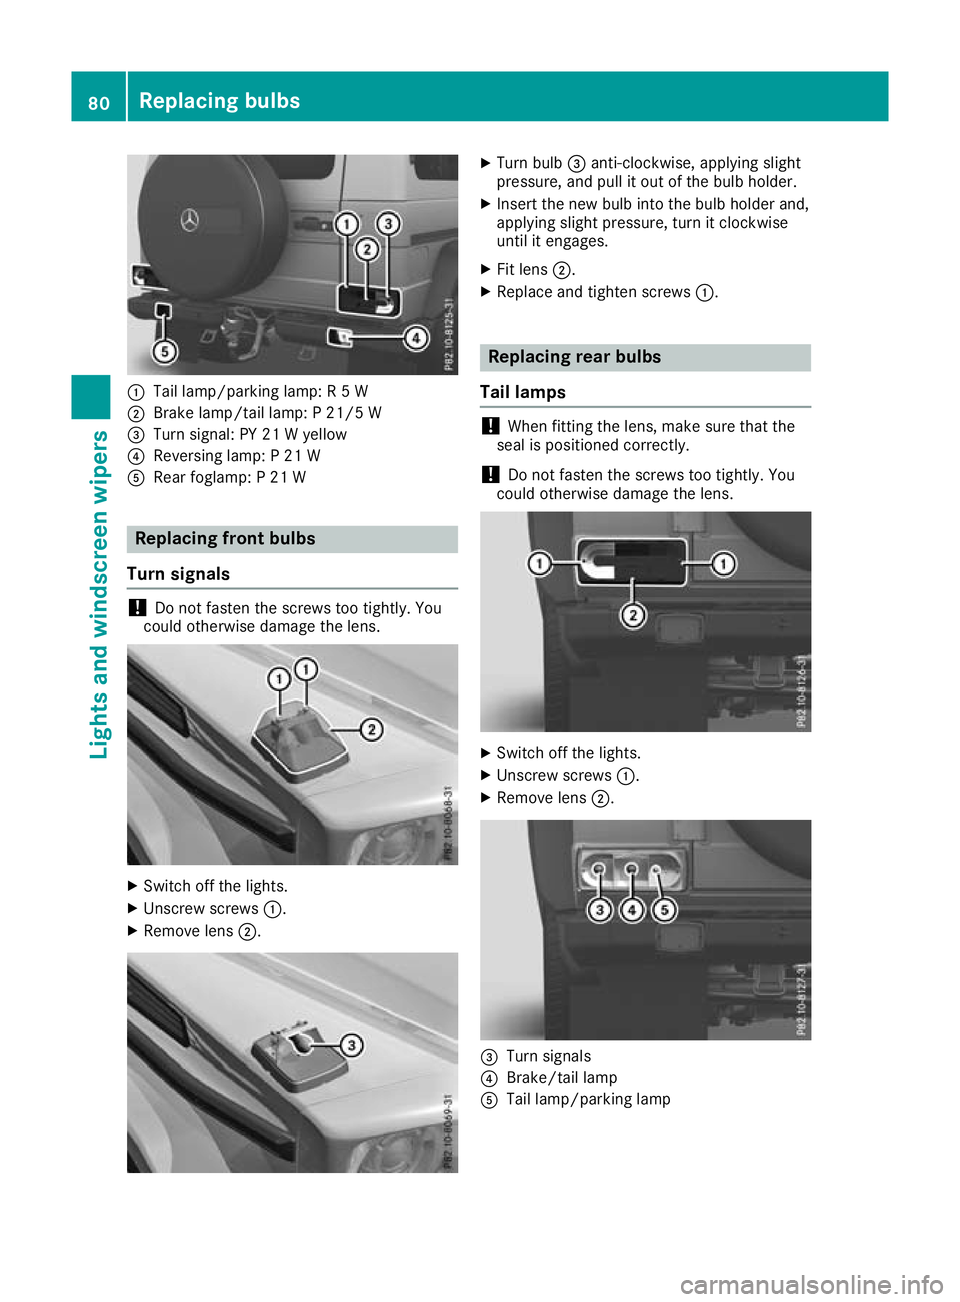
Tail lamp/parking lamp: R5W
; Brake lamp/tail lamp: P21/5 W
= Turn signal: PY 21 Wyellow
? Reversing lamp: P21W
A Rear foglamp: P21W Replacing fron
tbulbs
Turn signals !
Do not fasten the screws too tightly. You
coul dotherwise damage the lens. X
Switch off the lights.
X Unscrew screws :.
X Remove lens ;. X
Turn bulb =anti-clockwise, applying slight
pressure, and pull it out of the bulb holder.
X Insert the new bulb into the bulb holder and,
applying slight pressure, turn it clockwise
until it engages.
X Fit lens ;.
X Replace and tighten screws :. Replacing rear bulbs
Tail lamps !
When fitting the lens, make sure that the
seal is positioned correctly.
! Do not fasten the screws too tightly. You
could otherwise damage the lens. X
Switch off the lights.
X Unscrew screws :.
X Remove lens ;. =
Turn signals
? Brake/tail lamp
A Tail lamp/parkin glamp 80
Replacing bulbsLightsa
nd windscreen wipers
Page 84 of 261
X
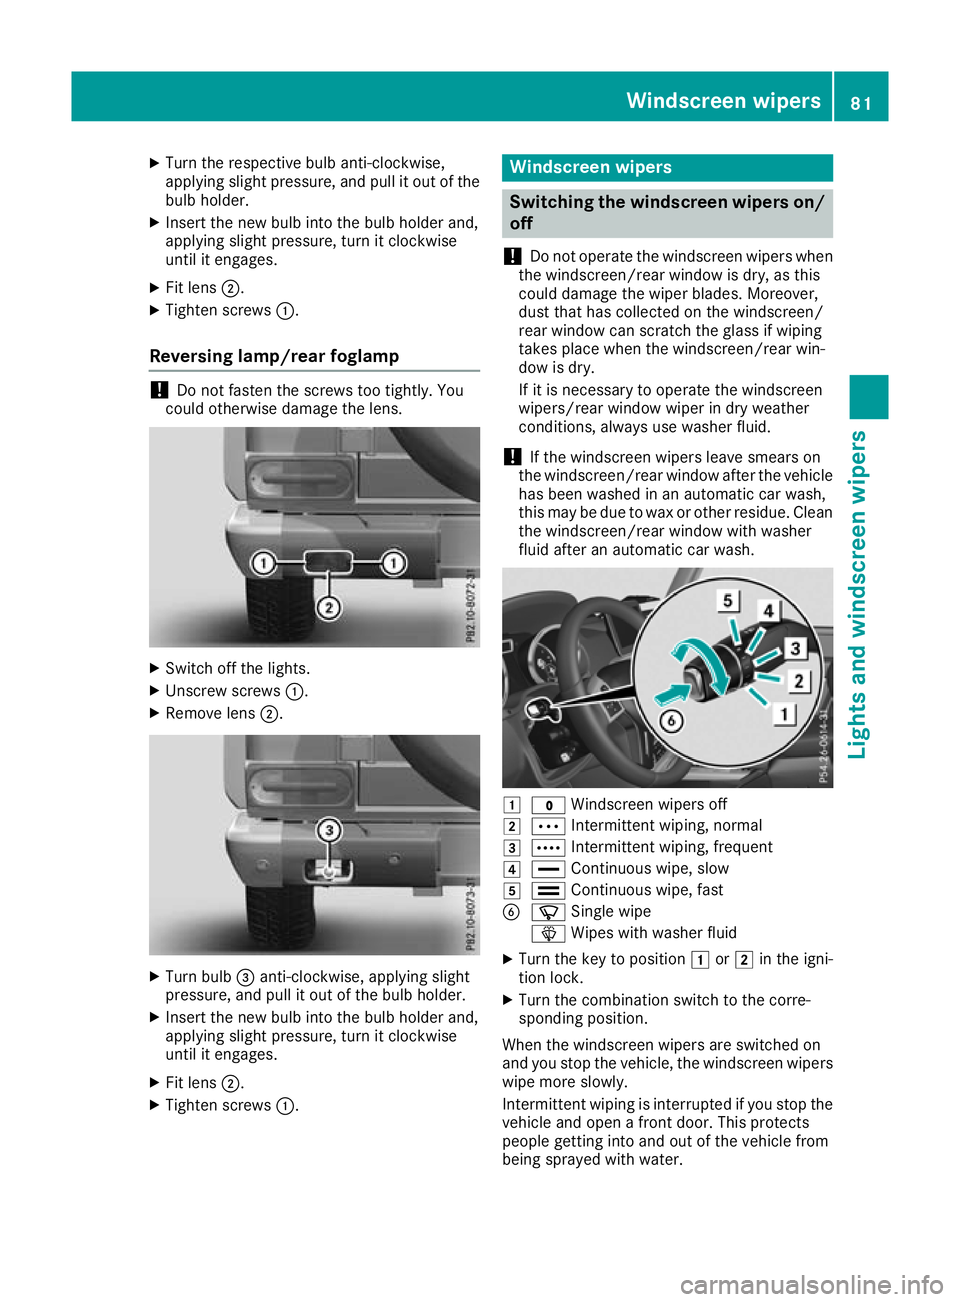
Turn the respective bulb anti-clockwise,
applying slight pressure, and pull it out of the
bulb holder.
X Insert the new bulb into the bulb holder and,
applying slight pressure, turn it clockwise
until it engages.
X Fit lens ;.
X Tighten screws :.
Reversing lamp/rear foglamp !
Do not fasten the screws too tightly. You
could otherwise damage the lens. X
Switch off the lights.
X Unscrew screws :.
X Remove lens ;. X
Turn bulb =anti-clockwise, applying slight
pressure, and pull it out of the bulb holder.
X Insert the new bulb into the bulb holder and,
applying slight pressure, turn it clockwise
until it engages.
X Fit lens ;.
X Tighten screws :. Windscreen wipers
Switching the windscreen wipers on/
off
! Do not operate the windscreen wipers when
the windscreen/rear window is dry, as this
could damage the wiper blades. Moreover,
dust that has collected on the windscreen/
rear window can scratc hthe glass if wiping
takes place when the windscreen/rear win-
dow is dry.
If it is necessary to operate the windscreen
wipers/rear window wiper in dry weather
conditions, always use washer fluid.
! If the windscreen wipers leave smears on
the windscreen/rear window after the vehicle has been washed in an automatic car wash,
this may be due to wax or other residue. Clean
the windscreen/rear window with washer
fluid after an automatic car wash. 1
$ Windscreen wipers off
2 Ä Intermittent wiping, normal
3 Å Intermittent wiping, frequent
4 ° Continuous wipe, slow
5 ¯ Continuous wipe, fast
B í Single wipe
î Wipes with washer fluid
X Turn the key to position 1or2 in the igni-
tion lock.
X Turn the combination switch to the corre-
sponding position.
When the windscreen wipers are switched on
and you stop the vehicle, the windscreen wipers
wipe more slowly.
Intermittent wiping is interrupted if you stop the
vehicle and open afron tdoor. This protects
people getting into and out of the vehicle from
being sprayed with water. Windscreen wipers
81Lightsand windscreen wipers Z
Page 90 of 261
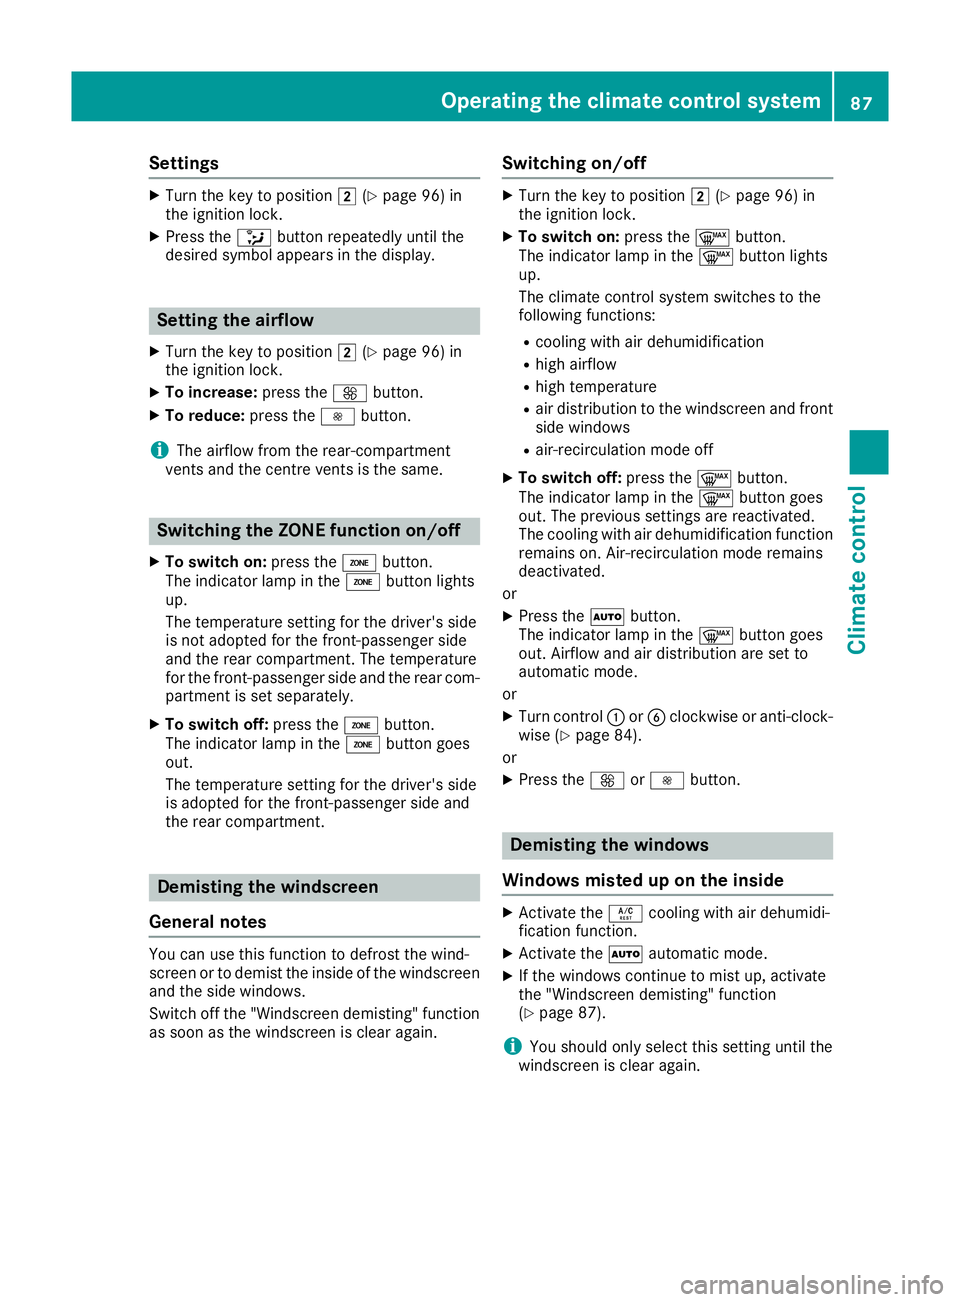
Settings
X
Turn the key to position 2(Ypage 96) in
the ignition lock.
X Press the _button repeatedly until the
desired symbol appears in the display. Setting the airflow
X Turn the key to position 2(Ypage 96) in
the ignition lock.
X To increase: press theKbutton.
X To reduce: press theIbutton.
i The airflow from the rear-compartment
ventsa nd the centre ventsist he same.Switching the ZONE function on/off
X To switch on: press theábutton.
The indicator lamp in the ábutton lights
up.
The temperature settingf or the driver's side
is not adopted for the front-passenger side
and the rear compartment. The temperature
for the front-passenger side and the rear com-
partment is set separately.
X To switch off: press theábutton.
The indicator lamp in the ábutton goes
out.
The temperature settingf or the driver's side
is adopted for the front-passenger side and
the rear compartment. Demisti
ng thewindscreen
General notes You can use this function to defrost the wind-
screen or to demis
tthe inside of the windscreen
and the side windows.
Switch off the "Windscreen demisting" function as soon as the windscreen is clear again. Switching on/off X
Turn the key to position 2(Ypage 96) in
the ignitio nlock.
X To switch on: press the¬button.
The indicator lamp in the ¬button lights
up.
The climate control system switches to the
following functions:
R cooling with air dehumidification
R high airflow
R high temperature
R air distribution to the windscreen and front
side windows
R air-recirculation mode off
X To switch off: press the¬button.
The indicator lamp in the ¬button goes
out. The previous settings are reactivated.
The cooling with air dehumidification function remains on. Air-recirculation mode remains
deactivated.
or
X Press the Ãbutton.
The indicator lamp in the ¬button goes
out. Airflow and air distribution are set to
automatic mode.
or
X Turn control :orB clockwise or anti-clock-
wise (Y page 84).
or
X Press the KorI button. Demisting the windo
ws
Windows misted up on th einside X
Activate the Ácoolin gwitha irdehumidi-
ficatio nfunction.
X Activate the Ãautomatic mode.
X If the windows continue to mis tup,activate
the "Windscreen demisting "fun ction
(Y page 87).
i Yo
us houl donlys elect thi ssetting unti lthe
windscree nisc lear again. Operatin
gthe climat econtrol system
87Climatecont rol
Page 112 of 261
nozzle. Thi
sdischarge sany electrostatic
charge tha tmayhave buil tup.
Do not get back into the vehicl eduring the refu-
elling process ;otherwise, electrostatic charge
could buil dupagain. G
WARNING
If yo umix diesel fuel with petrol, the flash
point of this fuel mixture is lower than that of pure diesel fuel .When the engine is running,
components in the exhaust system may over-
heatu nnoticed. There is arisk of fire.
Never refue lwith petrol. Never add petrol to
diesel fuel.
! Do not use petrol to refue
lvehicles with a
diesel engine. Do not switch on the ignitio nif
you accidentally refue lwith the wrong fuel.
Otherwise, fuel can enter the fuel system.
Even smal lamounts of the wrong fuel could
result in damage to the fuel system and the
engine. The repair costs are high .Notify a
qualified specialist worksho pand have the
fuel tank and fuel lines drained completely.
! Overfilling the fuel tank coul
ddamage the
fuel system.
! Take care not to spil
lany fuel on painted
surfaces. You coul dotherwise damage the
paintwork.
! Use
afilter when adding fuel from afuel can.
The fuel lines and/or the fuel injection system coul dotherwise be blocked by particles from
the fuel can.
If you overfil lthe fuel tank, some fuel may spray
out when you remove the fuel pump nozzle.
Further information on fuel and fuel quality
(Y page2 50). Refuelling
General information Observe the important safety notes
(Y
page 108).
If you unlock/lock the vehicle from the outside, the fuel filler flap also unlocks/locks.
The positio nofthe8 fuel filler cap is dis-
played on the instrument cluster. The arrow next to the filling pump indicates the side of the vehi-
cle.
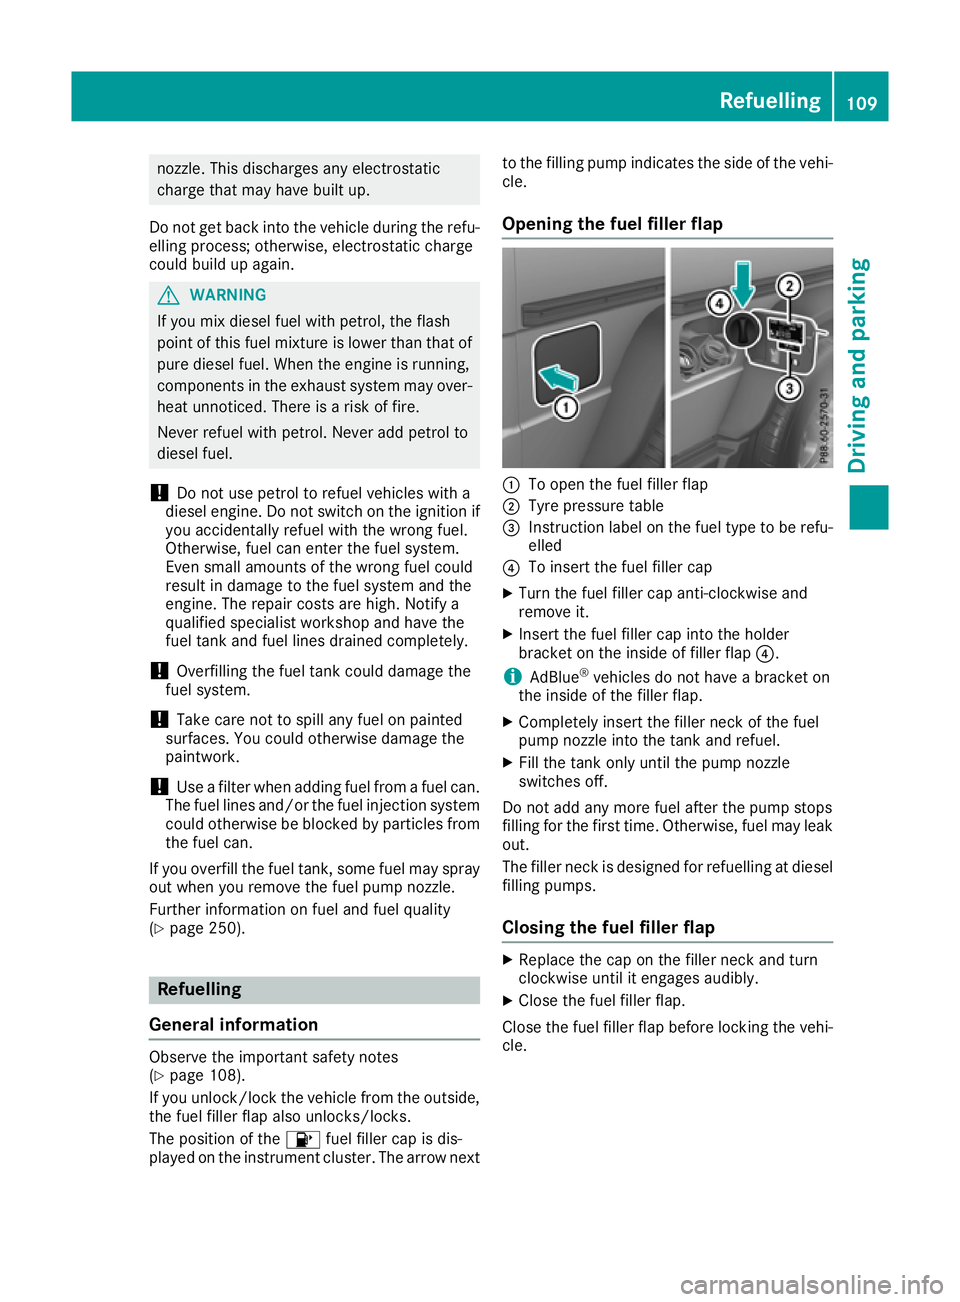
Opening the fuel filler flap :
To open the fuel filler flap
; Tyre pressure table
= Instruction label on the fuel type to be refu-
elled
? To insert the fuel filler cap
X Turn the fuel filler cap anti-clockwise and
remove it.
X Insert the fuel filler cap into the holder
bracket on the inside of filler flap ?.
i AdBlue ®
vehicles do not have abracket on
the inside of the filler flap.
X Completely insert the filler neck of the fuel
pump nozzle into the tank and refuel.
X Fill the tank only until the pump nozzle
switches off.
Do not add any more fuel after the pump stops
filling for the first time. Otherwise, fuel may leak out.
The filler neck is designed for refuelling at diesel
filling pumps.
Closing the fuel filler flap X
Replace the cap on the filler neck and turn
clockwise until it engages audibly.
X Clos ethe fuel filler flap.
Close th efuel filler flap before lockin gthe vehi-
cle. Refuelling
109Driving and parking Z