2016 MERCEDES-BENZ G-CLASS SUV wheel torque
[x] Cancel search: wheel torquePage 21 of 261

Unlocking
Emergenc yunlocking .......................62
From inside the vehicle (central
unlocking button) ............................. 62
Updatin gthe digital map .................. 197
USB (audio)
Connecting adevice ...................... 177
Selecting ........................................ 177 V
Vanity mirror Sun visor ........................................ 208
Vehicle
Correct us e...................................... 23
Data acquisition ............................... 24
Displa ymessage ............................ 153
Electronics ..................................... 248
Equipment ....................................... 21
Implied warranty .............................. 23
Individua lsettings .......................... 137
Leaving parked up ......................... 115
Locking (i nanemergency) ............... 62
Locking (key) ................................... 57
Lowering ........................................ 246
Parking .......................................... 113
Pulling away ..................................... 97
Raising ........................................... 244
Registration ..................................... 23
Securing from rolling away ............ 244
Tow-starting ................................... 232
Towing ........................................... 229
Transporting .................................. 231
Unlocking (i nanemergency) ........... 62
Unlocking (key) ................................ 57
Vehicl edata. .................................. 254
Vehicl edata ....................................... 254
Vehicl edata (off-road driving)
Approach/departure angle ............ 255
Fording depth ................................ 255
Maximu mgradient climbing abil-
ity .................................................. 255
Vehicl edimensions ........................... 254
Vehicl eemergenc yloc king ................ 62
Vehicl eidentificatio nnumber
see VIN
Vehicl eidentificatio nplate .............. 249
Vehicl etoolkit.................................. 223 Vehicl
etoolkit pocket ...................... 223
Vehicl eweigh ts................................. 254
Ventilation
Setting the airflow ........................... 87
VIN
Type plate ...................................... 249
Volume
Adjusting ....................................... 170 W
Warning and indicator lamps ABS ................................................ 158
Brake s.......................................... .157
ESP ®
.............................................. 159
ESP ®
OFF ....................................... 160
Fuel tank ........................................ 162
General notes ................................ 155
Overview .......................................... 26
Parking brake ................................ 157
PASSENGER AIR BAG OFF .............. .32
Reserv efuel .................................. .162
Seat bel t........................................ 155
Tyr ep ressure monitor ................... 164
Warning triangle ................................ 222
Washer fluid
Display message ............................ 154
Whee land tyre combinations
Tyres .............................................. 246
Whee lboltt ightening torque ........... 246
Wheels
Changing awheel .......................... 243
Changing/replacing ....................... 243
Checking ........................................ 235
Cleaning ......................................... 218
Fitting anew wheel ........................ 245
Fitting awheel ............................... 243
Important safety notes .................. 235
Information on driving .................... 235
Removing awheel .......................... 245
Snow chains .................................. 237
Storing .......................................... .243
Tightening torqu e........................... 246
Whee lsize/tyre size ..................... .246
Winch ................................................. 210
Windscreen
Demisting ........................................ 87
Windscreen heating ............................ 8818
Index
Page 57 of 261

4ETS (Electronic Traction System)
i
Observ
ethe "Important safety notes" sec-
tion (Y page 52).
4ETS traction control is part of ESP ®
.
4ETS traction control is no longer active above a
speed of approximately 60 km/h.
Traction control brakes the drive wheels indi-
vidually if they spin. This enables you to pull
awaya nd accelerate on slippery surfaces, e.g. if
the road surface is slippery on one side. In addi-
tion, more drive torque is transferred to the
wheel or wheels with traction.
Traction control remains active if you deactivate
ESP ®
.
Important safety notes i
Observe the "Important safety notes" sec-
tion (Y page 52). G
WARNING
If ESP ®
is malfunctioning, ESP ®
is unable to
stabilise the vehicle. In addition, other driving
safety systems are switched off. This increa-
ses the risk of skidding and an accident.
Drive on carefully.H ave ESP®
checked at a
qualified specialist workshop.
! Only operate the vehicl
efor am aximu mof
ten seconds on abrake dynamometer. Switch
off the ignition.
Application of the brakes by ESP ®
may oth-
erwise destroy the brake system.
! Af
unction or performance test should only
be carrie dout on atwin-axle dynamometer.
Before you operate the vehicl eonsuch a
dynamometer, please consult aqualified
workshop. You coul dotherwise damage the
drive train or the brake system.
If the å ESP®
OFF warning lamp lights up
continuously,E SP®
is deactivated.
If the ÷ ESP®
warning lamp lights up contin-
uously,E SP®
is not available due to amalfunc-
tion.
Observe the information on warning lamps
(Y page1 59) and display messages which may
be displayed in the instrument cluster
(Y page1 42). Use only wheels with the recommended tyre
sizes. Only then will ESP ®
functio nproperly.
If differential locks are switched on, ABS,B AS
and ESP ®
switch off automatically.
Characteristics of ESP ® General information
If the ÷ ESP warning lamp goes out before
you begin the journey, ESP ®
is automatically
active.
If ESP ®
intervenes,t he÷ ESP®
warning lamp
flashes on the instrument cluster.
If ESP ®
intervenes:
X Do not deactivate ESP ®
under any circum-
stances.
X When pulling away, depress the accelerator
pedalo nly as far as is necessary.
X Adapt yourd riving style to suit the prevailing
road and weather conditions.
ECO start/stop function
The ECO start/stop function switches the
engine off automaticall yifthe vehicle stops
moving. When the vehicle pulls awaya gain, the
engine starts automatically. ESP ®
remains in its
previously selected status, e.g. if ESP ®
was
deactivated before the engine was automati-
callys witched off.
Deactivating/activating ESP ® Im
portant safety notes
i Observ
ethe "Importan tsafety notes" sec-
tio n(Ypage 52).
You can select between th efollowin gESP®
sta-
tuses:
R ESP ®
is activated
R ESP ®
is deactivated G
WARNING
If yo udeactivate ESP ®
,E SP ®
no longer sta-
bilises the vehicle. There is an increased risk
of skidding and an accident.
Only deactivate ESP ®
in the situations descri-
bed in the following. 54
Driving safety systemsSafety
Page 58 of 261

It may be best to deactivate ESP
®
in the follow-
ing situations:
R when snow chains are used
R in deep snow
R on sand or gravel
R off-road
Spinning the wheelsr esults inacutting action,
which enhances traction.
Activate ESP ®
as soon as the situations descri-
bed above no longer apply. ESP ®
willo therwise
not be abletos tabilise the vehicle if the vehicle
starts to skid or awheel starts to spin.
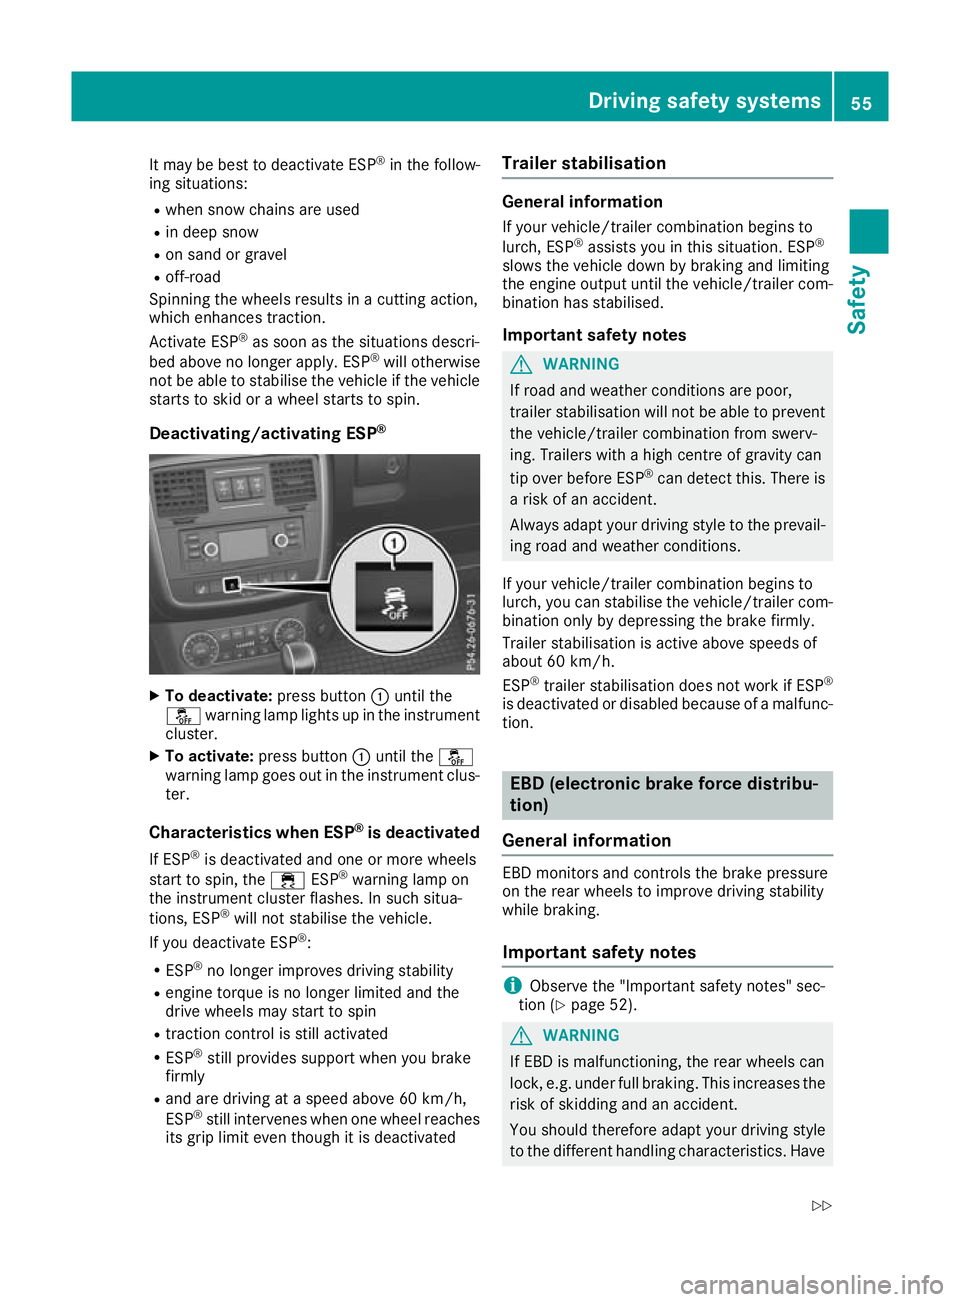
Deactivating/activating ESP ®X
To deactivate: press button:until the
å warning lamp lights up in the instrument
cluster.
X To activate: press button :until the å
warning lamp goes out in the instrument clus-
ter.
Characteristic swhenE SP®
is deactivated
If ESP ®
is deactivate dand one or more wheels
start to spin, the ÷ESP®
warning lamp on
the instrument cluster flashes. In such situa-
tions, ESP ®
will not stabilise the vehicle.
If yo udeactivate ESP ®
:
R ESP ®
no longer improve sdriving stability
R engine torque is no longer limite dand the
drive wheels may start to spin
R tractio ncontro lisstilla ctivated
R ESP ®
stil lprovides support when yo ubrake
firmly
R and are driving at aspeed above 60 km/h,
ESP ®
stil lintervene swheno ne whee lreaches
its gri plim it eve nthough it is deactivated Trailer stabilisation General information
If you rvehicle/trailer combinatio nbegins to
lurch, ESP ®
assists you in this situation. ESP ®
slowst he vehicle down by braking and limiting
the engine outpu tuntil the vehicle/trailer com-
binatio nhas stabilised.
Important safety notes G
WARNING
If road and weather conditions are poor,
trailer stabilisation willn ot be abletoprevent
the vehicle/trailer combination from swerv-
ing. Trailers with ahigh centre of gravity can
tip over before ESP ®
can detect this. There is
ar isk of an accident.
Always adapt yourd riving style to the prevail-
ing road and weather conditions.
If yourv ehicle/trailer combination begins to
lurch ,you can stabilise the vehicle/trailer com-
bination only by depressing the brake firmly.
Trailer stabilisation is active above speeds of
about 60 km/h.
ESP ®
trailer stabilisation does not work if ESP ®
is deactivated or disabledb ecause ofamalfunc-
tion. EB
D( electronic brak eforce distribu-
tion)
General information EB
Dm onitors and controls the brake pressure
on the rea rwheel stoi mprov edrivin gstability
whil ebraking.
Important safety notes i
Observ
ethe "Important safety notes" sec-
tion (Y page 52). G
WARNING
If EBD is malfunctioning, the rear wheels can
lock, e.g. under full braking. This increases the risk of skidding and an accident.
You should therefore adapt your driving style
to the different handling characteristics. Have Driving safe
tysystems
55Safety
Z
Page 249 of 261

for Mercedes-Benz vehicles and the respective
wheel.
X Clean the whee land whee lhub contact sur-
faces.
X Place the new whee lonthe whee lhub and
pus hito n.
X Tighten the whee lbolts until they are finger-
tight.
Lowering the vehicle G
WARNING
The wheels coul dwork loos eifthe whee lnuts
and bolts are not tightened to the specified
tightening torque .There is arisk of accident.
Have the tightening torque immediately
checked at aqualified specialist workshop
after awhee lisc hanged.
X Slowl yopen the pressure release screw on
the jack using the pump leve rbyapprox-
imatel yone full turn and carefully lower the
vehicl e(Ypage2 44).
X You can put the jack aside. X
Tighten the wheel bolts evenl yinacrosswise
pattern in the sequence indicated (: toA).
The specified tightening torque is 130 Nm.
X Dismantle the pump lever.
X Push the jack piston back in and close the
drain plug.
X Use the nuts to secure the faulty wheel to the
spare wheel bracket (Y page 223).
X Stow the jack and the vehicle tools in the
vehicle again.
X Check the tyre pressure of the newly fitted
wheel and adjust it if necessary.
Observe the recommended tyre pressure
(Y page 238). If you are drivin
gwith the emergency spare
wheel fitted, the tyre pressure monitor cannot
function reliably.R estart the tyre pressure mon-
itor only once the defective wheel has been
replaced with anew wheel.
All fitted wheelsm ust be equipped with func-
tioning sensors for the tyre pressure monitor. Wheel and tyre combinations
You can ask for information regarding permitted
wheel/tyre combinations at aMercedes-Benz
Service Centre.
! For safety reasons, Mercedes-Benz recom-
mends that you only use tyres, wheels and
accessories which have been approved by
Mercedes-Benz for you rvehicle. These are
speciall yadapted to the various driving safety
systems, such as ABS or ESP ®
.
Only use the tyres, wheels and accessories
tested and recommende dbyMercedes-Benz.
Certain characteristics, such as handling,
vehicl enoise emissions, fuel consumption,
etc. may otherwise be adversely affected.
Other wheel sizes may caus ethe tyres to
come into contact with the vehicl ebody and
axle components, whe nunder load. This may
result in damage to the tyre or the vehicle.
Mercedes-Benz is not responsibl efor any
damage caused by using tyres, wheels or
accessories other than those recommended.
Informatio nontyres, wheels and permissible
combinations can be obtained at aqualified
specialist workshop.
! Retreaded tyres are neither tested nor rec-
ommende dbyMercedes-Benz, since previ-
ous damage cannot alwaysbed etected on
retreaded tyres. As aresult, Mercedes-Benz
cannot guarantee vehicl esafety if retreaded
tyres are fitted. Do not fit use dtyres if you
have no information about their previous
usage.
! Large wheels: the lower the section width
for acertain wheel size, the lower the ride
comfort is on poor road surfaces. Rol lcomfort
and suspension comfort are reduced and the risk of damage to the wheels and tyres as a
result of driving over obstacles increases.
The recommende dtyre pressures for various
operating conditions can be found on the tyre 246
Wheel and tyre combinationsWheels and tyres
Page 259 of 261

Carefully depress th
eaccelerato rpedal and
mak esure that th ewheel sdon otspin when
driving on steep terrain.
i If th
eload on th efront axle is reduced when
pullin gaway on asteep uphill slope, th efront
wheel shave atendenc ytos pin .4ETSr ecog-
nises this and brakes th ewheel saccordingly.
The rear wheel torque is increased and it is
easie rtop ull away.
Further informatio nonthemaximum gradient
climbin gabilit y(Ypage 122). Trailer to
whitch Permissible trailer load, braked (at a
minimu mgradient-climbing capabil-
ity of 12% from astandstill) Model
G3
50dPROFES-
SIONAL 3200 kg
Permissible trailer load, unbraked
Model
G3
50dPROFES-
SIONAL 750 kg
Maximum drawbar load
! Use
adrawbar noseweight as close as pos-
sibl etot he maximu mpermissible nose-
weight. Do not use anoseweight of less than
50kg, otherwise the trailer may come loose.
Note that the payloada nd the rear axle load
are reduced by the actua lpayload.
The drawbar loadr educes the permissible over-
all loa dand rear axle load.
The drawbar loada cts from above onto the ball
hea dont he trailer tow hitch.
The drawbar loa disnot included in the trailer
load. Model Permissiblen
ose-
weight G3
50dPROFES-
SIONAL 140 kg You can secure carrier systems, e.g
.bicycle
rack sorl oad-bearing devices, to the ball cou-
pling. The maximum payload of 75 kg applies
when carrier systems are attached to the ball
coupling. Permissible rear axle load during
trailer towing
Model Permissibl
eaxle
load G3
50dPROFES-
SIONAL 1900 kg256
Trailer tow hitchTechnical data