2016 MERCEDES-BENZ G-CLASS SUV change time
[x] Cancel search: change timePage 4 of 261
Welcome to the world of Mercedes-Benz
Before you drive off for the first time, read this
Owner's Manual carefully and familiarise your-
self with you rvehicle. For you rown safety and a
longer vehicl elife ,follow the instructions and
warning notices in this manual. Disregarding
them may result in damage to the vehicl eor
personal injury.
The equipment or model designation of your
vehicl emay vary according to:
R model
R order
R country variant
R availability
The illustrations in this manua lshow aleft-hand-
drive vehicle. On right-hand-drive vehicles, the
layout of components and controls differs
accordingly.
Mercedes-Benz is constantly updating its vehi-
cles to the state of the art.
Mercedes-Benz therefore reserve sthe right to
introduce changes in the following areas:
R design
R equipment
R technical features
Consequently, the description may diffe rfrom
you rvehicl eins ome cases.
The following are integra lparts of the vehicle:
R Printed Owner's Manual
R Service Booklet
R Equipment-dependent supplements
Keep these documents in the vehicl eatall
times. If you sell the vehicle, alwaysp assa ll
documents on to the new owner. Please note that the Mercedes-Benz Guide
sapp
may not yet be available in you rcountry.
4635840105Z102 É4635840105Z102tËÍ
Page 23 of 261

Environmental protection
General notes
H
Environmenta
lnote
Daimler' sdeclared polic yisone of compre-
hensive environmental protection.
Our objectives are to use th enatural resour-
ces whic hformt hebasis of our existence on
this plane tsparingl yand in amanner which
takes th erequirements of bot hnature and
humanity int oconsideration.
You to ocan help to protect th eenvironment
by operatin gyour vehicle in an environmen-
tally-responsible manner.
Fuel consumption and th erateofe ngine,
transmission ,brak eand tyr ewear depen don
th ef ollowing factors:
R operatin gcondition sofyour vehicle
R your personal driving style
You can influenc ebothf actors. Therefore,
please bear th efollowing in mind:
Operatin gconditions:
R avoid shor ttrips, as these increase fuel
consumption.
R observe th ecorrec ttyrep ressure.
R do not carry any unnecessar yweight in the
vehicle.
R remove th eroof rac koncey ou no longer
nee dit.
R ar egularly serviced vehicle will contribute
to environmental protection .You should
therefore adher etotheservic eintervals.
R all maintenanc ework should be carried out
at aq ualifie dspecialist workshop.
Personal driving style:
R do not depress th eaccelerator pedal when
starting th eengine.
R do not warm up th eengine when th evehicle
is stationary.
R driv ecarefully and maintain asafe distance
fro mt hevehicle in front.
R avoid frequent, sudden acceleration and
braking. R
change gear in good time an duseeach gear
only up to Ôof its maximum engine speed.
R switch off the engine in stationar ytraffic.
R monitor the vehicle's fue lconsumption. Returnin
ganend-of-life vehicle
EU countrie sonly:
Mercedes-Benz will take back your end-of-life
vehicl efor environmentally friendl ydisposa lin
accordance with the Europea nUnion(EU) End-
Of-Life Vehicles Directive.
An etwork of return points and disassembly
plants ha sbeene stablished for yo utoreturn
your vehicle. Yo ucan leave it at any of these
points free of charge .Thism akesani mportant
contribution to closing the recycling circl eand
conserving resources.
For further information abou tthe recycling and
disposa lofend-of-life vehicles, and the take-
back conditions ,pleas evisit the national
Mercedes-Benz website for your country. Genuine Mercedes-Benz parts
H
Environmental note
Daimle rAGalso supplies reconditioned
assemblies and part swhicha re of th esame
qualit yasnew parts. For these, th esame war-
ranty applies as for new parts.
! Airbags and seat belt tensioners
,aswell as
control unit sand sensor sfor these restraint
systems, may be installe dinthefollowing
areas of your vehicle:
R doors
R door pillars
R door sills
R seats
R dashboard
R instrumen tcluster
R centr econsole
Do not install accessories such as audio sys-
tem sint hese areas. Do not carry out repairs
or welding. You could impair th eoperating
efficiency of th erestraint systems. 20
Introduction
Page 55 of 261
Pets in the vehicle
G
WARNING
If you leave animals unsupervised or unse-
cured in the vehicle, they may push abutton
or as witch, for example.
They could:
R activate vehicl eequipment and become
trapped, for example
R switch vehicl esystems on or off, thus
endangering other road users
In the event of an accident, sudden braking or
abrupt changes of direction, unsecured ani-
mals coul dbeflung around the vehicle, injur-
ing the vehicl eoccupants. There is arisk of an
accident and injury.
Never leave animals unattended in the vehi-
cle. Always secure animals correctly during a
journey ,e.g. in an anima ltransport box. Driving safe
tysystems Drivin
gsafet ys ystems overview
In this section ,you will fin dinformati on about
th ef ollowin gdrivin gsafet ysystems:
R AB S(Anti-lock Braking System)
(Y page 52)
R BA S(Brake Assist System) (Y page 53)
R Adaptive brake lights (Y page 53)
R ESP ®
(Electronic Stability Program)
(Y page 53)
R EB D( electronic brak eforce distributi on)
(Y page 55)
R ADAPTIV EBRAKE (Y page 56) Important safety notes
If you fail to adapt your driving style or if you are
inattentive, th edriving safet ysystems can nei-
ther reduce th eriskofana ccidentnor override
th el aws of physics .Drivin gs afet ysystems are
merely aids designed to assist driving .You are
responsible for maintainin gthe distanc etothe
vehicl einfront,for vehicl espeed, for braking in
goo dtime, and for staying in lane. Always adapt
your driving style to suit th eprevailing road and weather conditions and maintain
asafe distance
fro mt hevehicle in front .Drive carefully.
The driving safet ysystems described work as
effectively as possible only when there is ade-
quate contac tbetween th etyres and th eroad
surface. Pay particular attention to th einforma-
tio nr egarding tyres, recommended minimum
tyr etread depths etc .inthe"Wheels and tyres"
sectio n(Ypage 235).
In wintry driving conditions ,always use winter
tyres (M+S tyres) and, if necessary, snow
chains. Only in this way will th edriving safety
systems described in this sectio nwork as effec-
tively as possible. ABS (Anti-lock Braking System)
Genera linformation AB
Sregulate sbrake pressure in such awaythat
the wheels do not lock when yo ubrake. This
allows yo utocontinue steering the vehicl ewhen
braking.
The yellow !ABS warning lamp in the instru-
ment cluster lights up when the ignition is
switched on. It goe soutwhen the engine is run-
ning.
ABS works from aspeed of abou t8km/h,
regardless of road-surface conditions. ABS
works on slippery surfaces ,evenw heny ou
brake onl ygently.
Important safety notes i
Observ
ethe "Important safety notes" sec-
tion (Y page 52). G
WARNING
If ABS is faulty, the wheels could lock when
braking. The steerability and braking charac-
teristics may be severely impaired.A ddition-
ally, further driving safety systems are deac-
tivated. There is an increased dange rofskid-
ding and accidents.
Drive on carefully.H ave ABS checked imme-
diately at aqualified specialist workshop.
If ABS is malfunctioning, other systems ,includ-
ing driving safety systems ,willa lsob ecome
inoperative. Observe the information on the ABS warning lamp (Y page158) and display mes- 52
Driving safety systemsSafety
Page 61 of 261
The key centrally locks/unlocks:
R the doors
R the rear door
R the fuel filler flap
X To unlock centrally: press the%button.
If you do not open the vehicle within approx-
imately 40 seconds of unlocking:
R the vehicle locks again
R protection against theft is reactivated
X To lock centrally: press the&button.
i If the
& button is pressed when the driv-
er's door is open, the rear side door on the
driver's side is not locked either.
During unlocking, the turn signals flash once.
During locking, they flash three times.
You can also set an audibl esignal to confirm
that the vehicle has been locked. The audible
signal can be activated or deactivated using the
on-board computer (Y page 139).
Only when all the components have been locked is the visual or audibl elockingc onfirmation
issued.
When the surround lighting is activated via the
on-board computer, it lights up when it is dark
after the vehicle is unlocked with the key
(Y page 138). Changing the settings of the locking
system
You can change the settings of the lockin gsys-
tem. This mean sthato nlyt he driver' sdoor and
th ef uel fille rflap are unlocked when th evehicle
is unlocked. This is useful if you frequently travel
alone.
X To change th esetting: pressand hold down
the % and& buttons simultaneously
for about six seconds until th ebattery indica-
to rlamp flashes twice (Y page 59).
If th esettin goft helockin gsystem is changed
within th esignal range of th evehicle ,pressing
the & or% button:
R locks or
R unlock sthe vehicle The key now func
tions as follows:
X To unlock the driver's door and fuel filler
flap:
press the %button once.
X To unlock centrally: press the%button
twice.
X To lock centrally: press the&button.
X To restor ethe factory settings: press and
hold down the %and& button ssimul-
taneously for approximately six seconds until the battery check lamp flashes twice
(Y page 59). Emergency key element
Genera lnotes If the vehicl
ecan no longer be unlocked with the
key, use the emergency key element.
If you use the emergency key element to unlock
and open the driver's door, the anti-theft alarm
system willbet riggered. Switch off the alarm
(Y page 56).
If you unlock the vehicle using the emergency
key element, the fuel fillerf lap willnot be
unlocked automatically.
X To unlockt he fuel fillerf lap:insert the key
into the ignition lock.
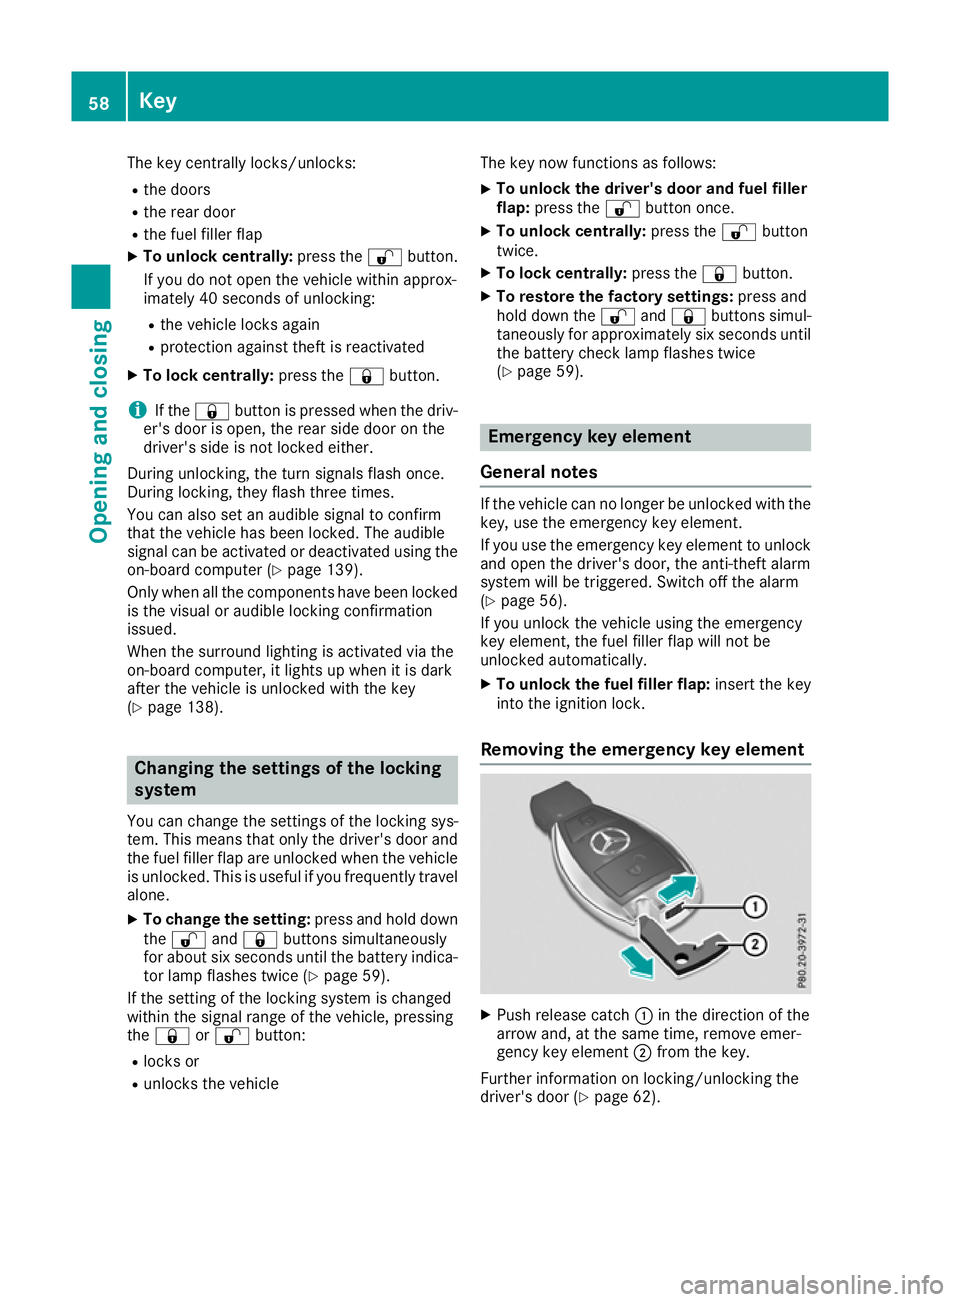
Removing the emergency key element X
Push releasec atch:in the direction of the
arrow and, at the same time, remove emer-
gency key element ;from the key.
Further information on locking/unlocking the
driver's door (Y page 62).58
KeyOpening and closing
Page 81 of 261
Make sure that the interior lighting does not
remain switched on too long after the engine
has been switched off.
X To switch on: press thecsymbol on
switch B(Ypage 77).
X To switch off: move switchBto the centre
position (Y page 77).
Reading lamps X To switch on/off: press the respective p
button (Y page 77).
Rear interior lighting X To switch on/off: press thetbutton
(Y page 77).
i When you open
arear side door, the rear
interior lighting switches on. Then, you cannot
switch it off using the tbutton.
If you leave the front doors open for along
time, switch the rear interior lighting off. In
this way,y ou can avoid draining the battery.
Luggage compartment lighting X To switch on/off: press thetbutton
(Y page 77).
i If you open the rear door, the luggagec
om-
partment lighting switches on. Then, you can-
not switch it off using the tbutton.
If you leave the rear door open for along time,
switch the luggagec ompartmentlighting off.
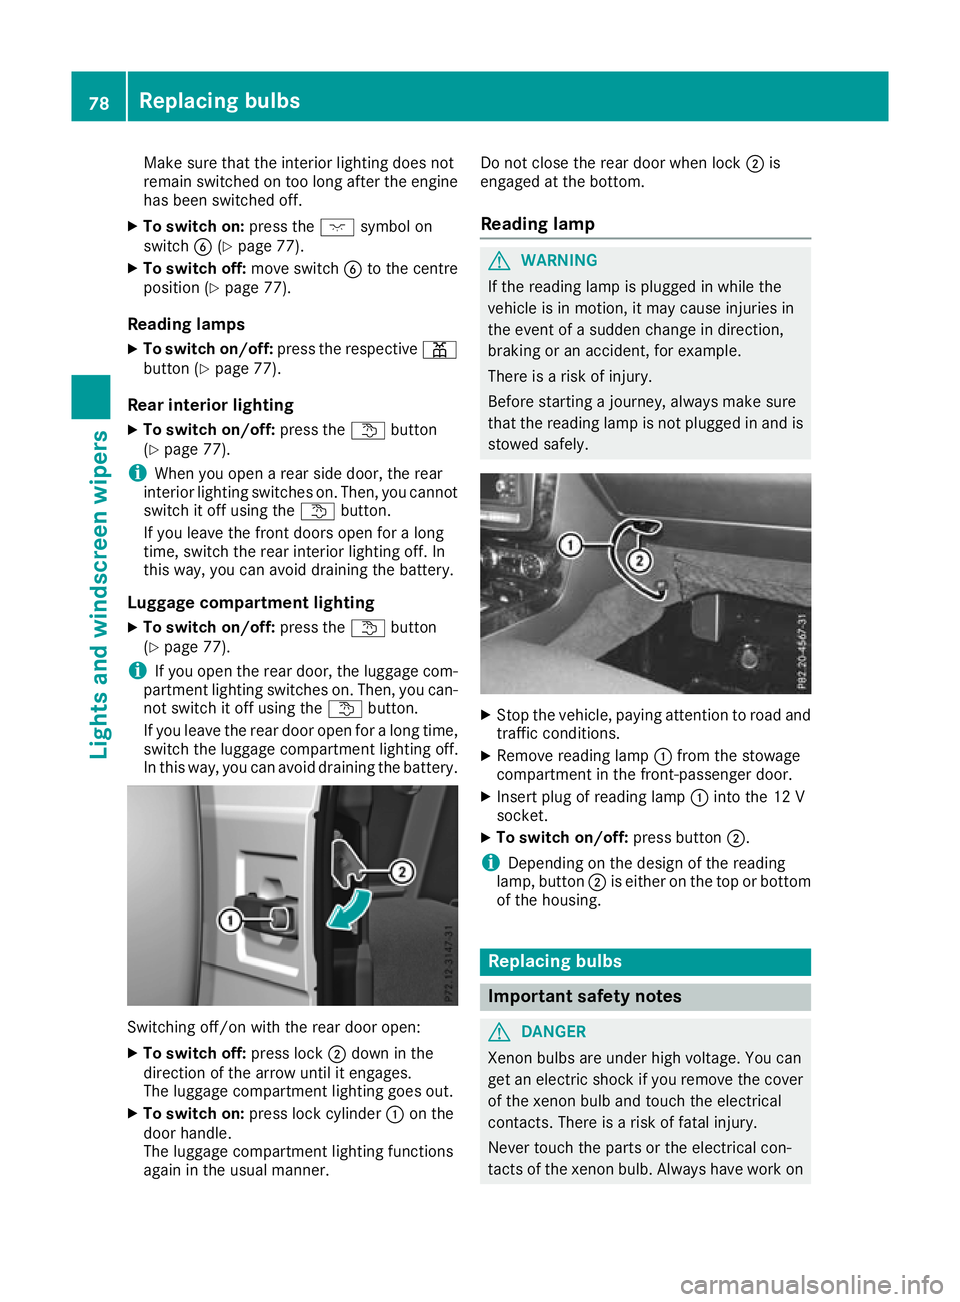
In this way,y ou can avoid draining the battery. Switching off/on with the rear door open:
X To switch off: press lock;down in the
direction of the arrow until it eng ages.
The luggage compartment lighting goe sout.
X To switc hon:press lock cylinder :on the
doo rhandle.
The luggage compartment lighting functions
agai nint he usua lmanner. Do not close the rea
rdoorw henlock ;is
engaged at the bottom.
Readin glamp G
WARNING
If the reading lamp is plugged in while the
vehicl eisinm otion, it may caus einjurie sin
the event of asudden change in direction,
braking or an accident, for example.
There is arisk of injury.
Before starting ajourney ,alwaysm ake sure
that the reading lamp is not plugged in and is stowed safely. X
Stop the vehicle, paying attentio ntoroada nd
traffic conditions.
X Remove reading lamp :from the stowage
compartment in the front-passenger door.
X Insert plug of reading lamp :into the 12 V
socket.
X To switc hon/off: press button ;.
i Depending on the desig
nofthe reading
lamp, button ;is either on the top or bottom
of the housing. Replacing bulbs
Importan
tsafety notes G
DANGER
Xenon bulbs are under high voltage. You can
get an electric shock if you remove th ecover
of th exenon bulb and touch th eelectrical
contacts. There is ariskoff atal injury.
Never touch th epartsort heelectrical con-
tacts of th exenon bulb. Always hav eworkon 78
Replacing bulbsLights
and windscreen wipers
Page 82 of 261
the xeno
nbulbs carrie doutataq uali fied spe-
cialist workshop. G
WARNING
Bulbs, lamp sand plugc onnectors can
become very hot during use. When replacing a bulb, you coul dburn yourself on these com-
ponents. There is arisk of injury.
Allow these components to cool downb efore
replacing the bulb.
Do not use abulbifith as been dropped or if its
glass has been scratched.
The bulbm ay explode if:
R you touch it
R it is hot
R you drop it
R you scratch it
Use bulbs only in closed lamp sthat have been
designed for this purpose. Fit only spar ebulbs of
the same type and the specified voltage.
Marks on the glass reduce the service life of the bulbs. Do not touch the glass tube with your
bare hands. If necessary, clea nthe glass tube
when cold with alcohol or spiri tand rub it off
with alint-free cloth.
Protect bulbs from moisture during operation.
Do not allow bulbs to come into contact with
liquids.
Xeno nbulbs and LED modules: you cannot
replace xenon bulbs or LED modules yourself.
Have the following bulbs replaced at aqualified
specialist workshop:
R third brake lamp
R side lamps/parking lamp s(front)
R main-beam/dipped-beam headlamps (xenon
headlamps)
R daytime driving lights
R licence plate lamp
i Individuals
egments of the licence plate
lamp LEDs may fail without adisplay message
appearing in the multifunction display.R egu-
larl ycheck the licence plate lighting. If nec-
essary, visit aqualified specialist workshop.
You can replace the following bulbs: R turn signa llamp (front)
R brake/tai llamp
R turn signa llamp (rear) R
tail lamp/parking lamp
R reversing light
R rear foglamp
Replace only the bulb sliste d( Ypage 79).
Hav ethe bulb stha tyou cannot change yourself
replaced at aquali fied specialis tworkshop.
If yo urequire assistance replacing bulbs, con-
sult aquali fied specialis tworkshop.
If the new bulb still does not light up ,consul ta
qualified specialis tworkshop.
Headlamps and lights ar eanimportant aspect of
vehicl esafety .You must therefore make sure
tha tthese functio ncorrectl yatalltimes .Have
the headlamp setting verified regularly. Overview of bulb types
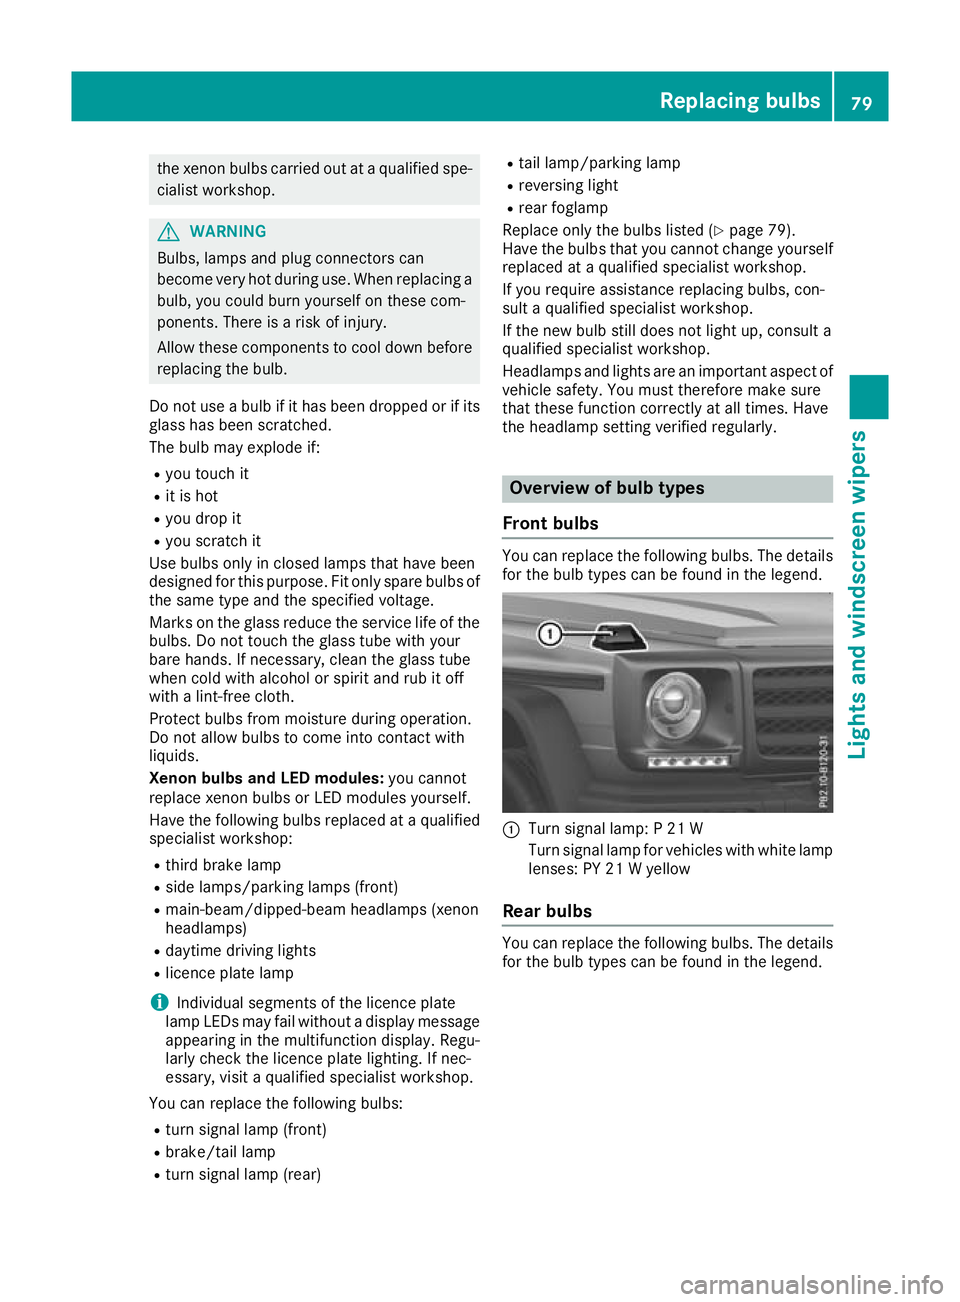
Fron tbulbs You can replace the following bulbs. The details
for the bulb types can be found in the legend. :
Turn signal lamp: P21W
Turn signal lamp for vehicles with white lamp lenses: PY 21 Wyellow
Rear bulbs You can replace the following
bulbs. The details
for the bulb types can be foun dinthe legend. Replacing bulbs
79Lights and windscreen wipers Z
Page 89 of 261
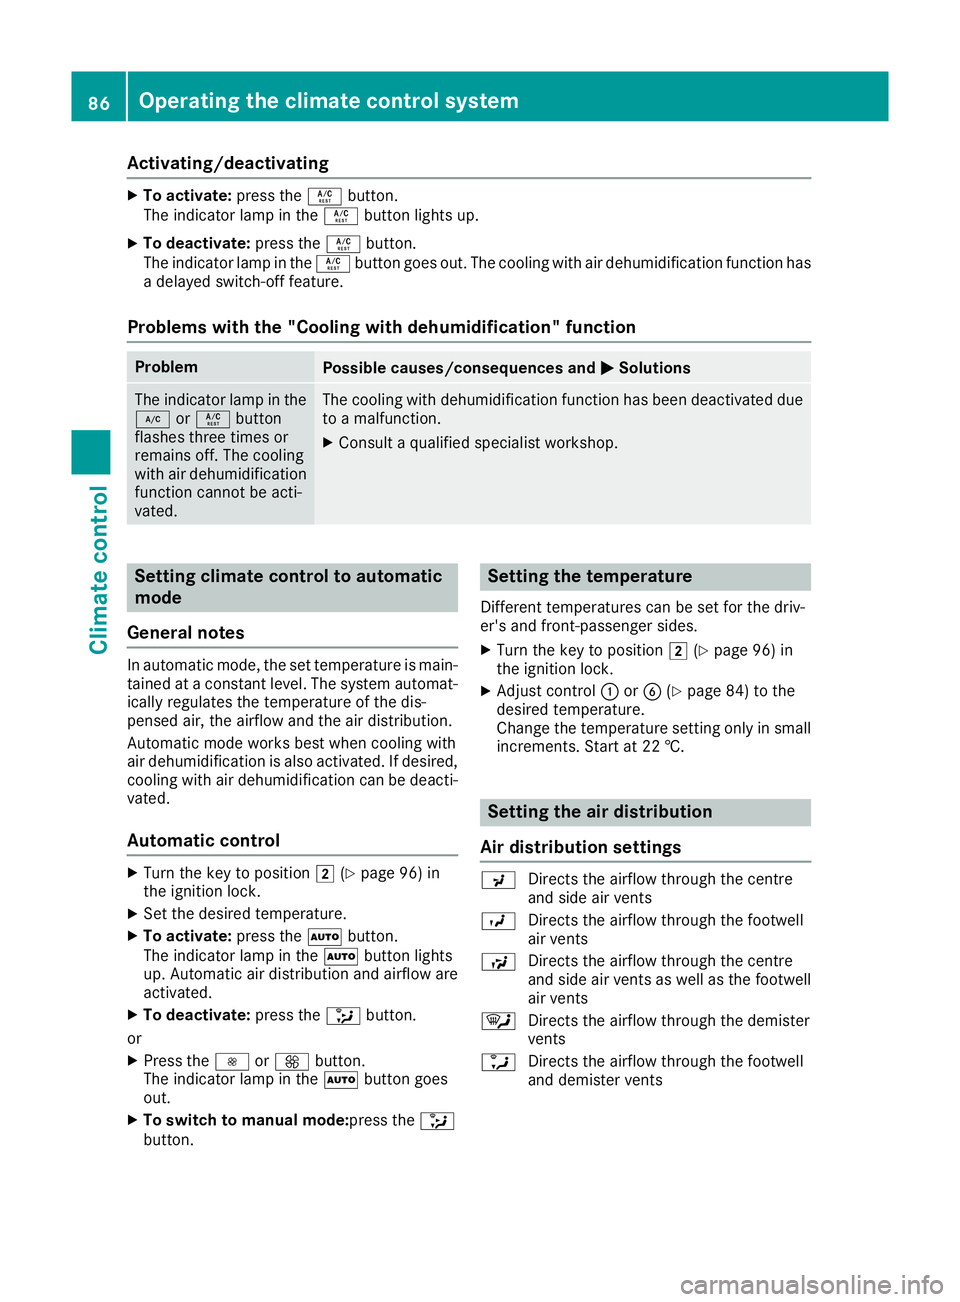
Activating/deactivating
X
To activate: press theÁbutton.
Th eindicator lamp in the Ábutton lights up.
X To deactivate: press theÁbutton.
The indicator lamp in the Ábutton goe sout.T he cooling with ai rdehumidifica tion functionhas
ad elayed switch-off feature.
Problems with the "Cooling with dehumidification" function Problem
Possible causes/consequence
sand M
MSolutions The indicator lamp in the
¿ orÁ button
flashes three times or
remains off. The cooling
with air dehumidification
function cannot be acti-
vated. The cooling with dehumidification function has been deactivated due
to am alfunction.
X Consult aqualified specialist workshop. Setting climate control to automatic
mode
General notes In automatic mode, the set temperature is main-
tained at aconstant level.T he system automat-
icallyr egulates the temperature of the dis-
pensed air, the airflow and the air distribution.
Automatic mode works best when cooling with
air dehumidification is also activated. If desired,
cooling with air dehumidification can be deacti- vated.
Automatic control X
Turn the key to position 2(Ypage 96) in
the ignition lock.
X Set the desire dtemperature.
X To activate: press theÃbutton.
The indicator lamp in the Ãbutton lights
up. Automatic air distribution and airflow are
activated.
X To deactivate: press the_button.
or X Press the IorK button.
The indicator lamp in the Ãbutton goes
out.
X To switch to manual mode:press the _
button. Setting the temperature
Differen ttemperatures can be set for the driv-
er's and front-passenger sides.
X Turn the key to position 2(Ypage 96) in
the ignition lock.
X Adjust control :orB (Ypage 84) to the
desired temperature.
Change the temperature settingo nly in small
increments. Start at 22 †. Setting the air distribution
Air distribution settings P
Directs the airflow throug hthe centre
and side ai rvents
O Directs the airflow throug hthe footwell
ai rv ents
S Directs the airflow throug hthe centre
and side ai rvents as well as the footwell
ai rv ents
¯ Directs the airflow throug hthe demister
vents
a Directs the airflow throug hthe footwell
and demister vents 86
Operatin
gthe climat econtrol systemClimat econt rol
Page 93 of 261
Flammable materials such as leaves, grass or
twig smay ignite if they come into contact
with:
R hot parts of the exhaust system
R the exhaust ga sitself
There is arisk of fire.
Whe nthe auxiliary heating is switched on,
make sur ethat:
R no flammable materials come into contact
with hot vehicle components
R the exhaust ga scan escape from the
exhaust pip eunhindered
R the exhaust ga sdoesn ot come into contact
with flammable materials.
! Operating the auxiliary heating/ventilation
draws on the vehicle battery. After yo uhave
heated or ventilated the vehicle amaximum of
two times ,drive for alonger distance.
i Switch the auxiliary heating on regularly –
once amonth –for abou tten minutes.
The auxiliary heating heats the ai rinthe vehicle
interior to the set temperature. Thi soccur swith-
ou tu sing the hea tofthe running engine. The
auxiliary heating is operate ddirectly using the
vehicle' sfuel. For this reason, the fue ltank level
mus tbea bove the reserve rang etoensure that
the auxiliary heating functions.
The auxiliary heating or auxiliary ventilation
automaticall yadjusts to changes in tempera-
ture and weathe rconditions. For this reason,
the auxiliary heating could switch from ventila-
tion mode to heating mode or from heating
mode to ventilation mode.
The auxiliary heating switches off automatically afte r30m inutes. Thi stime period can be
altered .Todot his, consult aquali fied specialist
workshop.
You cannot use the auxiliary ventilation to cool
the vehicle interior to atemperature lower than
the outsid etemperature.
Before switchin gonX
Turn the key to position 2(Ypage 96) in
the ignition lock.
X Set the desired temperature.
Auxiliary heating or auxiliary ventilation can also
be switched on if the manually set climate con- trol is activated. Optimum comfort is attained by
settin gthe syste mtoautomatic mode. Set the
temperatur eto22†.
The auxiliary heating or auxiliary ventilatio ncan
be switched on/off using the button on the
centr econsol eorthe remote control.
The on-board compute rcan be used to specify
up to thre edepartur etimes ,one of which may
be preselected (Y page 139).
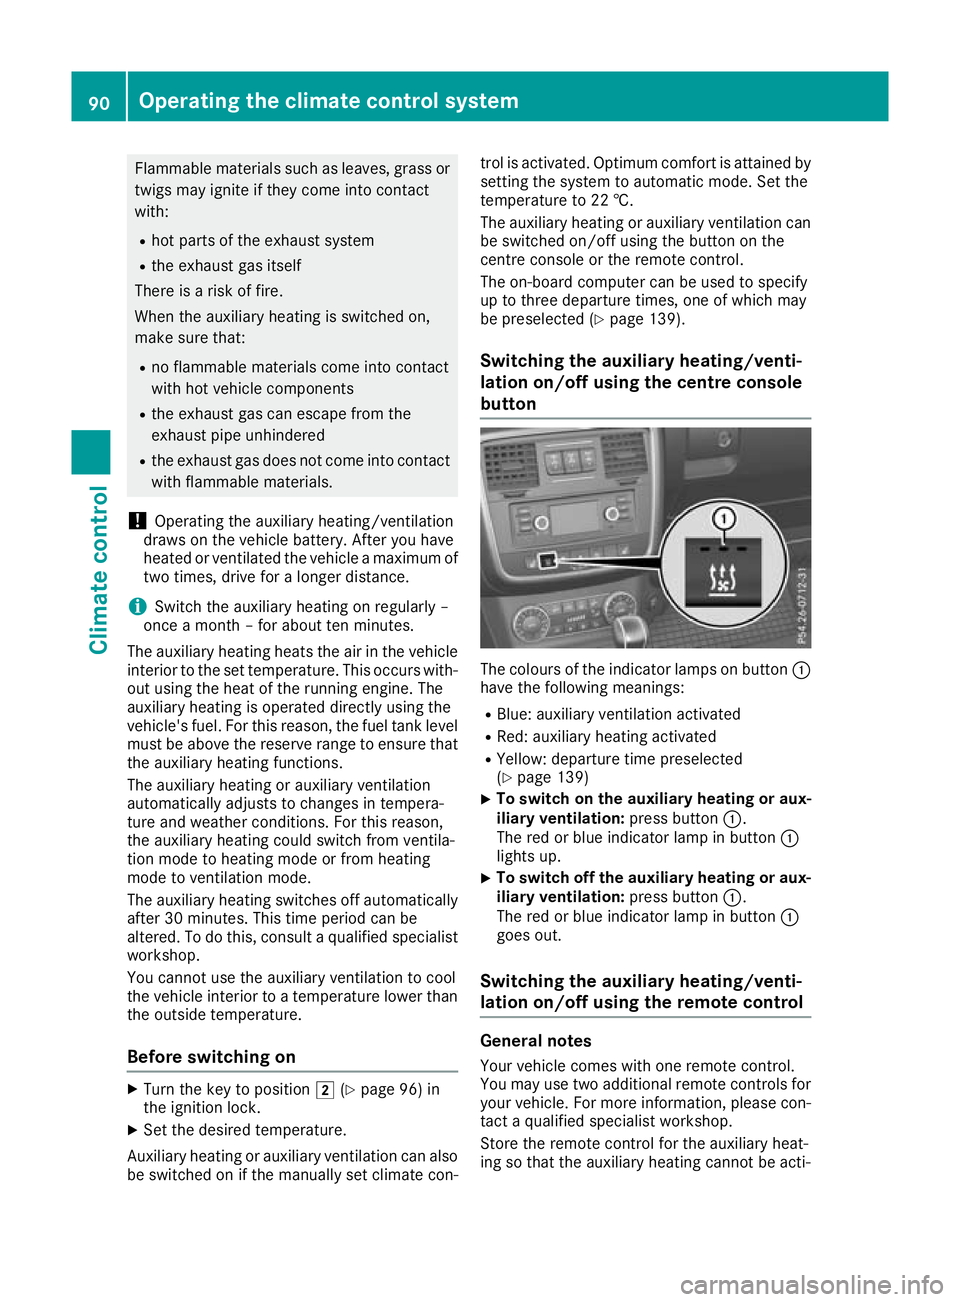
Switchin gthe auxiliary heating/venti-
lation on/off using the centre console
button Th
ec olours of the indicator lamps on button :
have the following meanings:
R Blue: auxiliary ventilation activated
R Red: auxiliary heating activated
R Yellow: departure time preselected
(Y page 139)
X To switch on the auxiliar
yheating or aux-
iliary ventilation: press button:.
The red or blue indicator lamp in button :
lights up.
X To switch off the auxiliar
yheating or aux-
iliary ventilation: press button:.
The red or blue indicator lamp in button :
goes out.
Switching the auxiliar yheating/venti-
lation on/off using the remotec ontrol General notes
Your vehicle comes with one remot econtrol.
You may use two additional remote controls for
yourv ehicle.For more information, please con-
tact aqualified specialist workshop.
Store the remote control for the auxiliary heat-
ing so that the auxiliary heating cannot be acti- 90
Operating the climate control systemClimate control