Page 65 of 264

M N
i? co
-Objects fall ing from t he roof of a vehicle can
cause a crash and personal injury.
- Only mount the roof rack on the designated
locations on the roof
c> fig. 66.
- The roof rack system must be insta lled ex
act ly according to the instructions provided .
- When driving with a roof rack system,
changes to the center of g ravity and wind re
sistance can change the vehicle handling
and lead to a collision. A lways adapt your
dr iv ing and your speed to the current condi
t ions .
- Your vehicle warranty does not cover any
damages to the vehicle caused by using roof
racks or mounting structures not approved
by Aud i for your vehicle. The same applies to
damage resulting from incor rect roof rack
i nsta llation.
- Always check the roof rack mount ings and
hardware before each t rip and dur ing a tr ip
to make su re eve ryth ing is securely t ight
ened.
If necessary, re tighten the mo untings
and c he ck the en tire system from time to
time.
- After mounting a roo f rac k system, o r when
you transport objec ts on the roof of your ve
hicle, the heig ht of the vehicle is nat urally
increased. Be caref ul when driving under
l ow bridges or in parking garages for exam
ple. This cou ld cause damage to the load
and even t he vehicle itself.
- Make sure that the open rear lid and the
sunroof do not come into contact w ith ob
jects on the roof.
Loading the roof rack
Always distribute loads evenly. Make sure any thing on the roof rack is securely tied down.
~ Always dist ribute the loads on the roof rack
evenly.
~ Always attach items to the roof rack securely
before you drive
off .
~ The maximum perm iss ible roof weight is 165 lb ..,.,
~ ( 7 S kg ). The roof weight is the total of the ,....,
Seat s and stor age
weight of the roof rack, the attachments and the
cargo you are carrying . You must a lso not exceed
the max imum load weight for the roof rack you
are using.
When using a roof rack system which has a lower
load carrying capacity, you must not use up the
total max imum permissib le load carrying capaci
ty specified above. Instead, you should load the
roof rack system only to the maximum capacity
specified by the manufacturer of the roof rack
system .
A WARNING
= -Weak, damaged or improper straps used to
secure items to the roof ra ck can fail d uring
h ard braking or in a collision and cause ser i
ous persona l injury.
- Ma ke s ure t he roof rack is in stalled exac tly
as specified above
I::!) page 62.
- Always use s uitable mount ing straps for se
cur ing items to the roof rack to help p revent
items from sh ifting o r flying forwa rd .
- It ems on the roof rac k must a lways be se
cure ly moun ted.
- T he use of a roof rack can negatively affect
the w ay a vehicle handles. Ca rgo th at is
large, heavy, bu lky, long or fla t will have a
g reater negative inf luence on the vehi cle's
ae rodynamics, center of gravity and overall
handling. Always drive slowly, avoid sudden
brak ing and mane uvers when transporting
cargo on the roof of your veh icle.
- Never exceed the maxim um permissible
load carrying capacity of the roof of your ve h icle, the permiss ible axle weights and the
perm issib le tota l we ight of your vehicle
I::!) page 241, Weights .
@ For the sake of the environment
As a result of the increased wind resistance
created by a roof rack , your vehicle is using
fuel u nnecessarily . So remove the roof rack af
ter using it.
63
Page 66 of 264

Seats and storag e
Luggage compartment
General information
A WARNING
Read and follow the impo rtant safety preca u
tions on
r=;, page 118, Storing cargo correctly.
Enlarging the luggage compartment
App lies to veh icles: w ith fol ding rear sea tback
The backrests can be folded forward separately
or together using the two release levers .
•
Fig . 67 Luggage compartment: release lever
F ig . 68 Backrest : release lever, securing knob and latch
Release lever in luggage compartment
• Pull the release leve r r=;,fig. 67 in the direction
of the arrow to fold the backrest forward.
R elease handle on the backrest
• Pull the release lever @ c::> fig. 68 in the direc-
tion of the a rrow to fold t he backrest forward.
Folding the backrest back into the upright
posit ion
• Fol d the backrest back up again until it latches
and the red mar kin g @ is no longer vis ib le
r:!;, A .
64
You can lock the backrest when it is latched in
place using the mechanical key
r=;, page 33 ©
r=;, fig. 68 . This prevents any access to the luggage
compartment from the vehicle interior .
You can on ly en large the luggage compartment if
the backrest is not locked.
A WARNING
- The backrest must always be secure ly latc h
ed so that the safety belt of the center seat
ing position can work proper ly to help pro
tect the occupant.
- The backrest must be securely latched in po
sition so that no items contained in the lug
gage compartment can slide forward upon
sudden b rak ing .
- Always check whether the latch is fully en
gaged by pu lli ng the seatback forward .
- Never a llow safety belts to become dam
aged by be ing caught i n door or seat hard
ware.
- Torn or frayed safety be lts can tear and
damaged be lt hardwa re can b reak in a crash .
I nspect the belts periodically. Belts show ing
damage to webbing, bindings, buckles, or
retractors must be re placed.
(D Note
- If you move the front seat back when the
rear seat backrest is folded forward, you
cou ld damage the head res traints on the
rear se at.
- Slide the be lt g uide on the o utside safety
belt all t he way up befo re folding the back
res t back forw ard. Make sure t he se at belt is
no t pin ched or damaged when the rear seat
backrest if folded back. Other objects
should be removed from the rear seat bench
to protect the seatback from damage.
Page 67 of 264

M N
0 loo
rl I.O
"' N
"' rl
Tie-downs and cargo net
Applies to vehicles: with cargo net
The cargo net prevents small objects from slid
ing .
Fig. 69 Luggage compartmen t: cargo net stretc hed out
Fig. 70 Luggage compartment: cargo net at the top of the
luggage compar tment
Net stretched out
.,. To secure objects wit h the cargo net, hang the
front hooks on the net in the t ie-downs first
and then hang the rear hooks~
fig. 69 .
.,. Read and heed all WARNI NGS ¢page 118,
Storing cargo correctly .
Net at the top of the luggage comp artment
.,. Hang the hooks on the cargo net in the tie
downs on the floor at the rear of the luggage
compartment ~
fig. 70.
.,. Fold down the hooks at the upper area of the
luggage compa rtment down, pull the net up
and hang the eyele ts on the net on the hooks .
.,. Read and heed all WARNINGS
~ page 118,
Storing cargo correctly.
You can a lso use the hooks c;, fig . 70 to hang bags
an d other objects. If noth ing is hung on the
hooks, they will fo ld back in by themselves .
Seats and storage
A WARNING
-~
Weak, damaged or improper straps used to
secure items to tie-downs can fail duri ng ha rd
braking o r in a coll is ion and cause serious per
sona l injury .
-Always use su itable reta ining straps and
properly secu re items to the tie-downs in
the luggage compa rtment to he lp prevent
items from sh ifting or flying forward.
- Never attach a ch ild s eat tether strap to a
tie-dow n.
- For strength-re lated reasons, the mou nti ng
hooks can only be used to secure objects
weighing up to 10 lb. (5 kg). Heav ier objec ts
will no t be adequately secure d -there is a
ris k of injury.
Ski sack
Applies to vehicles: with ski sack
Long objects such as skis or snowboards can be
transported in the ski sack.
Fi g. 7 1 Backrest : pass-t hro ug h cover
.,. To load the ski sack in the vehicle, fold the rear
center armrest down .
.,. Fold the pass-through cover down
c;, fig. 71 .
.,. Slide the ski sack from the luggage compart
ment through the opening w ith the zipper at
t he rear.
.,. Sec ure the ski sac k
¢page 66.
A WARNING
Objects must only be transported in the ski
sack since the sk i sack can be secured . Individ
ua l objects cannot be secured. There is a risk
of injury.
-
65
Page 68 of 264

Seats and storage
@ Tips
-You can open the pass-through from the
luggage compartment. Push the release
button down and push the cover forward.
- You can lock or unlock the pass-through us
ing the mechanical key. This prevents any
access to the luggage compartment from
the vehicle interior.
Securing the ski sack
App lies to veh icles: w ith s ki sac k
The ski sack must be secured in the luggage com
partment.
Fig. 72 Luggage compartmen t: Securing t he s ki sack
Fig. 73 Rear bench seat: securing the sk i sack
There are two straps with hooks on the bottom
side of the ski sack
~ fig. 72 @ . There is also a
securing strap@~
fig. 73 on the sack.
.. To secure the ski sack in the luggage compart
ment, hang the hooks in the rear tie-downs
~fig. 72.
.. Tighten the strap on the ski sack to prevent the
objects in the sack from sliding
~ fig. 73.
66
A WARNING
-The ski sack is intended only for the trans
portation of skis and other light objects. To
reduce the risk of serious personal injury,
never transport heavy or pointed objects in
the ski sack.
- When braking rapidly or during an accident,
the load could be displaced and cause injury to occupants.
- Sharp edges on the load must be covered
for protection. Always fasten the belt tightly
around the sack and its contents~
fig. 73.
-For safety reasons, do not transport more
than two pairs of skis in the ski sack.
- You must secure the ski sack with the strap
after loading.
- Make sure that all objects you are transport
ing in the pass-through are secured. Other
wise they could slide around during sudden
braking maneuvers and cause injuries.
(D Tips
- Never stow the ski sack away when it is still
wet or damp (for example, snow melting
from skis). Allow it to dry completely before
stowing it away.
- When transporting skis or snowboards,
tighten the securing strap between the
bindings.
- Position skis in the ski sack with the pointed
ends facing the front and ski poles with the
pointed ends facing the rear.
- You can lock or unlock the pass-through us
ing the mechanical key. This prevents any
access to the luggage compartment from
the vehicle interior.
Parcel shelf
The parcel shelf behind the rear seatback can be
used to carry light items of clothing.
A WARNING
No heavy or hard objects should be placed on
the parcel shelf. They are a hazard to the vehi
cle occupants during sudden braking. The is a risk of injury.
Page 69 of 264
M N
i? co ,...., \!) ..,.,
N ..,., ,....,
(D Note
Please make s ure that t he heat ing wires for
t he rear window defogger are not damage by
ab ras ive objects.
@ Tips
To ensure problem -free vent ilation, the venti
lation slots between t he rear w indow and t he
pa rcel she lf m ust not be covered.
Seats and storage
67
Page 70 of 264

Warm and cold
Warm and cold Climate control system
Description
The climate control system warms, cools and
adds humidity to the air in the vehicle interior. It
is the most effective when the windows and sun
roof are closed. If there is a build-up of heat in
side the vehicle , ventilation can help to speed up
the cooling process.
In all heating mode functions except
defrost, the
blower only switches to a higher speed once the
engine coolant has reached a certain tempera
ture.
Condensation from the cooling system can drip
and form a puddle of water under the vehicle.
This is normal and does not mean there is a leak.
Pollutant filter
The pollutant filter removes pollutants such as
dust and pollen from the air.
The air pollutants filter must be changed at the
intervals specified in your Warranty & Mainte
nance booklet, so that the air conditioner can
properly work.
If you drive your vehicle in an area with high air pollution , the filter may need to be changed
more frequently than specified in your Audi War
ranty
& Maintenance booklet. If in doubt, ask
your authorized Audi Service Advisor for advice.
Key coded settings
The climate control settings are automatically
stored and assigned to the remote control key
that is in use .
.8, WARNING
Reduced visibility is dangerous and can cause
accidents.
- For safe driving it is very important that all
windows be free of ice, snow and condensa
tion.
68
- Completely familiarize yourself with the
proper use and function of the heating and
ventilation system and especially how to de
fog and defrost the windows .
- Never use the windshield wiper/washer sys
tem in freezing weather until you have
warmed the windshield first, using the heat
ing and ventilation system . The washer solu
tion may freeze on the windshield and re
duce visibility .
(D Note
-If you suspect that the air conditioner has
been damaged, switch the system off to
avoid further damage and have it inspected
by a qualified dealership.
- Repairs to the Audi air conditioner require
special technical knowledge and special
tools. Contact an authorized Audi dealer for
assistance.
@ For the sake of the environment
By reducing the amount of fuel you use, you
also reduce the amount of pollutants emitted
into the air.
(D Tips
-Keep the air intake slots (in front of the
windshield) free from ice, snow and debris
in order to maintain the proper function of
the climate control system.
- The energy management system may switch
the seat heating* or rear window defroster
off temporarily. These systems are available
again as soon as the energy balance has
been restored.
- Air escapes through vents under the rear
window. When placing items of clothing on
the luggage compartment cover, ensure
that the openings are not covered.
Page 71 of 264
.
Fig. 74 Automatic cl imate control system: control
Fig. 75 3-zone d")
Warm and cold
Operation
We recommend pressing the !AUTO I button and setting the temperature to 72 °F (22 °C).
Fig. 74 Automatic cl imate control system: control
Fig. 75 3-zone del ux e automatic climate controt•: controls
Press the buttons to turn the functio ns on or off.
Use the dials to adjust the temperature, the
b lower speed and the air distrib ution . The LED in
a button will light up when the function is
switched on. The settings are displayed for a few
seconds in the radio or MMI* display.
In vehicles with a 3-zone del uxe automat ic cl i
mate control systems*, the dr iver and front pas
senger side can be adjusted separately. The set·
tings are also disp layed in the climate control
"' system display.
N
0 loo
rl I.O
"' N
"' rl
IOFF I Switching the climate control system
on/off
The i OFF i button switches the climate contro l
system on or off. It also sw itches on when you
press the knob. Airflow from outside is blocked
when the climate control system is switched off.
IA/Cl Switching cooling mode on/off
The air is not coo led and humidity is not removed
when cool ing mode is switched off. This can
cause fog on the windows . The cooling mode is
switched off automatically at low outside tern· peratures. .,.
69
Page 72 of 264

Warm and cold
l= I Swit ching recir culation m ode on /off
In recirculation mode, the air ins ide the vehicle is
circu lated and filtered . This prevents the unfil
tered air outside the vehicle from entering the
ve hicle interior . We recommend switching recir
culation mode on when driving through a tunne l
or when sitting in traffic
c:> ,&. .
The IAU TOI button or lllll> F RONT I button switches
recirculation mode off .
IAUTOI Switching automatic mode on
Automatic mode ma inta ins a constant tempera
ture inside the vehicle. A ir temperature, airflow
and ai r distribution are controlled automatica lly .
Adjusting th e tempe ratur e
Temperatures between 60 °F (+16 °C) and 84 °F
( + 28 °C) can be set. Outside of this range,
LO or
HI will appear in the cl imate control system dis
p lay. At both of these settings, the climate con
trol system r uns continuously at maximum cool
i n g or heating power. There is no temperat ure
regulation.
~ Ad justing the airflow
You can adjust the a irf low manually to su it yo ur
needs . To have the airf low regulated automatica l
ly, press the
IAUTO I button .
~ Adjusting the air distribution
You can manually se lect the vents where the air
will flow. To have the air distr ibution reg ulated
automatically , press the
!AUTO ! button.
QJ Adjusting seat h eating *
Pressing the button sw itches the seat heating on
at the h ighest setting (level 3) . The LEDs indicate
the tempe ratu re leve l. To reduce the tempe ra
ture, press the button again . To switch the seat
heating off, press the button repeatedly unt il the
L ED turns off .
Afte r 10 minutes, the seat heat ing automat ica lly
sw itches from level 3 to leve l 2.
~ Adjust ing seat ventilation*
Pressing the button switches the seat ventilation
on at the highest setting (level 3) . The LEDs indi-
70
cate the ventilation level. To reduce the ventila
tion level, press the button again. To switch the
seat ventilation off , press the button repeatedly
u nt il the LED turns off .
I@ FRONT I Switch the defro ste r on /off
The w indshield and side windows are defrosted
or cleared of condensation as q uickly as possib le.
The maximum amount of air f lows mainly from
the vents below the windshield. Recirculation
mode switches off. The temperature should be
set to 72 °F (22 °C) or h igher. The temperature is
controlled automat ically.
The
! AUTO ! button switches the defroster off.
lliil REAR I Switch ing rear window he ater on /
off
The rear window heater on ly operates when the
engine is runn ing . It switches off automatically
after a few minutes, depending on the outside
temperature.
To prevent the rear window heater from switch ing off automatically, press and hold the
I Cliil REARI
button for more than 2 seconds. This remains
stored until the ignit ion is switched off.
Air vents
You can open and close the center and rear air
vents using the th umbwhee ls . The levers adjust
the d irection of the airflow from the vents.
In vehicles with a 3-zone deluxe automa tic cli
mate control system*, you can adjust the air tem
perature in the rear by turning the thumbwhee l
toward the red side to make it warmer or toward
the blue side to make it cooler.
A WARNING
- Do not use the recircu lation for extended
periods of time. The windows could fog up
since no fresh air can enter the vehicle. If
the wi ndows fog up, press the air rec ircula
tion button again immed iate ly to sw itch off
the air recirc ulation func tion or selec t de
frost.
- I ndivid ua ls w ith red uced sensitivity to pain
or tempera ture could develop burns when
using the seat heating f unction . To reduce
-
 1
1 2
2 3
3 4
4 5
5 6
6 7
7 8
8 9
9 10
10 11
11 12
12 13
13 14
14 15
15 16
16 17
17 18
18 19
19 20
20 21
21 22
22 23
23 24
24 25
25 26
26 27
27 28
28 29
29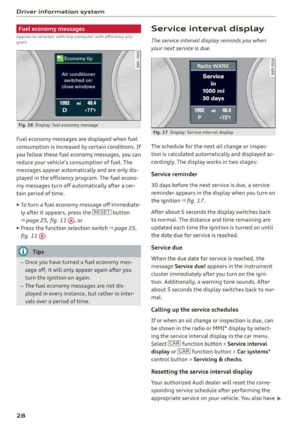 30
30 31
31 32
32 33
33 34
34 35
35 36
36 37
37 38
38 39
39 40
40 41
41 42
42 43
43 44
44 45
45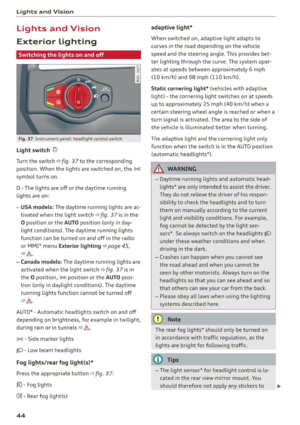 46
46 47
47 48
48 49
49 50
50 51
51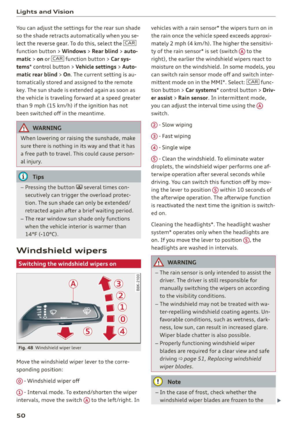 52
52 53
53 54
54 55
55 56
56 57
57 58
58 59
59 60
60 61
61 62
62 63
63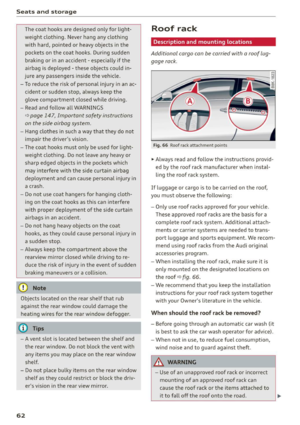 64
64 65
65 66
66 67
67 68
68 69
69 70
70 71
71 72
72 73
73 74
74 75
75 76
76 77
77 78
78 79
79 80
80 81
81 82
82 83
83 84
84 85
85 86
86 87
87 88
88 89
89 90
90 91
91 92
92 93
93 94
94 95
95 96
96 97
97 98
98 99
99 100
100 101
101 102
102 103
103 104
104 105
105 106
106 107
107 108
108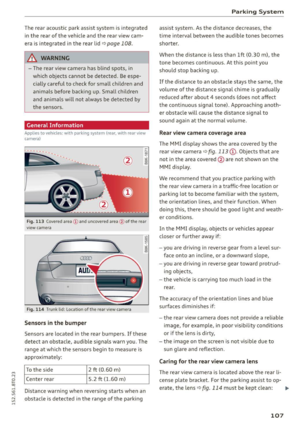 109
109 110
110 111
111 112
112 113
113 114
114 115
115 116
116 117
117 118
118 119
119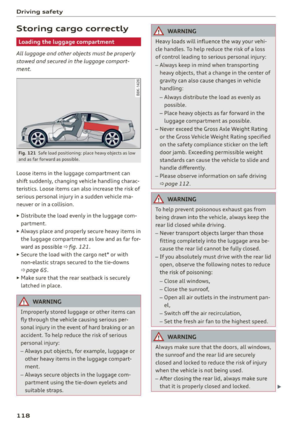 120
120 121
121 122
122 123
123 124
124 125
125 126
126 127
127 128
128 129
129 130
130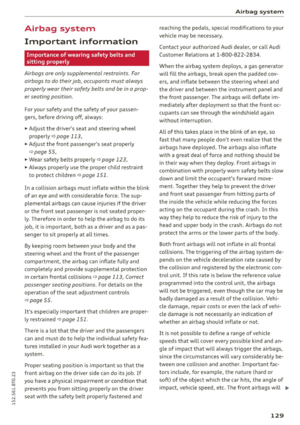 131
131 132
132 133
133 134
134 135
135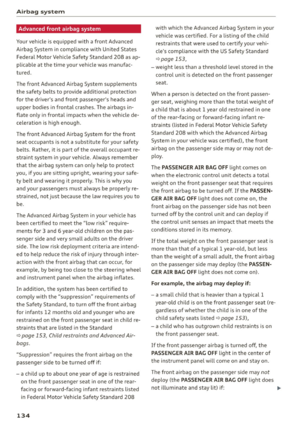 136
136 137
137 138
138 139
139 140
140 141
141 142
142 143
143 144
144 145
145 146
146 147
147 148
148 149
149 150
150 151
151 152
152 153
153 154
154 155
155 156
156 157
157 158
158 159
159 160
160 161
161 162
162 163
163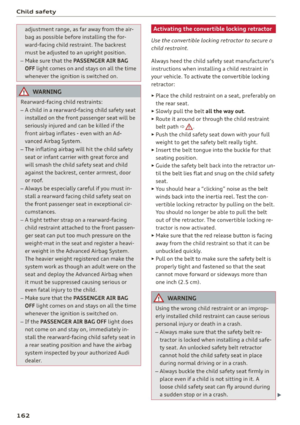 164
164 165
165 166
166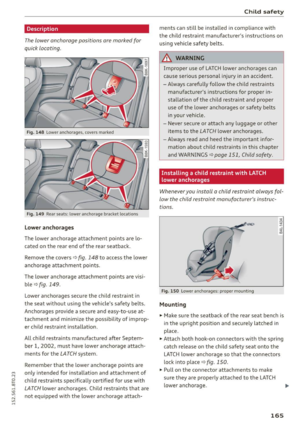 167
167 168
168 169
169 170
170 171
171 172
172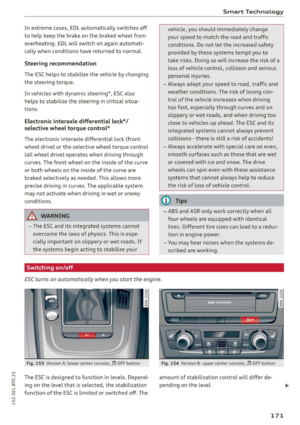 173
173 174
174 175
175 176
176 177
177 178
178 179
179 180
180 181
181 182
182 183
183 184
184 185
185 186
186 187
187 188
188 189
189 190
190 191
191 192
192 193
193 194
194 195
195 196
196 197
197 198
198 199
199 200
200 201
201 202
202 203
203 204
204 205
205 206
206 207
207 208
208 209
209 210
210 211
211 212
212 213
213 214
214 215
215 216
216 217
217 218
218 219
219 220
220 221
221 222
222 223
223 224
224 225
225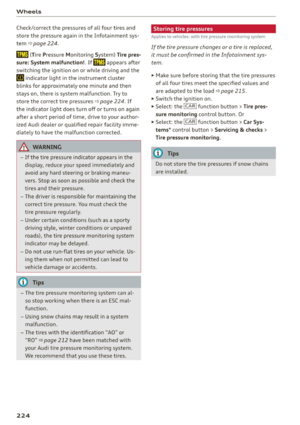 226
226 227
227 228
228 229
229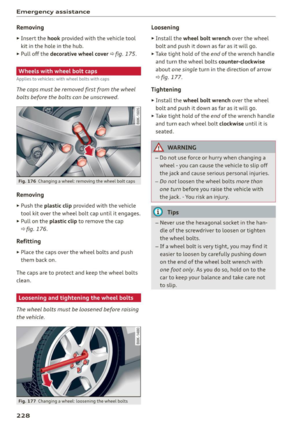 230
230 231
231 232
232 233
233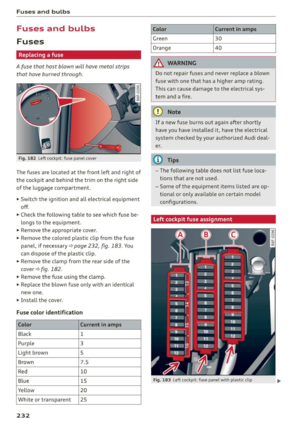 234
234 235
235 236
236 237
237 238
238 239
239 240
240 241
241 242
242 243
243 244
244 245
245 246
246 247
247 248
248 249
249 250
250 251
251 252
252 253
253 254
254 255
255 256
256 257
257 258
258 259
259 260
260 261
261 262
262 263
263 ..,.,
N ..,., ,....,
(D Note
Please make s ure that t he heat ing wires for
t he rear window defogger are not damage by
ab ras ive objects.
@ Tips
To ensure problem")