Page 105 of 264

M N
0 loo
rl I.O
"' N
"' rl
sporty sh ifting charac ter istics . The 5 gear
position engages automatically.
- In vehicles that have dynamic steering*, op
erating noise is hea rd when starting or sto p
p ing the engine . This does not indicate a
problem.
Selecting the driving mode
Applies to vehicles: with Audi drive select
You con choose between Comfort , Auto , Dynam·
ic
and Individual * modes.
N N 0
~=== =:::: ~ ~
drive I se lect _ ~ -~-
F ig . 109 Ce nter co nso le : Con trol fo r A udi dri ve se lect
F ig. 110 MMI*: Audi drive se lect
Adjusting the Individual mode
Applies to vehicles: with MMI an d Aud i d rive select
Aud i drive select
.,. To set the mode, press the r.:i:.~ button
~ fig . 109 multip le times until the des ired
mode is displayed in the instrument cl uster . Or
.,. In the M MI*, se lect : ICARlfunction button>
Comfort , Auto , Dyn amic or Individual *.
In veh icles without the MMI*, the r:l:e'i button is
fo und underneath the shift/selector lever.
You can change the driving mode when the vehi
cle is stationary or while dr iving.
If traffic per
mits, after c hanging modes, briefly take your
foot off the acce lerator pedal so that the recently
selected mode is also activated for t he engine
and transmission .
Comfort -provides a comfort-o riented veh icle
setup and is suited for long drives on highways.
Auto -provides an overall comfo rtable ye t dy
nam ic dr iving feel and is suited for every day use .
Dynamic -gives the driver a spor ty driving feel
and is suited to a sporty dr iv ing style.
Individual * -~ page 103 .
.&, WARNING
-Pay atte ntion to tra ffic when op era ti ng d rive
se lect to preven t pote ntial r is k of an a cci dent.
You con personally specify the vehicle setup in the MMI* .
.,. Se lect the ICAR I function bu tton > Set individu·
al
c o ntro l bu tton. Once yo u se lec t the me nu,
yo u will a utoma tical ly dr ive in the
individual
mode.
Systems Comfort
Engine/Transmi ssion
balan ced
Steering comfo rtable
Dynamic steering* comfor table/ indirect T
he equipment in you r vehicle will determine
wh ich se tt in gs y ou can adjust. The following ta
ble p rov ides an overview of the charac teristics of
each driving mode.
Auto Dynamic
balanced sporty
balanced sporty
ba lanced/direct sporty/direct
103
Page 106 of 264
Audi drive select
Systems Comfort
Adaptive dampers *
comfortable
Sport differential* balanc ed
Adaptive cruise control* comfortable
Engine sound* subtle
al Sub tle in t he d riving posit ion D and sp or ty in the driv ing pos it io n 5.
(D Tips
Your Individual* mode settings are automati
cally stored and assigned to the remote con
trol key being used.
104
Auto Dynamic
balanced sporty
agile sporty
balanced sporty
subt le/sporty
3> sporty
Page 107 of 264
 1.1\"1
N 1.1\"1 ,....,
Parking System
Parking system
Applies to vehicles: with parking system
Different park assist systems may be used for
parking or maneuvering,")
M N
i? co ,...., \!) 1.1"1
N 1.1"1 ,....,
Parking System
Parking system
Applies to vehicles: with parking system
Different park assist systems may be used for
parking or maneuvering, depending on the vehi
cle's features.
Parking system (rear)*:
For the parking system (rear), the acoustic park
assist system is installed in the rear of the vehicle
¢page 105.
The rear parking assist system uses ultrasonic
sensors to determine the distance of the vehicle
from a detected obstacle. There are a total of
four sensors located on the rear bumper (two in
the middle and two on the sides) .
Parking system (rear, with rear view
camera)*:
For the parking system (rear, with rear view cam
era),
the rear acoustic park assist system is inte
grated in the rear of the vehicle and the rear view
camera is integrated in the rear lid ¢page 108.
The parking system (rear, with rear view camera)
uses ultrasonic sensors to determine the distance
of the vehicle from a detected obstacle. There are
a total of four sensors located on the rear bump
er (two in the middle and two on the sides).
A WARNING
-
Make sure the sensors are not covered by
stickers, deposits or any other obstructions as
it may impa ir the sensor function. For infor
mation on cleaning, refer to
¢page 184.
Rear parking system
Rear acoustic park assist
Applies to vehicles: with parking system (rear)
The rear acoustic park assist warns you of obsta
cles or objects behind your car.
Description
The rear acoustic parking assist system deter
mines the distance o f the vehicle from an obsta-
Parking System
cle using ultrasonic sensors. There are 4 sensors
in the rear bumper.
T he range at wh ich the sensors start to measure
is
about:
To the side 2 ft (0.60 m)
Center rear 5.2
ft (1.60 m)
Activation
Acoustic parking assist is act ivated automatically
when
reverse gear is engaged. A brief tone con
firms that the system is activated.
Warning tones
Distance warn ing is given by warning tones which
are generated by the rear signal generator. The
vo lume and the p itch of the warning tones can be
adjusted in the MMI*
¢page 106.
Reversing
Distance warning when reversing starts when an
obstacle is detected in the range of the parking
ass ist system . As the distance decreases, the
time interval between the audible tones becomes
shorter.
When the distance is less than 1ft (0.30 m), the
tone becomes cont inuous . At this point you
should stop backing up .
Please note that low objects already signalled by
a warning can d isappear from the system's detec
tion range and will not continue to be signalled.
If the distance to an obstacle remains the same,
the volume of the distance warning is gradually
reduced after about 4 seconds (this does not ap
ply in the continous tone range). Approaching an
other obstacle will result in the distance warning
sounding at the normal volume again.
Malfunctions in the system
If a warning tone is audible for about five sec
onds when you turn on the ignition, there is a
malfunction in the system. Have the problem cor
rected by your author ized Audi dealer.
Keep the sensors in the rear bumper clean and
free from ice so that the acoustic park assist sys-
tem can function properly. .,,.
105
Page 108 of 264

Parking Sy stem
_& WARNING
- Sensors have dead spaces in which objects
cannot be detected. Be especia lly alert for
small chi ldren and animals, s ince they are
not always detected by the sensors .
- The acoustic parking system is not a substi
tute for the dr iver's own caution and alert
ness. Ultimate respons ibility always remains
with the driver during parking and sim ila r
maneuvers. A lways watc h where yo u are
dr iv ing .
- You should always adjust the vo lume and
frequency of the warning tones so that yo u
can eas ily hea r the acoust ic distance wa rn
ing even if the radio is playing, the air-co ndi
ti oner blower is on High or there is a high
level of o utsid e noise.
- Chec k the settings w henever anyone e lse
has driven t he veh icle befo re you.
(D Note
- Remember t hat low o bstacles for wh ich a
warning has already been issued may "dive"
below the system 's sens ing zone if the vehi
cle is being backed up close r. In this case,
the warn ing sound shutting off does
not in
dicate that you have cleared the obstacle .
Instead, impact is imm inent.
- Objects such as trailer h itches, chains , nar
r ow posts o r fences covered by a thin laye r
of pa int may n ot a lways be detec ted by t he
system. They can still damage you r veh icle
wi tho ut warn ing.
@ Tips
Keep the sens ors in the rear bumper clean
a nd free of sn ow and ice so tha t the acou stic
parking a ssi st system can f uncti on prope rly.
Adjusting the warning tones
Applies to vehicles: with park in g system (rea r)
The warning tones can be adjus ted in the MMI*.
• Select : I CARI function button > Parking syst em.
Or
• Se lect :
I CARI funct ion button > Car system s*
control button> Driver assi st > Parking aid .
106
-Rear volume -rear sensor vo lume
- Rear frequency -rear senso r frequency
- Music volume while parking -when the pa rk-
ing sys tem is switched on, the vo lume of the
ac tive a udio source is lowered .
The newly ad justed value is briefly hea rd from
the sig nal ge nerato r. T he settings are a utomat i
ca lly store d and assigned to the master key w ith
remo te con trol.
Rear parking system
with rearview camera
Introduction
Applies to vehicles: with parking system (rear, with rear view
camera)
Fi g. 1 11 Parkin g mode 1: reve rse park in g
Fi g. 11 2 Park in g mode 2: para ll el park ing
.... .... 0
-
"' :8
Vehicles with the parking system are equipped
with a
rear view camera in addit ion to the aco us
tic parking system.
You can choose between two modes to assist you
with parking. For examp le, you can use "parking
mode
l" when parking in a parking space or ga
r age
c> fig . 111. When you want to park parallel
to t he edge of the st reet, select "park ing mod e
2" c::;;, fig . 112. ...
Page 109 of 264

M N
0 loo
rl I.O
"' N
"' rl
The rear acoust ic park assist system is integrated
in the rear of th e vehicle and the rear vi ew cam
era is integ rated in the rear lid¢
pag e 108.
.&_ WARNING
-
- The rear view camera has blind spots, in
which objects cannot be detected. Be espe
c ially carefu l to check for small children and
animals before backing up . Small children
and animals wi ll not a lways be detected by
the sensors.
General Information
Applies to vehicles: with parking system (rear, with rear view
camera)
F ig . 113 Cove red area (!) and uncov ere d ar ea @ of the r ear
v iew ca mera
0
0
Fig. 114 Trunk lid : Location of the rea r view camera
Sensors in th e bumper
Sensors are located in the rear bumpers . If these
detect an obstacle, audible s ignals war n you . The
r ange at whi ch the sensors beg in to measure is
a pproxim ate ly :
To the side
2 ft (0 .60 m)
Center rea r 5.2 ft (1.60 m)
D istance warning when revers ing starts when an
obstacle is detected in the ra nge of the parking
Parking Sy stem
ass ist system. As the distance decreases, the
time int erval be tween the audible tones becomes
shorter.
When the distan ce is less than 1ft (0.30 m), the
tone becomes cont inuous. At this point you
shou ld stop backing up .
If the distance to an obst acle stays the same, the
vo lume of the dis tance s ignal ch ime is gradually
reduced afte r abo ut 4 seconds (does not affect
t h e continuous signal tone) . Approaching anoth
er obstacle w ill cause the distance s ignal to
sound again at the normal volume.
R ea r v iew cam era cov erage area
The M MI display shows the area covered by the
rear view camera ¢
fig. 113 (D. Objects that are
not in the area covered @are not shown on the
MMI display.
We recommend that you pract ice pa rking w ith
the rear view camera in a traffic -free location or
parking lot to become fami liar with the system,
the o rientat ion lines , and their function . When
doing t his, there should be good light and weath
er conditions.
In the MMI display, objects or vehicles appear
close r or furthe r away if:
- you a re d riving in reverse gear from a leve l su r
face onto an incline, o r a downward s lope,
- you are driving in reverse gear tow ard p rotr ud
ing objects,
- the vehicle is car ry ing too mu ch load in the
rea r.
T he acc uracy of the o rientation lines and b lue
su rfaces diminishes if :
- the rear view camera does not provide a reliable
image, fo r example , in poor visib ility condi tions
or if the lens is dirty ,
- the image on the screen is not vis ib le due to
sun glare and reflection .
Caring for the rear view camera len s
The rear v iew camera is located above the rear li
cense p late bracket. For the parking ass ist to op-
erate, the lens ¢
fig. 114 mu st be kept clean : 1111>
107
Page 110 of 264

Parkin g Sys tem
-Dampen the lens with a househo ld alcoho l
based glass cleaner, and clean the lens with a
dry cloth
c:::> 0 .
- Remove snow with a hand brush and ice pref
erably with a de -icing spray
c:::> 0 .
A WARNING
- The parking aid cannot replace the driver's
attention. The dr iver alone is responsib le for
parking and s imilar driving maneuvers.
- Always keep your eyes on the veh icle's sur
roundings, us ing the rear view m irror as
well.
- Do not a llow yourself to be distracted from
traff ic by the rear view camera pictures.
- If the posit ion and the installation ang le of
the camera has changed, for example, after
a rear end collision, do not continue to use
the system for safety reasons. Have it
checked by a qualified dealership.
(D Note
- Low obstacles already signaled by a warning
can d isappear from the system's detection
range as they are approached and will not
continue to be signa led. Objects such as
barrier chains, tra iler draw bars, thin paint
ed vertical po les or fences may not be de
tected by the sys tem, posing risk of dam
age.
- Never use warm or hot water to remove
snow or ice from the rear view camera lens -
danger of crack formation on the lens!
- When cleaning the lens, never use products
that are abrasive .
Switching on/off
A ppl ies to ve hicles: w ith pa rking system (rea r, w ith rea r view
c am era)
The rear view camera switches on automatically
together with the acoustic park assist when you
put the vehicle in reverse.
S w itch ing on
"' Put the vehicle in reverse gear, the acoustic
parking system w ith rear view camera is act ivat
ed automat ically. Act ivat ion of the acoustic
108
parking system is confirmed by a brief acknow l
edgement sound.
Switching off
"' Dr ive faste r than 9 mph ( 15 km/h), or
"' take the vehicle out of reverse gear. The acous
tic parking system is immed iate ly deactivated,
and the rear view camera picture is deactivated
automatically after a period of about 15 sec
onds, or
"' sw itch
off the ignition.
The delay in deactivating the camera provides an uninterrupted view behind the vehicle especia lly
when maneuvering in t ight parking spaces and
prevents the picture from turn ing
off the every
time you shift out of reverse .
If the warning message appears in the display
but not the rear v iew camera p icture, read and
confirm the warning message. The acoustic dis
tance signal is always active.
If you press a function button on the MMI contro l
console, the rear view camera p icture disappears.
The rear v iew camera picture reappears the next
time you park.
Further information on the warning message and
the MMI contro l conso le can be found in the MMI
instruct ion booklet.
A WARNING
- On ly use the rearv iew camera to assist you if
it shows a good, clea r picture. For example,
the image may be affected by the sun shin
ing into the lens, dirt on the lens o r if there
is a de fec t.
- Use the rea rv iew camera only with the rear
lid completely closed. Make sure any objects
you may have moun ted o n the rear lid do
no t block the rearv iew camera .
@ Tips
-The rear view came ra p icture is available as
soon as the MMI Disp lay o r th e MMI is
switched on, or the start-up phase is com
pleted.
- The sensors m ust be kept clean and free of
snow and ice for the park ass ist to operate.
Page 111 of 264

M N
0 loo
rl I.O
"' N
"' rl
-You can change the volume and pitch of the
signals as well as the display ¢
page 111.
-What appears in the display is time-delayed.
Reverse Parking
Applies to vehicles: with parking system (rear, with rear view
camera)
Parking mode 1 can be used when parking in a
garage or parking space.
Fig. 11S MMI Disp lay: A imin g at a parking spot
Fig. 116 MMI Display: Aligning the vehicle
.,. Switch the MMI on and select the reverse gear .
.,. Turn the steering wheel until the orange orien
tation lines
(D appear in the parking spot
¢fig. 115. Use the markings @to help you es
timate the distance from an obstacle. Each
marking corresponds to 3
ft (1 m). The blue
area represents an extension of the vehicle's
outline by approximately
16 ft (5 m) to the
rear .
.,. While driving in reverse gear, adjust the steer
ing wheel angle to fit the parking space with
the aid of the orange orientation lines ¢0 .@
marks the rear bumper. You should stop driving
in reverse as soon as and no later than when
the red orientation line@) abuts an object
¢ ,&. !
Parking System
A WARNING
--The rear view camera does not show the en-
tire area behind the vehicle¢
page 107,
fig . 113.
Watch out especially for small chil
dren and animals. The rear view camera can not always detect them, posing risk of an
accident !
- Please note that objects not touching the
ground can appear to be further away than
they really are (for example, the bumper of a parked vehicle, a trailer hitch, or the rear
of a truck). In this case, you should not use
the help lines to help with parking, which
poses danger of an accident!
(D Note
- Low obstacles already signaled by a warning
can disappear from the system's detection
range as they are approached and will not
continue to be signaled. Objects such as
barrier chains, trailer draw bars, thin paint
ed vertical poles or fences may not be de
tected by the system, posing risk of dam age.
- In the MMI display, the direction of travel of
the vehicle rear is represented depending on
the steering wheel angle. The vehicle front
swings out more than the vehicle rear. Main
tain plenty of distance from an obstacle so
that your outside mirror or a corner of your
vehicle does not collide with any obstacles -
danger of accident!
109
Page 112 of 264

Use parking mode 2 to help you park on the edge
of a street.
F ig. 117 MM")
Parking Sy stem
Parallel Parking
App lies to vehicles: with parking system (rear, with rear view
camera)
Use parking mode 2 to help you park on the edge
of a street.
F ig. 117 MMI Display: bl ue s urface in the park ing spot
F ig. 118 MMI Display : B lue curve o n th e curb
The following steps apply only when there is no
obstacle (such as a wall) near the parking spot.
Otherwise, please read the "Tips on Parking Next
to Obstacles "
r::;, page 110.
.,. Activate the turn signal.
.,. Position your vehicle parallel to the edge of the
street, approx imately 3
ft (1 m) from a parked
vehicle .
.,. Swi tch the MMI on and se lect the reverse gear.
T he park ing aid tu rns on and parking mode 1
appears on the display.
... Press the
Mode r::;, fig. 117 © control button on
the MMI contro l conso le . Parking mode 2 ap
pears .
... Back up in reverse gear and align your vehicle
so that the blue area@ borders on the rear end
of the vehicle or on the park ing spot line . The
blue a rea represents an extension of the vehi
cle's outline by approximately 16
ft (5 m) to the
rear. The lo ng side of the b lue area should be
110
on the curb. The ent ire blue area must fit into
the parking spot.
... Wh ile the vehicle is stat ionary, turn the steer
ing wheel to the right as far as it will go.
.,. Back into the parking spot. Stop the vehicle as
soon as the blue curve touches the curb
,:;;, fig . 118 .
.,. Wh ile the vehicle is stationary, turn the steer
ing wheel to the left as far as it w ill go .
.,. Con tinue to back up into the p arking spot until
the vehicle is parked paralle l to the curb. ®
ma rks the rea r bumper. You should stop driving
in reverse as soon as and no later than when
the red orientation line @) abuts an object
r::;, _&! Keep an eye on the front of your veh icle
while doing this
r::;, Q) _
Parking ne xt to ob stacles
When there is an obstacle (such as a wall) next to
the parking spot, choose a spot wit h more space
on the sides. Position the long s ide of the blue
area so that there is sufficient space from the
curb. The area must not be on the curb . You will
also need to start turning the steer ing wheel
much earlie r. The re should be a sufficient amount
of space between the curb and the blue c urve,
and the blue curve
r::;, fig. 118 must not touch the
c u rb.
&_ WARNING
- T he rear view camera does not show the en
tire area beh ind the vehicle
r::;, page 107,
fig. 113 . Watch out especially for small chil
dren and anima ls . The rear view camera can
not a lways detect them, pos ing risk of an
accident!
- Please n ote that objects not touching the
ground can appear to be further away than
they really a re (for example, the bumper of
a parked veh icle, a tra iler hitch, or the rear
of a tr uck). In this ca se, yo u sh ould not us e
t he help lines to help with parki ng, which
poses dange r of an accident!
(D Note
In the MMI d isplay, the direction of travel of
the veh icle rear is rep resented depend ing on
the steer ing whee l ang le. The vehicle fron t
 1
1 2
2 3
3 4
4 5
5 6
6 7
7 8
8 9
9 10
10 11
11 12
12 13
13 14
14 15
15 16
16 17
17 18
18 19
19 20
20 21
21 22
22 23
23 24
24 25
25 26
26 27
27 28
28 29
29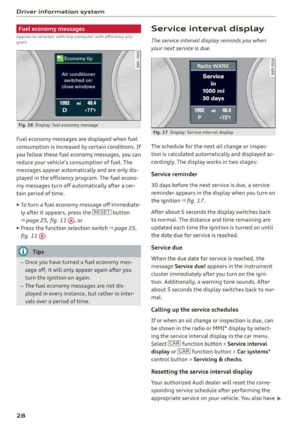 30
30 31
31 32
32 33
33 34
34 35
35 36
36 37
37 38
38 39
39 40
40 41
41 42
42 43
43 44
44 45
45 46
46 47
47 48
48 49
49 50
50 51
51 52
52 53
53 54
54 55
55 56
56 57
57 58
58 59
59 60
60 61
61 62
62 63
63 64
64 65
65 66
66 67
67 68
68 69
69 70
70 71
71 72
72 73
73 74
74 75
75 76
76 77
77 78
78 79
79 80
80 81
81 82
82 83
83 84
84 85
85 86
86 87
87 88
88 89
89 90
90 91
91 92
92 93
93 94
94 95
95 96
96 97
97 98
98 99
99 100
100 101
101 102
102 103
103 104
104 105
105 106
106 107
107 108
108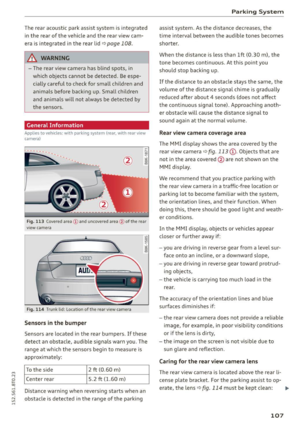 109
109 110
110 111
111 112
112 113
113 114
114 115
115 116
116 117
117 118
118 119
119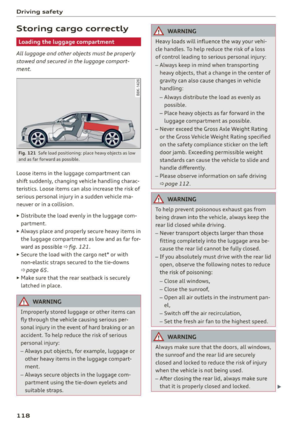 120
120 121
121 122
122 123
123 124
124 125
125 126
126 127
127 128
128 129
129 130
130 131
131 132
132 133
133 134
134 135
135 136
136 137
137 138
138 139
139 140
140 141
141 142
142 143
143 144
144 145
145 146
146 147
147 148
148 149
149 150
150 151
151 152
152 153
153 154
154 155
155 156
156 157
157 158
158 159
159 160
160 161
161 162
162 163
163 164
164 165
165 166
166 167
167 168
168 169
169 170
170 171
171 172
172 173
173 174
174 175
175 176
176 177
177 178
178 179
179 180
180 181
181 182
182 183
183 184
184 185
185 186
186 187
187 188
188 189
189 190
190 191
191 192
192 193
193 194
194 195
195 196
196 197
197 198
198 199
199 200
200 201
201 202
202 203
203 204
204 205
205 206
206 207
207 208
208 209
209 210
210 211
211 212
212 213
213 214
214 215
215 216
216 217
217 218
218 219
219 220
220 221
221 222
222 223
223 224
224 225
225 226
226 227
227 228
228 229
229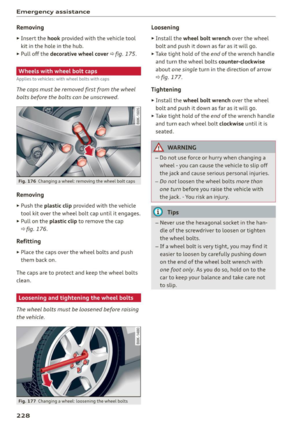 230
230 231
231 232
232 233
233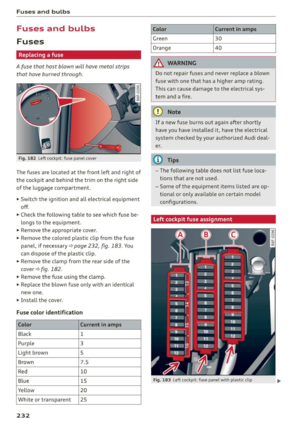 234
234 235
235 236
236 237
237 238
238 239
239 240
240 241
241 242
242 243
243 244
244 245
245 246
246 247
247 248
248 249
249 250
250 251
251 252
252 253
253 254
254 255
255 256
256 257
257 258
258 259
259 260
260 261
261 262
262 263
263