Page 57 of 264

M N
0 loo
rl I.O
"' N
"' rl
sudden braking or an accident, you would not
be able to brake or accelerate.
Front passenger's seat
Always move the front passenger seat into the rearmost position .
To avoid contac t with the airbag wh ile i t is de
p loying, do not sit a ny closer to the inst rument
panel than necessary and always wear the three
point safety belt provided adj usted correctly. We
recommend that you adjust the passenger's seat
in the following manner:
• Bring the back rest up to an (a lmost) upright
position .
Do not ride with the seat reclined .
• Applies to vehicles with adjustable head re
stra ints: Adjust the head restra int so the upper
edge is as even as possible with the top of your
head.
If that is not possible, try to adjust the
head restraint so that it is as close to this pos i
t io n as poss ible
¢ page 57.
• Place your feet on the f loor in front of the p as
senger 's seat.
Front seats
Power seat adjustment
App lies to vehicles : with power adjustable seats
Fig. 52 Front seats: powe r seat a dju st m en t
Controls
@ -Adjusting the l umbar suppo rt*: press the
button in the corresponding pos it io n
c:> & .
@ -Moving the se at up/down: press the bu tto n
up/down ¢ & .
@ -Mov ing the s eat fo rward/back: p ress the but
ton fo rward/back ¢
&,..
Seats and storage
©-Adjust ing the backrest angle : press the but
ton forward/back ¢.&. .
©-Raising/loweri ng* the head res train ts: p ress
t h e b utton up/down¢ &.
@ -Lengthening/shortening the upper thigh
support*: lift the hand le. A sp ring moves the
fron t se at c ushion fo rward ¢
.&..
_& WARNING
-Never a dju st the drive r's or front passeng
er 's seat while the ve hicle is moving .
If you
do this while the ve hicle is moving , you will
be out of position. Always adjust the d river's
or front passenger's seat when the vehicle is
not moving.
- Be careful when adjusting the seat height. Check to see t hat no one is in the way, or se
rious injury cou ld result!
- Because t he seats can be e lectrically adjust
ed w it h the ignition off or w ith the ignition
key removed, never leave children unattend
ed in the vehicle. Unsupe rv ised use of the
elec tric seat ad justments may cause serious
lnJUr y.
-To r educe the risk of inju ry in the case of
sudden b ra king o r ac cident, front passen
ge rs must neve r ride i n a moving veh icle
wit h the b ackres t re clined. Safety bel ts an d
the airbag system only offe r maximum pro
tect ion when the bac krest is upright and the
safety belts are prope rly positioned on the
body. The more the backrest is reclined, the
greater t he risk of personal injury from an
incorrect seating posit io n and improperly
positioned safety belts.
55
Page 58 of 264

Seats and storag e
Power easy entry function
Applies to vehicles: with power adjustable seats
The easy entry function makes it easier for the
rear passengers to enter and leave the vehicle .
Fig . 53 Comfo rt seat s•: easy e ntry co ntro ls
F ig . 54 Spor t seats * : ea sy entry con tro ls
.,. To fold the front seat backrests forward/back,
li ft the latch@~
fig. 53 or~ fig. 54 and fo ld
the backrest forwa rd .
.,. To move the front seats forward/back, press
and hold the @ button until the seat has
reached the desired posit ion.
When the front seats are moved forward, their
or iginal position is s tored. When it is moved
back, the sea t automatically stops in this posi
tion . To move the seat even further back , you
have to re lease the switch @ and reactivate it .
Applies to vehicles w ith adjustable head re
straints: The head restraint s from the front seats,
depending on the seat height that has been set,
are automatically ret racted when the seatbacks
are folded down . T hey return to their o riginal po
sition again when the seatbacks fo r the front
seats are raised .
56
@ Tips
With the driver 's or passenger's door closed,
the corresponding switch to move the seat is i noperative .
Seat adjustments in MMI
Applies to vehicles: with seat memory and MMI
The passenger 's seat can be adjusted to various
position s by the driver.
Convenience side view
.,. Sele ct: !CAR ! function b utton> Seat adju st
ment > Passenger's seat > Con venience side
v iew.
Or
.,. Select: !CAR ! function button> Car systems *
control button > Vehicle settings > Seats > Pas
s enger 's se at> Con venience side v ie w .
.,. Continue to press the control knob until the ad
justment process is complete .
Seat symmetry
.,. Sel ect: Function button !CAR !> Seat adju st
ment
> Passenge r's seat > Seat symmetry . Or
.,. Select: !CAR ! function button> Car s ystems *
control button > Vehicle settings > Seat s > Pas
se ng er' s s eat > Align with d rive r's se at .
.,. Continue to press the control knob until the ad-
j ustment process is complete .
Using the
Con venience side view functio n, the
passenger 's seat is adjusted so that the driver
has the best possib le view to the right . When the
Co nvenience side view is set, the spec ific position
of the dr iver's seat is taken into consideration .
Us ing the
Seat symmetr y function, the passeng
er's seat can be moved to the same position as
the d river 's sea t. The settings for the dr iver's seat
are imported and set au tomatically.
Page 59 of 264

M N
0 loo
rl I.O
"' N
"' rl
Center armrest
The center armrest can be adjusted to several
levels .
Fig. 55 Armrest between the driver's/front passenger's
seats.
Adjusting the center armrest
.,. To adjust the angle, raise the armrest from the
starting position
c:> fig. 55 detent by detent.
.,. To bring the armrest back into the starting po
s it io n, raise it out of the top detent and fold it
back down.
The armrest can slide forward and back .
Head restraints
Front head restraints
Applies to vehicles: with a djustable head restraints
Head restraints that are adjusted according to
body size, along with the seat belt, offer effec
tive protection .
Fig. 56 Front seat : ad just ing the man ual head restraints
Seats and storage
Fig. 57 Front seat: adjusting the power head restra int
Adjust the head restraint so the upper edge is as
even as possib le with the top of yo ur head . If tha t
is not possib le, try to adj ust the head restr aint so
that it is as close to this position as possible
<=> page 57.
.,. To adjust the height of the manual head re
straint*, grip the head restra int on the sides
w ith both hands and slide it up/down until it
locks into place
<=> fig . 56.
.,. To adjust the height of the power head re-
straint*, press the button up/down
c:> fig. 57 .
Refer to c:> page 115, Proper adjustment of head
restraints
for g uidelines on how to adjust the
height of the front head restraints to suit the oc
cupant's body size.
A WARNING
-- Driving without head restraints or with head
restraints that are not proper ly adjusted in
creases the risk of ser ious or fatal neck in
jury dramat ica lly.
- Read and heed all WARNINGS
c:> page 115,
Proper adjustment of head restraints.
@ Tips
- To prevent the head restraints from running
into the head liner, they retract automatical
ly when mov ing the seat forward or upward.
- Correctly adjusted head restraints and safe
ty be lts are an extreme ly effective combina
tion of safety features.
57
Page 60 of 264

Seats and storag e
Rear head restraints
Fig. 58 Rear seats: head restra ints
F ig. 59 Rear head restraints: release
Adjust ing t he he ad rest raints
.. To move the head restraint up, hold it at the
s ides with both hands and slide it upward until
you feel it click into place
c> &.
.. To move the head restraint down, press the
button @
c::> fig. 58 and slide the head restraint
downward.
Remo ving the head re str aints
.. Fold the backrest forward c> page 64.
.. Move the head restra int upward as far as it can
go .
.. Press the release @
c::> fig. 59 with the mechan
ica l key
c::> page 33 a nd the button @ c::> fig. 58.
Pull the head restraint out of the backrest at
the same time¢.&_ .
Inst all ing the head rest raints
.. Slide the posts on the head restra int down into
the gu ides unti l you feel the posts cl ick into
place.
.. Press the button@ ¢
fig. 58 and s lide the head
restraint a ll the way down . Yo u shou ld not be
able to pull the head restraint out of the back
rest .
58
So that the driver can have a better view to the
rear, the head restraints should be pushed down
completely when the rear seats are not occupied .
_& WARNING
-Read and heed all WARNINGS c> page 115,
Proper adjustment of head restraints.
-On ly remove the rear seat head restraints
when necessary in order to install a child
seat ¢
page 159. Install the head restraint
aga in immediately once the chi ld seat is re
moved. Driving w ithout head restraints or
w it h head restra ints that are not properly
adj usted increases the risk of serio us or fa
tal nec k injury dramat ica lly.
- Vehi cles w ith a pass through i n the center
conso le have seating for four. The long cen
ter conso le between t he two rea r seats is
not a seating position . There fore, a safety
be lt is not provided.
(0 Tips
Correct ly adjusted head restraints and sa fety
belts are an extremely effective combination
of safety features .
Memory function
Description
App lies to vehicles: with memory f unction
The memory function allows you to quickly and
eas ily store and recall pe rsonal seating p rofi les
fo r the driver. The memory function is ope rated
th rough the maste r key and the memory bu ttons
in the driver's door .
The driver's seati ng p rofile is stored and assigned
to the master key each t ime the vehicle is locked .
When yo u open the door, the seat profile is auto
matically recalled. If two people use one vehicle,
i t is recommended that each person always uses
"their own" master key .
Up to 2 seat profi les can be stored in the memory
buttons in the d river's door. Once they are stored,
these seat profiles can be selected at any time .
Ill>
Page 61 of 264

M N
0 loo
rl 1.0
"' N
"' rl
In addition to the d river 's seat settings, you can
also store and access the exterior mirror adjust
ment settings* using the remote control key or
memory button.
Remote control key
App lies to vehicles: with seat memory
To assign the driver's seat settings to the remote
control key when locking the veh icle, the funct ion
must be act ivated in the radio or
MM!*
• Select: I CARI function button > Seat adjust·
ment
> Driver's seat > Remote control key >
on .Or
• Select : I CAR I function button > Car sy stem s*
control button > Vehicle settings > Seats >
Driver' s seat > Remot e contro l key > On .
@ Tips
If you do not want anoth er driver's settings to
be assigned to the remote key, sw itc h off the
memory f un ct io n using the radio or MM I* or
the
I O N/OFF I but ton ¢ page 59 .
Memory buttons
Applies to vehicles: with seat memo ry
Fig. 6 0 Driver's door: memory fu nct io n buttons
The memory butto ns are located in the dr iver's
d oor.
Switching the memory function on /off
• Press the ION/O FF I button to switch the memo
ry function on/off . The word
OFF lights up when
the memory function is switched off. Seat p ro·
files are nei ther stored no r r eca lled.
Seats and storage
Storing a seat profile
• Press the ISET I button. Whe n the word SET
lights up, the memory is ready to store set
tings.
• Press a memory button
dil or [II) briefly . A tone
confirms that the settings were stored.
Accessing a seat profile
• If the driver's door is open and the ignition is
sw itched off, press the memory button .
• If the driver's door is closed or the ignition is
switched on, press and hold the memory but
ton unti l the seat adjustment is complete.
A WARNING
- For safety reasons, the seat setting can o nly
be recalled when the veh icle is stationary·
otherwise you risk hav ing an accident.
- In an emergency the recall procedure can be
cancelled by pressing the
I O N/OF F! switch o r
by tappi ng the memory buttons.
Ashtray
Fi g. 6 1 Center console: ashtray
Opening /clo sing
• To open the ashtray, sl ide the cover up
r:!) fig. 61.
• To close the ashtray, press down on the cover.
Emptying the ashtray
• To remove the insert, slide the latch to the right
r:!) fig. 61 -arrow-.
• To insta ll the insert, press it down into the
mou nt.
59
Page 62 of 264

Seats and storag e
_& WARNING
Never put waste paper in the ashtray . Hot
ashes or other hot objects in the ashtray could
set waste paper on fire .
Cigarette Lighter
Fig. 62 Fron t center c onso le: cig arett e lighter
.,. Press the c igarette lighter in .
.,. Remove the cigarette lighter when it pops out .
_& WARNING
The cigarette lighter only works when the ig
nition is sw itched on. Incorrect usage can lead
to ser ious injuries or burns. For this reason,
children should never be left unattended in
the vehicle because this increases the risk of
injury.
(D Note
The ciga rette lighter can be damaged if you
connect electrical accessories to it .
Storing
General overview
_& WARNING
- Always remove objects from the instrument
panel. Any items not put away could slide
around inside the vehicle while dr iv ing or
when accelerating or when applying the brakes or when dr iv ing aro und a corner .
- When you a re driv ing make sure that a ny
thing yo u may have placed in the ce nter con
so le or ot her storage locations can not fall
o ut into the footwells. In case of sudden
60
braking you would not be ab le to brake, de
press the clutch or accelerate.
- Any pieces of clothing that you have hung
up must not interfere with the driver's view .
The coat hooks are designed only for light
weigh t clothing. Never hang any cloth ing
w ith ha rd, pointed or heavy objects in the
pockets on the coat hooks. During sudden
braking or in an accident -espec ially if the
airbag is deployed -these objects cou ld in
jure any p assengers inside the vehicle.
Cupholder
F ig. 63 Center co nsole: front cup holde r
Fig. 6 4 Rea r arm rest: rear cuphol der
Opening re ar cupholders
.,. To open the cupholder, press on the symbol~
®Qfig . 64 .
.,. To adjust the arm @, sw ing it in the d irection
of the a rrow.
.,. Place the beverage in the ho lder and release
the arm . The arm sw ings back by itself and au-
tomatically secures the beverage .
Ill>-
Page 63 of 264

M N
0 loo
rl I.O
"' N
"' rl
Closing cupholders
• To close the cupholder, press on the center sec
tion between the two arms and push the cu
pholder in the slot as far as it will go.
.&_ WARNING
Spilled hot liquid can cause an accident and
personal injury.
- Never carry any beverage containers with
hot liquids, such as hot coffee or hot tea, in
the vehicle while it is moving. In case of an
accident, sudden braking or other vehicle
movement, hot liquid could spill, causing
scalding burns . Spil led hot liquid can also
cause an accident and personal injury.
- Use only soft cups in the cupholder. Hard
cups and glasses can cause injury in an acci
dent .
- Never use the cupholder or adapter as an
ashtray - risk of fire.
(y Note
Only drink containers with lids should be car
r ied in the cupholder . Liquid could spill out
and damage your vehicle's electronic equip
ment or stain the upholstery, etc.
Glove compartment
The glove compartment is illuminated and can
be locked .
Fig. 65 Glove compar tmen t
• To open the glove compartment, pull the han
dle in the direction of the arrow~
fig. 65 and
swing the cover down to open .
Seats and storage
• To close the glove compartment, push the
glove compartment lid upward until the lock
engages .
The glove compartment can be locked using the
mechanical key
~ page 33 .
On the right side in the glove compartment is a
holder with the key body into which the emergen
cy key must be clipped to be able to start the ve
hicle.
A WARNING
-
To reduce the risk of personal injury in an acci-
dent or sudden stop, always keep the glove
compartment closed while driving.
Additional storage
There are a variety of storage compartments and
fasteners in various places in the vehicle .
- In the roof headliner above the rearview mirror.
- On the back of the front seat . The compart -
ment can hold a maximum weight of 1 kg.
- On the left and right of the luggage compart
ment, behind the side trim .
- Garment hooks on the pillars in the rear of the
vehicle.
A WARNING ,..___
- When driving, do not leave any hard objects
on the rear window shelf or allow your pet
to sit on the shelf. They could become a haz
ard for vehicle occupants in the event of
sudden braking or a crash .
- Always remove objects from the instrument
panel. Any items not stored could slide
around inside the vehicle whi le driving or
when accelerating or when apply ing the
b rakes or when driving around a corner.
- When you are driving make sure that any
thing you may have placed in the center con
sole or other storage locations cannot fall
out into the footwells. In case of sudden
braking you would not be able to brake or
accelerate.
- Any articles of clothing that you have hung
up must not interfere with the driver's view .
~
61
Page 64 of 264

Seats and storag e
The coat hooks are des igned only for light
weight cloth ing . Never hang any clothing
with hard, pointed or heavy objects in the
pockets on the coat hooks . During sudden
braking or in an acc ident -especially if the
airbag is deployed -these objects could in
jure any passenge rs ins ide the veh icle.
- T o reduce the r isk of persona l injury in an ac
cident or sudden stop, always keep the
glove compartment closed while dr iv ing .
- Read and follow all WARNINGS
9 page 147, Important safety instructions
on the side airbag system.
- Hang clothes in such a way that they do not
impa ir the d river's vision.
- The coat hooks must only be used for light
weight clot hing . Do not leave any heavy o r
sharp edged objects in the pockets which may in terfere with the side curtain airbag
deployment and can cause personal injury in
a cras h.
- Do not use coat hangers for hanging cloth
ing on the coat hooks as this can interfere
with proper deployment of the side c urtain
airbags in an accident.
- Do not hang heavy objects on the coat
hooks, as they could cause personal injury in
a sudden stop.
- Always keep the compartment above the
rearview mirror closed while dr iving to re
duce the r isk of injury in the event of sudden
braking maneuvers or a collision .
(D Note
Objects located on the rear shelf that rub
against the rear window could damage the
heating wires for the rear window defogger.
(D Tips
- A vent slot is located between the shelf and
the rear window. Do not b lock the
vent with
any items you may place on the rear window
shelf.
- Do not place bulky items on the rear w indow
shelf as they could restrict or b lock the driv
er 's vision in the rear view m irror.
62
Roof rack
Description and mounting locations
Additional cargo can be carried with a roof lug
gage rack .
Fig. 66 Roof ra ck attachm en t po ints
.. Always read and follow the instructions provid
ed by the roof rack manufacturer when instal
ling the roof rack system .
If luggage or cargo is to be carr ied on the roof,
you must observe the following:
- Onl y use roof racks approved for your vehicle .
T hese approved roof racks are the bas is for a
comp le te roof rack system . Addi tional attach
ments or carrier systems are needed to trans
port luggage and sports equipment. We recom
mend using roof racks from the Aud i origina l
accessories program.
- When installing the roof rack, make sure it is
only mounted on the designated locations on
the roof
c:> fig. 66.
- We recommend that you keep the installation
instructions for your roof rack system together
w ith your Owner 's litera ture in the vehicle.
When should the roof rack be r em oved?
- Before going through an automatic car wash (it
is best to ask the car wash operator for advice).
- When not in use, to reduce fue l consumption,
wind noise and to guard against theft .
A WARNING
-Use of an unapproved roof rack or incorrect
mounting of an approved roof rack can
cause the roof rack or the items attached to
it to fall off the roof onto the road .
~
 1
1 2
2 3
3 4
4 5
5 6
6 7
7 8
8 9
9 10
10 11
11 12
12 13
13 14
14 15
15 16
16 17
17 18
18 19
19 20
20 21
21 22
22 23
23 24
24 25
25 26
26 27
27 28
28 29
29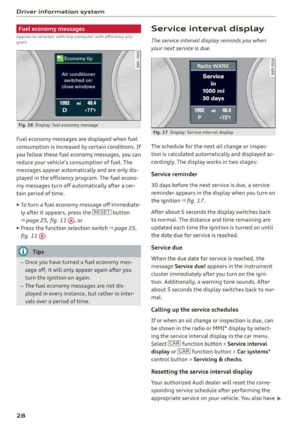 30
30 31
31 32
32 33
33 34
34 35
35 36
36 37
37 38
38 39
39 40
40 41
41 42
42 43
43 44
44 45
45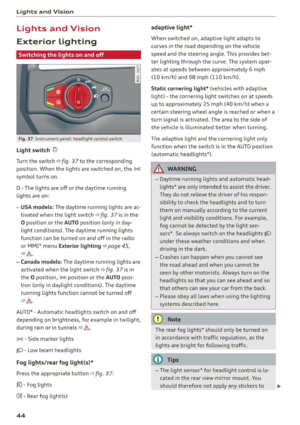 46
46 47
47 48
48 49
49 50
50 51
51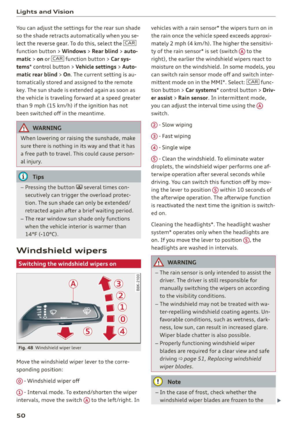 52
52 53
53 54
54 55
55 56
56 57
57 58
58 59
59 60
60 61
61 62
62 63
63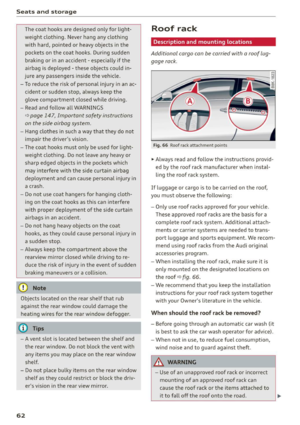 64
64 65
65 66
66 67
67 68
68 69
69 70
70 71
71 72
72 73
73 74
74 75
75 76
76 77
77 78
78 79
79 80
80 81
81 82
82 83
83 84
84 85
85 86
86 87
87 88
88 89
89 90
90 91
91 92
92 93
93 94
94 95
95 96
96 97
97 98
98 99
99 100
100 101
101 102
102 103
103 104
104 105
105 106
106 107
107 108
108 109
109 110
110 111
111 112
112 113
113 114
114 115
115 116
116 117
117 118
118 119
119 120
120 121
121 122
122 123
123 124
124 125
125 126
126 127
127 128
128 129
129 130
130 131
131 132
132 133
133 134
134 135
135 136
136 137
137 138
138 139
139 140
140 141
141 142
142 143
143 144
144 145
145 146
146 147
147 148
148 149
149 150
150 151
151 152
152 153
153 154
154 155
155 156
156 157
157 158
158 159
159 160
160 161
161 162
162 163
163 164
164 165
165 166
166 167
167 168
168 169
169 170
170 171
171 172
172 173
173 174
174 175
175 176
176 177
177 178
178 179
179 180
180 181
181 182
182 183
183 184
184 185
185 186
186 187
187 188
188 189
189 190
190 191
191 192
192 193
193 194
194 195
195 196
196 197
197 198
198 199
199 200
200 201
201 202
202 203
203 204
204 205
205 206
206 207
207 208
208 209
209 210
210 211
211 212
212 213
213 214
214 215
215 216
216 217
217 218
218 219
219 220
220 221
221 222
222 223
223 224
224 225
225 226
226 227
227 228
228 229
229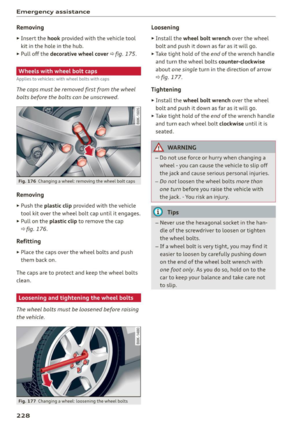 230
230 231
231 232
232 233
233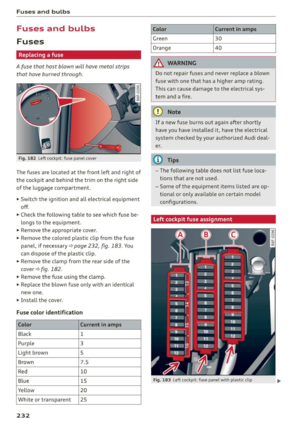 234
234 235
235 236
236 237
237 238
238 239
239 240
240 241
241 242
242 243
243 244
244 245
245 246
246 247
247 248
248 249
249 250
250 251
251 252
252 253
253 254
254 255
255 256
256 257
257 258
258 259
259 260
260 261
261 262
262 263
263