Page 225 of 284

Emergencies
Jump starting Jump leads The jump lead must have a sufficient wire
cross section.
If the engine fails to start because of a dis-
charged battery, the battery can be connec-
ted to the battery of another vehicle to start
the engine.
Jump leads
Jump leads must comply with standard
DIN
72553 (see cable manufacturer's instruc-
tion s).
The wire cross section must be at least
25 mm 2
for petrol engines and at least
35 mm 2
for diesel engines. Note
● The vehicles must not touch each other,
otherwise electricity could flow as soon as
the positive terminals are connected.
● The discharged battery must be properly
connected to the on-board network. How to jump start: description
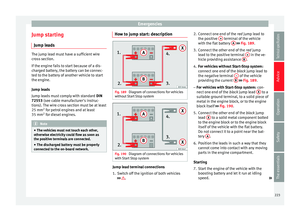
Fig. 189
Diagram of connections for vehicles
without Start Stop system Fig. 190
Diagram of connections for vehicles
with Start Stop system Jump lead terminal connections
1. Switch off the ignition of both vehicles
››› .2. Connect one end of the
red jump lead to
the po s
itive + terminal of the vehicle
with the flat battery A
››› Fig. 189 .
3. C
onnect the other end of the red
jump
lead to the positive terminal + in the ve-
hicle providing assistance B .
4. For vehicles without Start-Stop system:
connect one end of the black jump lead to
the negative terminal – of the vehicle
providing the current B
››› Fig. 189 .
– For
vehicles with Start-Stop system: con-
nect one end of the black jump lead X to a
suitable ground terminal, to a solid piece of
metal in the engine block, or to the engine
block itself ››› Fig. 190 .
5. C
onnect the other end of the black jump
lead X to a solid metal component bolted
to the engine block or to the engine block
itself of the vehicle with the flat battery.
Do not connect it to a point near the bat-
tery A .
6. Position the leads in such a way that they cannot come into contact with any moving
parts in the engine compartment.
Starting
7. Start the engine of the vehicle with the boosting battery and let it run at idling
speed. »
223
Technical specifications
Advice
Operation
Safety
The essentials
Page 226 of 284

Advice
8. Start the engine of the vehicle with the flat battery and wait 2 or 3 minutes until the
engine is “running”.
Removing the jump leads
9. Before you remove the jump leads, switch off the dipped beam headlights (if they
are switched on).
10.Turn on the heater blower and heated rear window in the vehicle with the flat battery.
This helps minimise voltage peaks which
are generated when the leads are discon-
nected.
11. When the engine is running, disconnect
the l e
ads in reverse order to the details
given above.
Connect the battery clamps so they have
good metal-to-metal contact with the battery
terminals.
If the engine fails to start, switch off the start-
er after about 10 seconds and try again after
about 1 minute. WARNING
● Please note the safety warnings referring to
working in the engine compartment
››› page 198.
● The b att
ery providing assistance must have
the same voltage as the flat battery (12V) and
approximately the same capacity (see imprint on battery). Failure to comply could result in
an explosion.
●
Never use jump leads when one of the bat-
teries is frozen. Danger of explosion! Even af-
ter the battery has thawed, battery acid could
leak and cause chemical burns. If a battery
freezes, it should be replaced.
● Keep sparks, flames and lighted cigarettes
away from batteries, danger of explosion.
Failure to comply could result in an explo-
sion.
● Observe the instructions provided by the
manufacturer of the jump leads.
● Do not connect the negative cable from the
other vehicle directly to the negative terminal
of the flat battery. The gas emitted from the
battery could be ignited by sparks. Danger of
explosion.
● Do not attach the negative cable from the
other vehicle to parts of the fuel system or to
the brake line.
● The non-insulated parts of the battery
clamps must not be allowed to touch. The
jump lead attached to the positive battery
terminal must not touch metal parts of the ve-
hicle, this can cause a short circuit.
● Position the leads in such a way that they
cannot come into contact with any moving
parts in the engine compartment.
● Do not lean on the batteries. This could re-
sult in chemical burns. Note
The vehicles must not touch each other, oth-
erwise electricity could flow as soon as the
positive terminals are connected. Towing and tow-starting the
vehicle
General information Read the additional information carefully
››› page 35
Points to observe when tow-starting or tow-
ing away
If you use a tow rope:
Notes for the driver of the towing vehicle
– The tow rope must be taut before you drive
off.
– Release the clutch very carefully when start-
ing the vehicle (manual gearbox), or accel-
erate gently (automatic gearbox).
Driving style
Towing requires some experience, especially
when using a tow rope
. Both drivers should
be f
amiliar with the technique required for
towing. Inexperienced drivers should not at-
tempt to tow.
224
Page 227 of 284

Emergencies
Do not pull too hard with the towing vehicle
and take care to avoid jerking the tow rope.
When towing on an unpaved road, there is al-
ways a risk of overloading and damaging the
anchorage points. WARNING
If the vehicle has no electrical power, the
brake lights, turn signals and all other lights
will no longer function. Do not have the vehi-
cle towed away. Failure to follow this instruc-
tion could result in an accident. CAUTION
If there is no oil in the gearbox or no lubricant
in the automatic transmission the car may
only be towed with the driven wheels lifted
clear of the road, or transported on a special
car transporter or trailer. Note
● Please observe related legal requirements.
● Switch on the hazard warning lights of both
vehicles. However, observe any regulations
to the contrary.
● The tow rope must not be twisted. Other-
wise the front towline anchorage could be
pulled off the vehicle. Towline anchorage at the front of the
vehicle
Fig. 191
Right side of the front bumper: tow-
line anchorage screwed in. The front towline anchorage is only mounted
if the vehicle has to be towed.
There is a cover with an opening into which
the towline anchorage is screwed on the right
part of the front bumper.
– To remove the bumper cover, just press the
upper left side inwards.
– Take the towline anchorage out of the vehi-
cle tool kit ››› page 220 .
– Sc r
ew the towline anchorage into the screw
connection as far as it will go ››› Fig. 191
and tighten with the wheel brace.
After use, unscrew the towline anchorage
and fit the cover back on the bumper. Put the
towline anchorage back in the vehicle tool kit. The towline anchorage should always be
kept in the vehicle.
Rear towline anchorage Fig. 192
Right side of the rear bumper: cover-
cap. Fig. 193
Right side of the rear bumper: tow-
line anchorage screwed in. The rear towline anchorage should only be
mounted if you wish to tow another vehicle.
»
225
Technical specifications
Advice
Operation
Safety
The essentials
Page 228 of 284

Advice
Vehicles with towline anchorage
On the right of the rear bumper there is a cov-
er which covers a threaded hole. – Take the towline anchorage out of the vehi-
cle tool set ››› page 220 .
– To r
emove the bumper cover, just press the
upper side of the cover inwards (arrow) and
remo
ve the cover by levering on the lower
››› Fig. 192 side.
– Scr
ew the towline anchorage into the screw
connection as far as it will go ››› Fig. 193
and tighten with the wheel brace.
After use, unscrew the towline anchorage
and put it back in the vehicle tool kit. Replace
the cover on the bumper. The towline anchor-
age should always be kept in the vehicle. WARNING
● If the towline anchorage is not screwed in
as far as the stop, there is a risk of the screw
connection shearing off during towing (acci-
dent risk).
● If your car has a towing bracket, only use
special towing ropes. Risk of accident! CAUTION
In vehicles fitted with a towing bracket, only
use special tow bars to prevent damage to
the ball joint. These tow bars have been spe-
cially approved for use with towing brackets. Tow-starting
As a general rule, tow-starting is not recom-
mended.
– Engage 2nd or 3rd gear before moving off.
– Press the clutch and hold the pedal down.
– Switch the ignition on.
– Once both vehicles are moving, release the
clutch.
– As soon as the engine has started, press
the clutch and move the gear lever to neu-
tral.
If the engine will not start, it is best to try
starting it using the battery of another vehi-
cle ›››
page 223 before attempting to tow
s t
art. You should only try to tow-start the en-
gine if jump starting is not successful. Tow-
starting is an attempt to start the engine via
the movement of the wheels.
When tow-starting a vehicle with a petrol en-
gine
, do not tow it more than a short dis-
tance, otherwise unburned fuel can enter the
catalytic converter. WARNING
The risk of accidents is high when tow-start-
ing, for example, the towed vehicle can easily
be driven into the towing vehicle. CAUTION
Do not tow vehicles for more than 50 km. Risk
of damage to the catalytic converter. Towing vehicles with a manual
gearbox
Towing is relatively straightforward.
Please observe the relevant instructions
››› page 224.
The v
ehicle can be towed using a tow bar or
tow rope in the normal way, with all four
wheels on the road; it can also be towed with
either the front or rear wheels lifted off the
road. The maximum towing speed is 50 km/h
(30 mph).
To
wing a vehicle equipped with
automatic gearbox Certain restrictions must be observed when
towing your vehicle.
Please observe the relevant instructions
››› page 224 .
The v
ehicle can be towed with a tow bar or
tow rope in the normal way, with all four
wheels on the ground. When doing so,
please note the following points:
226
Page 229 of 284

Emergencies
● Make sure the selector lever is in the N
po-
s ition.
● The
vehicle must not be towed faster than
50 km/h (30 mph).
● The v
ehicle must not be towed further than
50 km (30 miles)
. Reason: when the engine
is not running, the gearbox oil pump does
not work and the gearbox is not adequately
lubricated for higher speeds or longer distan-
ces.
If the vehicle has to be towed with a break-
down truck
, it must only be suspended at the
front wheels. Reason: the drive shafts are lo-
cated on the front wheels. If the car is towed
with the rear wheels lifted off the road (I.e.
travelling backwards), the drive shafts also
turn backwards. The planetary gears in the
aut
omatic gearbox then turn at such high
speeds that the gearbox will be severely
damaged in a short time. Note
● If it is not possible to tow the vehicle in the
normal way, or if it has to be towed further
than 50 km (30 miles), it must be transported
on a special car transporter or trailer.
● Should the power supply to the selector
lever be interrupted in position P, the selector
lever will be locked. Before the vehicle can be
recovered/manoeuvred you must manually
release the selector lever ››› page 229. Emergency locking and
unlocking
Introduction The doors, rear lid and panoramic tilting sun-
roof can be locked manually and partially
opened, for example if the key or the central
locking is damaged.
WARNING
Opening and closing doors carelessly can
cause serious injury.
● If the vehicle is locked from outside, the
doors and windows cannot be opened from
the inside.
● Never leave children or disabled people
alone in the car. They could be trapped in the
car in an emergency and will not be able to
get themselves to safety.
● Depending on the time of the year, temper-
atures inside a locked and closed vehicle can
be extremely high or extremely low resulting
in serious injuries and illness or even death,
particularly for young children. WARNING
Getting in the way of the doors and the rear
lid is dangerous and can lead to serious in-
jury.
● Open and close the doors and the rear lid
only when there is nobody in the way. CAUTION
When opening and closing in an emergency,
carefully disassemble components and then
reassemble them carefully to avoid damage
to the vehicle. Locking or unlocking the driver door
Fig. 194
Driver door lever: hidden lock cylin-
der. If the central locking system should fail to op-
erate, the driver door can still be locked and
unlocked by turning the key in the lock.
As a general rule, when the driver door is
locked all other doors are locked. When the
vehicle is unlocked manually, only the driver
door opens. Please observe the instructions
relating to the anti-theft alarm system
››› page 82 .
● Unf o
ld the vehicle key shaft ››› page 83.
»
227
Technical specifications
Advice
Operation
Safety
The essentials
Page 230 of 284

Advice
● Insert the key shaft into the opening in the
cover on the driver door handle from below
››› Fig. 194 (arrow) then remove the cover up-
w ar
ds.
● Insert the key shaft into the lock cylinder to
unlock or lock the vehicle.
Unlocking notes:
● The anti-theft alarm will remain active when
vehicles are unlocked. However, the alarm
will not yet be triggered ››› page 82.
● After the driver door is opened, you have
15 seconds to switch on the ignition. After 15
seconds, the alarm is triggered.
● Switch the ignition on. When the ignition is
switched on, the electronic immobiliser rec-
ognises a valid vehicle key and deactivates
the anti-theft alarm system. Note
The anti-theft alarm is not activated when the
vehicle is locked manually using the key
shaft ››› page 82. Manual locking of the doors with no
lock cylinder
Fig. 195
Locking the door manually. If the central locking system should fail to
work at any time, the doors with no lock cyl-
inder will have to be locked separately.
A mechanical locking device (only visible
when the door is open) is provided on the
front passenger door.
– Pull the cap out of the opening.
– Insert the key in the inside slot and turn it
to the right as far as it will go (if the door is
on the right side) or to the left (if the door
is on the left side).
Once the door has been closed it can no lon-
ger be opened from the outside. Pull the inte-
rior door handle once to unlock and open the
door. Manual release of the rear lid 3 Applies to the model: LEON/LEON SC
Fig. 196
Luggage compartment: access to
manual release. The rear lid can be unlocked manually from
inside in the event of an emergency.
– Insert the key in the opening in the lining
of the tail gate 1 and move the key in the
direction of the arrow until the lock is re-
leased.
228
Page 231 of 284

Emergencies
Manual release of the rear lid 3 Applies to the model: LEON ST
Fig. 197
Luggage compartment: access to
manual release. The rear lid can be unlocked manually from
inside in the event of an emergency.
– Remove the lid through the groove with a
screwdriver ››› Fig. 197
A.
– Insert the key into the opening and turn it
in the direction of the arrow until the latch
››› Fig. 197 B
has been released. Manual release of the selector lever
Fig. 198
Selector lever: manual release from
position P. The selector lever can be released manually if
the electrical power supply should fail.
The manual release mechanism is located
under the selector lever console on the right
side. Releasing the selector lever requires a
certain degree of practical skill. We therefore
advise you to obtain professional assistance.
A screwdriver will be needed to carry out the
manual release. Use the flat part of the
screwdriver blade
››› page 220.
Removing the cover from the selector lever
– Apply the handbrake ››› to ensure that
the car does not move.
– Carefully pull the corners of the selector
lever boot and fold up the selector lever
boot (inside out) by hand. Releasing the selector lever
– Using a screwdriver, press and hold the yel-
low unlocking tab sideways ››› Fig. 198 .
– No w pr
ess the interlock button on the se-
lector lever A and move the selector lever
to position N.
– After carrying out the manual release, at-
tach the selector lever boot on the gearbox
console again.
If the power supply should ever fail (dis-
charged battery, etc.) and the vehicle has to
be pushed or towed, the selector lever must
first be moved to position N. This is possible
after operating the manual release mecha-
nism. WARNING
The selector lever may be moved out of posi-
tion P only when the handbrake is firmly ap-
plied. If this does not work, secure the vehi-
cle with the brake pedal. On a slope the vehi-
cle could otherwise start to move inadver-
tently after shifting the selector lever out of
position P - accident risk! 229
Technical specifications
Advice
Operation
Safety
The essentials
Page 232 of 284

Advice
Windscreen wipers service position Fig. 199
Wipers in service position The wiper arms can be raised when the wip-
ers are in service position
››› Fig. 199 . To
p l
ace the windscreen wipers in the service
position, proceed as follows:
● The bonnet must be closed ››› page 198.
● Switch the ignition on and off.
● Press the windscreen wiper lever down-
wards briefly 4
›››
page 16.
Before driving, always lower the wiper arms.
Using the windscreen wiper lever, the wind-
screen wiper arms return to their initial posi-
tion.
Lifting and returning windscreen wiper arms
● Place the wiper arms in the service position
››› . ●
Only hold the wiper arms at the point
where the blade is fixed. CAUTION
● To prevent damage to the bonnet and the
wiper arms, only leave them in the service
position.
● Before driving, always lower the wiper
arms. Changing windscreen wiper and
window washer blades
Fig. 200
Changing the windscreen wiper
blades Fig. 201
Changing the rear wiper blade The windscreen wiper blades are supplied as
standard with a layer of graphite. This layer is
responsible for ensuring that the wipe is si-
lent. If the graphite layer is damaged, the
noise of the water as it is wiped across the
windscreen will be louder.
Check the condition of the wiper blades regu-
larly. If the wipers scrape across the glass
,
they shou
ld be changed if they are damaged,
or cleaned if they are dirty ››› .
Damaged wiper blades should be replaced
immediately. These are available from quali-
fied workshops.
Raising/lowering windscreen wiper arms
For windscreen wipers, please note: the wip-
er should be in service position before being
lowering ››› page 230 .
When r ai
sing or lowering an arm, it should
only
be held at the blade fastening point.
230