Page 217 of 284

Wheels
Removing the temporary spare wheel
– Lift and hold up the floor panel to remove
the temporary spare wheel ››› Fig. 181 .
– Turn the thumb wheel anti-clockwise.
– Take out the temporary spare wheel.
Chains
For technical reasons, snow chains must not
be used on the temporary spare wheel.
If you have a puncture on one of the front
wheels when using snow chains, fit the tem-
porary spare wheel in place of one of the rear
wheels. Fit the snow chains on the rear wheel
that you have removed and replace the punc-
tured front wheel with this wheel. WARNING
● After fitting the temporary spare wheel,
check the tyre pressures as soon as possible.
Failure to do so may cause an accident. The
tyre pressures are listed on the inside of the
fuel tank flap.
● Do not drive at over 80 km/h (50 mph)
when the temporary spare wheel is fitted on
the vehicle: risk of accident!
● Avoid heavy acceleration, hard braking and
fast cornering: risk of accident!
● Never use more than one temporary spare
wheel at the same time, risk of accident. ●
No other type of tyre (normal summer or
winter tyre) may be fitted on the compact
temporary spare wheel rim.
● If you are driving using the spare wheel,
the ACC system could automatically switch
off during the journey. Switch off the system
when starting off. Extraction of the spare wheel in
vehicles with SEAT SOUND 10
speakers (with
subwoofer)* –
Disassemble the subwoofer's
floor panel
(c
arpet) as follows:
– LEON/LEON SC model: first, pull the carpet
in the direction of the backrest and then
pull it upwards to remove it. LEON ST mod-
el: lift and secure the floor storage com-
par
tment as explained in ››› page 121.
– Disconnect the subwoofer's speaker cable.
– Turn the sec
uring wheel anti-clockwise.
– Remove the subwoofer speaker and the
s
pare wheel.
– When replacing the spare wheel, place the
subwoofer speaker in the direction indica-
ted b
y the arrow and with the word
“FRONT” facing forward.
– Reconnect the speaker cable and firmly ro-
tate the securing wheel clockwise so that the subwoofer system and wheel are firmly
in place.
Winter service Winter tyres –
Winter tyres must be fitted on all four
wheels.
– Only use winter tyres that are approved for
your vehicle.
– Please note that the maximum permissible
speed for winter tyres may be lower than
for summer tyres.
– Also note that winter tyres are no longer ef-
fective when the tread is worn down.
– Af
ter fitting the wheels you must always
check the tyre pressures. The correct tyre
pressures are listed on the sticker on the
inside of the fuel tank flap ›››
page 208.
In winter road conditions winter tyres will
considerably improve vehicle handling. The
design of summer tyres (width, rubber com-
pound, tread pattern) gives less grip on ice
and snow. This applies particularly to vehi-
cles equipped with wide section tyres or with
high speed tyres (code letters H, V or Y on
the sidew
all). »
215
Technical specifications
Advice
Operation
Safety
The essentials
Page 218 of 284

Advice
Only use winter tyres of the correct type ap-
proved for your vehicle. The sizes of these
tyres are specified in the vehicle's docu-
ments (e.g. EC Certificate of Conformity or
COC 1)
). The vehicle documentation varies de-
pending on the country of residence. See al-
so ››› page 210 .
W int
er tyres lose a great deal of their proper-
ties when the tread
is worn down to a depth
of 4 mm.
The performance of winter tyres is also se-
verely impaired by ageing, even if the tread is
still much deeper than 4 mm.
Winter tyres are subject to the following max-
imum speed limits according to speed rating
code l
etter: ›››
Speed rating
code letter
››› page 210Maximum speed limit
Q160 km/h
S180 km/h
T190 km/h
H210 km/h
V240 km/h (150 mph)
(note restrictions)
W270 km/h
Speed rating
code letter
››› page 210Maximum speed limit
Y300 km/h Vehicles capable of exceeding these speeds
must have an appropriate
sticker attached so
that it is visible to the driver. Suitable stickers
are available from the SEAT Official Service
and specialised workshop. Please note the
regulations to this effect in your country.
“All-weather” tyres can also be used instead
of winter tyres.
Using winter tyres with V-rating
Please note that the generally applicable
240 km/h (150 mph) speed rating for winter
tyres with the letter V is subject to technical
restrictions; the maximum permissible
speed for your vehicle may be significantly
lower . The maximum speed limit for these
ty r
es depends directly on the maximum axle
weights for your car and on the listed weight
rating of the tyres being used.
It is best to contact a SEAT Official Service to
check the maximum speed which is permissi-
ble for the V-rated tyres fitted on your car on
the basis of this information. WARNING
Exceeding the maximum speed permitted for
the winter tyres fitted on your car can cause
tyre failure, resulting in a loss of control of
the vehicle – risk of accident. For the sake of the environment
Summer tyres should be fitted again as soon
as possible after the winter period; they give
better handling on roads which are free of
snow and ice. Summer tyres perform with
less rolling noise, tyre wear and – most im-
portant – reduce fuel consumption. Snow chains
–
Snow chains can be used on the front
wheels only.
– Check that they are correctly seated after
driving for a few yards; correct the position
if necessary. Always take the manufacturer
assembly instructions into account.
– Keep your speed below 50 km/h.
– If there is a danger of being trapped de-
spite having mounted the chains, it is best
to disable the driving wheels (ASR) in the
ESC ›››
page 145, Switching on/off the ESC
and ASR . 1)
COC = certificate of conformity.
216
Page 219 of 284

Emergencies
Snow chains will improve braking ability as
well as traction in winter conditions.
F or t
echnical reasons snow chains may only
be used with the following wheel rim/tyre
combination.
195/65 R15Chains with links of maximum 15 mm
205/55 R16Chains with links of maximum 15 mm
225/45 R17Chains with links of maximum 9 mm
225/40 R18Chains with links of maximum 9 mm Remove wheel covers and any
integral trim
ring before fitting snow chains.
R emo
ve the chains when roads are free of
snow
. Otherwise they will impair handling,
damage the tyres and wear out very quickly. Emergencies
Changing a wheel What to do first Read the additional information carefully
››› page 34
– If you have a flat tyre or puncture, park the
car as far away from the flow of traffic as
possible in a safe place. If you have a punc-
ture, stop the vehicle on a horizontal sur-
face. If you are on a slope, take extra care.
– Apply the handbrake.
– Switch on the hazard warning lights.
– Manual gearbox: select the 1st gear.
– Automatic gearbox: move the selector lever
to P.
– When towing a trailer: unhitch the trailer
from your vehicle.
– Have the vehicle tool kit ›››
page 220 and
the spare wheel ready ›››
page 214.
– Observe the applicable legislation for each
country (reflective vest, warning triangles,
etc.).
– All vehicle occupants should leave the car.
They should wait in a safe area (for in-
stance behind the roadside crash barrier). WARNING
● Always observe the above steps and pro-
tect yourself and other road users.
● If you change the wheel on a slope, block
the wheel on the opposite side of the car with
a stone or similar to prevent the vehicle from
moving. Wheel covers*
Fig. 182
Remove the wheel cover. The wheel covers must be removed for access
to the wheel bolts.
Removing
– Remove the wheel cover using the wire
hook ›››
Fig. 182 .
– Hook thi
s into one of the cut-outs of the
wheel cover. »
217
Technical specifications
Advice
Operation
Safety
The essentials
Page 220 of 284

Advice
Fitting
– Fit the wheel cover onto the wheel rim by
pressing it firmly. Put pressure initially on
the point of the cut-out for the valve. Next
fit the rest of the hubcap
Wheel bolt caps* Fig. 183
Wheel: wheel bolts with caps. Removal
– Fit the plastic clip (vehicle tools) over the
cap until it clicks into place ››› Fig. 183.
– Remove the cap with the plastic clip. Anti-theft wheel bolts
Fig. 184
Anti-theft wheel bolt with cap and
adapter. A special adapter (vehicle tools) is required
to remove the anti-theft wheel bolts.
–
Remove the wheel cover* or the cap*.
– Insert the adapter onto the anti-theft wheel
bolt and push it on as far as it will go.
– Insert the wheel brace (vehicle tools) onto
the adapter as far as it will go.
– Remove the wheel bolt ››› page 218. Note
Make a note of the code number of the anti-
theft wheel bolt and keep it in a safe place,
but not in your vehicle. If you need a new
adapter, you can obtain it from the SEAT Offi-
cial Service, indicating the code number. Loosening the wheel bolts
Fig. 185
Wheel: loosen the wheel bolts. –
Insert the box spanner (vehicle tools) onto
the wheel bolt as far as it will go. An adapt-
er is required to unscrew or tighten the an-
ti-theft wheel bolts ››› page 218.
– Turn the wheel bolt approximately one turn
to the left ››› Fig. 185 (arrow). To apply the
r equir
ed torque, hold the wheel brace at
the end. If it is not possible to loosen a
wheel bolt, carefully apply pressure with
one foot on the end of the box spanner.
Hold on to the vehicle for support and take
care not to slip. WARNING
Slightly loosen the wheel bolts (one turn) be-
fore raising the vehicle with the jack*. If not,
an accident may occur. 218
Page 221 of 284

Emergencies
Raising the vehicle Fig. 186
Crossbar: marks. Fig. 187
Strut: mounting the jack on the vehi-
cle. –
Place the jack* (vehicle tools) on a firm sur-
face. If necessary use a large, strong board
or similar support. On a slippery surface
(such as tiles) place the jack on a rubber
mat or similar to prevent it from slipping.
››› . –
Find the support point on the strut (sunken
area) closest to the wheel to be changed
››› Fig. 186 . The jack* support point is be-
hind the m ark
on the strut.
– Turn the jack*, located below the strut sup-
port point, to raise it until tab 1 ›››
Fig. 187 is below the housing provided.
– Align the j
ack* so that tab 1 “grips” onto
the housing provided on the strut and the
mobile base 2 is resting on the ground.
The base plate 2 should fall vertically with
respect to the support point 1 .
– Continue turning the jack* until the wheel
is slightly lifted off the ground. WARNING
● Make sure that the jack* remains stable. If
the surface is slippery or soft, the jack* could
slip or sink, respectively, with the resultant
risk of injury.
● Only raise the vehicle with the jack* sup-
plied by the manufacturer. Other vehicles
could slip, with the consequent risk of injury.
● Only mount the jack* on the support points
designed for this purpose on the strut, and
always align the jack correctly. If you do not,
the jack* could slip as it does not have an ad-
equate grip on the vehicle: risk of injury!
● The height of the parked vehicle can
change as a result of variations in tempera-
ture and loading. CAUTION
The vehicle must not be raised on the cross-
bar. Only place the jack* on the points de-
signed for this purpose on the strut. Other-
wise, the vehicle may be damaged. Removing and fitting a wheel
Change the wheel as described below after
loosening the wheel bolts and raising the ve-
hicle with the jack.
Taking off the wheel
– Unscrew the wheel bolts using the box
spanner and place them on a clean surface.
– Take off the wheel ››› .
Putting on the spare wheel
When fitting tyres with a compulsory rotation
direction, observe the instructions in
››› page 220 .
– Mou nt
the wheel.
– Screw on the wheel bolts in position and
tighten them loosely with a box spanner.
– Carefully lower the vehicle using the jack*.
– Tighten the wheel bolts in diagonal pairs
using the wheel brace.
The wheel bolts should be clean and turn
easily. Before fitting the spare wheel, inspect »
219
Technical specifications
Advice
Operation
Safety
The essentials
Page 222 of 284

Advice
the wheel condition and hub mounting surfa-
ces. These surfaces must be clean before fit-
ting the wheel. CAUTION
When removing/fitting the wheel, the rim
may hit and damage the brake disc. For this
reason, please take care and get a second
person to assist you. Tyres with compulsory direction of
rotation
A directional tread pattern can be identified
by arrows on the sidewall that point in the di-
rection of rotation. Always observe the direc-
tion of rotation indicated when mounting the
wheel. This is important so that these tyres
can give maximum grip and avoid excessive
noise, tread wear and aquaplaning.
If, exceptionally, it is necessary to mount the
spare wheel* in the opposite direction of ro-
tation, please drive carefully, as in this case
the tyre does not have optimum conditions of
use. This is particularly important when driv-
ing on wet roads.
To benefit from the advantages of tyres with
this type of tread pattern, the defective tyre
should be replaced as soon as possible so
that all tyres again rotate in the correct direc-
tion. After changing a wheel –
On alloy wheels: replace the wheel bolt
caps.
– On plate wheels: replace the wheel hubcap
››› page 217.
– Put the tools and jack back in the luggage
compartment.
– If the replaced wheel does not fit in the
spare wheel housing, store it safely in the
luggage compartment ››› page 114.
– Check the tyre pressure of the newly moun-
ted tyre as soon as possible.
– In vehicles fitted with a tyre pressure indi-
cator, adjust the pressure and store the
reading in the radio/ Easy Connect system*
››› page 212.
– The wheel bolts should be tightened to 120
Nm. Check the torque as soon as possible
with a torque wrench. Meanwhile, drive
carefully.
– Have the flat tyre replaced as quickly as
possible. Tyre repair
Tools, anti-puncture kit* The tools and anti-puncture kit* are stored
under the floor panel in the luggage compart-
ment.
To access the vehicle tools:
– Lift up the floor surface by the plastic han-
dle until it is fastened to the tabs on both
sides.
Depending on the vehicle equipment, the
tyre repair kit* is located under the floor pan-
el in the luggage compartment.
The tool kit includes: ● Jack*
● Wire hook for pulling off the wheel cov-
er* /wheel bolt cap clip.
● Box spanner for wheel bolts*
● Towline anchorage
● Adapter for the anti-theft wheel bolts*
Some of the items listed are only provided in
certain model versions, or are optional ex-
tras. Note
The jack does not generally require any main-
tenance. If required, it should be greased us-
ing universal type grease. 220
Page 223 of 284

Emergencies
TMS (Tyre Mobility System)* Read the additional information carefully
››› page 33
The Anti-puncture kit* (Tyre Mobility System)
will reliably seal punctures caused by the
penetration of a foreign body of up to about
4 mm in diameter. Do not remove foreign ob-
j
ects, e.g. screws or nails, from the tyre.
After inserting the sealant residue in the tyre,
you must again check the tyre pressure about
10 minutes after starting the engine.
You should only use the tire mobility set if
the vehicle is parked in a safe place, you are
familiar with the procedure and you have the
necessary tire mobility set! Otherwise, you
should seek professional assistance.
The tyre sealant must not be used in the
following cases:
● If the wheel rim has been damaged.
● In outside temperatures below -20°C (-4°F).
● In the event of cuts or perforations in the
tyre greater than 4 mm.
● If you have been driving with very low pres-
sure or a completely flat tyre.
● If the sealant bottle has passed its use by
date. WARNING
Using the tyre mobility system can be dan-
gerous, especially when filling the tyre at the
roadside. Please observe the following rules
to minimise the risk of injury:
● Stop the vehicle safely as soon as possible.
Park it at a safe distance from surrounding
traffic to fill the tyre.
● Ensure the ground on which you park is flat
and solid.
● All passengers and particularly children
must keep a safe distance from the work area.
● Turn on the hazard warning lights to warn
other road users.
● Use the tyre mobility system only if you are
familiar with the necessary procedures. Oth-
erwise, you should seek professional assis-
tance.
● The tyre mobility set is intended for tempo-
rary emergency use only until you can reach
the nearest specialised workshop.
● Replace the repaired tyre with the tire mo-
bility set as soon as possible.
● The sealant is a health hazard and must be
cleaned immediately if it comes into contact
with the skin.
● Always keep the tire mobility set out of the
reach of small children.
● Never use an equivalent jack, even if it has
been approved for your vehicle.
● Always stop the engine, apply the hand-
brake lever firmly and engage gear if using a manual gearbox, in order to reduce the risk of
vehicle involuntary movement.
WARNING
A tyre filled with sealant does not have the
same performance properties as a conven-
tional tyre.
● Never drive faster than 80 km/h (50 mph).
● Avoid heavy acceleration, hard braking and
fast cornering.
● Drive for only 10 minutes at a maximum
speed of 80 km/h (50 mph) and then check
the tyre. For the sake of the environment
Dispose of used or expired sealant observing
any legal requirements. Note
A new bottle of sealant can be purchased at
SEAT dealerships. Note
Take into account the separate instruction
manual of the tyre mobility set* manufactur-
er. 221
Technical specifications
Advice
Operation
Safety
The essentials
Page 224 of 284

Advice
Contents of the tyre mobility system* Fig. 188
Standard representation: Contents
of the tyre mobility system. The tyre mobility set is located underneath
the floor covering in the luggage compart-
ment. It includes the following components
››› Fig. 188 :
T y
re valve remover
Sticker indicating maximum speed “max.
80 km/h” or “max. 50 mph”
Filler tube with cap
Air compressor
Tube for inflating tyres
Warning provided by tyre pressure moni-
toring system (it can also be integrated in
the compressor).
1 2
3
4
5
6 Air bleed screw (in its place, the compres-
sor may have a button).
ON/OFF switch
12 volt connector
Bottle of sealant
Spare tyre valve
The valve insert remover
1 has a gap at the
lower end for a valve insert. The valve insert
can only be screwed or unscrewed in this
way. This also applies to its replacement part 11 .
WARNING
When inflating the wheel, the air compressor
and the inflator tube may become hot.
● Protect hands and skin from hot parts.
● Do not place the hot flexible inflator tube or
hot air compressor on flammable material.
● Allow them to cool before storing the de-
vice.
● If it is not possible to inflate the tyre to at
least 2.0 bars (29 psi / 200 kPa), the tyre is
too badly damaged. The sealant is not in a
good condition to seal the tyre. Do not con-
tinue driving. Seek specialist assistance. CAUTION
Switch off the air compressor after a maxi-
mum of 8 operational minutes to avoid over-
heating! Before switching on the air compres-
sor again, let it cool for several minutes. 7
8
9
10
11 Check after 10 minutes of driving
Screw the inflator tube
››› Fig. 188 5 again
and check the pressure on the gauge 6 .
1.3 bar (19 psi / 130 kPa) and lower:
● Stop the vehicle! The tyre cannot be sealed
sufficiently with the tyre mobility set.
● You should obtain professional assistance
››› .
1.4 bar (20 psi / 140 kPa) and higher:
● Set the tyre pressure to the correct value
again.
● Carefully resume your journey until you
reach the nearest specialised workshop with-
out exceeding 80 km/h (50 mph).
● Have the damaged tyre replaced. WARNING
Driving with an unsealed tyre is dangerous
and can cause accidents and serious injury.
● Do not continue driving if the tyre pressure
is 1.3 bar (19 psi / 130 kPa) and lower.
● Seek specialist assistance. 222
 1
1 2
2 3
3 4
4 5
5 6
6 7
7 8
8 9
9 10
10 11
11 12
12 13
13 14
14 15
15 16
16 17
17 18
18 19
19 20
20 21
21 22
22 23
23 24
24 25
25 26
26 27
27 28
28 29
29 30
30 31
31 32
32 33
33 34
34 35
35 36
36 37
37 38
38 39
39 40
40 41
41 42
42 43
43 44
44 45
45 46
46 47
47 48
48 49
49 50
50 51
51 52
52 53
53 54
54 55
55 56
56 57
57 58
58 59
59 60
60 61
61 62
62 63
63 64
64 65
65 66
66 67
67 68
68 69
69 70
70 71
71 72
72 73
73 74
74 75
75 76
76 77
77 78
78 79
79 80
80 81
81 82
82 83
83 84
84 85
85 86
86 87
87 88
88 89
89 90
90 91
91 92
92 93
93 94
94 95
95 96
96 97
97 98
98 99
99 100
100 101
101 102
102 103
103 104
104 105
105 106
106 107
107 108
108 109
109 110
110 111
111 112
112 113
113 114
114 115
115 116
116 117
117 118
118 119
119 120
120 121
121 122
122 123
123 124
124 125
125 126
126 127
127 128
128 129
129 130
130 131
131 132
132 133
133 134
134 135
135 136
136 137
137 138
138 139
139 140
140 141
141 142
142 143
143 144
144 145
145 146
146 147
147 148
148 149
149 150
150 151
151 152
152 153
153 154
154 155
155 156
156 157
157 158
158 159
159 160
160 161
161 162
162 163
163 164
164 165
165 166
166 167
167 168
168 169
169 170
170 171
171 172
172 173
173 174
174 175
175 176
176 177
177 178
178 179
179 180
180 181
181 182
182 183
183 184
184 185
185 186
186 187
187 188
188 189
189 190
190 191
191 192
192 193
193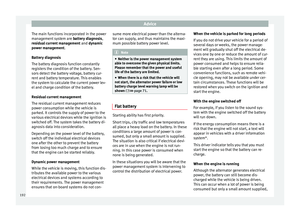 194
194 195
195 196
196 197
197 198
198 199
199 200
200 201
201 202
202 203
203 204
204 205
205 206
206 207
207 208
208 209
209 210
210 211
211 212
212 213
213 214
214 215
215 216
216 217
217 218
218 219
219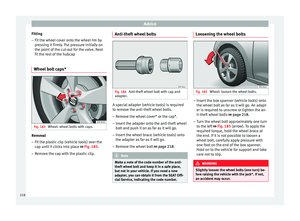 220
220 221
221 222
222 223
223 224
224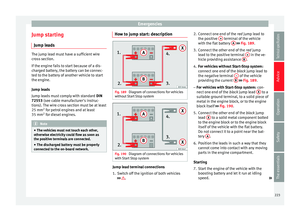 225
225 226
226 227
227 228
228 229
229 230
230 231
231 232
232 233
233 234
234 235
235 236
236 237
237 238
238 239
239 240
240 241
241 242
242 243
243 244
244 245
245 246
246 247
247 248
248 249
249 250
250 251
251 252
252 253
253 254
254 255
255 256
256 257
257 258
258 259
259 260
260 261
261 262
262 263
263 264
264 265
265 266
266 267
267 268
268 269
269 270
270 271
271 272
272 273
273 274
274 275
275 276
276 277
277 278
278 279
279 280
280 281
281 282
282 283
283


