Page 209 of 284
 .
– On ly
use a charger which is compatible for
use with 12 V nominal voltage batteries.
The charge must not exceed a vo")
Checking and refilling levels
exclusively to an earth on the bodywork
(–) .
– On ly
use a charger which is compatible for
use with 12 V nominal voltage batteries.
The charge must not exceed a voltage of 15
V.
– Now connect the battery charger to the
power socket and switch on.
– After charging the battery: switch off the
battery charger and disconnect the power
socket cable.
– Finally disconnect the charger cables from
the battery.
– Replace the battery cover correctly.
– Close the bonnet ››› page 199.
Important: Before you charge the battery
make sure you read the manufacturer's in-
structions for using the battery charger. WARNING
Never charge a battery that has frozen: re-
place battery! Failure to do so may lead to an
explosion. Note
Use only the terminals in the engine compart-
ment to charge the battery. Replacing the battery
The new battery should have the same speci-
fications (amperage, load and voltage) as the
used battery.
Your vehicle is equipped with an intelligent
power management system to control the
distribution of electrical energy
››› page 191.
The power management function ensures
that the battery is charged much more effi-
ciently than on vehicles without a power
management system. To maintain this func-
tion after replacing the battery, we recom-
mend that the replacement battery used is of
the same make and type as the original fitted
battery. To make proper use of the power
management function after the battery has
been changed, have the battery coded to the
power management mode at a specialised
workshop. CAUTION
● Some vehicles, for example those with the
Start-Stop system* are fitted with a special
battery (AGM-type or EFB-type battery). If any
other type of battery is fitted, the Start-Stop
function may be considerably reduced and
the vehicle may not stop on repeated occa-
sions.
● Make sure that the vent hose is always at-
tached to the original opening on the side of
the battery. Gases or battery acid can other-
wise escape and possibly cause damage. ●
The battery holder and clamps must always
be correctly secured.
● Before starting any work on the battery, al-
ways observe the warnings listed under
››› page 206, Important safety warnings for
handling a vehicle battery .
● Do not forget to replace the battery cover-
ings, where applicable. It is a protection for
high temperatures. This in turn extends the
vehicle service life. For the sake of the environment
Batteries contain toxic substances includ-
in g s
ulphuric acid and lead. They must be
disposed of appropriately and must not be
disposed of with ordinary household waste.
Make sure disconnected batteries cannot tip
over. Sulphuric acid could be spilt! 207
Technical specifications
Advice
Operation
Safety
The essentials
Page 210 of 284
.
– If you have to drive over a kerb or similar
obstacle, driv")
Advice
Wheels
Wheels and tyres General notes –
When driving with new tyres, be especially
car
eful during the first 500 km (300 miles).
– If you have to drive over a kerb or similar
obstacle, drive very slowly and as near as
possible at a right angle to the obstacle.
– Check from time to time if the tyres are
damaged (punctures, cuts, cracks or
dents). Remove any foreign objects embed-
ded in the treads.
– Damaged wheels and tyres must be re-
placed immediately.
– Keep grease, oil and fuel off the tyres.
– Replace any missing valve caps as soon as
possible.
– Mark the wheels before taking them off so
that they rotate in the same direction when
put back.
– When removed, the wheels or tyres should
be stored in a cool, dry and preferably dark
place.
New tyres
New tyres do not give maximum grip straight
a w
ay and should therefore be “run in” by driving carefully and at moderate speeds for
about the first 500 km (300 miles). This will
also increase the useful life of the tyres.
The tread depth of new tyres may
v
ary, ac-
cording to the type and make of tyre and the
tread pattern.
Concealed damage
Damage to tyres and rims is often not readily
visible. If you notice unusual vibration
or the
car pulling to one side, this may indicate that
one of the tyres is damaged. Reduce speed
immediately if there is any reason to suspect
that damage may have occurred. Inspect the
tyres for damage. If no external damage is
visible, drive slowly and carefully to the near-
est specialised workshop and have the car
inspected.
Tyres with directional tread pattern
An arrow on the tyre sidewall indicates the di-
rection of rotation on single drive tyres. Al-
ways note the direction of rotation indicated
when mounting the wheel. This guarantees
optimum grip and helps to avoid aquaplan-
ing, excessive noise and wear.
Retrofitting Accessories
If you wish to change or fit wheels, rims or
wheel trims, we recommend that you consult
with a SEAT Official Service centre for advice
regarding current techniques. Useful life of tyres Correct inflation pressures and sensible driv-
ing habits will increase the useful life of your
tyres.
– Check tyre pressure at least once a month,
and also prior to any long trip.
– The tyre pressure should only be checked
when the tyres are cold. Do not reduce the
pressure of warm tyres.
– Adjust tyre pressure to the load being car-
ried by the vehicle.
– In vehicles with a tyre pressure indicator,
save the pressure of modified tyres
››› page 212 , ››
›
page 208.
– Avoid fast cornering and hard acceleration.
– Inspect the tyres for irregular wear from
time to time.
The useful life of your tyres depends on the
following factors:
Tyre pressure
Tyre pressure values are indicated on the
sticker on the inside of the fuel tank flap.
Insufficient or excessive pressure greatly re-
duces the useful life of the tyres and adverse-
ly affects vehicle performance and ride. Cor-
rect inflation pressures are very important,
especially at high speeds.
208
Page 211 of 284
 to in-
crease driving comfort. When driving with
comfort tyre pressure fuel consumption may
increase slight")
Wheels
Depending on the vehicle, tyre pressure can
be adjusted (“comfort” tyre pressure) to in-
crease driving comfort. When driving with
comfort tyre pressure fuel consumption may
increase slightly.
The tyre pressure must be adjusted according
to the load the vehicle is carrying. If the vehi-
cle is going to carry the maximum load, the
tyre pressure should be increased to maxi-
mum value indicated on the sticker on the in-
side of the fuel tank flap.
Do not forget the spare wheel when checking
the tyre pressures: Keep this spare wheel in-
flated to the highest pressure required for the
road wheels.
In the case of a minimised temporary spare
wheel (125/70 R16 or 125/70 R18) inflate to
a pressure of 4.2 bar as indicated on the tyre
pressure label on the fuel tank flap.
Driving style
Fast cornering, heavy acceleration and hard
braking (squealing tyres) all increase tyre
wear.
Wheel balance
The wheels on new vehicles are balanced.
However, certain circumstances may lead to
imbalance (run-out), which is detected as vi-
brations in the steering wheel. Unbalanced wheels should be rebalanced, as
they otherwise cause excessive wear on
steering, suspension and tyres. A wheel must
also be rebalanced when a new tyre is fitted
or if a tyre is repaired.
Incorrect wheel alignment
Incorrect wheel alignment causes excessive
tyre wear, impairing the safety of the vehicle.
If you notice excessive tyre wear, you should
check wheel alignment at a SEAT Official
Service.
WARNING
● Always adapt the tyre pressure accordingly
when the vehicle load changes.
● A tyre with low air pressure has to flex a lot
more when the vehicle is heavily loaded or at
high speeds, therefore causing overheating
to occur. Under these conditions, the tyre
bead may be released or the tyre may burst.
Risk of accident! For the sake of the environment
Under-inflated tyres will increase fuel con-
sumption. Wear indicators
Fig. 177
Tyre tread: tread wear indicators Tread wear indicators indicate if a tyre is
worn.
The original tyres on your vehicle have
1.6 mm high “tread wear indicators” running
across the tread. Depending on the manufac-
turer, there will be 6 to 8 of them spaced at
equal distances around the tyre. Markings on
the tyre sidewall (for instance the letters
“TWI” or a triangle) indicate the positions of
the tread wear indicators.
The minimum tread depth required by law is
1.6 mm (measured in the tread grooves next
to the tread wear indicators). (Different fig-
ures may apply in other countries.)
»
209Technical specifications
Advice
Operation
Safety
The essentials
Page 212 of 284

Advice
WARNING
The tyres must be replaced at the latest when
the tread is worn down to the tread wear indi-
cators. Failure to follow this instruction could
result in an accident.
● Especially in difficult driving conditions
such as wet or icy roads. It is important that
the tyre tread be as deep as possible and be
approximately the same on the tyres of both
the front and the rear axles.
● The scant driving safety due to insufficient
tread depth is particularly evident in vehicle
handling, when there is a risk of “aquaplan-
ing” in deep puddles of water and when driv-
ing through corners, and braking is also ad-
versely affected.
● The speed has to be adapted accordingly,
otherwise there is a risk of losing control over
the vehicle. Changing wheels
Fig. 178
Interchanging tyres. To ensure that the wear is equal on all tyres
the wheels should be changed round from
time to time according to the system
››› Fig. 178 . The useful life of all the tyres will
then be about the s
ame time.
Replacing wheels and tyres –
All four wheels must be fitted with tyres of
the same type, size (rolling circumference)
and preferably the same tread pattern.
– Tyres should be replaced at least in pairs
and not individually (i.e. both front tyres or
both rear tyres together). –
Do not use tyres whose effective size ex-
ceeds the dimensions of the factory-ap-
proved makes of tyre.
– If you wish to fit the vehicle with rims or
tyres different to those installed in manu-
facture, it is advisable to consult a SEAT Of-
ficial Service before purchasing them.
The ty r
es and wheel rims are an essential
part of the vehicle's design. The tyres and
rims approved by SEAT are specially matched
to the characteristics of the vehicle and make
a major contribution to good roadholding
and safe handling ››› .
The sizes of the rims and tyres approved for
your vehicle are listed in the vehicle docu-
mentation (e.g. EC Certificate of Conformity or
COC document 1)
). The vehicle documentation
varies depending on the country of resi-
dence.
Note for Italy: A SEAT Service Centre should
be c on
sulted whether different sized wheels
or tyres to those originally fitted by SEAT may
be fitted, as well as the combinations al-
lowed between the front axle (axle 1) and
back axle (axle 2).
A knowledge of tyre designations makes it
easier to choose the correct tyres. The follow-
ing wording can be read on the sides of the
tyre: 1)
COC = certificate of conformity.
210
Page 213 of 284

Wheels
205/55 R16 91V
This contains the following information:205Tyre width in mm
55Height/width ratio in %
RTyre construction: Radial
16Rim diameter in inches
91Load rating code
VSpeed index The
manufacturing date
is also indicated on
the ty
re sidewall (possibly only on the inner
part):
DOT... 2212...
it means, for example, that the tyre was man-
ufactured in the 22nd week of 2012.
But note that with some types of tyre, the ac-
tual tyre size can differ from the nominal size
marked on the tyre (for instance 205/55 R 16
91 W), and there may be significant differen-
ces in the contours of the tyres, even though
the tyres are marked with the same nominal
size designation. When replacing the tyres,
it is therefore important to make sure that
the actual size of the new tyres does not ex-
ceed the dimensions of the factory-approved
makes of tyre.
Failure to observe this requirement can af-
fect the clearance needed for the tyres. If the tyres rub against the bodywork, in certain
circumstances the tyres , suspension or
bodywork and pipes may be damaged, and
vehicle safety could be severely impaired
››› .
If you use tyres that are approved by SEAT
you can be sure that the actual tyre dimen-
sions will be correct for your vehicle. If you
decide to fit a different type of tyre, you must
obtain the appropriate manufacturer's certif-
icate from the tyre retailer to confirm that
the tyres are suitable for your vehicle. Keep
this certificate in a safe place.
Your SEAT Official Service will be able to ad-
vise you on which tyres may be fitted to your
vehicle.
It is best to have all servicing of wheels and
tyres performed by a specialised workshop.
They are familiar with the procedure and
have the necessary special tools and spare
parts as well as the proper facilities for dis-
posing of the old tyres respecting the envi-
ronment. WARNING
● It is very important to ensure that the tyres
you have chosen have adequate clearance.
When selecting replacement tyres, do not re-
ly entirely on the nominal tyre size marked on
the tyre, since the effective tyre size can dif-
fer significantly depending on the manufac-
turer. Inadequate tyre clearance can result in
damage to the tyres or the vehicle, causing a serious safety risk. Risk of accident! It may
also invalidate the vehicle's registration for
use on public roads.
●
Avoid running the vehicle on tyres that are
more than 6 years old. If you have no alterna-
tive, you should drive slowly and with extra
care at all times.
● If wheel trims are fitted after the car is pur-
chased, ensure that there is an adequate flow
of air for cooling the brake system. For the sake of the environment
Old tyres must be disposed of according to
the laws in the country concerned. Note
● Never mount used tyres if you are not sure
of their “previous history”.
● For technical reasons, it is not generally
possible to use the wheels from other vehi-
cles. In some cases, this may also be true for
the same model of wheel. Wheel bolts
The
wheel bolts
ar
e m
atched to the rims.
When installing different wheels (for instance
alloy wheels or wheels with winter tyres) it is
important to use the correct wheel bolts with
the right length and correctly shaped bolt
heads. This ensures that wheels are fitted »
211
Technical specifications
Advice
Operation
Safety
The essentials
Page 214 of 284

Advice
securely and that the brake system functions
correctly.
The wheel bolts must be clean and turn easi-
ly.
A special adapter is required to turn the anti-
theft wheel bolts* ››› page 218.
Tyre monitoring systems Introduction WARNING
Unsuitable handling of the wheels and tyres
may lead to sudden tyre pressure losses, to
tread separation or even to a blow-out.
● Check tyre pressures regularly and ensure
they are maintained at the pressures indica-
ted. Tyre pressure that is too low could cause
overheating, resulting in tread detachment or
even burst tyres.
● Tyre pressure should be that indicated on
the label when the tyres are cold at all times
››› page 243.
● Re
gularly check the cold inflation pressure
of the tyres. If necessary, change the tyre
pressure of the vehicle tyres while they are
cold.
● Regularly check your tyres for damage and
wear. ●
Never exceed the maximum permitted
speed or loads specified for the type of tyre
fitted on your vehicle. For the sake of the environment
Under-inflated tyres lead to increased fuel
consumption and tyre wear. Note
● Driving for the first time with new tyres at a
high speed can cause them to slightly ex-
pand, which could then produce an air pres-
sure warning.
● Only replace used tyres with those author-
ised by SEAT for the corresponding type vehi-
cle.
● Do not only rely on the tyre monitoring sys-
tem. Regularly check your tyres to ensure
that the tyre pressure is correct and that the
tyres are not damaged due to puncture, cuts,
tears and impacts/dents. Remove objects
from the tyres only when they have not
pierced the tyres. Tyre monitor indicator warning lamp
If a light appears
The pressure in one or more tyres has
clearly reduced in comparison to the
tyre pressure set by the driver or the
tyre has structural damage.
Additionally, an audible warning can be heard and a text
message can be seen on the instrument panel display.
Stop the vehicle!
Reduce speed immediately! Stop
the vehicle safely as soon as possible. Avoid sudden
manoeuvres and braking! Check all tyres and pressures.
Replace any damaged tyres. If flashing
System malfunction
The control lamp flashes for approximately one minute
and then lights up permanently.
If tyre pressure is correct, switch the ignition off and on
again. If the control lamp remains lit up, the tyre moni-
toring indicator can be calibrated. Have the system
checked by a specialised workshop.
Several warning and control lamps light up
for a few seconds when the ignition is switch-
ed on while the function is verified. They will
switch off after a few seconds.
WARNING
When the tyres are inflated at different pres-
sures or at a pressure that is too low then a
tyre may be damaged resulting in a loss of 212
Page 215 of 284

Wheels
control of the vehicle and a serious or fatal
accident.
●
If the warning lamp lights up, stop im-
mediately and check the tyres.
● If the tyres are inflated at different pres-
sures or if a tyre pressure is too low, this will
increase tyre wear, negatively affecting vehi-
cle stability and increasing braking distan-
ces.
● If tyres are inflated at different pressures or
a tyre pressure is too low, a tyre may be dam-
aged and burst resulting in a loss of control
of the vehicle.
● The driver is responsible for ensuring that
all of the vehicle tyres are correctly inflated
to the right pressure. The recommended tyre
pressure is indicated on the label
››› page 243.
● The ty r
e monitoring system can only oper-
ate correctly if all of the tyres are inflated to
the correct pressure when cold.
● Driving with tyres at the wrong pressure
can damage them and result in an accident.
Ensure that the tyre pressures of all the tyres
correspond to the vehicle load.
● Before starting a journey, always inflate
tyres to the correct pressure.
● Tyres with insufficient pressure are subjec-
ted to more flexing. Due to this, the tyre
could become excessively hot, causing tread
separation and also tyre blow-out.
● With an overloaded vehicle at high speed,
the tyres can overheat and burst resulting in
a loss of vehicle control. ●
Tyre pressures which are too high or too
low reduce the useful life of the tyre, affect-
ing vehicle performance.
● If a tyre has not been punctured and it does
not have to be changed immediately, drive to
the nearest specialised workshop at a moder-
ate speed and have the tyre checked and in-
flated to the correct pressure. WARNING
Observe the safety warnings ››› in Control
and warning lamps on page 71. Note
● If excessively low tyre pressure is detected
with the ignition on, an audible warning will
sound. In the event that there is a fault in the
system, an audible warning will sound.
● Driving on dirt tracks for a long period of
time or driving in a sporty style can tempora-
rily deactivate the TPMS. The control lamp
shows a fault, but disappears when road con-
ditions or the driving style change. Tyre monitoring indicator
Fig. 179
Instrument panel: warning of loss of
tyre pressure. The tyre monitor indicator compares wheel
revolutions and, with this information, the
tread of each wheel using the ABS sensors. If
the rolling circumference of one or more
wheels has changed, the tyre monitoring in-
dicator will indicate this on the instrument
panel through a warning lamp and a warning
to the driver
››› Fig. 179 . When only one spe-
c ific
tyre is affected, its position within the
vehicle will be indicated.
Loss of pressure: Check left tyre pressure!
Wheel tread change
The wheel tread changes when: ● Tyre pressure is manually changed
● Tyre pressure is insufficient
● Tyre structure is damaged »
213
Technical specifications
Advice
Operation
Safety
The essentials
Page 216 of 284
.
● The vehicle is fitted with snow chains
● The temporary sp")
Advice
● The vehicle is unbalanced because of a
load
● The wheels on an axle are subject to a
heavier load (e.g. with a heavy load).
● The vehicle is fitted with snow chains
● The temporary spare wheel is fitted
● The wheel on one axle is changed
There may be a delay in the reaction of the
tyre
monitoring indicator or it may not in-
dic
ate anything under certain circumstances
(e.g. sporty driving, snow-covered or un-
paved roads, or when driving with snow
chains).
Calibrating the tyre monitoring
indicator Fig. 180
Glove compartment: tyre control
switch. After changing the tyre pressure or replacing
one or more wheels, the tyre monitoring indi-
cator must be recalibrated. Do the same, for
example, when the front and rear wheels are
swapped.
● Switch the ignition on.
● Store the new tyre pressure in the Easy
Connect system with the button and the
function button Setup
›››
page 17 or us-
ing the switch located in the glove compart-
ment* ››› Fig. 180 .
When driv in
g, the system self-calibrates the
tyre pressure provided by the driver and the
wheels fitted. After a long journey with varied
speeds the programmed values are collected
and monitored.
With the wheels under very heavy loads, the
tyre pressure must be increased to the total
recommended tyre pressure before the cali-
bration ››› page 243
. Note
● The tyre monitoring indicator does not
function when there is a fault in the ESC or
ABS ››› page 143.
● An err oneou
s indication may be given when
snow chains are in use because they increase
the tread of the wheel. Compact temporary spare
wheel
General information Fig. 181
Compact temporary spare wheel:
raised floor panel. The temporary spare wheel has been de-
signed to be used for short periods of time.
Have the tyres checked, and if necessary, re-
placed as soon as possible at a SEAT Official
Service or at a specialised workshop.
Please note the following restrictions when
using the compact temporary spare wheel.
The compact temporary spare wheel is de-
signed specifically for this model. For this
reason, do not use a temporary spare wheel
from a different type of vehicle.
214
 1
1 2
2 3
3 4
4 5
5 6
6 7
7 8
8 9
9 10
10 11
11 12
12 13
13 14
14 15
15 16
16 17
17 18
18 19
19 20
20 21
21 22
22 23
23 24
24 25
25 26
26 27
27 28
28 29
29 30
30 31
31 32
32 33
33 34
34 35
35 36
36 37
37 38
38 39
39 40
40 41
41 42
42 43
43 44
44 45
45 46
46 47
47 48
48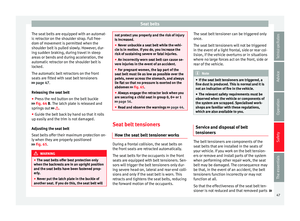 49
49 50
50 51
51 52
52 53
53 54
54 55
55 56
56 57
57 58
58 59
59 60
60 61
61 62
62 63
63 64
64 65
65 66
66 67
67 68
68 69
69 70
70 71
71 72
72 73
73 74
74 75
75 76
76 77
77 78
78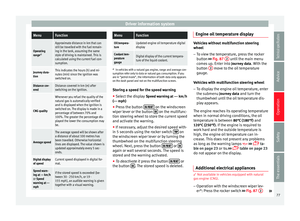 79
79 80
80 81
81 82
82 83
83 84
84 85
85 86
86 87
87 88
88 89
89 90
90 91
91 92
92 93
93 94
94 95
95 96
96 97
97 98
98 99
99 100
100 101
101 102
102 103
103 104
104 105
105 106
106 107
107 108
108 109
109 110
110 111
111 112
112 113
113 114
114 115
115 116
116 117
117 118
118 119
119 120
120 121
121 122
122 123
123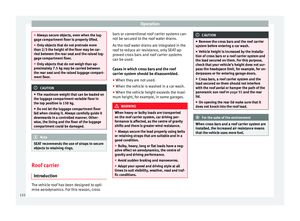 124
124 125
125 126
126 127
127 128
128 129
129 130
130 131
131 132
132 133
133 134
134 135
135 136
136 137
137 138
138 139
139 140
140 141
141 142
142 143
143 144
144 145
145 146
146 147
147 148
148 149
149 150
150 151
151 152
152 153
153 154
154 155
155 156
156 157
157 158
158 159
159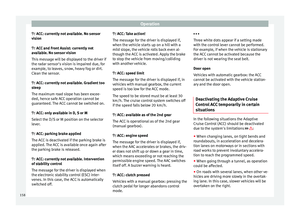 160
160 161
161 162
162 163
163 164
164 165
165 166
166 167
167 168
168 169
169 170
170 171
171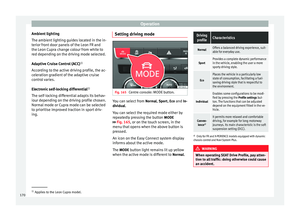 172
172 173
173 174
174 175
175 176
176 177
177 178
178 179
179 180
180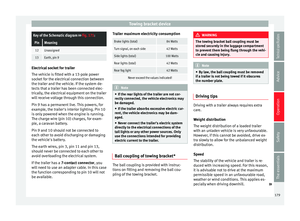 181
181 182
182 183
183 184
184 185
185 186
186 187
187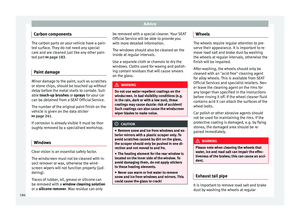 188
188 189
189 190
190 191
191 192
192 193
193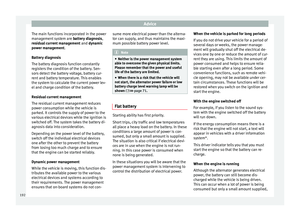 194
194 195
195 196
196 197
197 198
198 199
199 200
200 201
201 202
202 203
203 204
204 205
205 206
206 207
207 208
208 209
209 210
210 211
211 212
212 213
213 214
214 215
215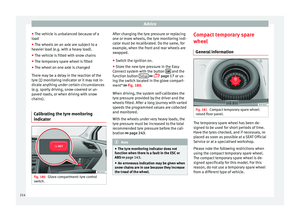 216
216 217
217 218
218 219
219 220
220 221
221 222
222 223
223 224
224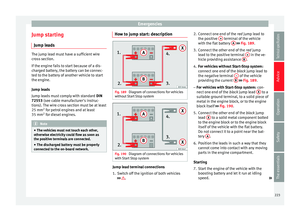 225
225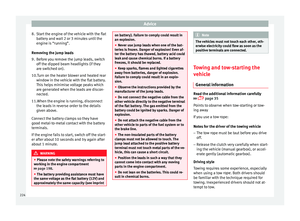 226
226 227
227 228
228 229
229 230
230 231
231 232
232 233
233 234
234 235
235 236
236 237
237 238
238 239
239 240
240 241
241 242
242 243
243 244
244 245
245 246
246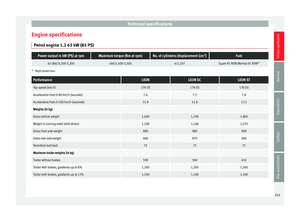 247
247 248
248 249
249 250
250 251
251 252
252 253
253 254
254 255
255 256
256 257
257 258
258 259
259 260
260 261
261 262
262 263
263 264
264 265
265 266
266 267
267 268
268 269
269 270
270 271
271 272
272 273
273 274
274 275
275 276
276 277
277 278
278 279
279 280
280 281
281 282
282 283
283