2014 NISSAN TEANA mirror
[x] Cancel search: mirrorPage 2591 of 4801

WINDSHIELD GLASSGW-11
< REMOVAL AND INSTALLATION >
C
D E
F
G H
I
J
L
M A
B
GW
N
O P
REMOVAL AND INSTALLATION
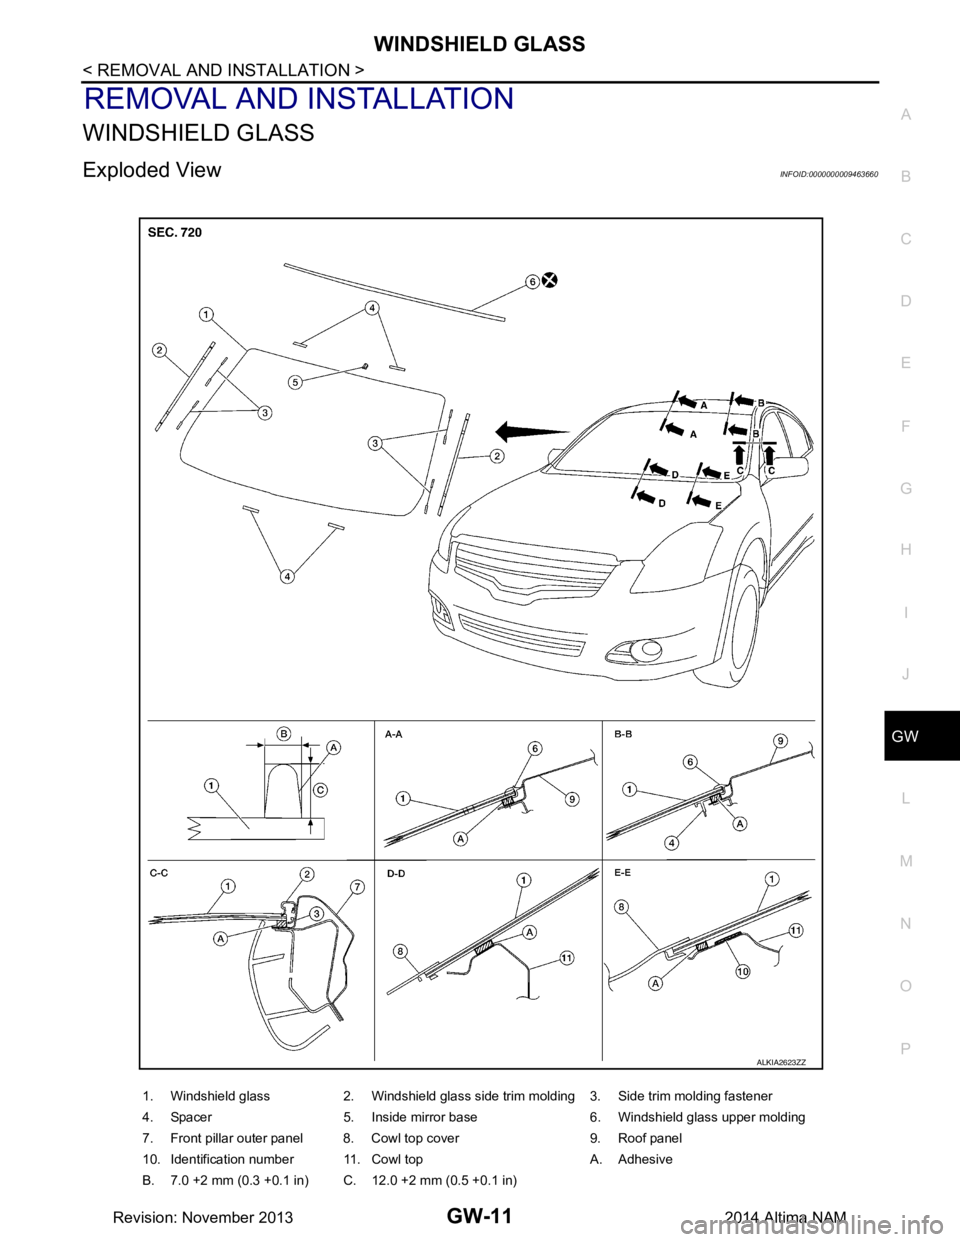
WINDSHIELD GLASS
Exploded ViewINFOID:0000000009463660
1. Windshield glass 2. Windshield glass side trim molding 3. Side trim molding fastener
4. Spacer 5. Inside mirror base 6. Windshield glass upper molding
7. Front pillar outer panel 8. Cowl top cover 9. Roof panel
10. Identification number 11. Cowl top A. Adhesive
B. 7.0 +2 mm (0.3 +0.1 in) C. 12.0 +2 mm (0.5 +0.1 in)
ALKIA2623ZZ
Revision: November 20132014 Altima NAM
Page 2592 of 4801

GW-12
< REMOVAL AND INSTALLATION >
WINDSHIELD GLASS
Removal and Installation
INFOID:0000000009463661
REMOVAL
1. Partially remove the headlining (front edge). Refer to INT-30, "Removal and Installation".
2. Remove inside mirror. Refer to MIR-19, "Removal and Installation"
.
3. Remove the cowl top cover. Refer to EXT-24, "Removal and Installation"
.
4. Remove roof side moldings (LH/RH). Refer to EXT-36, "Removal and Installation"
.
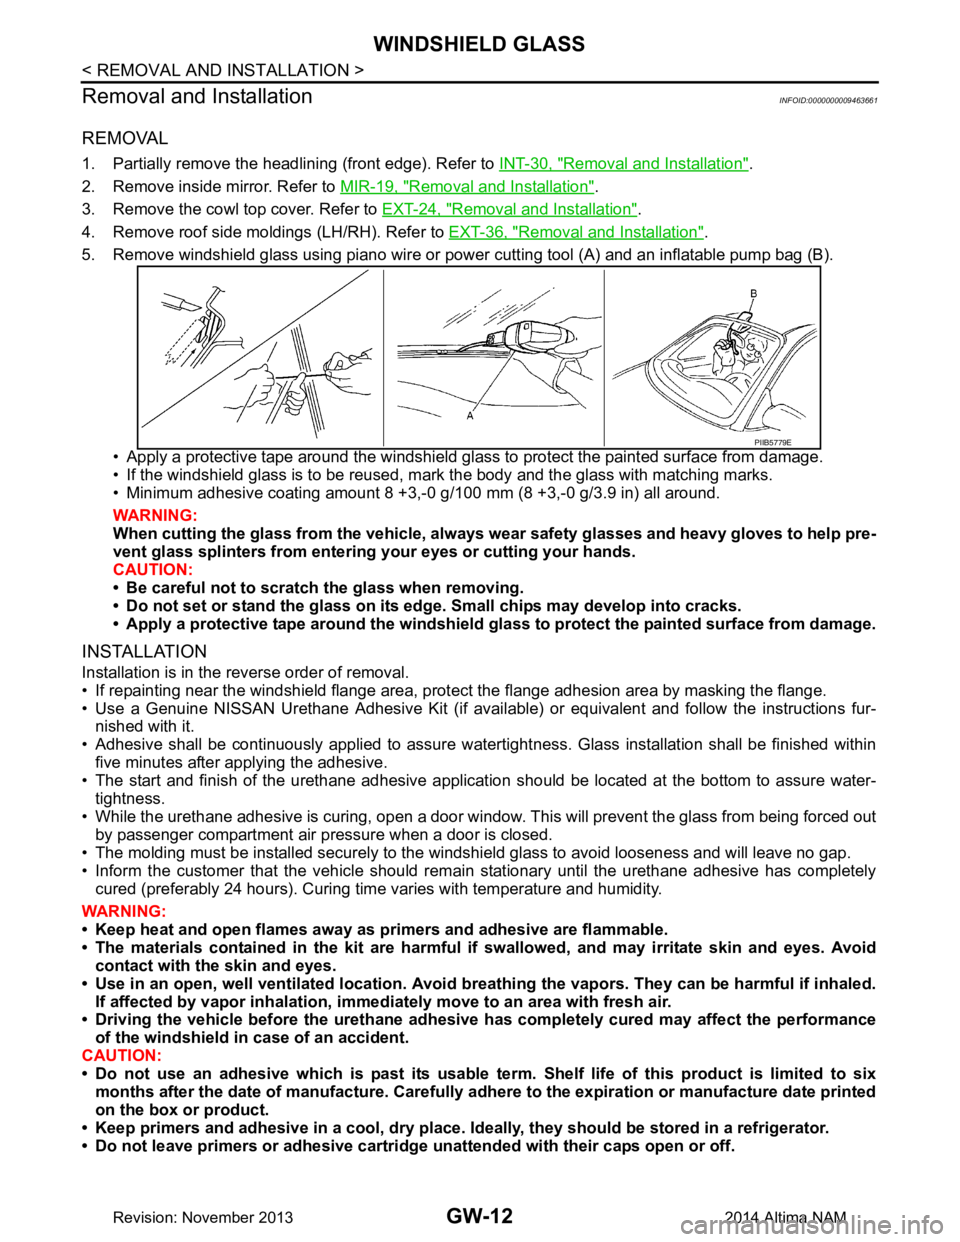
5. Remove windshield glass using piano wire or pow er cutting tool (A) and an inflatable pump bag (B).
• Apply a protective tape around the windshield gla ss to protect the painted surface from damage.
• If the windshield glass is to be reused, mark the body and the glass with matching marks.
• Minimum adhesive coating amount 8 +3,- 0 g/100 mm (8 +3,-0 g/3.9 in) all around.
WARNING:
When cutting the glass from the vehicle, always wear safety glasses and heavy gloves to help pre-
vent glass splinters from entering your eyes or cutting your hands.
CAUTION:
• Be careful not to scratch the glass when removing.
• Do not set or stand the glass on its ed ge. Small chips may develop into cracks.
• Apply a protective tape around the windshield glass to protect the painted surface from damage.
INSTALLATION
Installation is in the reverse order of removal.
• If repainting near the windshield flange area, pr otect the flange adhesion area by masking the flange.
• Use a Genuine NISSAN Urethane Adhesive Kit (if availabl e) or equivalent and follow the instructions fur-
nished with it.
• Adhesive shall be continuously applied to assure watert ightness. Glass installation shall be finished within
five minutes after applying the adhesive.
• The start and finish of the urethane adhesive application should be located at the bottom to assure water-
tightness.
• While the urethane adhesive is curing, open a door window . This will prevent the glass from being forced out
by passenger compartment air pressure when a door is closed.
• The molding must be installed securely to the windshield glass to avoid looseness and will leave no gap.
• Inform the customer that the vehicle should rema in stationary until the urethane adhesive has completely
cured (preferably 24 hours). Curing time varies with temperature and humidity.
WARNING:
• Keep heat and open flames away as primers and adhesive are flammable.
• The materials contained in the kit are harmful if swallowed, and may irritate skin and eyes. Avoid
contact with the skin and eyes.
• Use in an open, well ventilated location. Avoid br eathing the vapors. They can be harmful if inhaled.
If affected by vapor inhalation, imme diately move to an area with fresh air.
• Driving the vehicle before the urethane adhesive has completely cured may affect the performance
of the windshield in case of an accident.
CAUTION:
• Do not use an adhesive which is past its usable te rm. Shelf life of this product is limited to six
months after the date of manufacture. Carefully a dhere to the expiration or manufacture date printed
on the box or product.
• Keep primers and adhesive in a c ool, dry place. Ideally, they should be stored in a refrigerator.
• Do not leave primers or adhesive cartridge unattended with their caps open or off.
PIIB5779E
Revision: November 20132014 Altima NAM
Page 2628 of 4801

HA-22
< PERIODIC MAINTENANCE >
REFRIGERANT
4. Press UV lamp switch (5) and check A/C system for refrigerant leakage. (Where refrigerant leakage
occurs, fluorescent leak detec tion dye appears in green color.)
WARNING:
Do not look directly into UV lamp light source.
NOTE:
• For continuous operating time of UV lamp, follow the manufacturer operating instructions.
• Illuminate piping joints from different angles using UV lamp and check that there is no leakage.
• Use a mirror in area that is difficult to see to check refrigerant leakage.
• Refrigerant leakage from evaporator can be detected by soaking cotton swab or a similar material with
drain hose water and illuminating it using UV lamp.
• Dust, dirt and packing materials adhesive used for condenser, evaporator, and other locations may fluo- resce. Be careful not to misidentify leakage.
5. Repair or replace parts where refrigerant leakage occurs and wipe off fluorescent leak detection dye. NOTE:
Completely wipe off fluorescent leak detection dy e from gaps between parts, screw threads, and others
using a cotton swab or similar materials.
6. Use a UV lamp to check that no fluorescent leak detection dye remains after finishing work.
WARNING:
Do not look directly into UV lamp light source.
NOTE:
• For continuous operating time of UV lamp, follow the manufacturer operating instructions.
• Dust, dirt, and packing materials adhesive used for condenser, evaporator, and other locations may flu-
oresce. Be careful not to misidentify leakage.
CHECK REFRIGERANT LEAKAGE USING ELECTRICAL LEAK DETECTOR
WARNING:
Do not check refrigerant leakage while the engine is running.
CAUTION:
Be careful of the following it ems so that inaccurate checks or misidentifications are avoided.
• Do not allow refrigerant vapor, shop chemical vapor s, cigarette smoke or others around the vehicle.
• Always check refrigerant leakage in a low air flow en vironment so that refrigerant may not disperse
when leakage occurs.
1. Stop the engine.
2. Connect recovery/recycling/recharging equipment or manifold gauge set (J-39183-C) to A/C service
valve.
3. Check that A/C refrigerant pressure is 345 kPa (3.52 kg/cm
2, 50 psi) or more when temperature is 16 °C
(61 °F) or more. When pressure is lower than the specif ied value, recycle refrigerant completely and fill
refrigerant to the specified level.
NOTE:
Leakages may not be detected if A/C refrigerant pressure is 345 kPa (3.52 kg/cm
2, 50 psi) or less when
temperature is less than 16 °C (61 °F).
4. Clean area where refrigerant leakage check is performed and check refrigerant leakage along all surfaces of pipe connections and A/C system components us ing electrical leak detector (J-41995) probe.
CAUTION:
• Continue checking when a leakag e is found. Always continue and complete checking along all
pipe connections and A/C system components for additional leakage.
• When a leakage is detected, clean leakage area using compressed air and check again.
• When checking leakage of cooling unit inside, always clean inside of drain hose so that the
probe surface may not be exposed to water or dirt.
NOTE:
• Always check leakage starting from high-pressure side and continue to low-pressure side.
• When checking leakage of cooling unit inside, operate bl ower fan motor for 15 minutes or more at the
maximum fan speed while the engine is stopped, and then in sert electrical leak detector probe into drain
hose and hold for 10 minutes or more.
• When disconnecting shut-off valve that is connected to A/C service valve, always evacuate remaining
refrigerant so that misidentification can be avoided.
5. Repair or replace parts where refrigerant leak age is detected. (Leakage is detected but leakage area is
unknown.)
Revision: November 20132014 Altima NAM
Page 2823 of 4801

INL-2
Component Function Check ...................................54
Diagnosis Procedure ..............................................54
STEP LAMP CIRCUIT .......................................56
Description ........................................................... ...56
Component Function Check ...................................56
Diagnosis Procedure ..............................................56
TRUNK ROOM LAMP CIRCUIT ........................58
Description ........................................................... ...58
Component Function Check ...................................58
Diagnosis Procedure ..............................................58
PUSH-BUTTON IGNITION SWITCH ILLUMI-
NATION CIRCUIT ........................................... ...
60
Description ........................................................... ...60
Component Function Check ...................................60
Diagnosis Procedure ..............................................60
SYMPTOM DIAGNOSIS .............................62
INTERIOR LIGHTING SYSTEM SYMPTOMS ...62
Symptom Table ................................................... ...62
REMOVAL AND INSTALLATION ...............63
FRONT ROOM/MAP LAMP ............................ ...63
Removal and Installation ..................................... ...63
Bulb Replacement ..................................................63
VANITY MIRROR LAMP ...................................64
Removal and Installation .........................................64
Bulb or Lens Replacement ................................... ...64
GLOVE BOX LAMP ...........................................65
Removal and Installation .........................................65
Bulb Replacement ................................................ ...65
STEP LAMP .......................................................66
Bulb or Lens Replacement ................................... ...66
PERSONAL LAMP ............................................67
Removal and Installation .........................................67
Bulb or Lens Replacement ................................... ...67
TRUNK ROOM LAMP .......................................68
Removal and Installation .........................................68
Bulb Replacement ................................................ ...68
ILLUMINATION CONTROL SWITCH ...............69
Removal and Installation .........................................69
SERVICE DATA AND SPECIFICATIONS
(SDS) ............... ...........................................
70
SERVICE DATA AND SPECIFICATIONS
(SDS) .............................................................. ...
70
Bulb Specifications ............................................... ...70
Revision: November 20132014 Altima NAMRevision: November 20132014 Altima NAM
Page 2829 of 4801

INL-8
< SYSTEM DESCRIPTION >
INTERIOR ROOM LAMP CONTROL SYSTEM
The BCM controls the following interior lamps:
• Front step lamp LH/RH
• Front room/map lamp LH/RH
• Personal lamp rear LH/RH
• Vanity mirror lamp LH/RH (if equipped)
• Trunk room lamp
After the battery saver system turns the la mps OFF, the lamps will illuminate again when:
• A signal is received from an Intelligent Key or main power window and door lock/unlock switch or when the front door lock assembly LH (key cylinder switch) is locked or unlocked.
• A door is opened or closed.
Revision: November 20132014 Altima NAMRevision: November 20132014 Altima NAM
Page 2837 of 4801

INL-16
< SYSTEM DESCRIPTION >
DIAGNOSIS SYSTEM (BCM)
*: Initial SettingANSWERBACK I-KEY LOCK UNLOCK
BUZZER Buzzer reminder function by door lock/unlock request switch ON.
HORN Horn chirp reminder function by door lock request switch ON.
Off* No reminder function by door lock/unlock request switch.
INVALID This mode is not used.
ANSWERBACK KEYLESS LOCK UN-
LOCK On
Buzzer or horn chirp reminder when doors are locked/unlocked with
Intelligent Key.
Off* No buzzer or horn chirp reminder when doors are locked/unlocked
with Intelligent Key.
ANSWER BACK On* Horn chirp reminder when doors are locked with Intelligent Key.
Off No horn chirp reminder when doors are locked with Intelligent Key.
RETRACTABLE MIRROR SET On Retractable mirror set ON.
Off* Retractable mirror set OFF.
CONFIRM KEY FOB ID — Intelligent Key ID code can check.
LOCK/UNLOCK BY I-KEY On* Door lock/unlock function from Intelligent Key ON.
Off Door lock/unlock function from Intelligent Key OFF.
ENGINE START BY I-KEY On* Engine start function from Intelligent Key ON.
Off Engine start function from Intelligent Key OFF.
TRUNK/GLASS HATCH OPEN On* Buzzer reminder function by trunk opener request switch ON.
Off Buzzer reminder function by trunk opener request switch OFF.
INTELLIGENT KEY LINK SET On Intelligent Key link set ON.
Off* Intelligent Key link set OFF.
SHORT CRANKING OUTPUT Start70 msec
Starter motor operation duration times.
100 msec
200 msec
End —
INSIDE ANT DIAGNOSIS — This function allows inside key antenna self-diagnosis.
AUTO LOCK SET MODE7 5 min
Auto door lock time can be set in this mode.
MODE6 4 min
MODE5 3 min
MODE4 2 min
MODE3* 1 min
MODE2 30 sec
MODE1 Off
Support Item Setting Description
Revision: November 20132014 Altima NAMRevision: November 20132014 Altima NAM
Page 2873 of 4801

INL-52
< DTC/CIRCUIT DIAGNOSIS >
BATTERY SAVER OUTPUT/POWER SUPPLY CIRCUIT
BATTERY SAVER OUTPUT/POWER SUPPLY CIRCUIT
DescriptionINFOID:0000000009463879
Provides the interior room lamp power supply. Also cuts the power supply when the interior room lamp battery
saver is activating.
Component Function CheckINFOID:0000000009463880
1.CHECK BATTERY SAVER OUTPUT /POWER SUPPLY FUNCTION
CONSULT
1. Turn ignition switch ON.
2. Turn each interior room lamp ON.
- Front room/map lamps
- Personal lamps rear
- Front step lamps
- Vanity mirror lamps (if equipped)
- Trunk room lamp
3. Open the driver door to turn ON the front step lamps.
4. Select BATTERY SAVER of BCM (BATTERY SAVER) active test item.
5. While operating the test item, check that each interior room lamp turn ON/OFF.
Is the inspection result normal?
YES >> Interior room lamp power supply circuit is normal.
NO >> Refer to INL-52, "Diagnosis Procedure"
.
Diagnosis ProcedureINFOID:0000000009463881
Regarding Wiring Diagram information, refer to INL-22, "Wiring Diagram".
1.CHECK BATTERY SAVER OUTPUT/POWER SUPPLY OUTPUT
CONSULT
1. Turn ignition switch ON.
2. Select BATTERY SAVER of BCM (BATTERY SAVER) active test item.
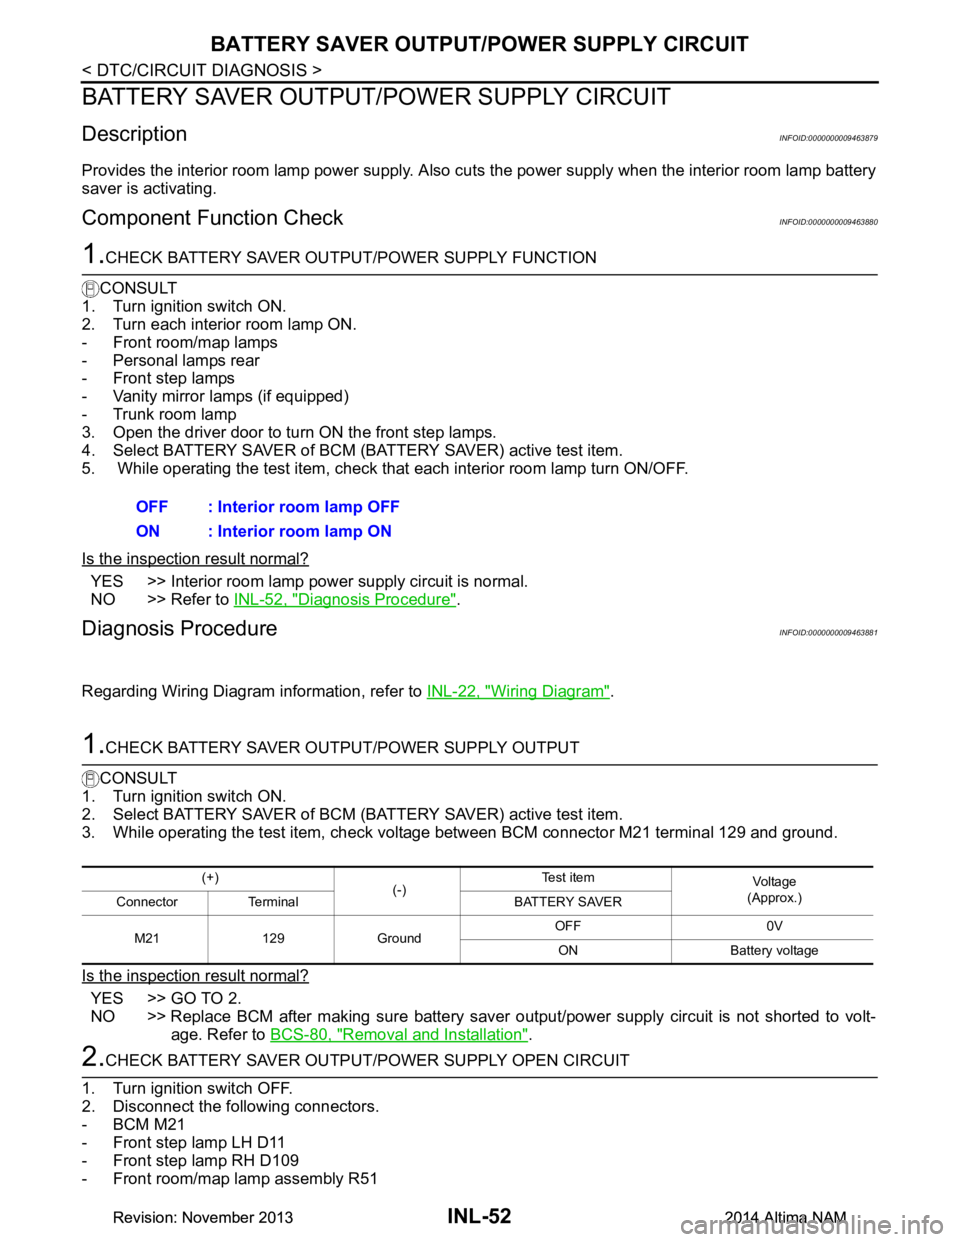
3. While operating the test item, check voltage between BCM connector M21 terminal 129 and ground.
Is the inspection result normal?
YES >> GO TO 2.
NO >> Replace BCM after making sure battery saver out put/power supply circuit is not shorted to volt-
age. Refer to BCS-80, "Removal and Installation"
.
2.CHECK BATTERY SAVER OUTPUT/P OWER SUPPLY OPEN CIRCUIT
1. Turn ignition switch OFF.
2. Disconnect the following connectors.
-BCM M21
- Front step lamp LH D11
- Front step lamp RH D109
- Front room/map lamp assembly R51 OFF : Interior room lamp OFF
ON : Interior room lamp ON
(+) (-)Te s t i t e m
Vo l ta g e
(Approx.)
Connector Terminal BATTERY SAVER
M21 129 Ground OFF 0V
ON Battery voltage
Revision: November 20132014 Altima NAMRevision: November 20132014 Altima NAM
Page 2874 of 4801

BATTERY SAVER OUTPUT/POWER SUPPLY CIRCUITINL-53
< DTC/CIRCUIT DIAGNOSIS >
C
D E
F
G H
I
J
K
M A
B
INL
N
O P
- Vanity mirror lamp LH (if equipped) R3
- Vanity mirror lamp RH (if equipped) R9
- Trunk room lamp B36
- Personal lamp rear R50
3. Check continuity between BCM connector M21 terminal 129 and each interior room lamp connector.
Is the inspection result normal?
YES >> GO TO 3.
NO >> Repair or replace harness or connectors.
3.CHECK BATTERY SAVER OUTPUT/POWER SUPPLY SHORT CIRCUIT
Check continuity between BCM connector M21 terminal 129 and ground.
Is the inspection result normal?
YES >> Check that each interior room lamp has no internal short circuit.
NO >> Repair or replace harness or connectors.
BCM Each interior room lamp Continuity
Connector Terminal Connector Terminal
M21 129 Front step lamp LH D11 1
Ye s
Front step lamp RH D109 1
Front room/map lamp assembly R51 1
Vanity mirror lamp LH R3 2
Vanity mirror lamp RH R9 2
Trunk room lamp B36 1
Personal lamp rear R50 3
BCM GroundContinuity
Connector Terminal
M21 129 No
Revision: November 20132014 Altima NAMRevision: November 20132014 Altima NAM