Page 2903 of 4801

INT-12
< SYMPTOM DIAGNOSIS >
SQUEAK AND RATTLE TROUBLE DIAGNOSES
1. Loose harness or harness connectors.
2. Front console map/reading lamp lens loose.
3. Loose screws at console attachment points.
SEATS
When isolating seat noise it's important to note the pos ition the seat is in and the load placed on the seat when
the noise is present. These conditions should be dupl icated when verifying and isolating the cause of the
noise.
Cause of seat noise include:
1. Headrest rods and holder
2. A squeak between the seat pad cushion and frame
3. The rear seatback lock and bracket
These noises can be isolated by moving or pressing on the suspected components while duplicating the con-
ditions under which the noise occurs. Most of thes e incidents can be repaired by repositioning the component
or applying urethane tape to the contact area.
UNDERHOOD
Some interior noise may be caused by components under the hood or on the engine wall. The noise is then
transmitted into the passenger compartment.
Causes of transmitted underhood noise include:
1. Any component installed to the engine wall
2. Components that pass through the engine wall
3. Engine wall mounts and connectors
4. Loose radiator installation pins
5. Hood bumpers out of adjustment
6. Hood striker out of adjustment
These noises can be difficult to isolate since they cannot be reached from the interior of the vehicle. The best
method is to secure, move or insulate one component at a time and test drive the vehicle. Also, engine rpm or
load can be changed to isolate the noise. Repairs can usually be made by moving, adjusting, securing, or
insulating the component causing the noise.
Revision: November 20132014 Altima NAM
Page 2906 of 4801
FRONT DOOR FINISHERINT-15
< REMOVAL AND INSTALLATION >
C
D E
F
G H
I
K L
M A
B
INT
N
O P
REMOVAL AND INSTALLATION
FRONT DOOR FINISHER
Exploded ViewINFOID:0000000009461342
NOTE:
LH side shown; RH side similar.
Removal and InstallationINFOID:0000000009461343
REMOVAL
1. Remove the inside door handle escutcheon.
a. Release the inside door handle escutcheon by pushing down on the pawl shown with a suitable tool.
: Pawl
1. Front door finisher 2. Front door finisher bracket 3. Main power window and door lock/ unlock switch finisher
4. Inside door handle escutcheon 5. Front door pull handle outer finisher 6. Front door pull handle inner finisher
7. Door mirror remote control switch 8. Inside door handle finisher Front
ALJIA0895ZZ
ALJIA0909ZZ
Revision: November 20132014 Altima NAM
Page 2907 of 4801
INT-16
< REMOVAL AND INSTALLATION >
FRONT DOOR FINISHER
b. Remove the inside door handle escutcheon by sliding theremaining pawls forward out of the inside door handle cap inser-
tion point (A).
: Pawl
: Front
CAUTION:
Do not reuse inside door handle escutcheon. Replace with
new part after removal.
2. Remove the inside door handle bolt (A).
3. Remove the main power window and door lock/unlock switch (LH). Refer to PWC-142, "Removal and
Installation".
4. Remove the power window and door lock/unlock switch (RH). Refer to PWC-143, "Removal and Installa-
tion".
5. Remove the armrest cover bolt (A).
6. Remove the front door pull handle bolt (A).
ALJIA0910ZZ
ALJIA0891ZZ
ALJIA0893ZZ
ALJIA0892ZZ
Revision: November 20132014 Altima NAM
Page 2908 of 4801
FRONT DOOR FINISHERINT-17
< REMOVAL AND INSTALLATION >
C
D E
F
G H
I
K L
M A
B
INT
N
O P
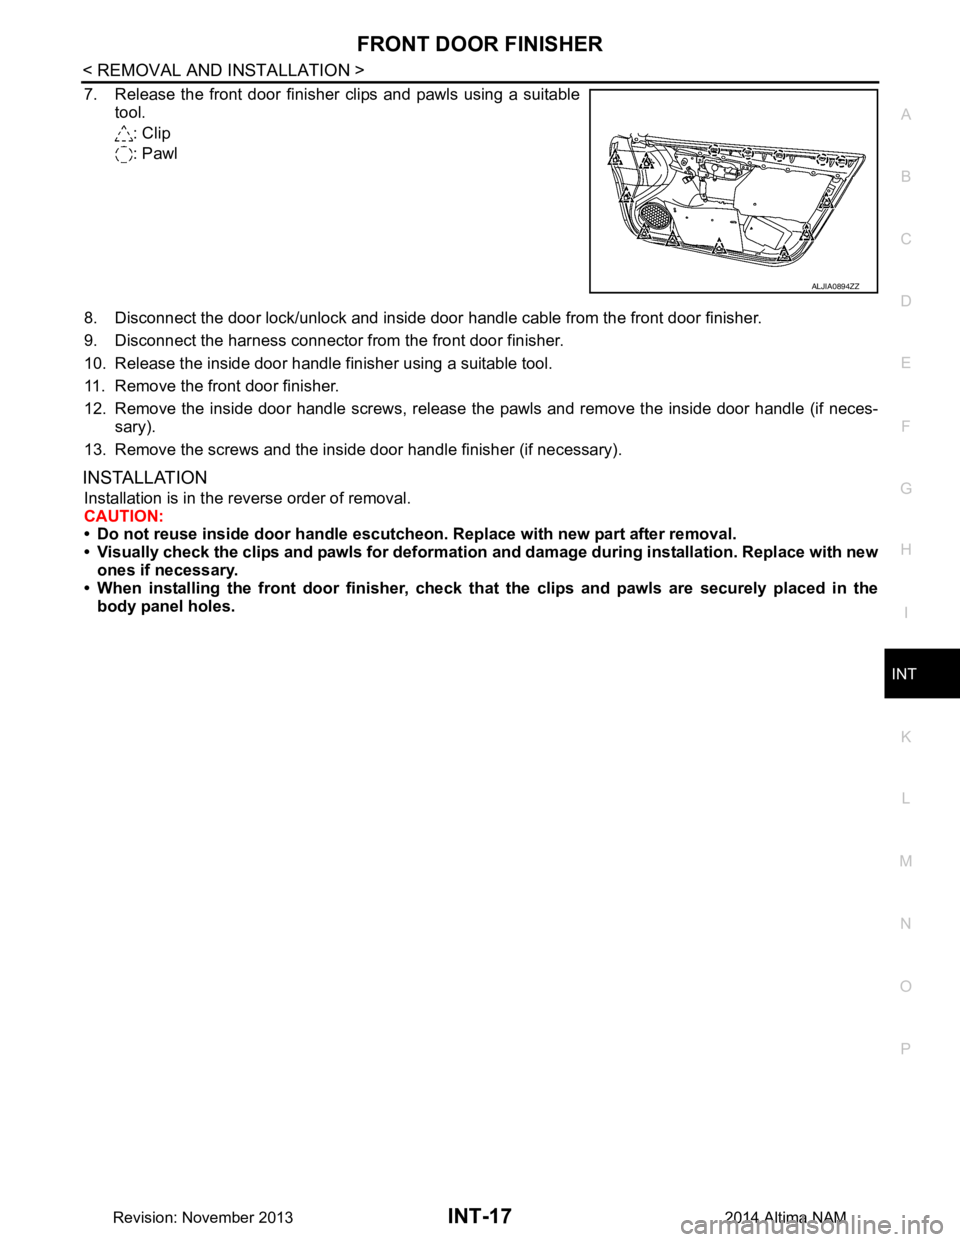
7. Release the front door finisher clips and pawls using a suitable tool.
: Clip
: Pawl
8. Disconnect the door lock/unlock and inside door handle cable from the front door finisher.
9. Disconnect the harness connector from the front door finisher.
10. Release the inside door handle finisher using a suitable tool.
11. Remove the front door finisher.
12. Remove the inside door handle screws, release the pawls and remove the inside door handle (if neces- sary).
13. Remove the screws and the inside door handle finisher (if necessary).
INSTALLATION
Installation is in the reverse order of removal.
CAUTION:
• Do not reuse inside door handle escutche on. Replace with new part after removal.
• Visually check the clips and pawls for deformation and damage during installation. Replace with new
ones if necessary.
• When installing the front door finisher, check th at the clips and pawls are securely placed in the
body panel holes.
ALJIA0894ZZ
Revision: November 20132014 Altima NAM
Page 2910 of 4801
REAR DOOR FINISHERINT-19
< REMOVAL AND INSTALLATION >
C
D E
F
G H
I
K L
M A
B
INT
N
O P
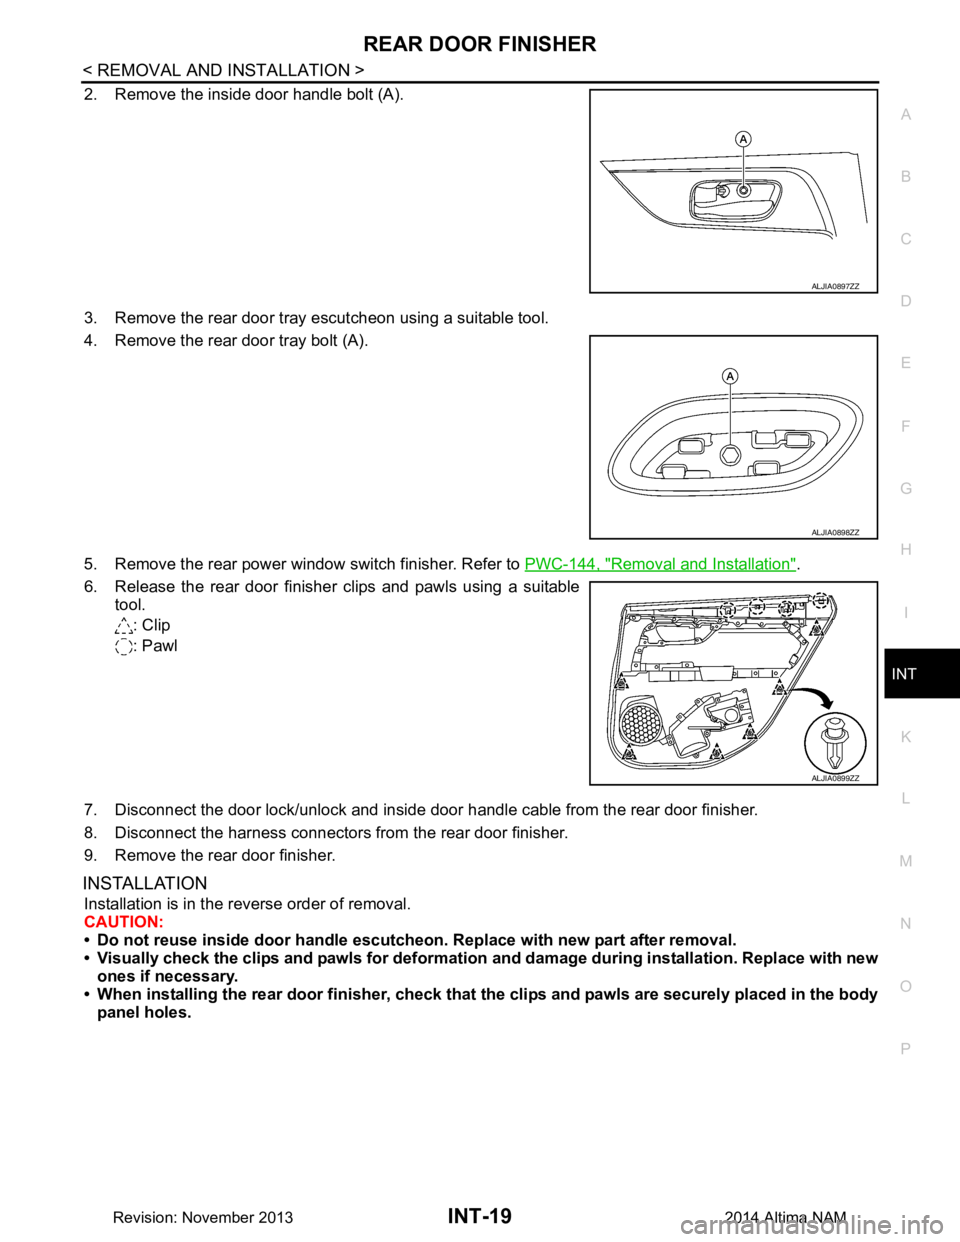
2. Remove the inside door handle bolt (A).
3. Remove the rear door tray escutcheon using a suitable tool.
4. Remove the rear door tray bolt (A).
5. Remove the rear power window switch finisher. Refer to PWC-144, "Removal and Installation"
.
6. Release the rear door finisher clips and pawls using a suitable tool.
: Clip
: Pawl
7. Disconnect the door lock/unlock and inside door handle cable from the rear door finisher.
8. Disconnect the harness connectors from the rear door finisher.
9. Remove the rear door finisher.
INSTALLATION
Installation is in the reverse order of removal.
CAUTION:
• Do not reuse inside door handle escutche on. Replace with new part after removal.
• Visually check the clips and pawls for deformation and damage during installation. Replace with new
ones if necessary.
• When installing the rear door fi nisher, check that the clips and pa wls are securely placed in the body
panel holes.
ALJIA0897ZZ
ALJIA0898ZZ
ALJIA0899ZZ
Revision: November 20132014 Altima NAM
Page 2917 of 4801
INT-26
< REMOVAL AND INSTALLATION >
REAR PARCEL SHELF FINISHER
REAR PARCEL SHELF FINISHER
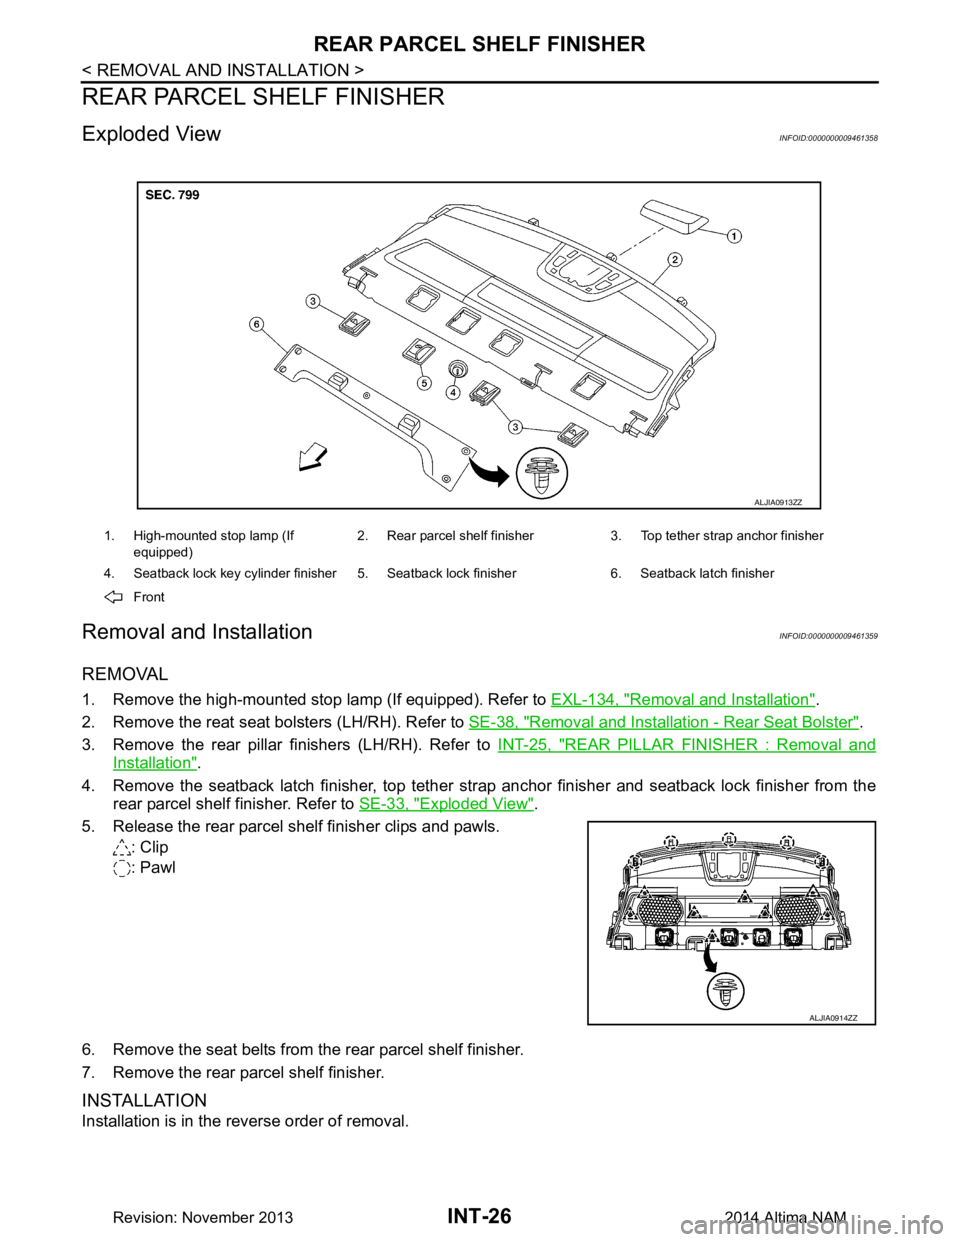
Exploded ViewINFOID:0000000009461358
Removal and InstallationINFOID:0000000009461359
REMOVAL
1. Remove the high-mounted stop lamp (If equipped). Refer to EXL-134, "Removal and Installation".
2. Remove the reat seat bolsters (LH/RH). Refer to SE-38, "Removal and Installation - Rear Seat Bolster"
.
3. Remove the rear pillar finishers (LH/RH). Refer to INT-25, "REAR PILLAR FINISHER : Removal and
Installation".
4. Remove the seatback latch finisher, top tether str ap anchor finisher and seatback lock finisher from the
rear parcel shelf finisher. Refer to SE-33, "Exploded View"
.
5. Release the rear parcel shelf finisher clips and pawls. : Clip
: Pawl
6. Remove the seat belts from the rear parcel shelf finisher.
7. Remove the rear parcel shelf finisher.
INSTALLATION
Installation is in the reverse order of removal.
1. High-mounted stop lamp (If equipped) 2. Rear parcel shelf finisher 3. Top tether strap anchor finisher
4. Seatback lock key cylinder finisher 5. Seatback lock finisher 6. Seatback latch finisher Front
ALJIA0913ZZ
ALJIA0914ZZ
Revision: November 20132014 Altima NAM
Page 2922 of 4801
HEADLININGINT-31
< REMOVAL AND INSTALLATION >
C
D E
F
G H
I
K L
M A
B
INT
N
O P
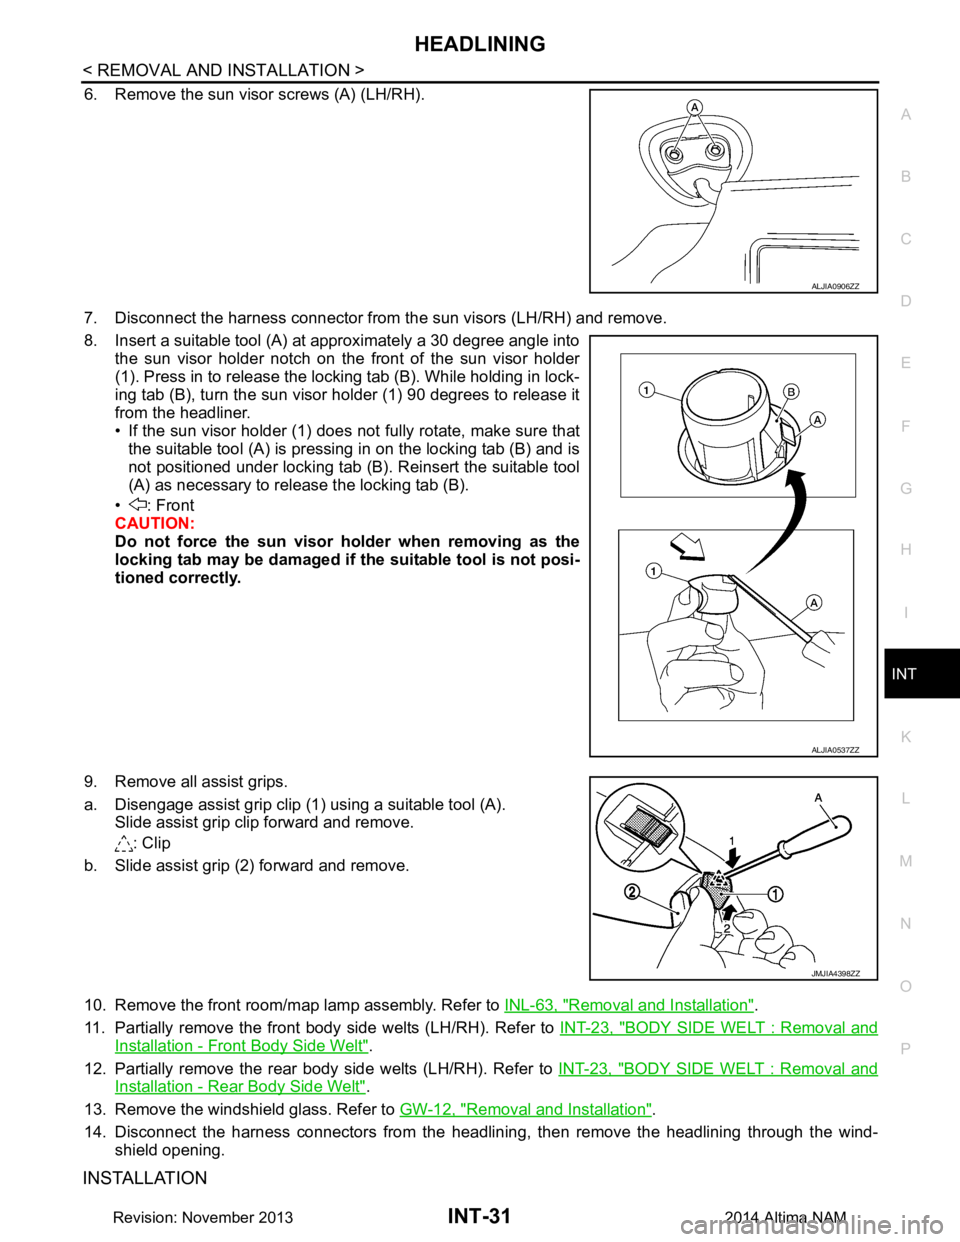
6. Remove the sun visor screws (A) (LH/RH).
7. Disconnect the harness connector from the sun visors (LH/RH) and remove.
8. Insert a suitable tool (A) at approximately a 30 degree angle into the sun visor holder notch on the front of the sun visor holder
(1). Press in to release the locking tab (B). While holding in lock-
ing tab (B), turn the sun visor holder (1) 90 degrees to release it
from the headliner.
• If the sun visor holder (1) does not fully rotate, make sure that the suitable tool (A) is pressing in on the locking tab (B) and is
not positioned under locking tab (B). Reinsert the suitable tool
(A) as necessary to release the locking tab (B).
• : Front
CAUTION:
Do not force the sun visor ho lder when removing as the
locking tab may be damaged if the suitable tool is not posi-
tioned correctly.
9. Remove all assist grips.
a. Disengage assist grip clip (1) using a suitable tool (A). Slide assist grip clip forward and remove.
: Clip
b. Slide assist grip (2) forward and remove.
10. Remove the front room/map lamp assembly. Refer to INL-63, "Removal and Installation"
.
11. Partially remove the front body side welts (LH/RH). Refer to INT-23, "BODY SIDE WELT : Removal and
Installation - Front Body Side Welt".
12. Partially remove the rear body side welts (LH/RH). Refer to INT-23, "BODY SIDE WELT : Removal and
Installation - Rear Body Side Welt".
13. Remove the windshield glass. Refer to GW-12, "Removal and Installation"
.
14. Disconnect the harness connectors from the headlin ing, then remove the headlining through the wind-
shield opening.
INSTALLATION
ALJIA0906ZZ
ALJIA0537ZZ
JMJIA4398ZZ
Revision: November 20132014 Altima NAM
Page 2934 of 4801
IP-8
< SYMPTOM DIAGNOSIS >
SQUEAK AND RATTLE TROUBLE DIAGNOSES
SYMPTOM DIAGNOSIS
SQUEAK AND RATTLE TROUBLE DIAGNOSES
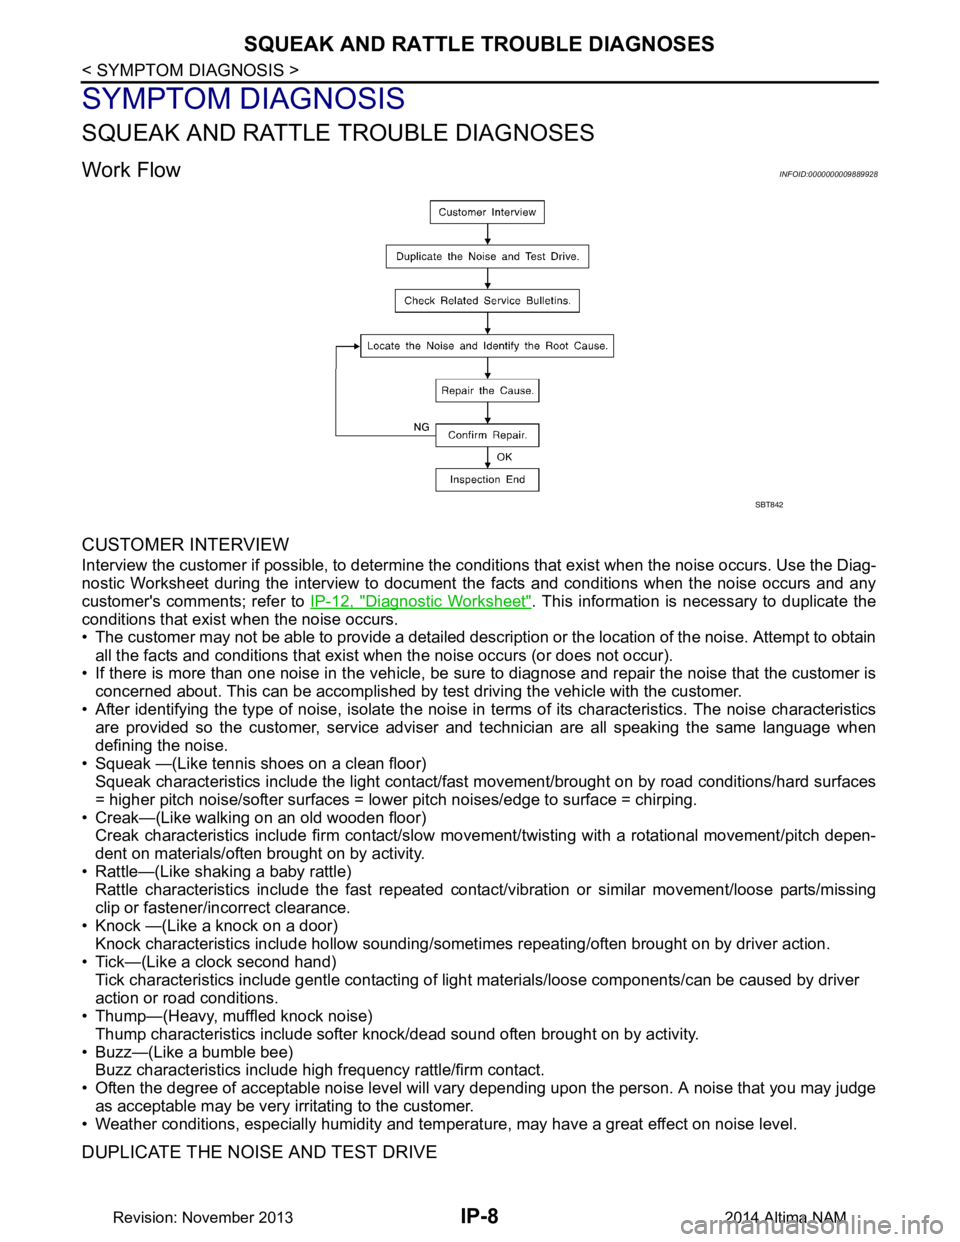
Work FlowINFOID:0000000009889928
CUSTOMER INTERVIEW
Interview the customer if possible, to determine the conditions that exist when the noise occurs. Use the Diag-
nostic Worksheet during the interview to document the facts and conditions when the noise occurs and any
customer's comments; refer to IP-12, "Diagnostic Worksheet"
. This information is necessary to duplicate the
conditions that exist when the noise occurs.
• The customer may not be able to provide a detailed description or the location of the noise. Attempt to obtain
all the facts and conditions that exist w hen the noise occurs (or does not occur).
• If there is more than one noise in the vehicle, be sure to diagnose and repair the noise that the customer is
concerned about. This can be accomplished by test driving the vehicle with the customer.
• After identifying the type of noise, isolate the noise in terms of its characteristics. The noise characteristics
are provided so the customer, service adviser and technician are all speaking the same language when
defining the noise.
• Squeak —(Like tennis shoes on a clean floor) Squeak characteristics include the light contact/fast movement/brought on by road conditions/hard surfaces
= higher pitch noise/softer surfaces = lower pitch noises/edge to surface = chirping.
• Creak—(Like walking on an old wooden floor) Creak characteristics include firm contact/slow mo vement/twisting with a rotational movement/pitch depen-
dent on materials/often brought on by activity.
• Rattle—(Like shaking a baby rattle) Rattle characteristics include the fast repeated contac t/vibration or similar movement/loose parts/missing
clip or fastener/incorrect clearance.
• Knock —(Like a knock on a door) Knock characteristics include hollow sounding/someti mes repeating/often brought on by driver action.
• Tick—(Like a clock second hand) Tick characteristics include gentle contacting of light materials/loose components/can be caused by driver
action or road conditions.
• Thump—(Heavy, muffled knock noise)
Thump characteristics include softer k nock/dead sound often brought on by activity.
• Buzz—(Like a bumble bee) Buzz characteristics include hi gh frequency rattle/firm contact.
• Often the degree of acceptable noise level will vary depending upon the person. A noise that you may judge
as acceptable may be very irritating to the customer.
• Weather conditions, especially humidity and temperat ure, may have a great effect on noise level.
DUPLICATE THE NOISE AND TEST DRIVE
SBT842
Revision: November 20132014 Altima NAM