2014 MITSUBISHI MIRAGE navigation
[x] Cancel search: navigationPage 58 of 135
58
5. Tap to save the
changes to the alert point.
Watching the simulation
of the route
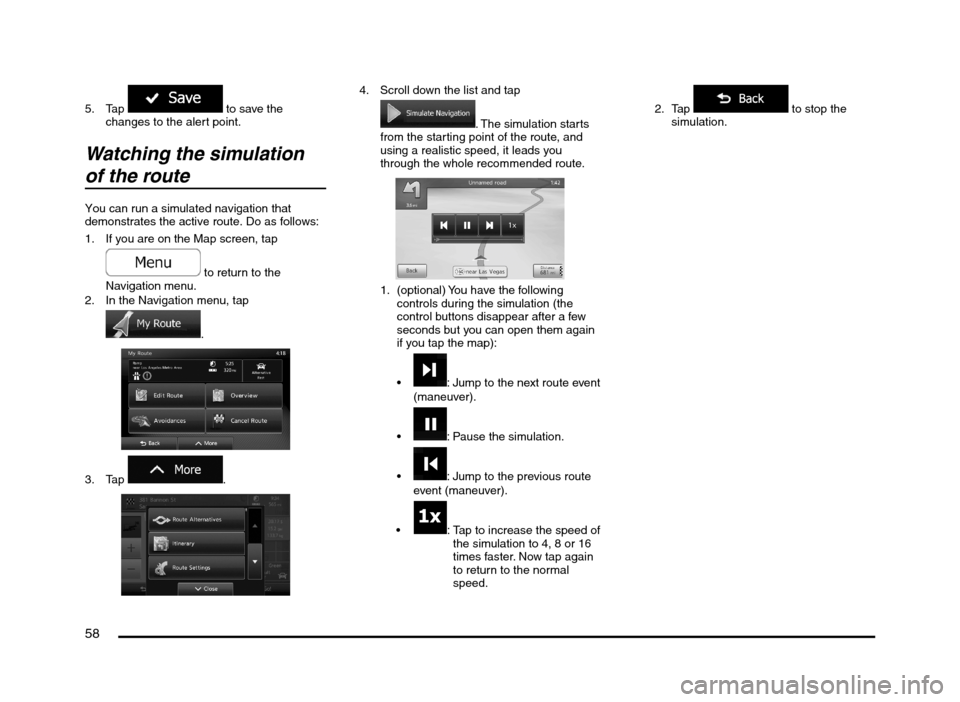
You can run a simulated navigation that
demonstrates the active route. Do as follows:
1. If you are on the Map screen, tap
to return to the
Navigation menu.
2. In the Navigation menu, tap
.
3. Tap
.
4. Scroll down the list and tap
. The simulation starts
from the starting point of the route, and
using a realistic speed, it leads you
through the whole recommended route.
1. (optional) You have the following
controls during the simulation (the
control buttons disappear after a few
seconds but you can open them again
if you tap the map):
: Jump to the next route event
(maneuver).
: Pause the simulation.
: Jump to the previous route
event (maneuver).
: Tap to increase the speed of
the simulation to 4, 8 or 16
times faster. Now tap again
to return to the normal
speed.2. Tap
to stop the
simulation.
205-0010-00_QY-7375M-A_EN.indb 58205-0010-00_QY-7375M-A_EN.indb 583/12/2013 9:57:23 AM3/12/2013 9:57:23 AM
Page 59 of 135
59
4. OFF-ROAD
NAVIGATION
When first started, MMES calculates routes
using the road network of the high quality
vector maps provided with the product. You
can switch the application to off-road mode
in Navigation settings in one of the following
ways:
From the Main menu, tap ,
, and then
.
From the Map screen, tap ,
and then
.
Most of the procedures described for on-road
navigation also apply to off-road navigation.
However, there are some that are not
available in this navigation mode (for example
you cannot open the itinerary as you have no
maneuvers just route points and straight lines
between them).
Selecting the destination
of the route
Selecting the start point or a destination
(waypoint or final destination) is the same as
described at on-road navigation. The only
difference is that route points are linked to
form a route with straight lines regardless of
the road network and traffic regulations.
Navigating in off-road
mode
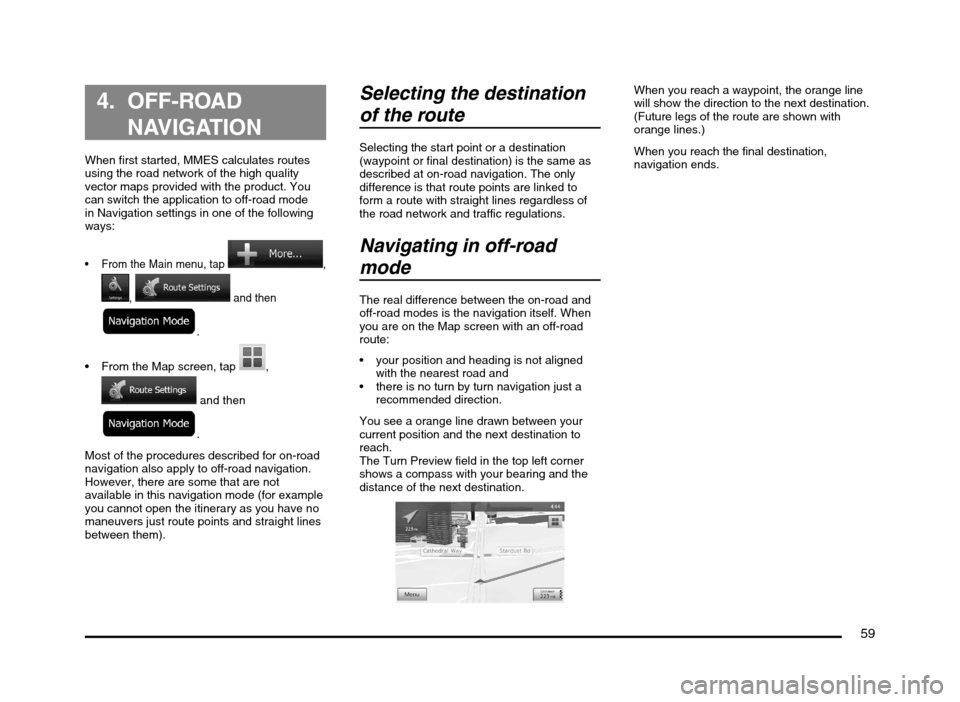
The real difference between the on-road and
off-road modes is the navigation itself. When
you are on the Map screen with an off-road
route:
your position and heading is not aligned
with the nearest road and
there is no turn by turn navigation just a
recommended direction.
You see a orange line drawn between your
current position and the next destination to
reach.
The Turn Preview field in the top left corner
shows a compass with your bearing and the
distance of the next destination.
When you reach a waypoint, the orange line
will show the direction to the next destination.
(Future legs of the route are shown with
orange lines.)
When you reach the final destination,
navigation ends.
205-0010-00_QY-7375M-A_EN.indb 59205-0010-00_QY-7375M-A_EN.indb 593/12/2013 9:57:23 AM3/12/2013 9:57:23 AM
Page 63 of 135
63
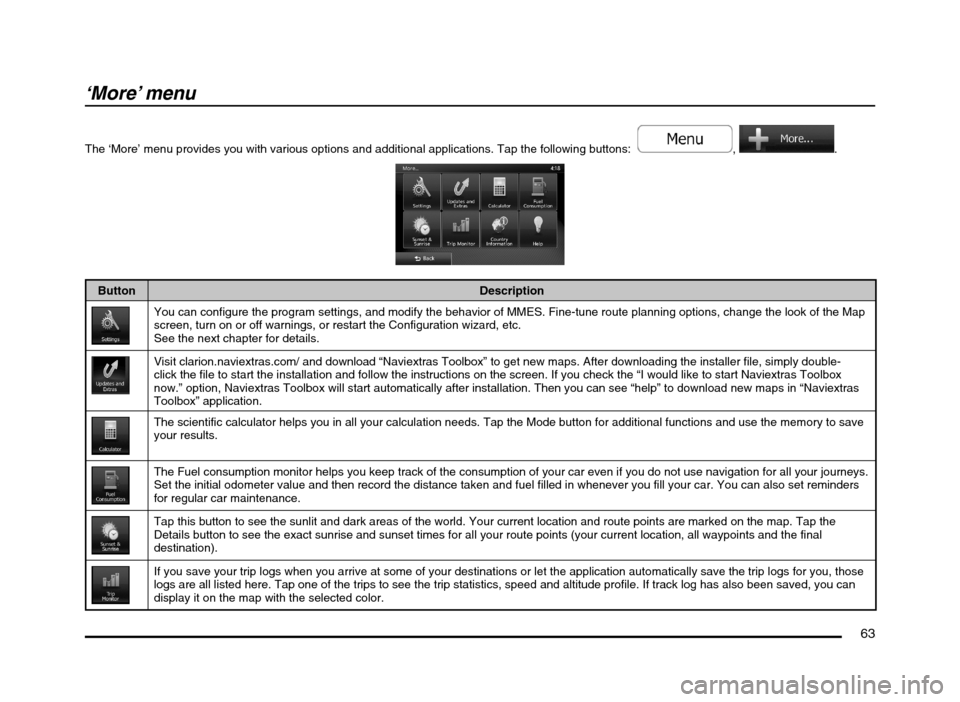
‘More’ menu
The ‘More’ menu provides you with various options and additional applications. Tap the following buttons: , .
Button Description
You can configure the program settings, and modify the behavior of MMES. Fine-tune route planning options, change the look of the Map
screen, turn on or off warnings, or restart the Configuration wizard, etc.
See the next chapter for details.
Visit clarion.naviextras.com/ and download “Naviextras Toolbox” to get new maps. After downloading the installer file, simply double-
click the file to start the installation and follow the instructions on the screen. If you check the “I would like to start Naviextras Toolbox
now.” option, Naviextras Toolbox will start automatically after installation. Then you can see “help” to download new maps in “Naviextras
Toolbox” application.
The scientific calculator helps you in all your calculation needs. Tap the Mode button for additional functions and use the memory to save
your results.
The Fuel consumption monitor helps you keep track of the consumption of your car even if you do not use navigation for all your journeys.
Set the initial odometer value and then record the distance taken and fuel filled in whenever you fill your car. You can also set reminders
for regular car maintenance.
Tap this button to see the sunlit and dark areas of the world. Your current location and route points are marked on the map. Tap the
Details button to see the exact sunrise and sunset times for all your route points (your current location, all waypoints and the final
destination).
If you save your trip logs when you arrive at some of your destinations or let the application automatically save the trip logs for you, those
logs are all listed here. Tap one of the trips to see the trip statistics, speed and altitude profile. If track log has also been saved, you can
display it on the map with the selected color.
205-0010-00_QY-7375M-A_EN.indb 63205-0010-00_QY-7375M-A_EN.indb 633/12/2013 9:57:24 AM3/12/2013 9:57:24 AM
Page 64 of 135
64
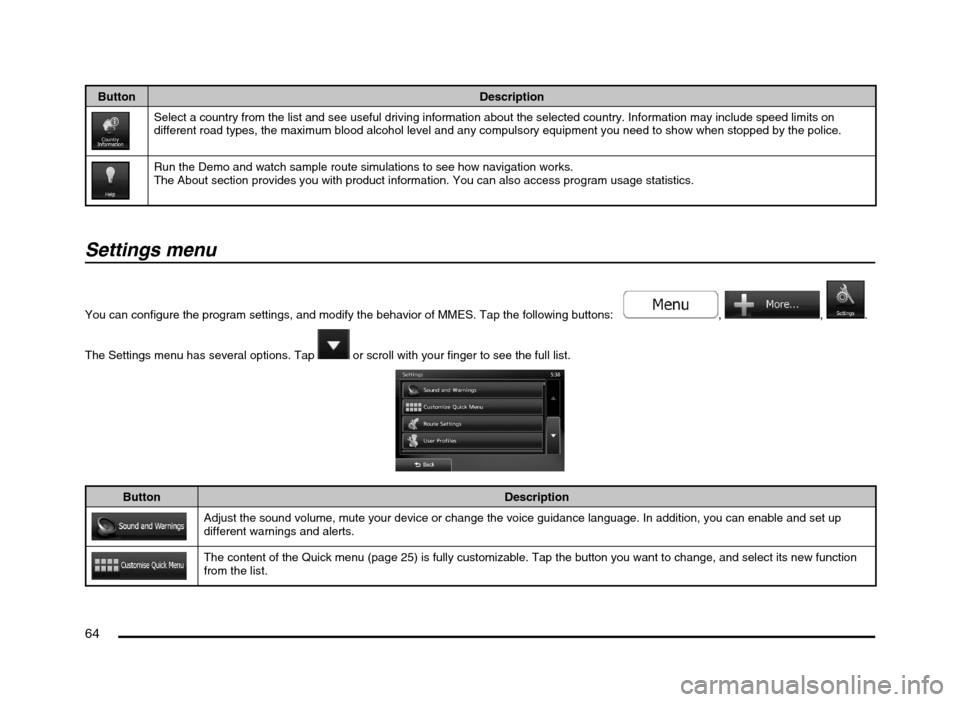
Button Description
Select a country from the list and see useful driving information about the selected country. Information may include speed limits on
different road types, the maximum blood alcohol level and any compulsory equipment you need to show when stopped by the police.
Run the Demo and watch sample route simulations to see how navigation works.
The About section provides you with product information. You can also access program usage statistics.
Settings menu
You can configure the program settings, and modify the behavior of MMES. Tap the following buttons: , , .
The Settings menu has several options. Tap
or scroll with your finger to see the full list.
Button Description
Adjust the sound volume, mute your device or change the voice guidance language. In addition, you can enable and set up
different warnings and alerts.
The content of the Quick menu (page 25) is fully customizable. Tap the button you want to change, and select its new function
from the list.
205-0010-00_QY-7375M-A_EN.indb 64205-0010-00_QY-7375M-A_EN.indb 643/12/2013 9:57:24 AM3/12/2013 9:57:24 AM
Page 68 of 135
68
q
Route settings
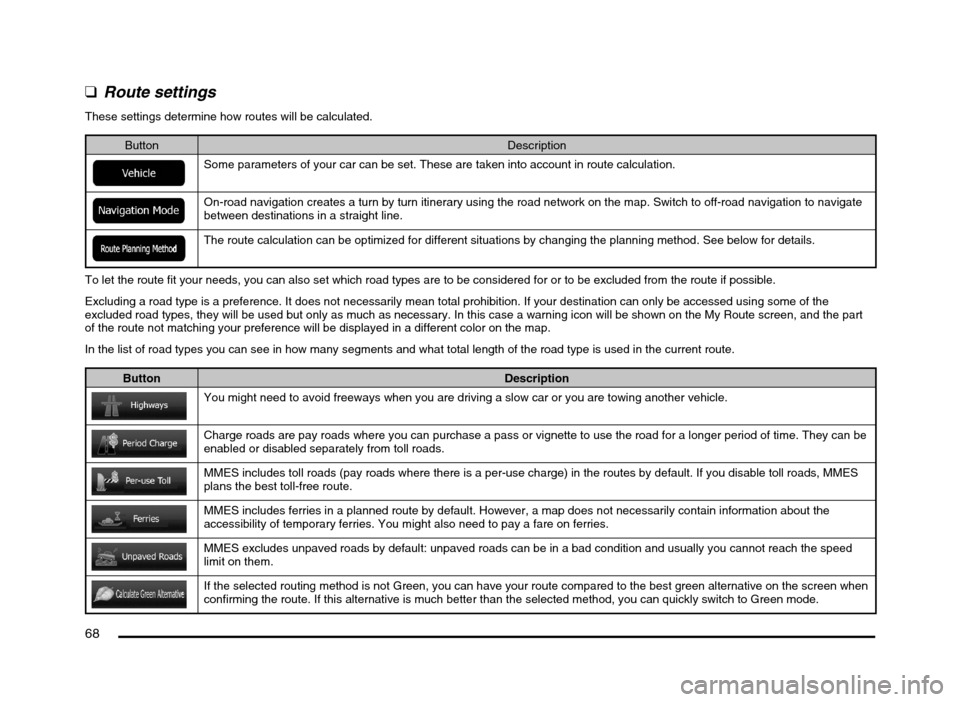
These settings determine how routes will be calculated.
Button Description
Some parameters of your car can be set. These are taken into account in route calculation.
On-road navigation creates a turn by turn itinerary using the road network on the map. Switch to off-road navigation to navigate
between destinations in a straight line.
The route calculation can be optimized for different situations by changing the planning method. See below for details.
To let the route fit your needs, you can also set which road types are to be considered for or to be excluded from the route if possible.
Excluding a road type is a preference. It does not necessarily mean total prohibition. If your destination can only be accessed using some of the
excluded road types, they will be used but only as much as necessary. In this case a warning icon will be shown on the My Route screen, and the part
of the route not matching your preference will be displayed in a different color on the map.
In the list of road types you can see in how many segments and what total length of the road type is used in the current route.
Button Description
You might need to avoid freeways when you are driving a slow car or you are towing another vehicle.
Charge roads are pay roads where you can purchase a pass or vignette to use the road for a longer period of time. They can be
enabled or disabled separately from toll roads.
MMES includes toll roads (pay roads where there is a per-use charge) in the routes by default. If you disable toll roads, MMES
plans the best toll-free route.
MMES includes ferries in a planned route by default. However, a map does not necessarily contain information about the
accessibility of temporary ferries. You might also need to pay a fare on ferries.
MMES excludes unpaved roads by default: unpaved roads can be in a bad condition and usually you cannot reach the speed
limit on them.
If the selected routing method is not Green, you can have your route compared to the best green alternative on the screen when
confirming the route. If this alternative is much better than the selected method, you can quickly switch to Green mode.
205-0010-00_QY-7375M-A_EN.indb 68205-0010-00_QY-7375M-A_EN.indb 683/12/2013 9:57:24 AM3/12/2013 9:57:24 AM
Page 74 of 135

74
qTrip monitor settings
Trip logs contain useful information about your trips. Trip logs can be saved manually when you reach your destination or you can turn on the automatic
saving here. You can access these logs in the Trip monitor. Trip monitor is available from the More menu.
Button Description
Trip monitor can record statistical data of your trips. If you need these logs later, you can let the application save them
automatically for you.
This is not a button. This line shows the current size of the trip database, the sum of all trip and track logs saved.
Track logs, the sequence of the positions given by the GPS receiver, can be saved together with trip logs. They can later be
displayed on the map. You can let the application save the track log whenever it saves a trip.
q
Log collection settings
If you accept this when first using the application, it collects usage information and GPS logs that may be used for improving the application and the
quality and coverage of maps. The data is processed anonymously; no one will be able to track any personal information.
Here you can enable or disable collecting these logs.
Button Description
Anonymous statistical information on using the navigation software is collected for later development purposes. Understanding
how different people use the application can help us improve the user interface and the program workflow.
Anonymous track logs are collected for later development purposes. Your trips can help us improve the quality and coverage of
maps.
205-0010-00_QY-7375M-A_EN.indb 74205-0010-00_QY-7375M-A_EN.indb 743/12/2013 9:57:25 AM3/12/2013 9:57:25 AM
Page 75 of 135

75
Fuel Consumption
The Fuel consumption monitor helps you
keep track of the consumption of your car
even if you do not use navigation for all your
journeys.
1. Tap the following buttons:
, ,
.
2. Tap
and set the initial odometer value.
3. Tap and record the
distance travelled and fuel filled whenever
you fill your car.
4. Tap to return to the
main Fuel consumption screen.
You can also set reminders for regular car
maintenance.
1. Tap the following buttons in the main Fuel
consumption screen:
.
2. Tap and input
maintenance information.
3. The reminder screen appears when the
conditions you set are met.
205-0010-00_QY-7375M-A_EN.indb 75205-0010-00_QY-7375M-A_EN.indb 753/12/2013 9:57:25 AM3/12/2013 9:57:25 AM
Page 77 of 135

77
6. GLOSSARY
2D/3D GPS reception
The GPS receiver uses satellite signals to
calculate its (your) position and needs at
least four signals to give a three-dimensional
position, including elevation. Because the
satellites are moving and because objects
can block the signals, your GPS device might
not receive four signals. If three satellites
are available, the receiver can calculate the
horizontal GPS position but the accuracy is
lower and the GPS device does not give you
elevation data: only 2D reception is possible.
Active route
The currently navigated route. Whenever the
destination is set, the route is active until you
delete it, reach your destination or you quit
MMES. See also: Route.
City Center
The city/town center is not the geometric
center of the city/town but an arbitrary point
the map creators have chosen. In towns
and villages, it is usually the most important
intersection; in larger cities, it is one of the
important intersections.
Color theme
MMES comes with different color themes for
daytime or night use of the map and menu
screens. Themes are custom graphic settings
and they can have different colors for streets,
blocks or surface waters in 2D and 3D modes,
and they display shades or shadows in
different ways in 3D mode.
One daytime scheme and one night scheme
is always selected for the map and for the
menus. MMES uses them when it switches
from day to night and back.
GPS accuracy
Several factors have impact on the deviation
between your real position and the one given
by the GPS device. For example, signal delay
in the ionosphere or reflecting objects near
the GPS device have a different and varying
impact on how accurately the GPS device can
calculate your position.
Map
MMES works with digital maps which are not
simply the computerized versions of traditional
paper maps. Similarly to the paper road maps,
the 2D mode of digital maps show you streets,
roads, and elevation is also shown by colors.
In 3D mode, you can see the altitude
differences, for example valleys and
mountains, elevated roads, and in selected
cities 3D landmarks and 3D buildings are also
displayed.You can use digital maps interactively: you
can zoom in and out (increase or decrease
the scale), you can tilt them up and down, and
rotate them left and right. In GPS-supported
navigation, digital maps facilitate route
planning.
North-up map orientation
In North-up mode the map is rotated so its top
always faces North. This is the orientation for
example in Find on Map.
Road Safety Camera
Special alert points for speed, red light or
bus lane cameras. Different data sources
are available. You can configure MMES to
warn you when you approach one of these
cameras.
Detecting the location of Road Safety Cameras
is prohibited in certain countries. It is the sole
responsibility of the driver to check whether
this feature can be used during the trip.
The software is capable of showing and
warning for more than just cameras. Various
other types of proximity alert points like
school zones and railroad crossings are also
available.
Route
A sequence of route events, i.e. maneuvers
(for example, turns and traffic circles) to reach
the destination. The route contains one start
point and one or more destinations. The start
point is the current position by default. If you
need to see a future route, the start point can
be replaced with any other given point.
205-0010-00_QY-7375M-A_EN.indb 77205-0010-00_QY-7375M-A_EN.indb 773/12/2013 9:57:25 AM3/12/2013 9:57:25 AM