Page 97 of 135
97
(Main menu screen)
(Phone screen)
(Bluetooth screen)
(Clock screen)
(Others screen)
205-0010-00_QY-7375M-A_EN.indb 97205-0010-00_QY-7375M-A_EN.indb 973/12/2013 9:57:27 AM3/12/2013 9:57:27 AM
Page 98 of 135
.
Turning the Power On/Off
Note:
Start the engine before using this unit.
Be careful about using")
98
11. BASIC
OPERATIONS
Note:
Be sure to read this chapter while referring to
“Controls” (page 91).
Turning the Power On/Off
Note:
Start the engine before using this unit.
Be careful about using this unit for a long time
without running the engine. If you drain the
vehicle’s battery too far, you may not be able to
start the engine and this can reduce the service
life of the battery.
qTurning the power on
1. Start the engine. The power is
automatically turned on and the startup
screen is displayed.
Note:
The power is turned on even when the ignition
switch is set to the ACC ON position.
2. The startup screen automatically changes
to the caution screen. Touch the [OK] key.
The system resumes from its status when
the power was turned off.
The navigation system does not operate until
the [OK] key is touched.
Some audio features are available even if
the [OK] key is not touched.
qTurning the power off
1. Turn the ignition switch to the OFF position.
Opening the Operation
Panel and Adjusting the
Angle
The operation panel can be opened/closed to
insert/eject a disc or memory card. The angle
of the operation panel can be adjusted to suit
the mounting angle of the unit or light coming
into the vehicle.
WARNING
To prevent the battery from going
dead, operate this unit with the engine
running if possible.
When the operation panel is operating,
be careful not to get your hand or
finger caught between the panel and
main unit or the instrument panel of
the vehicle.
Do not move the operation panel by
hand.
qOpening/closing the
operation panel
1. Press the [OPEN/TILT] button to display
the OPEN/TILT screen.
2. Touch the [Panel Open/Close] key.
The operation panel opens.
3. Touch the [Panel Open/Close] key when
the operation panel is open.
The operation panel closes.
qAdjusting the angle of the
operation panel
The angle of the operation panel can be
adjusted in the range of 0 to 30°.
1. Press the [OPEN/TILT] button to display
the OPEN/TILT screen.
205-0010-00_QY-7375M-A_EN.indb 98205-0010-00_QY-7375M-A_EN.indb 983/12/2013 9:57:27 AM3/12/2013 9:57:27 AM
Page 99 of 135
![MITSUBISHI MIRAGE 2014 6.G MMCS Manual 99
2. Select the angle from [0] to [6] in Angle
Adjustment.
The selected angle is stored in memory.
Once you select the angle of the operation
panel, the operation panel returns to the
selected an](/manual-img/19/7509/w960_7509-98.png "MITSUBISHI MIRAGE 2014 6.G MMCS Manual 99
2. Select the angle from [0] to [6] in Angle
Adjustment.
The selected angle is stored in memory.
Once you select the angle of the operation
panel, the operation panel returns to the
selected an")
99
2. Select the angle from [0] to [6] in Angle
Adjustment.
The selected angle is stored in memory.
Once you select the angle of the operation
panel, the operation panel returns to the
selected angle even after it is opened/
closed.
Returning the operation panel to
the original angle
1. Press the [OPEN/TILT] button to display
the OPEN/TILT screen.
2. Touch the [0] key in Angle Adjustment.
The operation panel moves and stops at
0°.
Adjusting the Display and
Audio
qTurning the Monitor Display
Off
You can turn off the monitor display, and
change it to a black screen.
1. Press the [MENU] button and touch the
[Display] key to display the Display screen.
2. Touch the [Screen Display OFF] key.
The monitor display turns off.
Turning the monitor display on
1. Touch the monitor display.
You can also turn on the monitor display
by pressing the [AV], [MAP], [MENU],
[DEST], or [OPEN/TILT] button, or any
button on the Steering Wheel Audio
Remote Control (if so equipped).
q
Switching between day and
night modes
You can switch the screen brightness setting
between day and night modes.
1. Press the [MENU] button and touch the
[Day/Night] key.
The display dims or brightens.
qAdjusting the Volume
1. Press the [{], [
}] (Volume) buttons to
adjust the volume.
[{] button: Increases the volume.
[
}] button: Decreases the volume.
The volume level has a range of 0 (min.)
to 31 (max.).
qTurning the Audio Off
1. Press the [POWER] button.Note:
You can also turn off the audio features by
pressing the [AV] button once or twice until the
Source screen is displayed, and then touching
the [Audio OFF] key.
Turning the Audio features on
1. Press the [POWER] button.Note:
You can also turn on the audio features by
pressing the [AV] button once or twice until the
Source screen is displayed, and then touching
one of the source keys.
CAUTION
While driving, keep the volume at a level at
which external sounds can be heard.
205-0010-00_QY-7375M-A_EN.indb 99205-0010-00_QY-7375M-A_EN.indb 993/12/2013 9:57:27 AM3/12/2013 9:57:27 AM
Page 100 of 135
![MITSUBISHI MIRAGE 2014 6.G MMCS Manual 100
Switching the Operation
Mode
qSwitching to the Source
screen, Navigation screen,
and Main Menu screen
To switch to the Source screen from the
Navigation screen, press the [AV] button once
o](/manual-img/19/7509/w960_7509-99.png "MITSUBISHI MIRAGE 2014 6.G MMCS Manual 100
Switching the Operation
Mode
qSwitching to the Source
screen, Navigation screen,
and Main Menu screen
To switch to the Source screen from the
Navigation screen, press the [AV] button once
o")
100
Switching the Operation
Mode
qSwitching to the Source
screen, Navigation screen,
and Main Menu screen
To switch to the Source screen from the
Navigation screen, press the [AV] button once
or twice. To switch to the Navigation screen
from the Source screen, press the [MAP]
button.
Note:
You can also access the Navigation screen from
the Main Menu screen.
É “Main Menu Operations” (page 100)
qSelecting a Media SourceYou can change the media source to be
played from the Source screen.
1. Press the [AV] button once or twice to
display the Source screen.
2. Touch the corresponding key for the
desired Source.
The system switches to the corresponding
source mode.
When [Audio OFF] is not enabled,
pressing the [AV] button from the Source
screen displays the current mode screen.
Note:
You can also change the source mode by using
the Steering Wheel Audio Remote Control (if so
equipped).
É “Steering Wheel Audio Remote Control
Operations” (page 103)
Available media sources
Key name Corresponding
source modeRefer to
FM/AM Tuner mode P. 105
DVD/CD*
1Audio CD mode P. 111
MP3/WMA/AAC
modeP. 112
DVD Video mode P. 106
SD Memory
CARDSD memory card
modeP. 115
USB/iPod*
2USB memory
modeP. 115
iPod mode P. 117
Bluetooth Bluetooth Audio
modeP. 120
*1 The source mode differs depending on the
data format of the disc inserted into the CD
player.
When no disc is inserted into the CD
player, “No disc.” is displayed.
*2 The source mode differs depending on
the device connected. When no device
is connected, “No USB memory.” is
displayed.
q
Main Menu Operations
Selecting Navigation Mode
1. Press the [MENU] button and touch the
[Navigation] key to display the Navigation
screen.
Selecting Telephone mode
1. Press the [MENU] button and touch the
[Phone] key to display the Phone screen.
Note:
Even in Telephone mode, the previous Source
mode continues operating.
É “Telephone Operations” (page 122)
Displaying the Clock ScreenYou can change the screen to display only the
digital clock on a dark background.
1. Press the [MENU] button and touch the
[Display] key to display the Display screen.
2. Touch the [Clock Screen Display] key.
The Clock screen is displayed.
To return to the mode you were previously
using, touch the monitor screen.
You can also exit the Clock screen by
pressing the [AV], [MAP], [MENU],
[DEST], or [OPEN/TILT] button.
205-0010-00_QY-7375M-A_EN.indb 100205-0010-00_QY-7375M-A_EN.indb 1003/12/2013 9:57:27 AM3/12/2013 9:57:27 AM
Page 101 of 135

101
Media and Device
Operations
q
Inserting/Ejecting a Disc
Notes on handling discs
Handling New discs may have some roughness
around the edges. If such discs are used, the
player may not work or the sound may skip.
Use a ball-point pen or the like to remove
any roughness from the edge of the disc.
Ball-point pen
Roughness
Never stick labels on the surface of the disc or
mark the surface with a pencil or pen.
Never play a disc with any cellophane tape
or other glue on it or with labels that are
peeling off. If you try to play such a disc, you
may not be able to get it back out of the unit
or it may damage the unit.
Do not use discs that have large scratches
or a unique shape, or discs that are
misshapen, cracked, etc. Use of such
discs may cause malfunction or damage.
To remove a disc from its storage case,
press down on the center of the case and
lift the disc out, holding it carefully by the
edges. Do not use commercially available disc
protection sheets or discs equipped with
stabilizers, etc. These may damage the
disc or cause breakdown of the internal
mechanism.
Storage
Do not expose discs to direct sunlight or any
heat source.
Do not expose discs to excess humidity or
dust.
Do not expose discs to direct heat from
heaters.
Cleaning
To remove finger marks and dust, use a soft
cloth and wipe in a straight line from the
center of the disc to the circumference.
Do not use any solvents, such as
commercially available cleaners, anti-static
spray, or thinner to clean discs.
After using special disc cleaner, let the disc
completely dry off before playing it.
On Discs
Exercise sufficient precaution when
inserting a disc.
Never turn off the power and remove the
unit from the vehicle with a disc inserted.
Do not use lens cleaning discs. These may
damage the lens of this unit.
When there seems to be something wrong
with reading discs, please consult the
nearest authorized Mitsubishi Motors dealer.
Inserting a disc
1. Press the [OPEN/TILT] button to display
the OPEN/TILT screen.
2. Touch the [Panel Open/Close] key.
The operation panel opens.
3. Insert a disc into the center of the insertion
slot with the label side facing up.The disc is automatically drawn into the
disc slot.
The system automatically switches to the
relevant source mode according to the
disc, and starts playing the disc.
When a DVD video disc is inserted:
The system is switched to DVD Video
mode.
É “DVD Video Operations” (page 106)
When an Audio CD is inserted:
The system is switched to Audio CD mode.
É “Audio CD Operations” (page 111)
When a DVD/CD with MP3/WMA/AAC
files is inserted:
The system is switched to MP3/WMA/AAC
mode.
É “MP3/WMA/AAC Disc Operations”
(page 112)
Note:
Never insert foreign objects into the disc slot.
If the disc cannot be inserted, another disc
might already be in the disc slot. Eject a disc in
the disc slot before inserting a new disc.
8 cm (single play) discs cannot be used.
When a disc is inserted, the disc indicator at the
left side of the [Disc Eject] key in the OPEN/
TILT screen becomes lit.
CAUTION
For your safety, the driver should not
insert or eject a disc while driving.
Ejecting a disc
1. Press the [OPEN/TILT] button to display
the OPEN/TILT screen.
2. Touch the [Disc Eject] key to eject the disc.The operation panel opens and the disc is
ejected.
205-0010-00_QY-7375M-A_EN.indb 101205-0010-00_QY-7375M-A_EN.indb 1013/12/2013 9:57:27 AM3/12/2013 9:57:27 AM
Page 102 of 135
![MITSUBISHI MIRAGE 2014 6.G MMCS Manual 102
If a disc is left in the ejected position for
20 seconds, the disc is automatically
reloaded (Auto reload).
3. Remove the disc carefully.
4. Touch the [Panel Open/Close] key to close
the ope](/manual-img/19/7509/w960_7509-101.png "MITSUBISHI MIRAGE 2014 6.G MMCS Manual 102
If a disc is left in the ejected position for
20 seconds, the disc is automatically
reloaded (Auto reload).
3. Remove the disc carefully.
4. Touch the [Panel Open/Close] key to close
the ope")
102
If a disc is left in the ejected position for
20 seconds, the disc is automatically
reloaded (Auto reload).
3. Remove the disc carefully.
4. Touch the [Panel Open/Close] key to close
the operation panel.
Note:
You can eject a disc by pressing and holding
the [OPEN/TILT] button.
If you force a disc into the insertion slot before
auto reloading, this can damage the disc.
q
Inserting/Removing an SD
Memory Card
In this system, SD memory cards are used for
playing MP3/WMA/AAC files.
É “SD Memory Card/USB Memory
Operations” (page 115)
Note:
This device supports SD memory cards, SDHC
memory cards (32GB or less), miniSD memory
cards*, and microSD memory cards*.
* A special adapter is required. If you insert this
memory card into the unit without an adapter,
you may be unable to remove it, and the unit
may become damaged.
Only use SD memory cards that conform to the
SD memory card standard.
Media that is not compatible with SD memory
cards is not supported.
SDXC memory cards are not supported.
Do not leave a miniSD adapter or microSD
adapter inside the unit.
Inserting an SD memory card
CAUTION
For your safety, the driver should not
insert or remove an SD memory card.
Do not turn off your vehicle or remove an
SD memory card while accessing a file
from the SD memory card.
1. Press the [OPEN/TILT] button to display
the OPEN/TILT screen.
2. Touch the [Panel Open/Close] key.
The operation panel opens.
3. Insert an SD memory card into the SD
memory card slot with the label side facing
up and the connectors facing forward. You
will hear a “click” when the SD memory
card is fully inserted.
It may take a long time to recognise the
inserted card.
Note:
If SD memory card mode is already selected,
the system automatically starts playing the files
on the card.
Never insert foreign objects into the SD memory
card slot.
If the SD memory card cannot be inserted,
another SD memory card might already be in
the SD memory card slot. Eject the SD memory
card from the SD memory card slot before
inserting a new SD memory card.
Removing an SD memory card
CAUTION
For your safety, the driver should not
insert or remove an SD memory card while
driving.1. Press the [OPEN/TILT] button to display
the OPEN/TILT screen.
2. Touch the [Panel Open/Close] key.
The operation panel opens.
3. Lightly press the SD memory card inward
with your finger until it stops, and then pull
back your finger. The SD memory card
comes out.
4. Remove the SD memory card carefully.
5. Touch the [Panel Open/Close] key to close
the operation panel.
q
Connecting/Disconnecting a
USB Memory
A USB memory can be used for playing MP3/
WMA/AAC files with this system.
É “SD Memory Card/USB Memory
Operations” (page 115)
To connect your USB memory to this unit, use
a USB cable (if so equipped).
For details, consult your Mitsubishi Motors dealer.Note:
This device supports USB 2.0/1.1.
Connecting a USB memory
CAUTION
For your safety, the driver should not
connect or disconnect a USB memory.
Do not turn off your vehicle or
disconnect a USB memory while
accessing a file from the USB memory.
1. Turn on the power of your USB memory, if
it has a power supply.
2. Confirm the orientation of the connectors,
and connect the USB memory to the USB
connector of this unit.
205-0010-00_QY-7375M-A_EN.indb 102205-0010-00_QY-7375M-A_EN.indb 1023/12/2013 9:57:27 AM3/12/2013 9:57:27 AM
Page 103 of 135

103
It may take a long time to recognise the
connected device.
Note:
If USB memory mode is already selected, the
system switches to the relevant source media
mode, and playback starts.
Never insert unrelated objects into the USB
connector.
Always insert the USB memory fully into the
connector. Incomplete connections may cause
the device not to be recognised.
Disconnecting a USB memory
CAUTION
For your safety, the driver should not
connect or disconnect a USB memory.
Do not turn off your vehicle or disconnect
a USB memory while accessing a file from
the USB memory. Before disconnecting
the USB memory, change to a source
mode other than USB memory mode,
press the [POWER] button, or press the
[AV] button and touch the [Audio OFF] key.
1. Confirm that data is not being transferred
to or from the USB memory.
For how to confirm this, refer to the
operation manual of your USB memory.
2. Remove the USB memory from the USB
connector.
Note:
When turning on the ACC power with no USB
memory connected, “No USB memory.” may
be displayed on the screen if USB memory
mode is selected.
qConnecting/Disconnecting
an iPod
An iPod can be used for playing audio data
with this system.
É “iPod Operations” (page 117)
To connect your iPod to this unit, use a USB
cable (if so equipped).
For details, consult your Mitsubishi Motors
dealer.
Connecting an iPod
CAUTION
For your safety, the driver should not
connect or disconnect an iPod.
Do not turn off your vehicle or disconnect
an iPod while accessing a file from the iPod.
1. Turn on the power of your iPod.
2. Confirm the orientation of the connectors,
and connect the iPod to the USB cable.
It may take a long time to recognise the
iPod.
Note:
If iPod mode is already selected, the system
switches to the relevant source media mode,
and playback starts.
Never insert unrelated objects into the iPod
USB connector.
Always insert the cable connector fully into the
iPod. Incomplete connections may cause the
iPod not to be recognised.
Disconnecting an iPod
CAUTION
For your safety, the driver should not
connect or disconnect an iPod.
Do not turn off your vehicle or
disconnect an iPod while accessing a
file from the iPod. Before disconnecting
the iPod, change to a source mode other
than iPod mode, press the [POWER]
button, or press the [AV] button and
touch the [Audio OFF] key.
1. Confirm that data is not being transferred
to or from the iPod.
For how to confirm this, refer to the
operation manual of your iPod.
2. Remove the iPod from the iPod USB
connector.
Note:
When turning on the ACC power with no
iPod connected, “No USB memory.” may
be displayed on the screen if iPod mode is
selected.
Steering Wheel Audio
Remote Control Operations
You can use the Steering Wheel Audio
Remote Control (if so equipped) to perform
various audio operations.
These operations can be used only when your
vehicle is equipped with a Steering Wheel
Audio Remote Control.
Note:
While driving, be sure that audio control
operations do not interfere with your driving.
205-0010-00_QY-7375M-A_EN.indb 103205-0010-00_QY-7375M-A_EN.indb 1033/12/2013 9:57:27 AM3/12/2013 9:57:27 AM
Page 104 of 135
![MITSUBISHI MIRAGE 2014 6.G MMCS Manual 104
The buttons on the Steering Wheel Audio Remote
Control are effective only when the Audio features
are turned on. On the unit, press the [AV] button
once or twice until the Source screen is disp](/manual-img/19/7509/w960_7509-103.png "MITSUBISHI MIRAGE 2014 6.G MMCS Manual 104
The buttons on the Steering Wheel Audio Remote
Control are effective only when the Audio features
are turned on. On the unit, press the [AV] button
once or twice until the Source screen is disp")
104
The buttons on the Steering Wheel Audio Remote
Control are effective only when the Audio features
are turned on. On the unit, press the [AV] button
once or twice until the Source screen is displayed
and select a source before you operate the
Steering Wheel Audio Remote Control.
Function of controls
The operations differ depending on the type
of Steering Wheel Audio Remote Control that
you use.
[VOL UP], [VOL DOWN] buttons:
Press these buttons to increase/decrease
the volume.
[MODE/SOURCE] button:
Press this button to switch between the
source mode. Switching is performed in the
following order:
FM/AM (Tuner mode) É SD memory card
mode* É Bluetooth Audio mode* É DVD/
CD mode* É USB memory/iPod mode* É
FM/AM (Tuner mode) ...
* When a corresponding media is not
inserted or connected, the unit will skip
SD memory card mode, Bluetooth Audio
mode, DVD/CD mode, and USB memory/
iPod mode.
Press and hold this button to turn the power
off. When the power is turned off, press this
button to turn the power on.
[TRACK/CH UP], [TRACK/CH DOWN]
buttons:
Other than when in Tuner mode, these
buttons have the same function as the [
]
and [] (TUNE/TRACK) buttons on the unit.
É “Functions of Buttons” (page 91)
In Tuner mode, press these buttons to
change to the next/previous preset station.
Continue pressing these buttons to
automatically seek a station.
In Audio CD, MP3/WMA/AAC, SD memory
card, USB memory, iPod, and Bluetooth
Audio modes, press these buttons to select
a track to be played.
Other than when in Tuner mode, press and
hold these buttons to fast forward or fast
backward.
Using a Rear View Camera
When an optional Rear View Camera (if so
equipped) is connected to this unit, the rear
view video from the camera is displayed on
the screen when the vehicle’s gear lever is set
to the reverse position.
WARNING
Do not look only at the screen when
driving the vehicle in reverse. Always
inspect your surroundings by looking
at them directly, and slowly move the
vehicle.
CAUTION
Use the Rear View Camera only to assist
you when driving the vehicle in reverse.
Raindrops may get on the camera area
and obscure video.
Always perform adjustments to the video
settings when the vehicle is stopped and
in a safe location.
Note:
The Rear View Camera uses a wide-angle lens,
so objects in the screen may appear closer or
farther than they appear.Video from the Rear View Camera is inverted,
so it appears the same as it would from the
vehicle’s rear-view mirror.
Video from the Rear View Camera may be
difficult to see or impossible to see in dark
places or at night.
The lens features a splash-proof construction to
prevent fogging.
Do not loosen the Rear View Camera screws
or disassemble the Rear View Camera. The
splash-proofing may be affected, and the
camera may be damaged.
If the front cover of the lens is dirty, video will
not be clear. If raindrops, snow, or dirt gets on
the front cover of the lens, wipe it off with a soft
cloth moistened with water. If you use a dry
cloth to wipe the cover of the lens, dirt on the
cover of the lens may be damaged.
qDisplaying video from the
Rear View Camera
Set the gear lever to the reverse position while
the vehicle’s engine is turned on.
The display changes to the video from the
Rear View Camera. This video is preferentially
displayed even if you are watching a DVD
video, etc.
F
AB
C
D
E
A: This position is approximately 3 m from the
rear of the vehicle.
B: This position is approximately 2 m from the
rear of the vehicle.
205-0010-00_QY-7375M-A_EN.indb 104205-0010-00_QY-7375M-A_EN.indb 1043/12/2013 9:57:27 AM3/12/2013 9:57:27 AM
 1
1 2
2 3
3 4
4 5
5 6
6 7
7 8
8 9
9 10
10 11
11 12
12 13
13 14
14 15
15 16
16 17
17 18
18 19
19 20
20 21
21 22
22 23
23 24
24 25
25 26
26 27
27 28
28 29
29 30
30 31
31 32
32 33
33 34
34 35
35 36
36 37
37 38
38 39
39 40
40 41
41 42
42 43
43 44
44 45
45 46
46 47
47 48
48 49
49 50
50 51
51 52
52 53
53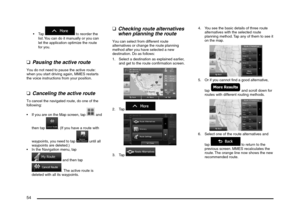 54
54 55
55 56
56 57
57 58
58 59
59 60
60 61
61 62
62 63
63 64
64 65
65 66
66 67
67 68
68 69
69 70
70 71
71 72
72 73
73 74
74 75
75 76
76 77
77 78
78 79
79 80
80 81
81 82
82 83
83 84
84 85
85 86
86 87
87 88
88 89
89 90
90 91
91 92
92 93
93 94
94 95
95 96
96 97
97 98
98 99
99 100
100 101
101 102
102 103
103 104
104 105
105 106
106 107
107 108
108 109
109 110
110 111
111 112
112 113
113 114
114 115
115 116
116 117
117 118
118 119
119 120
120 121
121 122
122 123
123 124
124 125
125 126
126 127
127 128
128 129
129 130
130 131
131 132
132 133
133 134
134
(Phone screen)
(Bluetooth screen)
(Clock screen)
(Others screen)
205-0010-00_QY-7375M-A_EN.indb 97205-0010-00_QY-7375M-A_EN.indb 973/12/2013 9:57:27 AM3/12/2013 9:57:27 A")