Page 17 of 135

17
Task Instruction
Switching to another keyboard layout, for example
from an English keyboard to a French keyboard
Tap the
button and select the new keyboard layout from the list.
Correcting your entry on the keyboard
Tap
to remove the unneeded character(s).
Tap and hold the button to delete several characters or the entire input string.
Entering a space, for example between a first name
and a family name or in multi-word street names
Tap the
button at the bottom center of the screen.
Entering upper and lower case letters When entering a text, the first character appears in upper case while the rest of the text is in
lower case. Tap
to enter an upper case letter or tap twice to turn on Caps Lock. Tap
again and lower case letters return.
Entering numbers and symbols
Tap
to switch to a keyboard offering numeric and symbol characters.
Finalizing the keyboard entry (accepting the
suggested search result)
Tap
.
Finalizing the keyboard entry (opening the list of
search results)
Tap
.
Finalizing the keyboard entry (saving your input)
Tap
.
Canceling the keyboard entry (returning to the
previous screen)
Tap
.
205-0010-00_QY-7375M-A_EN.indb 17205-0010-00_QY-7375M-A_EN.indb 173/12/2013 9:57:14 AM3/12/2013 9:57:14 AM
Page 18 of 135

18
qBeyond single screen tap
You usually need to tap the screen only once. However, some useful features can be accessed with combined touch screen tapping. Those are the
following:
Action Details
Tapping and holding the
screenTap and keep pressing the following buttons to reach extra functions:
Tap and hold
on list and menu screens: the Map screen appears.
Tap and hold any of the
, , , , , and buttons on the Map screen: you can rotate, tilt or
scale the map continuously.
Tap and hold
on keyboard screens: you can delete several characters quickly.
Tap and hold
or in long lists: you can scroll pages continuously.
Gestures (drag&drop) You need to drag and drop the screen only in cases like:
Moving the handle on a slider.
Scrolling the list: grab the list anywhere and slide your finger up or down. Depending on the speed of the sliding, the
list will scroll fast or slow, only a bit or till the end.
Moving the map in map browsing mode: grab the map, and move it in the desired direction.
205-0010-00_QY-7375M-A_EN.indb 18205-0010-00_QY-7375M-A_EN.indb 183/12/2013 9:57:14 AM3/12/2013 9:57:14 AM
Page 19 of 135

19
Map screen
qNavigating on the map
The Map screen is the most frequently used
screen of MMES.
A small live map is displayed on the
Navigation menu, as a part of the
button.
To enlarge this small map and open the Map
screen, tap
or press the
MAP button to the right of the screen.
This map shows the current position (the
Vehimarker, a red arrow), the recommended
route (an orange line), and the surrounding
map area.
When there is no GPS position, the
Vehimarker is transparent.You see colored dots circling around a
satellite symbol in the top left corner. The
more green dots you see, the closer you are
to get the valid GPS position.
When GPS position is available, the
Vehimarker is displayed in full color, now
showing your current position.
There are screen buttons and data fields
on the screen to help you navigate.
During navigation, the screen shows route
information.
The
button gives quick access to
frequently used functions. You can change
the available functions in Settings.By default, only one data field is displayed in
the bottom right corner. Tap this field to see all
route data fields. Tap any of the data fields to
suppress others and display only the selected
one.
The data fields are different when you are
navigating an active route and when you have
no specified destination (the orange line is not
displayed).
205-0010-00_QY-7375M-A_EN.indb 19205-0010-00_QY-7375M-A_EN.indb 193/12/2013 9:57:14 AM3/12/2013 9:57:14 AM
Page 20 of 135
:
Field Description
Shows your current
speed.
Shows the speed limit
of the current r")
20
Default data fields when cruising without a
destination (tap and hold any of the fields to
change its value):
Field Description
Shows your current
speed.
Shows the speed limit
of the current road if
the map contains it.
Shows the current
time corrected with
time zone offset.
The accurate time
comes from the GPS
satellites, and the
time zone information
comes from the map or
it can be set manually
in Regional settings.
(The current time is
always displayed in
the top right corner of
menu screens.)
Note:
The speed and speed limit display are auxiliary
functions. Check the speed in the vehicle’s
speedometer and observe the legal speed.
Check the actual road signs because speed
limits are subject to change due to weather and
road conditions.
Default data fields when navigating a route
(tap and hold any of the fields to change its
value):
Field Description
Shows the distance
you need to travel
on the route before
reaching your final
destination.
Shows the time
needed to reach the
final destination of
the route based on
information available
for the remaining
segments of the route.
The calculation cannot
take into account
traffic jams and other
possible delays.
Shows the estimated
arrival time at the final
destination of the route
based on information
available for the
remaining segments of
the route.
The calculation cannot
take into account
traffic jams and other
possible delays.
qPosition markers
Vehimarker and Lock-on-Road
MMES marks your current position with the
Vehimarker which is a red arrow.
When on-road navigation is selected, the
Vehimarker may not show your exact GPS
position and heading. If roads are near, it is
aligned to the nearest road to suppress GPS
position errors, and the direction of the icon is
aligned to the direction of the road.
If you select off-road navigation: The
Vehimarker is not aligned to the road. The
direction of the icon shows your current
heading.
Selected map location (Cursor)
and selected map object
You can mark a map location in the following
ways:
Tap the map when navigating,
Tap the map when you are asked to
confirm the destination at the end of a
search, or
Tap the map in Find on Map (page 47)
When a map location is selected, the Cursor
appears at the selected point on the map. The
Cursor is displayed with a radiating red dot
(
) to make it visible at all zoom levels.
The location of the Cursor can be used as
the destination of the route, a new alert point,
you can search for Places around it, or you
can save this location as one of your Favorite
destinations.
205-0010-00_QY-7375M-A_EN.indb 20205-0010-00_QY-7375M-A_EN.indb 203/12/2013 9:57:15 AM3/12/2013 9:57:15 AM
Page 21 of 135

21
You can also select some of the objects
on the map. If you tap the map at the icon
of a Place of Interest or an alert point, the
object will be selected (you see a red circling
border around the object), and you can get
information about this object or use it as a
route point.
qObjects on the map
Streets and roads
MMES shows the streets in a way that is
similar to how the paper road maps show
them. Their width and colors correspond to
their importance: you can easily tell a freeway
from a small street.
Turn preview and Next street
When navigating a route, the top section of
the Map screen shows information about the
next route event (maneuver) and the next
street or the next city/town.
There is a field in the top left corner that
displays the next maneuver. Both the type of
the event (turn, traffic circle, exiting freeway,
etc.) and its distance from the current position
are displayed.A smaller icon shows the type of the
second next maneuver if it is near the first
one. Otherwise, only the next maneuver is
displayed.
Most of these icons are very intuitive. The
following table lists some of the frequently
shown route events. The same symbols are
used in both fields:
Icon Description
Turn left.
Turn right.
Turn back.
Bear right.
Turn sharp left.
Keep left.
Continue straight in the
intersection.
Icon Description
Go left on the traffic circle, 3rd exit
(next maneuver).
Enter traffic circle (second next
maneuver).
Enter freeway.
Exit freeway.
Board ferry.
Leave ferry.
(yellow)
Approaching a waypoint.
Approaching the destination.
Lane information and Signposts
When navigating on multilane roads, it is
important to take the appropriate lane in
order to follow the recommended route. If
lane information is available in the map data,
MMES displays the lanes and their directions
using small arrows at the bottom of the map.
Highlighted arrows represent the lanes you
need to take.
205-0010-00_QY-7375M-A_EN.indb 21205-0010-00_QY-7375M-A_EN.indb 213/12/2013 9:57:15 AM3/12/2013 9:57:15 AM
Page 22 of 135

22
Where additional information is available,
signposts substitute arrows. Signposts are
displayed at the top of the map. The color
and style of the signposts are similar to
the real ones you can see above road or
by the roadside. They show the available
destinations and the number of the road the
lane leads to.
All signposts look similar when cruising (when
there is no recommended route). When
navigating a route, only the signpost that
points to the lane(s) to be taken is displayed
in vivid colors; all others are darker.
If you want to hide the currently displayed
signposts, tap any of them and the normal
Map screen returns until new signpost
information is received.Junction view
If you are approaching a freeway exit or
a complex intersection and the needed
information exists, the map is replaced with a
3D view of the junction. The lanes you need to
take are displayed with arrows. Signposts can
also be present if information is available.
If you want to hide the currently displayed
junction, tap the picture and the Map screen
returns.
Freeway exit services
You may need a gas station or a restaurant
during your journey. This feature displays a
new button on the map when you are driving
on freeways.
Tap this button to open a panel with the
details of the next few exits or service
stations.
Tap any of them to display the exit area on
the map. You can now easily add this exit as
a waypoint to your route if needed.
If you want to display other types of Places for
the exits, you can change the icons in Visual
Guidance settings (page 71).
205-0010-00_QY-7375M-A_EN.indb 22205-0010-00_QY-7375M-A_EN.indb 223/12/2013 9:57:15 AM3/12/2013 9:57:15 AM
Page 23 of 135

23
3D object types
MMES supports the following 3D object types:
Type Description
3D terrain 3D terrain map data shows changes in terrain, elevations or depressions in the land when you view the map in 2D, and
use it to plot the route map in 3D when you navigate. Hills and mountains are shown in the background of the 3D map, and
illustrated by color and shading on the 2D map.
Elevated roads Complex intersections and vertically isolated roads (such as overpasses or bridges) are displayed in 3D.
3D landmarks Landmarks are 3D artistic or block representations of prominent or well-known objects.
Elements of the active route
MMES shows the route in the following way:
Symbol Name Description
Current position Your current position displayed on the map. If roads are near, it is aligned to the nearest road.
(yellow)Waypoint (intermediate
destination)An intermediate destination of the route before reaching the final destination.
Destination (end point) The final destination of the route.
– Route color The route always stands out with its color on the map, both in daytime and in night color mode.
– Streets and roads that are
excluded from the navigationYou can choose whether you want to use or avoid certain road types. However, when MMES cannot
avoid such roads, the route will include them and it will show them in a color that is different from the
route color.
205-0010-00_QY-7375M-A_EN.indb 23205-0010-00_QY-7375M-A_EN.indb 233/12/2013 9:57:15 AM3/12/2013 9:57:15 AM
Page 24 of 135

24
qManipulating the map
Tap the map anywhere to browse it during navigation. The map stops following the current position (the Vehimarker, a red arrow, is not locked in a fix
position on the screen any more) and control buttons appear to help you modify the map view.
Action Button(s) Description
Moving the map with
drag&dropNo buttons You can move the map in any direction: tap and hold the map, and move your finger towards the
direction you want to move the map.
Zooming in and out
, Changes how much of the map is displayed on the screen.
MMES uses high-quality vector maps that let you examine the map at various zoom levels,
always with optimized content. It always displays street names and other text with the same font
size, never upside-down, and you only see the streets and objects that you need.
Map scaling has a limit in 3D map view mode. If you zoom out further, the map switches to 2D
view mode.
Tap the button once to modify the view in large steps, or tap and hold the button to modify it
continuously and smoothly.
Tilting up and down
,
Changes the vertical view angle of the map in 3D mode.
Tap the button once to modify the view in large steps, or tap and hold the button to modify it
continuously and smoothly.
Rotating left and right
,
Changes the horizontal view angle of the map.
Tap the button once to modify the view in large steps, or tap and hold the button to modify it
continuously and smoothly.
2D or 3D view
, Tap this button to switch between the 3D perspective and 2D top-down map view modes.
Compass in 2D map view
mode
,
The direction of the compass shows North. Tap the button to switch to North-up view, and then
tap again to rotate the map in the previous direction.
205-0010-00_QY-7375M-A_EN.indb 24205-0010-00_QY-7375M-A_EN.indb 243/12/2013 9:57:15 AM3/12/2013 9:57:15 AM
 1
1 2
2 3
3 4
4 5
5 6
6 7
7 8
8 9
9 10
10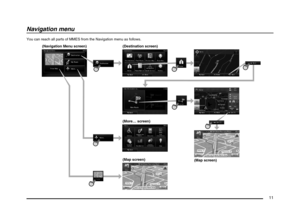 11
11 12
12 13
13 14
14 15
15 16
16 17
17 18
18 19
19 20
20 21
21 22
22 23
23 24
24 25
25 26
26 27
27 28
28 29
29 30
30 31
31 32
32 33
33 34
34 35
35 36
36 37
37 38
38 39
39 40
40 41
41 42
42 43
43 44
44 45
45 46
46 47
47 48
48 49
49 50
50 51
51 52
52 53
53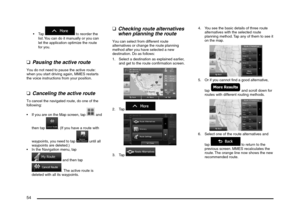 54
54 55
55 56
56 57
57 58
58 59
59 60
60 61
61 62
62 63
63 64
64 65
65 66
66 67
67 68
68 69
69 70
70 71
71 72
72 73
73 74
74 75
75 76
76 77
77 78
78 79
79 80
80 81
81 82
82 83
83 84
84 85
85 86
86 87
87 88
88 89
89 90
90 91
91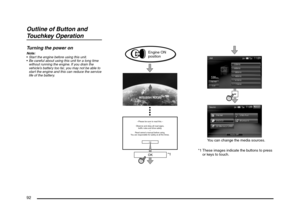 92
92 93
93 94
94 95
95 96
96 97
97 98
98 99
99 100
100 101
101 102
102 103
103 104
104 105
105 106
106 107
107 108
108 109
109 110
110 111
111 112
112 113
113 114
114 115
115 116
116 117
117 118
118 119
119 120
120 121
121 122
122 123
123 124
124 125
125 126
126 127
127 128
128 129
129 130
130 131
131 132
132 133
133 134
134