Page 57 of 135

57
2. The list of Favorite destinations is
displayed.
3. Tap the Favorite that you want to edit. If
necessary, browse down to see more of
the list or tap
and enter
a few letters from the name of the Favorite
destination.
4. A full screen map appears with the
selected point in the middle.
5. Tap
to see the details of the selected
Place.
6. Tap
and modify its
content.
7. Tap and hold
to return
to the map.
Saving a map location as
an alert point
You can save any map location as an alert
point (for example a railroad crossing). By
default, this is disabled. You can use it by
changing the setting (page 64).
1. Browse the map and select a location. The
red Cursor appears there.
2. Tap
.
3. Scroll down the list and tap
.
4. On the newly opened screen, select
the type of the alert point, the direction
from which you expect the alert, and (if
applicable) the speed limit for this alert
point.
5. Tap to save the
location as a new alert point.
Editing an alert point
You can edit a previously saved or uploaded
alert point (for example a railroad crossing).
1. Browse the map and select the alert point
to edit. The red circle appears around the
alert point.
2. Tap
.
3. Scroll down the list and tap
.4. On the newly opened screen, modify the
type of the alert point, the direction from
which you expect the alert, or (if applicable)
the speed limit for this alert point.
205-0010-00_QY-7375M-A_EN.indb 57205-0010-00_QY-7375M-A_EN.indb 573/12/2013 9:57:23 AM3/12/2013 9:57:23 AM
Page 58 of 135

58
5. Tap to save the
changes to the alert point.
Watching the simulation
of the route
You can run a simulated navigation that
demonstrates the active route. Do as follows:
1. If you are on the Map screen, tap
to return to the
Navigation menu.
2. In the Navigation menu, tap
.
3. Tap
.
4. Scroll down the list and tap
. The simulation starts
from the starting point of the route, and
using a realistic speed, it leads you
through the whole recommended route.
1. (optional) You have the following
controls during the simulation (the
control buttons disappear after a few
seconds but you can open them again
if you tap the map):
: Jump to the next route event
(maneuver).
: Pause the simulation.
: Jump to the previous route
event (maneuver).
: Tap to increase the speed of
the simulation to 4, 8 or 16
times faster. Now tap again
to return to the normal
speed.2. Tap
to stop the
simulation.
205-0010-00_QY-7375M-A_EN.indb 58205-0010-00_QY-7375M-A_EN.indb 583/12/2013 9:57:23 AM3/12/2013 9:57:23 AM
Page 59 of 135

59
4. OFF-ROAD
NAVIGATION
When first started, MMES calculates routes
using the road network of the high quality
vector maps provided with the product. You
can switch the application to off-road mode
in Navigation settings in one of the following
ways:
From the Main menu, tap ,
, and then
.
From the Map screen, tap ,
and then
.
Most of the procedures described for on-road
navigation also apply to off-road navigation.
However, there are some that are not
available in this navigation mode (for example
you cannot open the itinerary as you have no
maneuvers just route points and straight lines
between them).
Selecting the destination
of the route
Selecting the start point or a destination
(waypoint or final destination) is the same as
described at on-road navigation. The only
difference is that route points are linked to
form a route with straight lines regardless of
the road network and traffic regulations.
Navigating in off-road
mode
The real difference between the on-road and
off-road modes is the navigation itself. When
you are on the Map screen with an off-road
route:
your position and heading is not aligned
with the nearest road and
there is no turn by turn navigation just a
recommended direction.
You see a orange line drawn between your
current position and the next destination to
reach.
The Turn Preview field in the top left corner
shows a compass with your bearing and the
distance of the next destination.
When you reach a waypoint, the orange line
will show the direction to the next destination.
(Future legs of the route are shown with
orange lines.)
When you reach the final destination,
navigation ends.
205-0010-00_QY-7375M-A_EN.indb 59205-0010-00_QY-7375M-A_EN.indb 593/12/2013 9:57:23 AM3/12/2013 9:57:23 AM
Page 60 of 135

60
5. REFERENCE
GUIDE
On the following pages you will find the
description of the different concepts and menu
screens of MMES.
Concepts
qSmart Zoom
Smart Zoom provides much more than just a
usual automatic zoom feature:
While following a route: when
approaching a turn, it will zoom in and
raise the view angle to let you easily
recognize your maneuver at the next
junction. If the next turn is at a distance, it
will zoom out and lower the view angle to
be flat so you can see the road in front of
you.
While driving without an active route:
Smart Zoom will zoom in if you drive slowly
and zoom out when you drive at high
speed.
qDaytime and night color
themes
MMES uses different color themes during the
day and during the night for both the map and
the menu screens.
Daytime colors are similar to paper road
maps, and the menus are bright. The night color themes use dark colors
for large objects to keep the average
brightness of the screen low.
MMES offers different daytime and night
color profiles. It can also switch automatically
between the daytime and the night schemes
based on the current time and position a few
minutes before sunrise, when the sky has
already turned bright, and a few minutes after
sunset, before it becomes dark.
qTunnel view
When entering a tunnel, the map is replaced
with a generic tunnel image so that surface
roads and buildings cannot distract you.
The top-down overview of the tunnel helps
you orient yourself. The remaining distance in
the tunnel is also displayed.
After leaving the tunnel, the original map view
returns.
This feature can be turned off in Settings
(page 71).
qRoute calculation and
recalculation
MMES calculates the route based on your
preferences:
Route planning methods:
: Gives a quick
route if you can travel at or near the
speed limit on all roads. Usually the
best selection for fast and normal cars.
: Gives a quick
but fuel-efficient route based on the
fuel consumption data given in Route
settings. Travel cost and CO
2 emission
calculations are estimations only. They
cannot take elevations, curves and
traffic conditions into account.
: Gives a route that
has the smallest total distance of all
possible routes. It can be practical for
slow vehicles.
: Results in a
route with fewer turns and no difficult
maneuvers. With this option, you can
make MMES to take, for example, the
freeway instead of a series of smaller
roads or streets.
205-0010-00_QY-7375M-A_EN.indb 60205-0010-00_QY-7375M-A_EN.indb 603/12/2013 9:57:23 AM3/12/2013 9:57:23 AM
Page 61 of 135

61
Road types used or avoided in route
calculation:
MMES automatically recalculates the route if
you deviate from the proposed itinerary.
qGreen routing
Route calculation is not only about finding
the quickest or shortest route. You can also
check the fuel consumption and CO
2 emission
when planning a route, and you can create
cost effective routes with less effect on the
environment.
In Route settings, you can edit the parameters
of the vehicle. Enter the fuel consumption
values and the price of the fuel. You can also
select whether you want to see the difference
between your route and the green route even
if the selected routing method is not Green.
After the above parameters are set, select
as route planning method
to get a fast but also fuel-efficient route. Note
that travel cost and CO
2 emission calculations
are estimations only. They cannot take
elevations, turns, curves and traffic conditions
into account. Also, this routing is not meant
to give you the “greenest” route of all. It is still
important to travel quickly so the result is a
fast route with low fuel consumption and CO
2
emission.
Whichever route planning method is selected,
the Green details are also shown when you
confirm the route:
If the selected route planning method is not
Green, and you have allowed the application
to show the green alternative, the price, fuel
consumption and CO
2 emission differences
between your selected route and the Green
route are also shown on this screen:
Tap the field with these details to switch the
route to Green immediately.
qProximity alert points
The application can warn you for the alert
points you added or edited in advance when
you approach them. You can set up the
different alert types individually in Sound and
Warning settings (page 66).
The following alert types are available:
Audio warning: beeps can be played by
natural voice while you are approaching
one of these points, and an extra alert can
warn you if you exceed the given speed
limit while approaching.
Visual warning: the type of the alert point,
its distance and the related speed limit
appear on the Map screen while you are
approaching one of these.
205-0010-00_QY-7375M-A_EN.indb 61205-0010-00_QY-7375M-A_EN.indb 613/12/2013 9:57:23 AM3/12/2013 9:57:23 AM
Page 62 of 135

62
For some of the alert points, the enforced or
expected speed limit is available. For these
points, the audio alert can be different if you
are below or above the given speed limit.
Only when speeding: The audio alert is
only played when you exceed the given
speed limit.
When approaching: The audio alert is
always played when approaching one of
these alert points. In order to draw your
attention, the alert is different when you
exceed the speed limit.
qSpeed limit warning
Maps may contain information about the
speed limits of the road segments. MMES is
able to warn you if you exceed the current
limit. This information may not be available for
your region, or may not be fully correct for all
roads in the map.
Speed warning can be fine-tuned in Sound
and Warning settings (page 66).
You can set the relative speed above which
the application initiates the warning.
The following alert types are available:
Audio warning: you receive a verbal
warning when you exceed the speed limit
with the given percentage.
Visual warning: the current speed limit is
shown on the map when you exceed it
(for example:
).
You can also choose to see the speed limit
sign on the map all the time.
Note:
The speed limit warning is an auxiliary function.
Check the speed in the vehicle’s speedometer
and observe the legal speed.
qArrival notification
The inquiry screen appears when you stop
near the final destination.
MMES stops the route guidance and displays
the route summary if you select “Yes”.
MMES continues the route guidance if you
select “No”.
205-0010-00_QY-7375M-A_EN.indb 62205-0010-00_QY-7375M-A_EN.indb 623/12/2013 9:57:24 AM3/12/2013 9:57:24 AM
Page 63 of 135

63
‘More’ menu
The ‘More’ menu provides you with various options and additional applications. Tap the following buttons: , .
Button Description
You can configure the program settings, and modify the behavior of MMES. Fine-tune route planning options, change the look of the Map
screen, turn on or off warnings, or restart the Configuration wizard, etc.
See the next chapter for details.
Visit clarion.naviextras.com/ and download “Naviextras Toolbox” to get new maps. After downloading the installer file, simply double-
click the file to start the installation and follow the instructions on the screen. If you check the “I would like to start Naviextras Toolbox
now.” option, Naviextras Toolbox will start automatically after installation. Then you can see “help” to download new maps in “Naviextras
Toolbox” application.
The scientific calculator helps you in all your calculation needs. Tap the Mode button for additional functions and use the memory to save
your results.
The Fuel consumption monitor helps you keep track of the consumption of your car even if you do not use navigation for all your journeys.
Set the initial odometer value and then record the distance taken and fuel filled in whenever you fill your car. You can also set reminders
for regular car maintenance.
Tap this button to see the sunlit and dark areas of the world. Your current location and route points are marked on the map. Tap the
Details button to see the exact sunrise and sunset times for all your route points (your current location, all waypoints and the final
destination).
If you save your trip logs when you arrive at some of your destinations or let the application automatically save the trip logs for you, those
logs are all listed here. Tap one of the trips to see the trip statistics, speed and altitude profile. If track log has also been saved, you can
display it on the map with the selected color.
205-0010-00_QY-7375M-A_EN.indb 63205-0010-00_QY-7375M-A_EN.indb 633/12/2013 9:57:24 AM3/12/2013 9:57:24 AM
Page 64 of 135

64
Button Description
Select a country from the list and see useful driving information about the selected country. Information may include speed limits on
different road types, the maximum blood alcohol level and any compulsory equipment you need to show when stopped by the police.
Run the Demo and watch sample route simulations to see how navigation works.
The About section provides you with product information. You can also access program usage statistics.
Settings menu
You can configure the program settings, and modify the behavior of MMES. Tap the following buttons: , , .
The Settings menu has several options. Tap
or scroll with your finger to see the full list.
Button Description
Adjust the sound volume, mute your device or change the voice guidance language. In addition, you can enable and set up
different warnings and alerts.
The content of the Quick menu (page 25) is fully customizable. Tap the button you want to change, and select its new function
from the list.
205-0010-00_QY-7375M-A_EN.indb 64205-0010-00_QY-7375M-A_EN.indb 643/12/2013 9:57:24 AM3/12/2013 9:57:24 AM
 1
1 2
2 3
3 4
4 5
5 6
6 7
7 8
8 9
9 10
10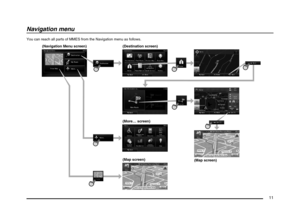 11
11 12
12 13
13 14
14 15
15 16
16 17
17 18
18 19
19 20
20 21
21 22
22 23
23 24
24 25
25 26
26 27
27 28
28 29
29 30
30 31
31 32
32 33
33 34
34 35
35 36
36 37
37 38
38 39
39 40
40 41
41 42
42 43
43 44
44 45
45 46
46 47
47 48
48 49
49 50
50 51
51 52
52 53
53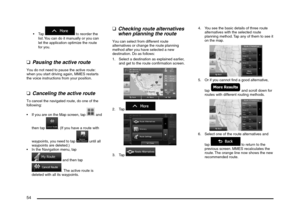 54
54 55
55 56
56 57
57 58
58 59
59 60
60 61
61 62
62 63
63 64
64 65
65 66
66 67
67 68
68 69
69 70
70 71
71 72
72 73
73 74
74 75
75 76
76 77
77 78
78 79
79 80
80 81
81 82
82 83
83 84
84 85
85 86
86 87
87 88
88 89
89 90
90 91
91 92
92 93
93 94
94 95
95 96
96 97
97 98
98 99
99 100
100 101
101 102
102 103
103 104
104 105
105 106
106 107
107 108
108 109
109 110
110 111
111 112
112 113
113 114
114 115
115 116
116 117
117 118
118 119
119 120
120 121
121 122
122 123
123 124
124 125
125 126
126 127
127 128
128 129
129 130
130 131
131 132
132 133
133 134
134