2014 MITSUBISHI MIRAGE USB port
[x] Cancel search: USB portPage 102 of 135
![MITSUBISHI MIRAGE 2014 6.G MMCS Manual 102
If a disc is left in the ejected position for
20 seconds, the disc is automatically
reloaded (Auto reload).
3. Remove the disc carefully.
4. Touch the [Panel Open/Close] key to close
the ope MITSUBISHI MIRAGE 2014 6.G MMCS Manual 102
If a disc is left in the ejected position for
20 seconds, the disc is automatically
reloaded (Auto reload).
3. Remove the disc carefully.
4. Touch the [Panel Open/Close] key to close
the ope](/manual-img/19/7509/w960_7509-101.png)
102
If a disc is left in the ejected position for
20 seconds, the disc is automatically
reloaded (Auto reload).
3. Remove the disc carefully.
4. Touch the [Panel Open/Close] key to close
the operation panel.
Note:
You can eject a disc by pressing and holding
the [OPEN/TILT] button.
If you force a disc into the insertion slot before
auto reloading, this can damage the disc.
q
Inserting/Removing an SD
Memory Card
In this system, SD memory cards are used for
playing MP3/WMA/AAC files.
É “SD Memory Card/USB Memory
Operations” (page 115)
Note:
This device supports SD memory cards, SDHC
memory cards (32GB or less), miniSD memory
cards*, and microSD memory cards*.
* A special adapter is required. If you insert this
memory card into the unit without an adapter,
you may be unable to remove it, and the unit
may become damaged.
Only use SD memory cards that conform to the
SD memory card standard.
Media that is not compatible with SD memory
cards is not supported.
SDXC memory cards are not supported.
Do not leave a miniSD adapter or microSD
adapter inside the unit.
Inserting an SD memory card
CAUTION
For your safety, the driver should not
insert or remove an SD memory card.
Do not turn off your vehicle or remove an
SD memory card while accessing a file
from the SD memory card.
1. Press the [OPEN/TILT] button to display
the OPEN/TILT screen.
2. Touch the [Panel Open/Close] key.
The operation panel opens.
3. Insert an SD memory card into the SD
memory card slot with the label side facing
up and the connectors facing forward. You
will hear a “click” when the SD memory
card is fully inserted.
It may take a long time to recognise the
inserted card.
Note:
If SD memory card mode is already selected,
the system automatically starts playing the files
on the card.
Never insert foreign objects into the SD memory
card slot.
If the SD memory card cannot be inserted,
another SD memory card might already be in
the SD memory card slot. Eject the SD memory
card from the SD memory card slot before
inserting a new SD memory card.
Removing an SD memory card
CAUTION
For your safety, the driver should not
insert or remove an SD memory card while
driving.1. Press the [OPEN/TILT] button to display
the OPEN/TILT screen.
2. Touch the [Panel Open/Close] key.
The operation panel opens.
3. Lightly press the SD memory card inward
with your finger until it stops, and then pull
back your finger. The SD memory card
comes out.
4. Remove the SD memory card carefully.
5. Touch the [Panel Open/Close] key to close
the operation panel.
q
Connecting/Disconnecting a
USB Memory
A USB memory can be used for playing MP3/
WMA/AAC files with this system.
É “SD Memory Card/USB Memory
Operations” (page 115)
To connect your USB memory to this unit, use
a USB cable (if so equipped).
For details, consult your Mitsubishi Motors dealer.Note:
This device supports USB 2.0/1.1.
Connecting a USB memory
CAUTION
For your safety, the driver should not
connect or disconnect a USB memory.
Do not turn off your vehicle or
disconnect a USB memory while
accessing a file from the USB memory.
1. Turn on the power of your USB memory, if
it has a power supply.
2. Confirm the orientation of the connectors,
and connect the USB memory to the USB
connector of this unit.
205-0010-00_QY-7375M-A_EN.indb 102205-0010-00_QY-7375M-A_EN.indb 1023/12/2013 9:57:27 AM3/12/2013 9:57:27 AM
Page 116 of 135

116
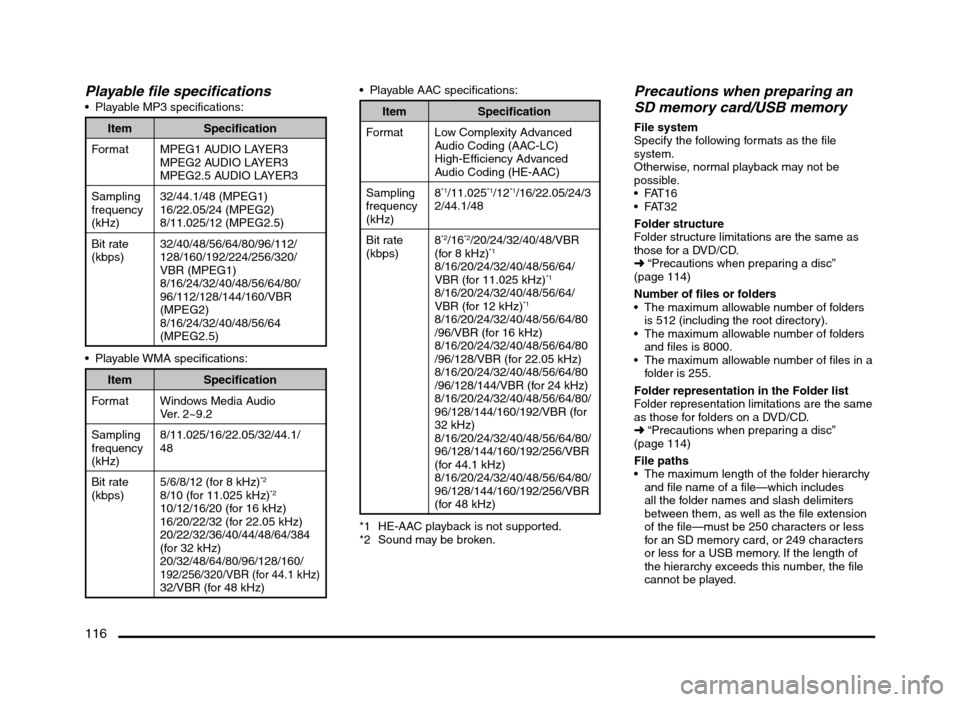
Playable file specifications Playable MP3 specifications:
Item Specification
Format MPEG1 AUDIO LAYER3
MPEG2 AUDIO LAYER3
MPEG2.5 AUDIO LAYER3
Sampling
frequency
(kHz)32/44.1/48 (MPEG1)
16/22.05/24 (MPEG2)
8/11.025/12 (MPEG2.5)
Bit rate
(kbps)32/40/48/56/64/80/96/112/
128/160/192/224/256/320/
VBR (MPEG1)
8/16/24/32/40/48/56/64/80/
96/112/128/144/160/VBR
(MPEG2)
8/16/24/32/40/48/56/64
(MPEG2.5)
Item Specification
Format Windows Media Audio
Ver. 2~9.2
Sampling
frequency
(kHz)8/11.025/16/22.05/32/44.1/
48
Bit rate
(kbps)5/6/8/12 (for 8 kHz)
*2
8/10 (for 11.025 kHz)*2
10/12/16/20 (for 16 kHz)
16/20/22/32 (for 22.05 kHz)
20/22/32/36/40/44/48/64/384
(for 32 kHz)
20/32/48/64/80/96/128/160/
192/256/320/VBR (for 44.1 kHz)32/VBR (for 48 kHz) Playable AAC specifications:
Item Specification
Format Low Complexity Advanced
Audio Coding (AAC-LC)
High-Efficiency Advanced
Audio Coding (HE-AAC)
Sampling
frequency
(kHz)8
*1/11.025*1/12*1/16/22.05/24/3
2/44.1/48
Bit rate
(kbps)8
*2/16*2/20/24/32/40/48/VBR
(for 8 kHz)*1
8/16/20/24/32/40/48/56/64/
VBR (for 11.025 kHz)*1
8/16/20/24/32/40/48/56/64/
VBR (for 12 kHz)*1
8/16/20/24/32/40/48/56/64/80
/96/VBR (for 16 kHz)
8/16/20/24/32/40/48/56/64/80
/96/128/VBR (for 22.05 kHz)
8/16/20/24/32/40/48/56/64/80
/96/128/144/VBR (for 24 kHz)
8/16/20/24/32/40/48/56/64/80/
96/128/144/160/192/VBR (for
32 kHz)
8/16/20/24/32/40/48/56/64/80/
96/128/144/160/192/256/VBR
(for 44.1 kHz)
8/16/20/24/32/40/48/56/64/80/
96/128/144/160/192/256/VBR
(for 48 kHz)
*1 HE-AAC playback is not supported.
*2 Sound may be broken.
Precautions when preparing an
SD memory card/USB memory
File system
Specify the following formats as the file
system.
Otherwise, normal playback may not be
possible.
Folder structure
Folder structure limitations are the same as
those for a DVD/CD.
É “Precautions when preparing a disc”
(page 114)
Number of files or folders
The maximum allowable number of folders
is 512 (including the root directory).
The maximum allowable number of folders
and files is 8000.
The maximum allowable number of files in a
folder is 255.
Folder representation in the Folder list
Folder representation limitations are the same
as those for folders on a DVD/CD.
É “Precautions when preparing a disc”
(page 114)
File paths
The maximum length of the folder hierarchy
and file name of a file—which includes
all the folder names and slash delimiters
between them, as well as the file extension
of the file—must be 250 characters or less
for an SD memory card, or 249 characters
or less for a USB memory. If the length of
the hierarchy exceeds this number, the file
cannot be played.
205-0010-00_QY-7375M-A_EN.indb 116205-0010-00_QY-7375M-A_EN.indb 1163/12/2013 9:57:28 AM3/12/2013 9:57:28 AM
Page 117 of 135

117
qSelecting SD memory card/
USB memory mode
1. Insert an SD memory card or connect a
USB memory with MP3/WMA/AAC files to
the unit.
For an SD memory card:
É “Inserting/Removing an SD Memory
Card” (page 102)
For a USB memory:
É “Connecting/Disconnecting a USB
Memory” (page 102)
2. Press the [AV] button to display the Source
screen.
3. Touch the [SD Memory CARD] key to
select SD memory card mode, or the
[USB/iPod] key to select USB memory
mode.
Playback starts from the first file in the first
folder.
You can also select SD memory card
mode/USB memory mode by using the
Steering Wheel Audio Remote Control (if
so equipped).
É “Steering Wheel Audio Remote
Control Operations” (page 103)
WARNING
Some tracks may be recorded at a higher
volume level than desired. Increase
the volume gradually from the minimal
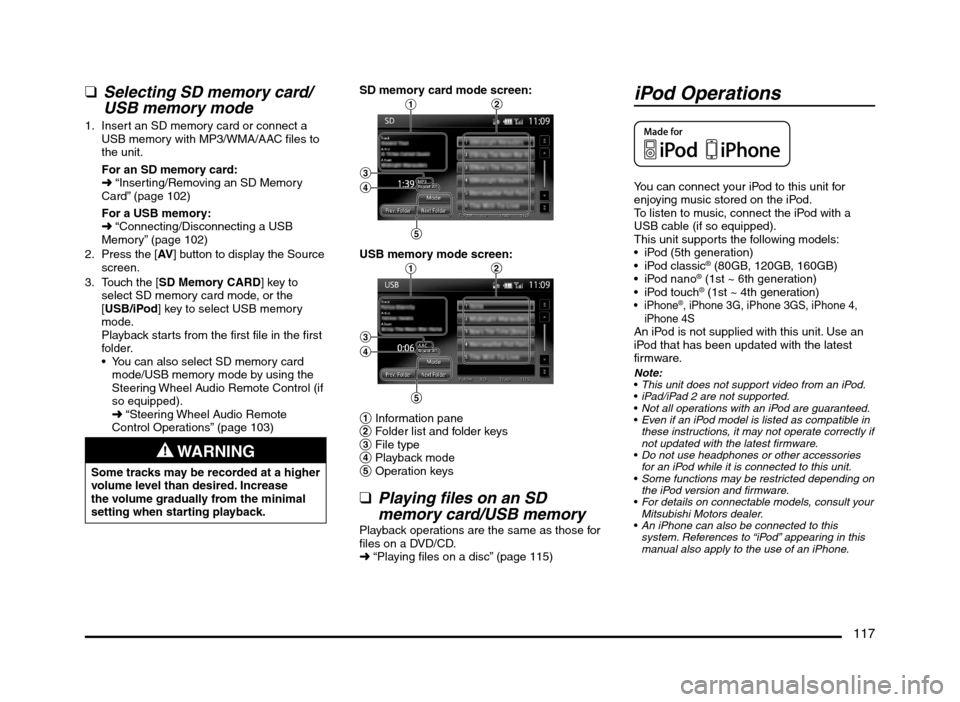
setting when starting playback.SD memory card mode screen:
12
3
4
5
USB memory mode screen:12
3
4
5
1 Information pane
2 Folder list and folder keys
3 File type
4 Playback mode
5 Operation keys
qPlaying files on an SD
memory card/USB memory
Playback operations are the same as those for
files on a DVD/CD.
É “Playing files on a disc” (page 115)
iPod Operations
You can connect your iPod to this unit for
enjoying music stored on the iPod.
To listen to music, connect the iPod with a
USB cable (if so equipped).
This unit supports the following models:
iPod (5th generation)
® (80GB, 120GB, 160GB)
® (1st ~ 6th generation)
® (1st ~ 4th generation)®, iPhone 3G, iPhone 3GS, iPhone 4,
iPhone 4S
An iPod is not supplied with this unit. Use an
iPod that has been updated with the latest
firmware.
Note:
This unit does not support video from an iPod.
iPad/iPad 2 are not supported.
Not all operations with an iPod are guaranteed.
Even if an iPod model is listed as compatible in
these instructions, it may not operate correctly if
not updated with the latest firmware.
Do not use headphones or other accessories
for an iPod while it is connected to this unit.
Some functions may be restricted depending on
the iPod version and firmware.
For details on connectable models, consult your
Mitsubishi Motors dealer.
An iPhone can also be connected to this
system. References to “iPod” appearing in this
manual also apply to the use of an iPhone.
205-0010-00_QY-7375M-A_EN.indb 117205-0010-00_QY-7375M-A_EN.indb 1173/12/2013 9:57:28 AM3/12/2013 9:57:28 AM