Page 65 of 476
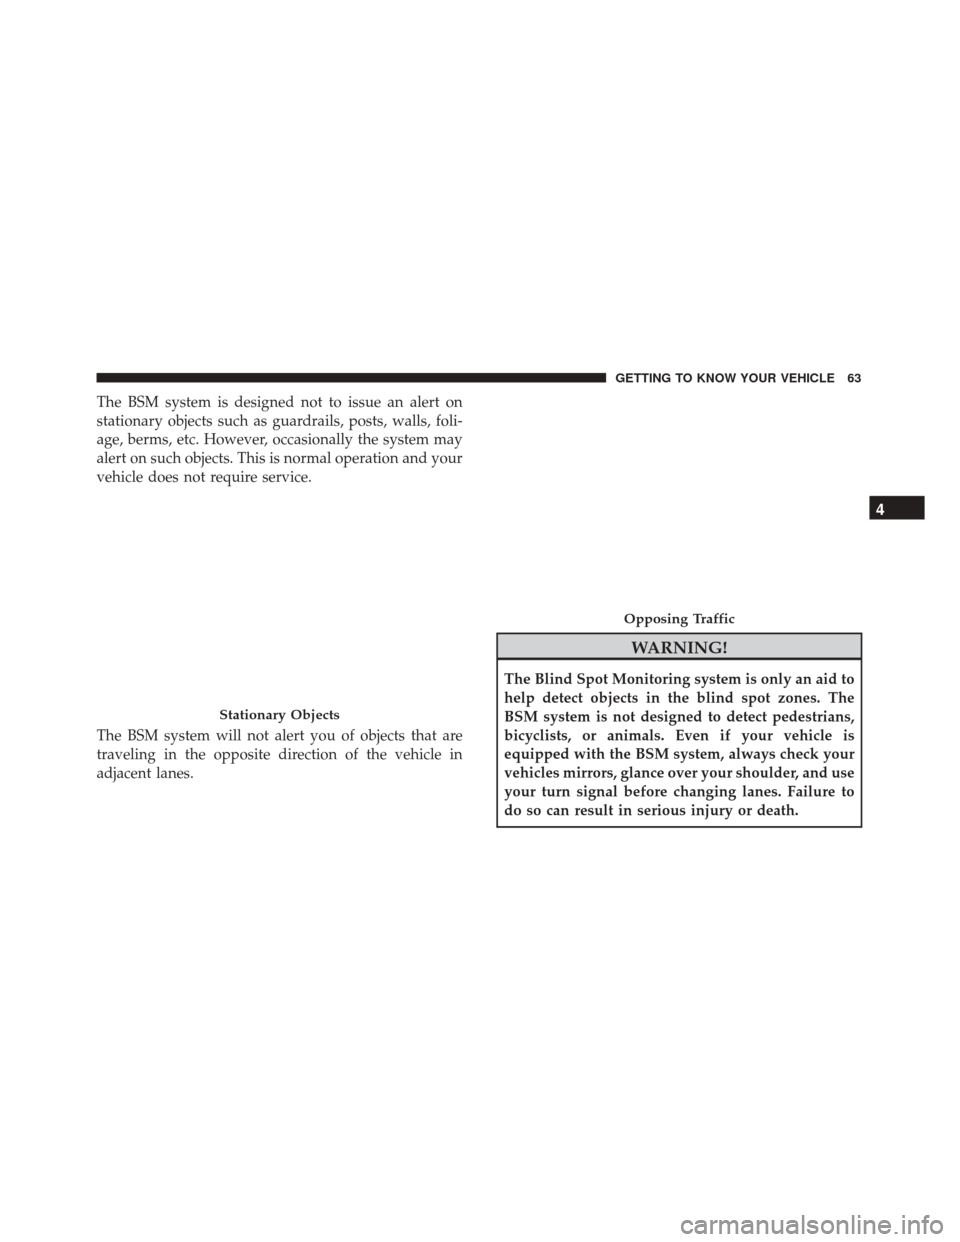
The BSM system is designed not to issue an alert on
stationary objects such as guardrails, posts, walls, foli-
age, berms, etc. However, occasionally the system may
alert on such objects. This is normal operation and your
vehicle does not require service.
The BSM system will not alert you of objects that are
traveling in the opposite direction of the vehicle in
adjacent lanes.
WARNING!
The Blind Spot Monitoring system is only an aid to
help detect objects in the blind spot zones. The
BSM system is not designed to detect pedestrians,
bicyclists, or animals. Even if your vehicle is
equipped with the BSM system, always check your
vehicles mirrors, glance over your shoulder, and use
your turn signal before changing lanes. Failure to
do so can result in serious injury or death.
Stationary Objects
Opposing Traffic
4
GETTING TO KNOW YOUR VEHICLE 63
Page 66 of 476

Rear Cross Path (RCP)
The Rear Cross Path (RCP) feature is intended to aid the
driver when backing out of parking spaces where their
vision of oncoming vehicles may be blocked. Proceed
slowly and cautiously out of the parking space until the
rear end of the vehicle is exposed. The RCP system will
then have a clear view of the cross traffic and if an
oncoming vehicle is detected, alert the driver.
RCP monitors the rear detection zones on both sides of
the vehicle, for objects that are moving toward the side
of the vehicle with a minimum speed of approximately1 mph (2 km/h), to objects moving a maximum of
approximately 22 mph (35 km/h), such as in parking lot
situations.
NOTE:
In a parking lot situation, oncoming vehicles
can be obscured by vehicles parked on either side. If the
sensors are blocked by other structures or vehicles, the
system will not be able to alert the driver.
When RCP is on and the vehicle is in REVERSE, the
driver is alerted using both the visual and audible
alarms, including reducing the radio volume.
WARNING!
RCP is not a back up aid system. It is intended to be
used to help a driver detect an oncoming vehicle in
a parking lot situation. Drivers must be careful
when backing up, even when using RCP. Always
check carefully behind your vehicle, look behind
you, and be sure to check for pedestrians, animals,
other vehicles, obstructions, and blind spots before
backing up. Failure to do so can result in serious
injury or death.
RCP Detection Zones
64 GETTING TO KNOW YOUR VEHICLE
Page 67 of 476

Mode Of Operation
Three selectable modes of operation are available in the
Uconnect System. Refer to “Uconnect Settings” in
“Multimedia” for further information.
Blind Spot Alert Lights Only
When operating in Blind Spot Alert mode, the BSM
system will provide a visual alert in the appropriate
side view mirror based on a detected object. However,
when the system is operating in Rear Cross Path (RCP)
mode, the system will respond with both visual and
audible alerts when a detected object is present. When-
ever an audible alert is requested, the radio is muted.
Blind Spot Alert Lights/Chime
When operating in Blind Spot Alert Lights/Chime
mode, the BSM system will provide a visual alert in the
appropriate side view mirror based on a detected object.
If the turn signal is then activated, and it corresponds to
an alert present on that side of the vehicle, an audible
chime will also be sounded. Whenever a turn signal and
detected object are present on the same side at the same
time, both the visual and audible alerts will be issued.
In addition to the audible alert, the radio (if on) will also
be muted.NOTE:
Whenever an audible alert is requested by the
BSM system, the radio is also muted.
When the system is in RCP, the system will respond
with both visual and audible alerts when a detected
object is present. Whenever an audible alert is re-
quested, the radio is also muted. Turn/hazard signal
status is ignored; the RCP state always requests the
chime.
Blind Spot Alert Off
When the BSM system is turned off, there will be no
visual or audible alerts from either the BSM or RCP
systems.
NOTE: The BSM system will store the current operating
mode when the vehicle is shut off. Each time the vehicle
is started the previously stored mode will be recalled
and used.
4
GETTING TO KNOW YOUR VEHICLE 65
Page 68 of 476

Blind Spot Monitoring Fault Warnings
Sensor Blinded
In the case of a sensor blinded:
•BSM Mirror Warning Lights are turned on continu-
ously.
• A instrument cluster message will display “Blind
Spot Monitoring Unavailable - Wipe Rear Bumper
Corners.”
NOTE: The rear bumper must be clean and free of any
obstructing debris.
System Not Available
In the case of the system being temporary unavailable:
• BSM Mirror Warning Lights are turned on continu-
ously.
• A instrument cluster message will display “Blind
Spot Monitoring Temporary Unavailable.”
In the case of the system being completely unavailable:
• A chime will turn on.
• A instrument cluster message will display “Blind
Spot Monitoring Unavailable - Service Required.” NOTE:
Vehicle must be taken to the nearest authorized
dealer for service.
General Information
This vehicle has systems that operate on radio fre-
quency that comply with Part 15 of the Federal Com-
munications Commission (FCC) rules and with Indus-
try Canada Standards RSS- GEN/210/220/310.
Operation is subject to the following two conditions:
1. The device may not cause harmful interference.
2. The device must accept any interference received, including interference that may cause undesired
operation of the device.
Changes or modifications to any of these systems by
other than an authorized service facility could void
authorization to use this equipment.
EXTERIOR LIGHTS
Headlights
The headlight switch is located on the left side of the
instrument panel. The headlight switch controls the
66 GETTING TO KNOW YOUR VEHICLE
Page 69 of 476

operation of the headlights, side marker lights, daytime
running lights, fog lights and the dimming of the
instrument cluster and interior lighting.
Turning on the headlights will illuminate the instru-
ment cluster and the controls located on the instrument
panel.Automatic Lighting — If Equipped
Light Sensor
The light sensor is equipped with an infrared LED,
located on the windshield. It detects changes in light
intensity outside the vehicle, based on the sensitivity of
light set by using the Menu on the display or on the
Uconnect system.
The higher the sensitivity, the lesser the amount of
external light required for controlling the lighting.
Automatic Headlights
Turn the headlight switch to the AUTO position.
When the automatic headlights are enabled, the head-
light time delay is active. After the ignition switch is
placed in the STOP mode, the headlights will automati-
cally turn off after approximately 90 seconds depending
on the settings of the feature.
The timing of the headlights is adjustable between 0, 30,
60 and 90 seconds. Refer to “Uconnect Settings” in
“Multimedia” for further information.
NOTE:The engine must be running before the head-
lights will come on in the automatic mode.
Headlight Switch
1 — Rotate Headlight Switch
2 — Ambient Light Dimmer
3 — Instrument Panel Dimmer
4 — Push Fog Light Switch
4
GETTING TO KNOW YOUR VEHICLE 67
Page 70 of 476

Daytime Running Lights (DRL) — If Equipped
The Daytime Running Lights (DRLs) will turn on when
the engine is started and remain on unless the head-
lights are turned on or the engine is shut off.
The DRLs will be disabled during turn signal operation
and resume operation when the turn signal operation
has ended.
Front Fog Lights — If Equipped
The front fog light switch is built into the headlight
switch.To activate the front fog lights, turn on the
parking lights or the low beam headlights and
push the headlight switch. To turn off the front fog
lights, push the headlight switch a second time or turn
off the headlight switch.
An indicator light in the instrument cluster illuminates
when the fog lights are turned on. NOTE:
•
The fog lights will operate with the low beam head-
lights or parking lights on. Selecting the high beam
headlights will turn off the fog lights.
• The fog lights also function as cornering lights.
Therefore there will be times when only one light is
on.
Parking Lights
Rotate the headlight switch to the first position to turn
on the parking lights. The parking light indicator in the
cluster will illuminate.
Headlight Delay
This feature provides the safety of headlight illumina-
tion for up to 90 seconds when leaving your vehicle in
an unlit area.
The time delay of the headlights is programmable
between 0, 30, 60 and 90 seconds. Refer to “Uconnect
Settings” in “Multimedia” for further information.
Headlight Delay Activation
To activate the delay feature, place the ignition in the
STOP position while the headlights are still on. Then,
68 GETTING TO KNOW YOUR VEHICLE
Page 71 of 476
turn off the headlights within two minutes. The delay
interval begins when the headlight switch is turned off.
Headlight Delay Disable
The feature is disabled by turning on the headlights, the
parking lights or by placing the ignition in RUN mode.
If you shut off the lights before the ignition is turned on,
they will turn off in the normal manner.
NOTE:The lights must be turned off within two
minutes of placing the ignition in STOP mode to
activate this feature.
High Beams
To turn on the high beam headlights, push the turn
signal lever forward (toward the front of the vehicle)
and an indicator will illuminate in the cluster. To turn
off the high beams, pull the turn signal lever rearward
(toward the rear of the vehicle). NOTE:
The headlights must be on for the high beams to
activate.
High Beam And Turn Signal Controls
4
GETTING TO KNOW YOUR VEHICLE 69
Page 72 of 476
Turn Signals
Move the multifunction lever up or down and the
arrows on each side of the instrument cluster flash to
show proper operation of the front and rear turn signal
lights.
When the Daytime Running Lights are on and a turn
signal is activated, the Daytime Running Lamp will
turn off on the side of the vehicle in which the turn
signal is flashing. The Daytime Running Lamp will turn
back on when the turn signal is turned off.
INTERIOR LIGHTS
Front Courtesy Light
The courtesy lights will automatically turn on when the
door is open or closed. The light switches in the
overhead console are for reading lamps.Push the driver or passenger light switch to operate the
reading lamps individually.
Front Courtesy/Reading Lights
1 — Left Courtesy/Reading Light
2 — Left Light Switch
3 — Right Light Switch
4 — Right Courtesy/Reading Light
70 GETTING TO KNOW YOUR VEHICLE