Page 65 of 306

-When installing the roof rack, make sure it
is only mounted on the designated locations
on the roof¢
fig. 61 .
-We recommend that you keep the installa
tion instructions for your roof rack system
together with your Owner's literature in the
vehicle.
Wh en should th e roof rack be remov ed ?
- Before going through an automatic car wash
(it is best to ask the car wash operator for
advice).
- When not in use, to reduce fuel consump
tion, wind noise and to guard against theft.
8_ WARNING
- Use of an unapproved roof rack or incor
rect mount ing of an approved roof rack
can cause the roof rack or the items at
tached to it to fall off the roof onto the road.
- Objects falling from the roof of a vehicle
can cause a crash and personal injury .
- Only mount the roof rack on the desig
nated locations on the roof¢
fig. 61 .
-The roof rack system must be installed
exactly according to the instructions pro
vided .
- When driving with a roof rack system,
changes to the center of gravity and wind
resistance can change the veh icle han
dling and lead to a collision . Always
adapt you r driv ing and your speed to the
c u rrent conditions.
(D Note
- Your vehicle warranty does not cover any
damages to the vehicle caused by using
r oof racks or mount ing structures not
approved by Audi for your vehicle . T he
same applies to damage resulting from
incorrect roof rack installa tion.
- Always check t he roof rack moun tings
and hardware before each trip and dur
i ng a trip to make sure everything is se
curely tightened . If necessary, retighten
the mount ings and check the entire sys
tem from t ime to t ime.
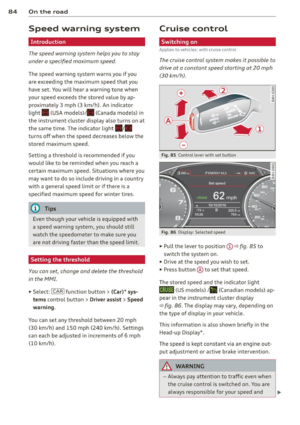
S eat s an d sto rage 63
-After mounting a roof rack system, or
when you transport objects on the roof
of your vehicle, the heig ht of the veh icle
is naturally increased. Be careful when
dr iving under low bridges or in parking
garages for example. This cou ld cause
damage to the load and even the vehicle
itself .
- Make sure the open rear lid and the sun
roof* do not come into contact w ith the
roof rac k.
Loading the roof rack
Always distribute loads evenly. Make sure
anything on the roof rack is securely tied
down.
"' Always distribute the loads on the roof rack
even ly.
"' Always attach items to the roof rack securely
befo re you dr ive off.
The maximum permissible roof weight is
220 l b (100 kg) . The roof weight is the total
of the we igh t of the roof rack, t he attach
ments and the cargo you a re carry ing . You
must a lso not exceed the max imum load
weight for the roof rack yo u are using .
When using a roof rack system which has a lower load ca rrying capacity, you must not use
u p the tota l maximum permissible load car ry
ing capacity specified above . Instead, you
sho uld load the roof rack system only to the
max imum capacity specified by the manufac
turer of the roof rack system.
8_ WARNING
Weak, damaged or improper straps used
to secure items to the roof rack can fail
du ring hard b raking o r in a coll is ion and
cause ser ious persona l injury.
- Make sure the roof rack is installed exact
ly as specif ied above ¢
page 62.
- Always use su itable mount ing straps for
secur ing items to the roof rack to help
prevent items from sh ifting or flying for
ward.
Page 66 of 306

64 Seats and storage
-Items on the roof rack must always be
sec urely mo unted.
- The use of a roof rack can negative ly af
fect the way a vehicle handles. Cargo
that is large, heavy, bulky, long or flat
will have a greater negative inf lue nce on
the vehicle's aerodynamics, center of gravity and overall handling . Always
dr ive slowly, avo id sudden braking and
maneuvers when tra nsporting cargo on
the roof of you r vehicle.
- Never exceed the maximum perm iss ible
load carryi ng capacity of the roof of yo ur
vehicle, the perm issib le axle weights and
the permiss ible total weight of your veh i
cle
¢ page 282, Weights .
@ For the sake of the environment
As a res ult of the increased w ind resist
ance crea ted by a roof rack, your ve hicle is
using fue l unnecessarily . So remove the
roof rack after using it .
Luggage compartment
Loading luggage compartment
Luggage items must be stowed securely.
Fig . 62 Place heavy obj ects as far forwar d as po ssible .
Note the following to prese rve the vehicle's
good hand ling cha ra c te ris tic s .
.. Distribute the load as evenly as possible .
.. Place heavy objects as far fo rward as possi
ble
¢ fig . 62 .
.. Secure luggage items wi th the cargo ne t* or
with non -elast ic retain ing s traps to the t ie
down r ings*
¢ page 66.
A WARNING """-iiiiiiiii
- Loose objects i n the l uggage compa rt-
ment can slide about suddenly and a lter
the vehicle's ha nd ling characteristics .
- Loose objects i n the passenge r compart
ment can fly forward during abrupt ma
ne uvers or accidents and inju re occu
pants .
- Always sto re objects in the luggage com
partment and use s uitable straps, partic
ularly w it h heavy objects.
- When you t ransport heavy objects, al
ways remember that a change in the cen
ter of gravity m ay result in a change in
the vehicle's hand ling c harac teristi cs.
- Follow all warnings
¢ page 130, Driving
Safely.
(D Tips
The t ire pressure mus t be adj usted to the
l oad -see the t ire p ressure sticker located
o n the dr iver's side 8-pilla r.
Luggage compartment cover
The luggage compartm ent cover consists of
two parts .
• • Fig. 63 Cov er in th e open rear lid
F ig . 64 Cover be hind th e r ear bench seat
Page 67 of 306

Removing the cover in the rear lid
• Remove the knobs CD c::> fig. 63 from the ball
mounts.
• Pull the cover @out of the retainers@ in
the direct ion of the arrow .
Installing the cover in the rear lid
• Slide the cover upward into the retainers @.
• Press the knobs
CD onto the ball mounts.
Removing the cover behind th e rear bench
seat
• Pull the cover ¢ fig. 64 back.
• Pull the cover upward to release.
Installing the cover behind the rear bench
seat
• Insert the left and right sides of the cover
into the mounts on the side trim .
• Slide the cover forward until it locks into
place .
A WARNING
-To prevent accidents, never install the
luggage compartment cover unsecured.
- The luggage compartment cover is not a
surface for storing objects. Objects
placed on the cover could endanger all
vehicle occupants during sudden braking
maneuvers or in a crash.
(D Note
Objects located on the rear shelf that rub
aga inst the rear window could damage the
heating wires for the rear window defog
ger .
Seats and storage 65
Enlarging cargo capacity of the vehicle
, interior
The seat backs can be folded forward to en
large the cargo capacity.
Fig. 65 Release handle on t he seatback
Folding the seatback forward
• When you pull the release lever @<=:> fig. 65
in the direction of the arrow, the safety knob
® pops out far enough for the red marking
on knob to be visib le.
.,. Fold the seatback forward.
Raising the seatback
.,. Raise the seatback until it is secure ly latch
ed¢ &,.. When you can no longer see the
red mark on the safety knob@, the seat is
latched .
_& WARNING
-
-The backrest must always be securely
latched so that the safety belt of the cen
ter seating position can work properly to he lp protect the occupant.
- The backrest must be securely latched in
position so that no items contained in
the luggage compartment can s lide for
ward upon sudden braking.
- Always check whether the latch is fully
engaged by pulling the seatback for
ward .
- N ever a llow safety belts to become dam
aged by being caught in door or seat
hardware .
- Torn or frayed safety belts can tear and
damaged be lt hardware can break in a
crash. Inspect the belts periodical ly.
Page 68 of 306

66 Seats and st o rage
Belts showing damage to webbing, bind
ings, buckles, or retractors must be re
placed.
(D Note
- If you move the front seat back when the
rear seat backrest is fo lded forward, you
could damage the head restraints on the
rear seat.
- Slide the belt guide on the outside safety
belt all the way up before folding the
backrest back forward. Make sure the
seat belt is not p inched or damaged
when the rear seat backrest if folded
back. Other objects shou ld be removed
from the rear seat bench to protect the
seatbac k from d amage.
Tie -downs and cargo net
The cargo net" prevents small objects from
sliding.
Fig . 66 Locat ion of the tie-downs in the luggage com
partment
Fig. 67 Luggage compartme nt: cargo net*
... To secure objects with the luggage compa rt
ment net*, fold the tie-down bracket up
ward
c:::> fig. 66. ...
Insert the hooks on the luggage compart
ment net* into the tie-downs
c:::> fig . 67.
... Read and heed all WARNINGS
c:::> page 136,
Stowing luggage.
In a collision, the laws of physics mean that
even smaller items that are loose in the vehi
cle wi ll turn into heavy missi les that can cause
serious injury. Items in the vehicle pick up ki
netic energy which varies with the veh icle and
the weight of the item . Vehicle speed is the
most sign ificant factor .
For example, in a frontal collision at a speed
of 30 mph (48 km/h), the forces acti ng on a
10-lb (5 kg) object are about
20 times the
normal we ight of the item . This means that
the weight of the item would sudden ly be the
equivalent of abo ut 200 lbs (90 kg). One can
easily imagine the injuries that an item of that
weight flying freely through the passenge r
compartment ca n cause in a collision at a
speed considered relatively low.
A WARNING
-
Weak, damaged or improper straps used
to secure items to tie-downs can fail dur
ing hard braking or in a collision and cause
serious personal injury.
- Always use suitable retaining straps and
properly secure items to the tie-downs in
the l uggage compartment to help pre
vent items from shift ing or fly ing for
ward.
- Never attach a chi ld seat tether strap to
a tie-down.
- For strength-related reasons, the mou nt
ing hooks can only be used to secure ob
jects weigh ing up to 10 lb. (5 kg). Heavi
er objects will not be adequ ately sec ured
- there is a risk of injury.
Page 69 of 306

Bag hooks
Light objects can be secured on the hooks.
Fig. 68 Luggage compartme nt: bag hooks
You can also use the hooks to hang light purs
es,bags, etc.
A WARNING
The hooks can hold a maximum weight of
3 kg. Heavier objects are not adequately
secured. There is risk of personal injury .
Luggage compartment covering
(reversible mat )
Applies to vehicles: with luggage compartment carpeting
The reversible luggage compartment covering
should be used when transporting dirty or
wet objects.
Fig. 69 L uggage compartment carpeting with seatback
folded dow n: sp read out over the bumper
The lugg age compartment carpeting can be
used w ith the dirt resistant s ide or the decora
tive side, depending on what is needed .
@ Tips
The protective mat should be folded up
only when dry.
Seats and storage 67
Pass-through with ski
sack
Preparing the pass-through
Applies to vehicles: wi th ski sack
Long objects such as skis can be transported
in the ski sack*.
Fig. 70 Rear bench seat: opening the pass -through
Opening the trunk pass-through
.. Fold the center armrest in the rear forward
and out .
.. Pull the release handle
c::> fig. 70 and fold
down the cover of the pass-through in the
vehicle interior.
.. Open the rear lid .
.,. Push the ski sack* through the opening from
the luggage compartment.
.,. Secure the ski sack
c::> page 68 .
Closing the trunk pass-through
.,. Open the rear lid .
.,. Remove the ski sack from the trunk pass
through .
.. Push the pass-through cover up inside the
veh icle until it latches .
.,. Raise the center armrest in the vehicle
again.
.. Close the rear lid.
A WARNING ~
Objects must only be transported in the ski
sack since the ski sack can be secured. In
dividual objects cannot be secured. There is a risk of injury .
Page 70 of 306

68 Seats and storage
@ Tips
You can a lso open the pass-through from
the luggage compartment. Push the re
lease button down and p ush the cover for
ward.
Securing the ski sack
App lies to vehicles: with sk i sack
The ski sock must be secured in the luggage
compar tmen t.
Fig. 71 Lu ggage compartme nt: Sec uri ng th e bag
Fig. 72 Sec urin g th e o bjects in t he s ki s ack
Securing the ski sack in the luggage
compartment
.. The ski sack has two be lts with hooks o n the
unders ide
9 fig. 71 @ . Hang the hooks to
t h e rear fastening eye lets in the luggage
compartment .
Securing the objects in the ski sack
.. The re is also a securi ng strap q fig . 72 @ in
the sack . Pu ll the strap taut using the free
end of the s trap.
& WARNING
- Th e ski sac k is intended only fo r the
t ransportation of skis and ot her ligh t ob- jects
. To reduce the risk of serio us per
sonal injury, never transport heavy or
pointed objects in the sk i sack.
- When braking rapid ly or during an acci
dent, the load could be d isplaced and
cause injury to occupa nts .
- Sharp edges on the load must be covered
for protection. A lways fasten the belt
tightly around the sack and its contents
9 fig. 72.
(D Tips
- Never stow the ski sack away when it is
st ill wet or damp (for example, snow
me lting from skis) . Allow it to dry com
pletely before stow ing it away .
- Pos ition skis in the sk i sack with the
pointed ends facing the front and ski
poles with the pointed ends facing the
rear.
Page 71 of 306

Warm and cold Climate controls
Description
App lies to vehicles: with three -zone cl imate contro l or
four -zone a uto mat ic climate contro l
The climate control system warms, cools and
adds humidity to the air in the vehicle interior .
It is the most effective when the windows and
sunroof* are closed . If the temperature inside
the parked veh icle becomes very warm, open
i ng the w indow br iefly will speed up the cool
ing process.
In all heating mode functions except
defrost,
the blower on ly switches to a higher speed
once the engine coolant has reached a certain
temperature.
Condensat ion from the cooling system can
drip and form a puddle of wate r under the ve
h icle. This is normal and does not mean there
is a leak .
Pollutant filt er
The pollutant filter removes pollutants such
as dust and po llen from the air.
The air pollutants filter must be changed at
the intervals specified in your Warranty
&
Maintenance booklet, so that the air condi
tioner can properly work .
If you drive your vehicle in an area with high
a ir pollution, the filter may need to be
changed more frequently than specified in
your Aud i Warranty
& Ma intenance booklet. If
i n doubt, ask your authori zed Audi Service Ad
visor for adv ice.
K ey coded settings
Three-zone climate control: T he b lower set
ting and air d istribution are stored automati
cally and ass igned to the remote control key
that is in use .
Four-zone automatic climate control: The cli
mate contro l settings are automatica lly stor
ed and assigned to the remote control key
that is in use .
Warm and c old 69
A WARNING
-
Reduced visibi lity is dangerous and can
cause acc idents .
- For safe driving it is very important that
all windows be free of ice, snow and con
densat ion.
- Comp letely fam il iarize yourse lf with the
proper use and funct ion of the heat ing
a nd ventilation system and especially
how to defog and defrost the w indows.
- Never use the windshield wiper/washer system in freez ing weathe r unt il you
have wa rmed the windshie ld first, using
the heating and ventilation system. The
washer sol ution may freeze on the wind
shie ld and red uce visibi lity.
CJ) Note
- If you s uspect that the air conditioner
has been damaged, switch the system
off to avoid furt her damage and have it
inspected by a qualified dea lership .
- Repairs to the Audi air conditioner re
quire specia l technical know ledge and
special tools. Contact an authorized Audi
dealer fo r ass istance.
@ For the sake of the envi ronment
By reducing the amount of f uel you use,
you also red uce the amount of pollutants
emitted into the air.
(D Tips
- Keep the air intake s lo ts ( in front of the
w indshield) free from ice, snow and de
bris in order to maintain the proper func
tion of the climate control system.
- The energy ma nagement system may
switch the seat heating* or rear window defroster off temporar ily. These systems
are available again as soon as the energy
balance has been restored .
- Air escapes through vents under the rear window. When plac ing items of cloth ing
on the luggage compartment cover, en
sure that the openings are not covered.
Page 72 of 306

70 Warm and cold
Three-zone climate control
Operation
Applies to vehicles: with three -zone climate control
We recommend pressing the IA UT O I button and setting the temperature to 72 °F (22 °C).
Fig . 7 3 Thr ee-zone cl imate co ntrol: co ntro ls
Press the buttons to t urn the func tions on o r
off. The dia l adjusts the te mperat ure and the
bl ower. The LED i n the bu tto ns ill umi nates
when the funct ion is a ctive.
IAU TO I Switching automatic mode on
Automatic mode ma inta ins a constant tem
pe rat ure ins ide the vehi cle. Air temp erature,
a ir flow an d air d ist ribution a re controlled a u
tom atically.
e °Fe Adjusting the temperature
The temperature can be adjusted individ ua lly
for the dr iver and fro nt passenger using the
d ials @and @.
8fr Adjusting the airflow
Using the dial@, you can manually adj ust t he
amount of air generated by the blower to suit
your preferences . To have the ai rflow regu lat
ed automatically, p ress the
!AU TO ! bu tton .
~.~ .~ Adjusting the air distribution
You can manually se lect the vents whe re the
a ir will flow. To have the air distribution regu
lated automatically, press the
I AUTOI b utton .
1..,., 1 Switching recirculation mode on/off
"' ..... g
0 .. a,
In recirc ulation mode, the a ir inside the vehi
cle is c irculated a nd filtered . T his prevents th e
unfiltered air outs ide the ve hicle from enter
ing t he ve hicl e inte rio r. We recommend
swi tching recirc ulati on mode on when driving
t hr ou gh a tunne l o r w hen sit ting in t ra ffic
¢ ,& .
The !AUTO ! button or~ button swi tche s reci r
cula tion mode o ff.
IOFF I Switching the climate control
system on/off
T he IOFF ! button sw itches the cli mate con trol
s ystem on or off.
It al so s wit c hes on whe n yo u
tu rn t he dia l or press any bu tton . Airflow from
o utside is blocked when the climate co ntro l
system is switched off .
IACI Switching cooling mode on/off
The air is n ot coo led and hu midity is not re
moved when coo ling mode is swi tched off .
T his can ca use fog on the windows. Cooling
mode switches off automatically w hen t he
outside temperat ure is be low ze ro.