Page 57 of 287
 Owners Manual Lights and visibility
Lights
Introduction
This chapter contains information on the following subjects:
Side lights and low beam
55
Daylight running lights (DAY LIGHT)
55
Turn signal and main beam
5")
Lights and visibility
Lights
Introduction
This chapter contains information on the following subjects:
Side lights and low beam
55
Daylight running lights (DAY LIGHT)
55
Turn signal and main beam
56
Automatic driving lamp control
57
Adaptive headlights (AFS)
57
Headlight assist
58
Fog lights
59
Fog lights with the CORNER function
59
Rear fog light
60
COMING HOME / LEAVING HOME
60
Hazard warning light system
61
Parking lights
61
The lights work only with the ignition on, unless otherwise stated.
On models fitted with right-hand steering, the position of some of the controls
differs from that shown in » Fig. 28 on page 55. The symbols which mark the
positions of the controls are identical.
Keep the headlights lenses clean. The following guidelines must be ob-
served » page 207 , Headlight lenses .
WARNING■
The activation of the lights should only be undertaken in accordance with
national legal requirements.■
The driver is always responsible for the correct settings and use of the
lights.
■
The automatic driving lamp control only operates as a support and does
not release the driver from his responsibility to check the light and, if necessa-
ry, to switch on the light depending on the given light conditions. The light sensor cannot, for example, detect rain or snow. Under these conditions we
recommend switching on the low beam or fog lights!
Note
■ If there is a fault in the light switch, the low beam comes on automatically.■The headlights may mist up temporarily. When the driving lights are switched
on, the light outlet surfaces are free from mist after a short period, although the
headlight lenses may still be misted up in the peripheral areas. This mist has no
influence on the life of the lighting system.■
The instruments are also illuminated when the side light, low or high beam light
is switched on. The brightness of the instrument lighting can be activated or de- activated in the Infotainment » Operating instructions for Infotainment , chap-
ter Vehicle settings (CAR button) .
54Using the system
Page 58 of 287
 Owners Manual Side lights and low beamFig. 28
Light switch and control dial for
the headlight beam range regu-
lation
First read and observe the introductory information and safety warn-
ings on page 54.
Light sw")
Side lights and low beamFig. 28
Light switch and control dial for
the headlight beam range regu-
lation
First read and observe the introductory information and safety warn-
ings on page 54.
Light switch positions
A
» Fig. 28 .
Switching off lights (except daytime running lights) Automatic switching lights on and off » page 57
Switch on the parking light or parking lights on both sides » page 61
Switching on the low beam
Switch on the front fog lamp » page 59
Switching on the rear fog light » page 60
Headlight beam control
Turning the rotary switch
B
» Fig. 28 from position
to
gradually activates the
headlight beam control, thereby shortening the beam of light.
The positions of the width of illumination correspond approximately to the fol-
lowing car load.
Front seats occupied, boot empty
All seats occupied, boot empty
All seats occupied, boot loaded
Driver seat occupied, boot loaded
WARNINGAlways adjust the headlight beam to satisfy the following conditions.■The vehicle does not dazzle other road users, especially oncoming vehicles.■
The beam range is sufficient for safe driving.Note■ We recommend you adjust the headlight beam when the low beam is switched
on.■
The Bi-Xenon bulbs adapt automatically to the load and driving state of the ve-
hicle when the ignition is switched on and when driving. Vehicles that are equip- ped with Bi-Xenon headlights do not have a manual headlight range adjustment
control.
■
The low beam continues to shine while the ignition is switched on and the light
switch is in the position or . After switching off the ignition, the low beam
is switched off automatically and only the side lights come on. The side light goes
out after the ignition key is removed.
Daylight running lights (DAY LIGHT)
First read and observe the introductory information and safety warn-
ings
on page 54.
The daytime running lights function provides the lighting of the front of the vehi-
cle.
Switching on daytime running lights
›
The light switch
A
is in position
or turn
» Fig. 28 on page 55.
Activating or dectivating daytime running lights function on vehicles with Infotainment
The daytime running light can be activated or deactivated in the Infotain-
ment » Operating instructions for Infotainment , chapter Vehicle settings (CAR
button) .
Deactivating the daytime running lights feature on vehicles without
Infotainment
›
Pull the turn signal and main beam lever to the steering wheel and push down-
wards » Fig. 29 on page 56.
›
At the same time switch on the ignition and hold the lever down in this position
for at least 3 seconds.
Activating the daytime running lights feature on vehicles without Infotainment
›
Pull the turn signal and main beam lever to the steering wheel and push up- wards » Fig. 29 on page 56.
›
At the same time switch on the ignition and hold the lever down in this position
for at least 3 seconds.
55Lights and visibility
Page 59 of 287
 Owners Manual The daytime running lights are switched on automatically if the following condi-tions are met:
The ignition is switched on.
The daylight driving lights function is activated.
The light switch is in th")
The daytime running lights are switched on automatically if the following condi-tions are met:
The ignition is switched on.
The daylight driving lights function is activated.
The light switch is in the position or » Fig. 30 on page 57.
Note
When the daytime running light is switched on, the side lights (neither at the
front or rear) and the number plate lights are not lit.
Turn signal and main beam
Fig. 29
Operating lever: Turn signal and
main beam operation
First read and observe the introductory information and safety warn- ings on page 54.
Operating lever positions » Fig. 29 .
Switch on right turn signal
Switch on left turn signal
Switch on main beam (spring-tensioned position)
Switch on main beam or headlamp flasher (spring-loaded position)
The parking light can also be controlled with the control lever » page 61.
The main beam can only be switched on when the low beam lights are on.
When the high beam or headlight flasher is on, the warning light
illuminates in
the instrument cluster.
When the left or right turn signal is on, the warning light
or
flashes in the
instrument cluster.
ABCDOn vehicles with Headlight assist, when the lever is put into position C, the As-
sistant is activated » page 58.
“Convenience turn signal”
If you only wish to flash three times, briefly push the lever to the upper or lower
pressure point and release again.
The “convenience turn signal” can be activated or deactivated in the Infotain- ment » Operating instructions for Infotainment , chapter Vehicle settings (CAR
button) .
Turn signal for changing lanes - to only flash briefly, only move the lever up or
down to the pressure point and hold it in this position.WARNINGOnly turn on the main beam or the headlight flasher if other road users will
not be dazzled.
Note
■ The headlight flasher system can also be operated if the ignition is switched off.■The turn signal light switches itself off automatically when driving around a
curve or after making a turn.■
The warning light flashes at twice its normal rate if a bulb for the turn signal
light fails.
56Using the system
Page 60 of 287
 Owners Manual Automatic driving lamp controlFig. 30
Light switch
First read and observe the introductory information and safety warn-
ings on page 54.
If the light switch is in position
» Fig. 30 ,")
Automatic driving lamp controlFig. 30
Light switch
First read and observe the introductory information and safety warn-
ings on page 54.
If the light switch is in position
» Fig. 30 , the parking lights, low beam and
number plate lights are switched on or off automatically.
The light is regulated based on data gathered by the light sensor attached be- tween the windscreen and the interior mirror.
The sensitivity of the light sensor can be activated or deactivated in the Infotain-
ment » Operating instructions for Infotainment , chapter Vehicle settings (CAR
button) .
If the light switch is in position
, the symbol
lights up next to the light
switch. If the light is switched on automatically, the symbol
next to the light
switch also lights up.
Automatic headlight control in rain
If the light switch is in position
and if automatic wiping in rain or wiping (posi-
tion 2 or 3) is switched on for longer than 30 seconds » page 66, the side lights
and low beam will switch on automatically.
The light switches off when automatic wiping/wiping (position 2 or 3) is not
switched on for longer than approx. 4 seconds.
The automatic headlight control in rain can be activated or deactivated in the In-fotainment » Operating instructions for Infotainment , chapter Vehicle settings
(CAR button) .
CAUTION
Do not affix any stickers or similar objects in front of the light sensor on the wind-
screen, so that its functionality is not impaired or disabled.
Adaptive headlights (AFS)
First read and observe the introductory information and safety warn-ings
on page 54.
The AFS system works in tandem with automatic driving lamp control , please
read the following » page 57.
The AFS system makes sure the street remains lit up depending on the traffic and weather situation.
The system automatically adjusts the cone of light in front of the vehicle based
on the vehicle speed, whether the windscreen wipers are in use, the rear fog
lights, and data from Infotainment Navigation.
The AFS system can work only if the following condition is met. The light switch is in the position
.
The AHL system operates in the following modes.
Out of town mode
The cone of light in front of the vehicle is similar to the low beam. The mode is
active if none of the following modes are active.
City mode
The cone of light in front of the vehicle is adjusted so that it illuminates the adja- cent pavement, crossings, etc. The mode is active at speeds of 15-50 km/h.
Motorway mode
The cone of light in front of the vehicle is adjusted so that the driver can respond in time to an obstruction or other hazard in time. The mode is active at speeds
above 110 km/h.
Rain mode
The cone of light in front of the vehicle is adjusted so that the driver can reduce the glare from oncoming vehicles in rain.
The mode is active at speeds of 50 – 90 km/h and if the windscreen wipers con-tinuously operate for a period of time longer than 2 minutes. The mode is deacti-
vated when the windscreen wipers are switched off for longer than 8 minutes.
Fog mode
The cone of light in front of the vehicle is adjusted so that the driver is not daz-
zled by the reflection of the cone of light by fog in front of the vehicle.
57Lights and visibility
Page 61 of 287
 Owners Manual The mode is active at speeds of 15 – 70 km/h and if the rear fog light is switchedon for a period of time longer than 10 seconds. The mode is deactivated when the
rear fig light is switched off for")
The mode is active at speeds of 15 – 70 km/h and if the rear fog light is switchedon for a period of time longer than 10 seconds. The mode is deactivated when the
rear fig light is switched off for longer than 5 seconds.
Dynamic cornering lights
The cone of light in front of the vehicle is adjusted to the steering angle so that the road in the curve is illuminated. This function is active at speeds greater than
10 km.h and in all AFS modes.
Tourist light (Travel mode)
This mode makes it possible to drive in countries with opposing traffic system (driving on the left/right) without dazzling the oncoming vehicles.
When the “tourist light” mode is active, the above-mentioned modes and the side
swivel of the headlights is deactivated.
The "Tourist light" mode can be configured in the Infotainment » Operating in-
structions for Infotainment , chapter Vehicle settings (CAR button) .WARNINGIf the AFS system is defective, the headlights are automatically lowered to the
emergency position, which prevents a possible dazzling of oncoming traffic. This reduces the cone of light in front of the vehicle. Drive carefully and visit a
specialist garage as soon as possible.
Note
If the Eco driving mode is selected, the AFS system is deactivated » page 161.
Headlight assist
Fig. 31
Operating lever: Headlight assist
First read and observe the introductory information and safety warn-
ings on page 54.
The Headlight assist switches the headlights on/off automatically depending on
the environmental conditions.
The headlight is regulated based on data gathered by the camera attached be-
tween the windscreen and interior mirror.
The function of high beam assist can be activated or deactivated in the Infotain-ment » Operating instructions for Infotainment , chapter Vehicle settings (CAR
button) .
The headlight can switch off automatically at speeds above 60 km/h. The head-
light switches off automatically when the speed falls below 30 km/h.
When the assistant automatically switches on the main beam, warning light
is
lit in the instrument cluster.
Activating
›
Turn the light switch to the
» Fig. 30 on page 57 position.
›
Place the lever in position
A
(spring-tensioned position) » Fig. 31.
The warning icon
for the activated headlight assist appears in the display of
the instrument cluster.
Deactivating
›
If the headlight is currently switched on automatically, move the lever into posi-
tion
B
(spring-tensioned position) » Fig. 31.
›
If the headlight is not currently switched on automatically, move the lever into
position
A
(the headlight switches on) followed by position
B
.
If you want to reactivate the Assist, put the lever back into position
A
.
The Assist can also be deactivated when the light switch is turned from position
to another position.
Manually switching on the headlights
If the headlight is not switched on automatically, it can be switched on manually -
put the lever into position
A
. The assistant is deactivated, the warning icon
goes out.
Manually switching off the headlights
If the headlight is switched on automatically, it can be switched off manually -
put the lever into position
B
. The assistant is deactivated, the warning icon
goes out.
58Using the system
Page 62 of 287
 Owners Manual Information message
The messages and information are indicated in the instrument cluster display. Fault: Light Assist
LIGHT ASSIST FAULT
Seek help from a specialist garage. Light Assist: clean the win")
Information message
The messages and information are indicated in the instrument cluster display. Fault: Light Assist
LIGHT ASSIST FAULT
Seek help from a specialist garage. Light Assist: clean the windscreen!
WINDSCREEN PLEASE CLEAN
Check for any obstacles on the windscreen in the viewing area of the camera.WARNINGHeadlight assist only functions as a support and does not relieve the driver of
his responsibility to check the headlights and light beam and, if necessary, to
switch on the lights depending on the light conditions. Manual operation may be required in the following situations.■
Poor visibility conditions, e.g. fog, heavy rain, thick snowfall.
■
The oncoming traffic is partially blocked on roads or motorways.
■
Passing poorly lit road users, e.g. cyclists.
■
Driving around “sharp” curves.
■
Driving on sharp slopes up/large inclines.
■
Driving through poorly-lit locations.
■
Driving over highly reflective surfaces.
■
The windscreen around the camera is dirty, iced up, misted up, or covered by
stickers.
■
Near the camera lens there is a light source, such as the screen of an exter-
nal navigation system.
CAUTION
Do not attach any stickers or similar objects to the windscreen to avoid impairing
the functions of the Assist system.Fog lightsFig. 32
Light switch
First read and observe the introductory information and safety warn-
ings on page 54.
Switching on/off
›
Turn the light switch to position
,
or
» Fig. 32 .
›
Pull the light switch to position
1
.
The rear fog light is switched off in the reverse order.
The warning light
lights up in the instrument cluster when the fog lights are
switched on » page 15.
Fog lights with the CORNER function
First read and observe the introductory information and safety warn-ings
on page 54.
The CORNER function improves illumination of the vehicle surroundings when
turning, parking and the like, by switching on the fog lights on the respective side
of the vehicle.
The CORNER function is switched on automatically if the following conditions
are met.
The turn signal is switched on or the front wheels are turned sharply to the
right or left 1)
.
The engine is running.
1)
If both switch-on conditions are conflicting, for example, if the front wheels are turned to the left and
the right turn signal light is switched on, the turn signal light has the higher priority.
59Lights and visibility
Page 63 of 287
 Owners Manual The vehicle is stopped or moves at a speed of no more than 40 km/h.
The low beam is switched on or the light switch is in the position and the
low beam is switched on.
The daytime runnin")
The vehicle is stopped or moves at a speed of no more than 40 km/h.
The low beam is switched on or the light switch is in the position and the
low beam is switched on.
The daytime running lights are not switched on. The fog lights are not switched on.
The CORNER light is mainly intended to be used for illuminating the nearby envi-
ronment at a broad angle in front of and beside the vehicle. It lights up and goes out gradually.
Note
The two fog lights are switched on when you shift into the reverse gear.
Rear fog light
First read and observe the introductory information and safety warn-
ings
on page 54.
Switching on/off
›
Turn the light switch into position
or
» Fig. 32 on page 59.
›
Pull the light switch to position
2
.
The rear fog light is switched off in the reverse order.
If the vehicle is not fitted with fog lights, the rear fog light is switched on by pull-
ing out the light switch directly to the position
2
. This switch can only be put in-
to one position.
The warning light
lights up in the instrument cluster when the rear fog light is
switched on » page 15.
Only the rear fog light on the trailer lights up if the vehicle has a factory-fitted towing device or a towing device from ŠKODA original accessories and it is driven
with a trailer.
COMING HOME / LEAVING HOME
First read and observe the introductory information and safety warn-ings
on page 54.
COMING HOME/LEAVING HOME (hereafter referred to only as function) makes it possible to automatically switch on the lights for a short time after leaving the
vehicle or when approaching the vehicle in poor visibility.
The function is switched on automatically if the following conditions are met: The light switch is in position » Fig. 30 on page 57.
The visibility in the vehicle environment is reduced.
The ignition is switched off.
The function and duration of the lighting can be activated or deactivated in the Infotainment » Operating instructions for Infotainment , chapter Vehicle settings
(button CAR) .
The light is regulated based on data gathered by the light sensor attached be-
tween the windscreen and the interior mirror » page 57.
The function switches on the parking and low beam lights, the entry lighting in
the exterior mirrors and the licence plate light.
COMING HOME
The light turns on automatically when you open the driver's door.
The light turns off after the preset time when you close all the doors and the boot
lid.
If a door or the boot lid remains open, the light goes out after 60 seconds.
LEAVING HOME
The light turns on automatically after the vehicle is unlocked with the remote
control.
The light turns off after a preset time or after the vehicle is locked.
CAUTION
Do not affix any stickers or similar objects in front of the light sensor on the wind-
screen, so that its functionality is not impaired or disabled. 60Using the system
Page 64 of 287
 Owners Manual NoteIf this function is activated constantly, the battery will be heavily discharged par-
ticularly in short-haul traffic.
Hazard warning light system
Fig. 33
Button for hazard warning light
syste")
NoteIf this function is activated constantly, the battery will be heavily discharged par-
ticularly in short-haul traffic.
Hazard warning light system
Fig. 33
Button for hazard warning light
system
First read and observe the introductory information and safety warn-
ings on page 54.
Switching on/off
›
Press the button
» Fig. 33 .
All the turn signal lights on the vehicle flash at the same time when the hazard
warning light system is switched on. The warning light for the turn signals and
the warning light in the button also flash at the same time. The hazard warning
light system can also be operated if the ignition is switched off.
If one of the airbags is deployed, the hazard warning light system will switch on
automatically.
If the turn signal light is switched on when the hazard warning light and the igni- tion are both switched on, then only the turn signal light on the corresponding
vehicle side will flash.
WARNINGSwitch on the hazard warning light system if, for example, the following oc-
curs.■
You encounter a traffic congestion.
■
The vehicle has broken down.
Parking lights
First read and observe the introductory information and safety warn-ings
on page 54.
Parking light switching on
›
Switch off the ignition.
›
Place the control lever into position
A
or
B
as far as it can go » Fig. 29 on
page 56 - the parking light on the right/left-hand side of the vehicle is switched
on.
Switching on the side light on both sides
›
Turn the light switch
A
to position » Fig. 28 on page 55 and lock the vehicle.
Note
■
The parking light can only be activated if the ignition is switched off.■If the right or left turn signal light has been switched on and the ignition is
switched off, the parking light is not automatically switched on.
Interior lights
Introduction
This chapter contains information on the following subjects:
Front interior light
62
Rear interior light
62
Rear interior light
63
Front door warning light
63
Entry space lighting
63
61Lights and visibility
 1
1 2
2 3
3 4
4 5
5 6
6 7
7 8
8 9
9 10
10 11
11 12
12 13
13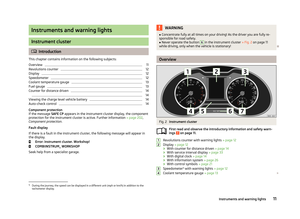 14
14 15
15 16
16 17
17 18
18 19
19 20
20 21
21 22
22 23
23 24
24 25
25 26
26 27
27 28
28 29
29 30
30 31
31 32
32 33
33 34
34 35
35 36
36 37
37 38
38 39
39 40
40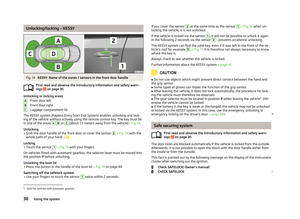 41
41 42
42 43
43 44
44 45
45 46
46 47
47 48
48 49
49 50
50 51
51 52
52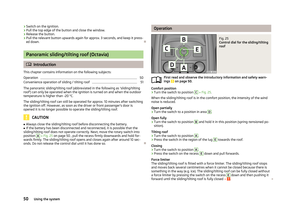 53
53 54
54 55
55 56
56 57
57 58
58 59
59 60
60 61
61 62
62 63
63 64
64 65
65 66
66 67
67 68
68 69
69 70
70 71
71 72
72 73
73 74
74 75
75 76
76 77
77 78
78 79
79 80
80 81
81 82
82 83
83 84
84 85
85 86
86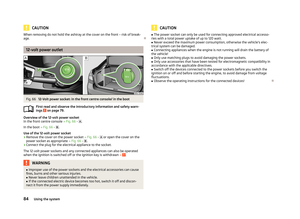 87
87 88
88 89
89 90
90 91
91 92
92 93
93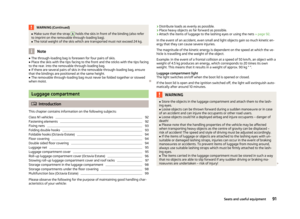 94
94 95
95 96
96 97
97 98
98 99
99 100
100 101
101 102
102 103
103 104
104 105
105 106
106 107
107 108
108 109
109 110
110 111
111 112
112 113
113 114
114 115
115 116
116 117
117 118
118 119
119 120
120 121
121 122
122 123
123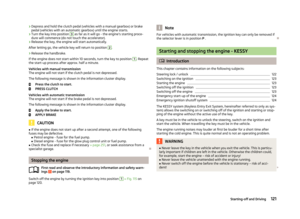 124
124 125
125 126
126 127
127 128
128 129
129 130
130 131
131 132
132 133
133 134
134 135
135 136
136 137
137 138
138 139
139 140
140 141
141 142
142 143
143 144
144 145
145 146
146 147
147 148
148 149
149 150
150 151
151 152
152 153
153 154
154 155
155 156
156 157
157 158
158 159
159 160
160 161
161 162
162 163
163 164
164 165
165 166
166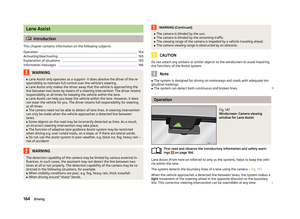 167
167 168
168 169
169 170
170 171
171 172
172 173
173 174
174 175
175 176
176 177
177 178
178 179
179 180
180 181
181 182
182 183
183 184
184 185
185 186
186 187
187 188
188 189
189 190
190 191
191 192
192 193
193 194
194 195
195 196
196 197
197 198
198 199
199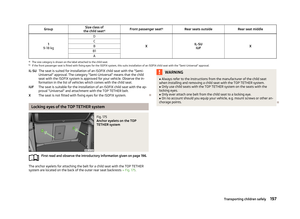 200
200 201
201 202
202 203
203 204
204 205
205 206
206 207
207 208
208 209
209 210
210 211
211 212
212 213
213 214
214 215
215 216
216 217
217 218
218 219
219 220
220 221
221 222
222 223
223 224
224 225
225 226
226 227
227 228
228 229
229 230
230 231
231 232
232 233
233 234
234 235
235 236
236 237
237 238
238 239
239 240
240 241
241 242
242 243
243 244
244 245
245 246
246 247
247 248
248 249
249 250
250 251
251 252
252 253
253 254
254 255
255 256
256 257
257 258
258 259
259 260
260 261
261 262
262 263
263 264
264 265
265 266
266 267
267 268
268 269
269 270
270 271
271 272
272 273
273 274
274 275
275 276
276 277
277 278
278 279
279 280
280 281
281 282
282 283
283 284
284 285
285 286
286