Page 113 of 287
 Owners Manual Air conditioning system (manual air conditioningsystem)
Introduction
This chapter contains information on the following subjects: Control elements
110
adjusting
111
Recirculated air mode
111
The c")
Air conditioning system (manual air conditioningsystem)
Introduction
This chapter contains information on the following subjects: Control elements
110
adjusting
111
Recirculated air mode
111
The cooling system only operates if the following conditions are met. The cooling system is switched on » page 110, Control elements .
The engine is running.
The outside temperature above approx. +2 °C.
The blower switch is switched on (positions 1-6).
If the desired interior temperature can also be achieved without activating the cooling system, fresh air mode should be selected.
The cooling system is switched off at a high coolant temperature in order to pro-
vide cooling at a high load of the engine.
CAUTION
■ Under certain circumstances, air at a temperature of about 5 °C can flow out of
the vents when the cooling system is switched on.■
Lengthy and uneven distribution of the air flow out of the vents (especially
around the feet) and large differences in temperature, for example, when getting
out of the vehicle, can cause susceptible individuals to catch a cold.
Note
We recommend that you have the air conditioning system cleaned by a specialist
garage once every year.Control elementsFig. 109
Air conditioning: Control elements
First read and observe the introductory information and safety warn- ings
on page 110.
Functions of the individual controls » Fig. 109 .
Set the temperature (turn to the left to reduce the temperature, turn to the
right to increase the temperature)
Set the blower stage (stage 0: Fan out, stage 6: the highest fan speed)
Set the direction of the air outlet » page 107
Depending on equipment:
›
Switching the windscreen heater on/off » page 64
›
Aux. heating on/off » page 116
Control the seat heater on the front left seat » page 76
Switching the cooling system on/off
Switching the rear window heater on/off » page 64
Open/close the fresh air supply (recirculation) » page 111
Control the seat heater on the front right seat » page 76
Note
The warning light in the symbol button
lights after activation, even if not all of
the conditions for the function of the cooling system are met » page 110. By light-
ing up of the warning light in the button, the operational readiness of the cooling system is signalled.
ABC1110Using the system
Page 114 of 287
 Owners Manual adjustingFirst read and observe the introductory information and safety warnings
on page 110.
Recommended basic settings of the air conditioning controls.
AdjustmentControl dial settings » Fig. 10")
adjustingFirst read and observe the introductory information and safety warnings
on page 110.
Recommended basic settings of the air conditioning controls.
AdjustmentControl dial settings » Fig. 109 on page 110Button » Fig. 109 on page 110Air outlet vents 4 » Fig. 106
on page 107ABCDefrost/defog windscreen and
side windows a)Desired tempera-
ture4 - 6Automatically
switched on b)Do not switch onOpen and align with the side
windowRapid heatingAs far as it will goto the right4 - 6Switched offBriefly switch onOpeningComfortable heatingDesired tempera-
ture1 - 4
Switched offDo not switch onOpeningRapid coolingTo the left up to
the stopbriefly 6, then 2 - 3ActivatedAutomatically switched
onc)OpeningComfortable coolingDesired tempera-
ture1 - 3
d)ActivatedDo not switch onOpeningFresh air mode – ventilationTo the left up to
the stopDesired position
d)Switched offDo not switch onOpeninga)
We recommend that you do not use this setting in countries with high humidity levels. This can result in heavy cooling of the window glass and the following fogging from outside.
b)
Automatic switch-on can be deactivated by pressing the symbol button
.
c)
The automatic activation can be turned off by pressing the symbol button
.
d)
Warmer air is directed to the footwell than to the upper part of the body.
We recommend that you leave the air outlet vents
3 » Fig. 106 on page 107 in the
open position in all operating modes.
Recirculated air mode
First read and observe the introductory information and safety warn-ings
on page 110.
Recirculated air mode prevents polluted air outside the vehicle from getting into
the vehicle, for example when driving through a tunnel or when standing in a traffic jam.
Switching on/off›Press the symbol button .
The warning light below the button lights up.›
Press the symbol button again.
The warning light below the button goes out.
Recirculated air mode is switched off automatically if the air distribution control
C
» Fig. 109 on page 110 is turned to position . Recirculated air mode can be
switched on again from this position by repeatedly pressing the symbol button
.
111Heating and air-conditioning
Page 115 of 287
 Owners Manual WARNINGNever leave recirculated air mode switched on over a longer period of time, as
“stale air” can cause driver and passenger fatigue, reduce attention levels and
also cause the windows to mist")
WARNINGNever leave recirculated air mode switched on over a longer period of time, as
“stale air” can cause driver and passenger fatigue, reduce attention levels and
also cause the windows to mist up. The risk of having an accident increases.
Switch off recirculated air mode as soon as the windows start to mist up.
Climatronic (automatic air conditioning system)
Introduction
This chapter contains information on the following subjects:
Control elements
112
Automatic mode
113
Switching the cooling system on/off
113
Setting temperature
113
Automatic recirculation mode
114
Controlling blower
114
Defrosting windscreen
115
The Climatronic in automatic mode ensures the best-possible setting of the tem-
perature of the outflowing air, the blower stage and air distribution.
The system also takes sunlight into account, which eliminates the need to alterthe settings manually.
The cooling system only operates if the following conditions are met. The cooling system is switched on » page 112, Control elements .
The engine is running.
The outside temperature above approx. +2 °C.
The cooling system is switched off at a high coolant temperature in order to pro-
vide cooling at a high load of the engine.
Note
We recommend that you have Climatronic cleaned by a specialist garage once ev-
ery year.Control elementsFig. 110
Climatronic: Control elements
First read and observe the introductory information given on page 112.
Functions of the individual controls » Fig. 110 .
Adjust the temperature for the left side or for both sides » page 113
Interior temperature sensor
Adjust the blower speed » page 114
Adjust the temperature for the right side » page 113
Display the temperature setting for the left side
Display the temperature setting for the right side
Depending on equipment:
›
Aux. heating on/off » page 116
›
Switching Climatronic system off
Control the seat heater on the front left seat » page 76
Air flow to the windows
Air flow to the upper body
Air flow in the footwell
Automatic recirculation switch on or off » page 114
Control the seat heater on the front right seat » page 76
Switch the intensive windscreen heater on/off » page 115
Switching the rear window heater on/off » page 64
ABCD123112Using the system
Page 116 of 287
 Owners Manual Switching the windscreen heater on/off » page 64
Climatronic set in the Infotainment » Operating instructions for Infotain-
ment
Switch the temperature setting in Dual mode on/off » page 113
Swit")
Switching the windscreen heater on/off » page 64
Climatronic set in the Infotainment » Operating instructions for Infotain-
ment
Switch the temperature setting in Dual mode on/off » page 113
Switching automatic mode on » page 113
Switching the cooling system on/off » page 113
Note
Do not stick anything onto or cover the interior temperature sensor 11 » Fig. 110
as this could impair the functioning of the Climatronic.
Automatic mode
First read and observe the introductory information given on page 112.
Automatic mode works in three modes - moderate, medium, and intensive.Setting the individual operating modes » Operating instructions for Infotainment ,
chapter Vehicle settings .
Climatronic is set to the medium setting at the factory.
Recommended setting for all periods of the year
›
Set the desired temperature, we recommend 22 °C.
›
Press the button
» Fig. 110 on page 112.
›
Set the air outlet vents 3 and 4 » Fig. 106 on page 107 so that the air flow is
directed slightly upwards.
After the automatic mode is switched on, Climatronic works in the last selected
mode.
The currently selected mode is displayed in the Infotainment display. Automatic mode can be switched off by pressing one of the buttons for the air
distribution or by increasing/decreasing the blower speed.
Switching the cooling system on/off
First read and observe the introductory information given on page 112.
›
Press the symbol button
.
The warning light in the button lights up.›
Press the symbol button
again.
The warning light in the button goes out.
After the cooling system is switched off, only the ventilation function remains ac-
tive whereby the minimum temperature that can be reached is the outside tem-
perature.
Setting temperature
First read and observe the introductory information given on page 112.
The interior temperature for the left and right side can be set separately or to-
gether.
For both sides
›
Turn the control dial
A
» Fig. 110 on page 112 to the left or right to increase or
decrease the temperature.
The warning light in the symbol button
does not light up.
For the right side
›
Turn the control dial
D
» Fig. 110 on page 112 to the left or right to increase or
decrease the temperature.
The warning light in the symbol button
lights up.
If the warning light in the symbol button
is lit, the temperature for both sides
cannot be set with the control dial
A
. This function can be resumed by pressing
the symbol button
. The warning light in the button goes out.
The interior temperature can be set between +16 ℃ and +29 ℃. The interior tem-
perature is regulated automatically within this range.
If a temperature lower than +16 ℃ is selected, a blue symbol lights up on the cor-
responding control dial.
If a temperature higher than +29 ℃ is selected, a red symbol lights up on the cor-
responding control dial.
At both end positions, Climatronic runs at maximum cooling/heating output and
the temperature is automatically not regulated.
113Heating and air-conditioning
Page 117 of 287
 Owners Manual CAUTIONLengthy and uneven distribution of the air flow out of the vents (especially
around the feet) and large differences in temperature, for example, when getting
out of the vehicle, can cause susce")
CAUTIONLengthy and uneven distribution of the air flow out of the vents (especially
around the feet) and large differences in temperature, for example, when getting
out of the vehicle, can cause susceptible individuals to catch a cold.
Automatic recirculation mode
First read and observe the introductory information given on page 112.
Recirculated air mode prevents polluted air outside the vehicle from getting into
the vehicle, for example when driving through a tunnel or when standing in a
traffic jam.
If a considerable increase in concentration of pollutants is recognised by the air
quality sensor, recirculated air mode will temporarily be switched off.
If the concentration of pollutants decreases to the normal level, the air distribu-
tion control is automatically switched off so that fresh air can be guided into the
vehicle interior.
In recirculated air mode air is sucked out of the interior of the vehicle and then
fed back into the interior. When the automatic air distribution control is switched on, an air quality sensor measures the concentration of pollutants in the drawn in
air.
If the air quality sensor does not switch on automatic recirculated air mode when
there is an unpleasant smell, you can switch in on manually.
Switching on/off
›
Press the symbol button
.
The warning light below the button lights up.
›
Press the symbol button
again; the warning light below the button goes out;
if necessary, press the symbol button
again.
Switching on and off is also possible in the Infotainment » Operating instructions
for Infotainment , chapter Vehicle settings .
WARNINGNever leave recirculated air mode switched on over a longer period of time, as
“stale air” can cause driver and passenger fatigue, reduce attention levels and
also cause the windows to mist up. The risk of having an accident increases.
Switch off recirculated air mode as soon as the windows start to mist up.
Note
■ If the windscreen mists up, press the symbol button . Press the symbol
button when the windscreen is demisted.■
The automatic air distribution control operates only if the outside temperature
is higher than approx. 2 °C.
Controlling blower
First read and observe the introductory information given on page 112.
The blower stage can be manually adapted to suit your particular needs.
›
Turn the control dial
C
» Fig. 110 on page 112 to the left or right to increase or
decrease the temperature.
If the blower speed is reduced to a minimum, Climatronic is switched off.
The set blower speed is displayed in the control dial
C
when the respective num-
ber of warning lights illuminate.
WARNING■ “Stale air” may result in fatigue in the driver and occupants, reduce attention
levels and also cause the windows to mist up. The risk of having an accident
increases.■
Do not switch off the Climatronic system for longer than necessary.
■
Switch on the Climatronic system as soon as the windows mist up.
114Using the system
Page 118 of 287
 Owners Manual Defrosting windscreenFirst read and observe the introductory information given on page 112.
Switching on/off
›
Press the symbol button » Fig. 110 on page 112.
›
Press the symbol button ")
Defrosting windscreenFirst read and observe the introductory information given on page 112.
Switching on/off
›
Press the symbol button » Fig. 110 on page 112.
›
Press the symbol button again or press the symbol button .
More air flows out of the air outlet vents 1 » Fig. 106 on page 107. The tempera-
ture control is controlled automatically.
Auxiliary heating (auxiliary heating and ventilation)
Introduction
This chapter contains information on the following subjects:
Switching on/off
116
Radio remote control
116
Conditions for the functioning of auxiliary heating (Aux. heating and ventilation),
hereinafter referred to only as auxiliary heating (Aux. heating).
The charge state of the vehicle battery is sufficient.
The fuel supply is adequate (the warning icon
is not lit in the display of the
instrument cluster).
Auxiliary ventilation
The auxiliary ventilation enables fresh air to flow into the vehicle interior by
switching off the engine, whereby the interior temperature is effectively de-
creased (e.g. with the vehicle parked in the sun).
Auxiliary heating (parking heating)
The auxiliary heating (parking heating) can be used when stationary, when the engine is switched off to preheat the vehicle and while driving (e.g. during the
heating phase of the engine).
The auxiliary heater (parking heater) functions in connection with the air-condi-
tioning system or Climatronic.
The auxiliary heating (parking heating) also warms up the engine.
The auxiliary heating (parking heating) warms up the coolant by combusting fuel
from the vehicle tank. The coolant heats air flowing into the passenger compart- ment (as long as the blower fan speed B
» Fig. 108 on page 108 or
C
» Fig. 110
on page 112 is not set to zero).
WARNING■ The auxiliary heater (independent vehicle heater) must never be operated in
closed rooms (e.g. garages) – risk of poisoning!■
The auxiliary heating (parking heating) must not be running during refuelling
– risk of fire.
■
The exhaust pipe of the auxiliary heating is located underneath the vehicle.
Therefore, if you wish to operate the auxiliary heating (parking heating), do
not park the vehicle in such a way that the exhaust gases can come into con-
tact with highly flammable materials (e.g. dry grass) or easily inflammable sub-
stances (e.g. spilt fuel) – risk of fire.
CAUTION
■ The running auxiliary heating (parking heating) consumes fuel from the vehicle
tank and automatically controls the filling level. If only a low quantity of fuel is
present in the fuel tank, the auxiliary heater switches itself off.■
The exhaust pipe of the auxiliary heating, which is located underneath the vehi-
cle, must not be clogged up and the exhaust flow must not be blocked.
■
If the auxiliary heating is running, the vehicle battery discharges. If the auxiliary
heating and ventilation has been operated several times over a longer period, the
vehicle must be driven a few kilometres in order to recharge the vehicle battery.
Note
■ The auxiliary heating (aux. heating) switches on the blower B » Fig. 108 on
page 108 or C » Fig. 110 on page 112 only if it has achieved a coolant temperature
of approx. 50 °C.■
At low outside temperatures, this can result in a formation of water vapour in
the area of the engine compartment. This is quite normal and is not an operating problem.
■
The air inlet in front of the windscreen must be free of e.g. ice, snow or leaves
to ensure that the auxiliary heating and cooling system operates properly.
■
So that warm air can flow into the vehicle interior after switching on the auxili-
ary heating, you must maintain the comfort temperature normally selected by
you, leave the fan switched on and leave the air outlet vents in an open position.
It is recommended to put the air flow in the position or .
115Heating and air-conditioning
Page 119 of 287
 Owners Manual Switching on/offFig. 111
Button for switching on/off the system directly on the operating
part of the air conditioning/Climatronic
First read and observe the introductory information and safety warn-")
Switching on/offFig. 111
Button for switching on/off the system directly on the operating
part of the air conditioning/Climatronic
First read and observe the introductory information and safety warn-ings
on page 115.
The auxiliary heating (parking heating) can be switched on/off as follows.
Manually switching on using the button on the operating part of the manual air conditioning/Clima-
tronic. The indicator light in the button illuminates » Fig. 111.
by using the radio remote control » page 116
Manually switching off
using the button on the operating part of the manual air conditioning/Clima-
tronic. The indicator light in the button goes out » Fig. 111.
by using the radio remote control » page 116
After switching the system off, the auxiliary heating will continue running a little
while longer in order to burn the remaining fuel in the auxiliary heater.
After switching off the auxiliary heating, the coolant pump runs for a short period.
Switching on automatically
The auxiliary heater is switched on according to the Infotainment settings » Info-
tainment manual , chapter Vehicle settings .
When automatic switching on is activated, the indicator light in the symbol button lights up for about 10 seconds after the ignition is turned off.
Switching off automatically
Turning off the auxiliary heating (auxiliary heating) occurs in the following cases. › The set switch-off has been achieved
» Operating instructions for Infotainment ,
chapter Vehicle settings .
› The fuel level has reached the reserve area (the warning icon
illuminates).
› The charge state of the vehicle battery has reduced too much
» page 224.
Radio remote control
Fig. 112
Auxiliary heating (aux. heating):
Radio remote control
First read and observe the introductory information and safety warn-
ings on page 115.
Explanation of graphic » Fig. 112
Aerial
Warning light
Switch on the auxiliary heating
Switch off the auxiliary heating
The transmitter and the battery are housed in the housing of the remote control. The receiver is located in the interior of the vehicle.
When the battery is fully charged, the range of the remote control is a few hun-
dred metres. Obstacles between the radio remote control and the vehicle, bad
weather conditions and a weaker battery can clearly reduce the range.
To switch the auxiliary heating (aux. heating) on or off, hold the remote control
vertical, with the aerial
A
pointing upwards. The antenna must not be covered
with the fingers or the palm of the hand during this process.
The auxiliary heating can only be switched on/off safely using the radio remote control, if the distance between the radio remote control and the vehicle is at
least 2 m.
AB116Using the system
Page 120 of 287
 Owners Manual After pressing the button, the warning light in the remote control gives the
user different kinds of feedback:Display warning light B » Fig. 112MeaningLights up green for around 2 seconds.The auxili")
After pressing the button, the warning light in the remote control gives the
user different kinds of feedback:Display warning light B » Fig. 112MeaningLights up green for around 2 seconds.The auxiliary heating has been switch-
ed on.Lights up red for around 2 seconds.The auxiliary heating has been switch-
ed off:Slowly flashes green for around 2 sec- onds.The ignition signal was not received.Quickly flashes green for around 2 sec-
onds.The auxiliary heating is blocked, e. g.
because the tank is nearly empty or
there is a fault in the auxiliary heating.Flashes red for around 2 seconds.The switch off signal was not received.Lights up orange for around 2 seconds,
then green or red.The battery is weak, however the
switching on or off signal was received.Lights up orange for around 2 seconds,
then flashes green or red.The battery is weak, however the
switching on or off signal was not re-
ceived.Flashes orange for around 5 seconds.The battery is discharged, however the
switching on or off signal was not re-
ceived.
Replace the battery » page 247.
CAUTION
The radio remote control comprises electronic components and must therefore be
protected against water, severe impacts and direct sunlight.
117Heating and air-conditioning
 1
1 2
2 3
3 4
4 5
5 6
6 7
7 8
8 9
9 10
10 11
11 12
12 13
13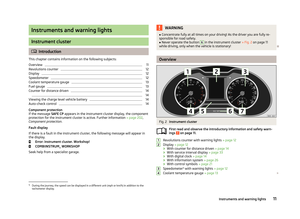 14
14 15
15 16
16 17
17 18
18 19
19 20
20 21
21 22
22 23
23 24
24 25
25 26
26 27
27 28
28 29
29 30
30 31
31 32
32 33
33 34
34 35
35 36
36 37
37 38
38 39
39 40
40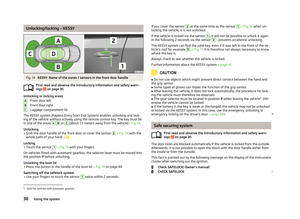 41
41 42
42 43
43 44
44 45
45 46
46 47
47 48
48 49
49 50
50 51
51 52
52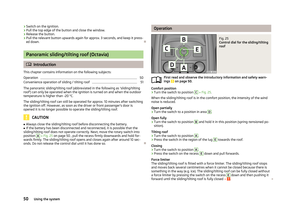 53
53 54
54 55
55 56
56 57
57 58
58 59
59 60
60 61
61 62
62 63
63 64
64 65
65 66
66 67
67 68
68 69
69 70
70 71
71 72
72 73
73 74
74 75
75 76
76 77
77 78
78 79
79 80
80 81
81 82
82 83
83 84
84 85
85 86
86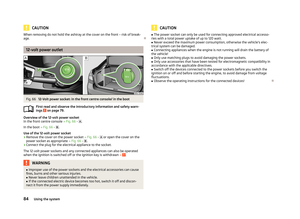 87
87 88
88 89
89 90
90 91
91 92
92 93
93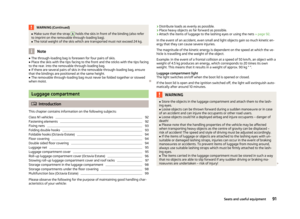 94
94 95
95 96
96 97
97 98
98 99
99 100
100 101
101 102
102 103
103 104
104 105
105 106
106 107
107 108
108 109
109 110
110 111
111 112
112 113
113 114
114 115
115 116
116 117
117 118
118 119
119 120
120 121
121 122
122 123
123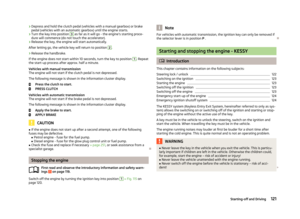 124
124 125
125 126
126 127
127 128
128 129
129 130
130 131
131 132
132 133
133 134
134 135
135 136
136 137
137 138
138 139
139 140
140 141
141 142
142 143
143 144
144 145
145 146
146 147
147 148
148 149
149 150
150 151
151 152
152 153
153 154
154 155
155 156
156 157
157 158
158 159
159 160
160 161
161 162
162 163
163 164
164 165
165 166
166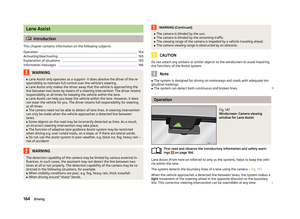 167
167 168
168 169
169 170
170 171
171 172
172 173
173 174
174 175
175 176
176 177
177 178
178 179
179 180
180 181
181 182
182 183
183 184
184 185
185 186
186 187
187 188
188 189
189 190
190 191
191 192
192 193
193 194
194 195
195 196
196 197
197 198
198 199
199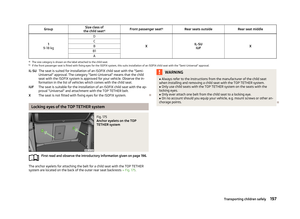 200
200 201
201 202
202 203
203 204
204 205
205 206
206 207
207 208
208 209
209 210
210 211
211 212
212 213
213 214
214 215
215 216
216 217
217 218
218 219
219 220
220 221
221 222
222 223
223 224
224 225
225 226
226 227
227 228
228 229
229 230
230 231
231 232
232 233
233 234
234 235
235 236
236 237
237 238
238 239
239 240
240 241
241 242
242 243
243 244
244 245
245 246
246 247
247 248
248 249
249 250
250 251
251 252
252 253
253 254
254 255
255 256
256 257
257 258
258 259
259 260
260 261
261 262
262 263
263 264
264 265
265 266
266 267
267 268
268 269
269 270
270 271
271 272
272 273
273 274
274 275
275 276
276 277
277 278
278 279
279 280
280 281
281 282
282 283
283 284
284 285
285 286
286