Page 49 of 287
 Owners Manual The range of the area 3 changes proportionally, depending on the setting of the
top position of the lid » page 46.
If the lid is set in the uppermost position in the area 2
, the area
3
is not act")
The range of the area 3 changes proportionally, depending on the setting of the
top position of the lid » page 46.
If the lid is set in the uppermost position in the area 2
, the area
3
is not active.
The range of the area
2
changes proportionally, depending on the setting of the
top position of the lid.
Symbol explanation in the operating description Feasible action
Non-feasible action
Movement in the opposite direction to the previous movement
Lid operation with the handle
AActionClosed LidRangeOpenLid123OpeningStopClosing
The operation of the lid using the handle
A
is only possible when the vehicle is
unlocked.
Lid operation with the button
BActionClosed LidRangeOpenLid123OpeningStopClosing
Operating the lid with the button
B
is only possible when the lid is open.
Lid operation with the symbol button
on the remote control key and the
button
CActionClosed LidRangeOpenLid123OpeningStopClosing
When the ignition is switched on, the operation of the lid does not function usingthe remote control key.
Operating the lid with the button C does not work if the vehicle was locked from
the outside.
Operating the lid with the symbol button on the remote control key and the
button C
does not work when a trailer is coupled to the vehicle.
Acoustic signals
First read and observe the introductory information and safety warn-ings
on page 44.
The acoustic signals serve as a safety function and provide information about the
success of a performed action.
SignalsStatus
Interrupted tone
Open (using the button on the remote control key or
the button C
» Fig. 22 on page 45 )
Automatic closing of the lid » page 45,
in section In-
troduction
1 continuous toneForce limiter3 rising tonesConfirmation of the storage of the lid position3 identical tonesfault
Adjusting/deleting the top lid position
First read and observe the introductory information and safety warn-ings
on page 44.
Adjusting
›
Stop the lid in the desired position (electrically or manually).
›
Press and hold the button
B
» Fig. 21 on page 45 for longer than 3 seconds.
Storing the new position is confirmed with an audible signal.
Delete
›
Carefully lift up the lid manually to the maximum opening position.
›
Press and hold the button
B
» Fig. 21 on page 45 for longer than 3 seconds.
An audible signal sounds and the height which was originally set is deleted from
the memory, while the basic position of the top lid position is again set.
46Using the system
Page 50 of 287
 Owners Manual The top lid position is adjusted, for example, in the following situations.
› When the space for opening the lid is limited (e.g. garage height).
› For a more convenient operation, such as by a pe")
The top lid position is adjusted, for example, in the following situations.
› When the space for opening the lid is limited (e.g. garage height).
› For a more convenient operation, such as by a person's height.
The top position which is reached when the lid opens automatically, is always
lower than the maximum top position which can be reached when the lid is
opened manually.
The lid always opens to the height which was last stored.
Malfunctions
First read and observe the introductory information and safety warn-
ings
on page 44.
If the battery is disconnected and reconnected while the lid is open, it is necessa-
ry to activate the system of the electric boot lid. Activation means closing the lid
by hand. Thus, the end position of the lid is stored under fully closed in secured lock.
Examples of operational malfunctions
Description of the malfunc-
tionPossible solutionsThe lid cannot be lifted out of
the lockEmergency unlocking of the lid » page 249The lid does not react to an
opening signalRemoving a possible obstacle (e.g. snow), re-
opening the lid » page 45
Press handle A
and pull the lid upwards
The lid remains in the top po-
sitionManual closing of the lid
Electrical power windows
Introduction
This chapter contains information on the following subjects:
Opening/closing the window from the driver seat
48
Opening the windows in the front passenger door and in the rear doors
48Force limit49Window convenience operation49
Operational faults
49
The electrical power windows can only be operated when the ignition is switched
on.
After switching the ignition off, it is still possible to open or close the windows for
approx. 10 minutes. The electrical power windows are only switched off com- pletely once the driver's door or front passenger door are opened.
When driving always use the existing heating, air conditioning and ventilation
system for ventilating the interior of the vehicle. If the windows are opened, dust
as well as other dirt can get into the vehicle and in addition the wind noise is
more at certain speeds.
WARNING■ Ensure that no persons are still left in the vehicle when locking the vehicle.
In an emergency, the windows will no longer be able to be opened from the
inside.■
The system is fitted with a force limiter » page 49. If there is an obstacle,
the closing process is stopped and the window goes down by several centi-
metres. The windows should nevertheless be closed carefully – risk of injury!
■
It is recommended to deactivate the electrically operated power windows in
the rear doors (safety switch)
S
if there are children in the rear seats » Fig. 23
on page 48.
CAUTION
■ Keep the windows clean to ensure the correct functionality of the electric win-
dows.■
In the event that the windows are frozen, first of all eliminate the
ice » page 207 , De-icing windows and exterior mirrors and only then operate the
electrical power windows. Otherwise, the window sealing and the electrical pow- er window mechanism could be damaged.
■
In the winter, ice accumulating on the surface of the window may cause there
to be more resistance when closing the window. The window will stop and move back several centimetres.
■
It is necessary to deactivate the force limiter to close the window » page 49.
■
When leaving the locked vehicle make sure that the windows are closed at all
times.
47Unlocking and opening
Page 51 of 287
 Owners Manual For the sake of the environmentAt high speeds, you should keep the windows closed to prevent unnecessarily
high fuel consumption.
Note
The window lift system is equipped with protection against overhe")
For the sake of the environmentAt high speeds, you should keep the windows closed to prevent unnecessarily
high fuel consumption.
Note
The window lift system is equipped with protection against overheating. Repea-
ted opening and closing of the window can cause this mechanism to overheat. If
this happens, it will not be possible to operate the window for a short time. You
will be able to operate the window again as soon as the overheating protection
has cooled down.
Opening/closing the window from the driver seat
Fig. 23
Buttons on the driver's door
First read and observe the introductory information and safety warn-
ings on page 47.
Buttons for the electrical power windows » Fig. 23 .
Button for electrical power window of the driver's door
Button for electrical power window of the front passenger door
Button for electrical power window of the rear right door
Button for electrical power window of the rear left door
Safety pushbutton
Opening
›
Lightly press the appropriate button down and hold it until the window has moved into the desired position. Releasing the button causes the window to
stop immediately.
ABCDSThe window can be completely opened automatically by briefly pressing the but-
ton as far as the stop. Renewed pressing of the button causes the window tostop immediately.
Closing›
Pull gently on the top edge of the corresponding button and hold until the win-
dow has moved into the desired position. Releasing the button causes the win-
dow to stop immediately.
The window can also be fully closed automatically by pulling the button up to the
stop. Renewed pulling of the button causes the window to stop immediately.
Safety pushbutton
The buttons for power windows in the rear doors can be deactivated by pressing
the safety switch
S
» Fig. 23 . The buttons for the electrical power windows in
the rear doors are activated again by pressing the safety pushbutton
S
again.
If the buttons for the rear doors are deactivated, the warning light
in the safe-
ty switch
S
lights up.
Opening the windows in the front passenger door and in the
rear doors
Fig. 24
Button arrangement in the front
passenger door
First read and observe the introductory information and safety warn-
ings on page 47.
There is a button in the front passenger door and in the rear doors for that win- dow.
Opening
›
Lightly press the appropriate button down and hold it until the window has
moved into the desired position.
48Using the system
Page 52 of 287
 Owners Manual The window can be completely opened automatically by briefly pressing the but-ton down as far as the stop. Renewed pressing of the button causes the window
to stop immediately.
Closing›
Lightly pr")
The window can be completely opened automatically by briefly pressing the but-ton down as far as the stop. Renewed pressing of the button causes the window
to stop immediately.
Closing›
Lightly press the appropriate button up and hold it until the window has moved
into the desired position.
The window can be completely closed automatically by briefly pressing the but-
ton up as far as the stop. Renewed pressing of the button causes the window to
stop immediately.
Force limit
First read and observe the introductory information and safety warn-ings
on page 47.
The electrical power window system is fitted with a force limiter. It reduces the
risk of bruises or injuries when closing the windows.
If there is an obstacle, the closing process is stopped and the window goes down
by several centimetres.
If the obstacle prevents the window from being closed during the next 10 sec-
onds, the closing process is interrupted once again and the window goes down by several centimetres.
If you attempt to close the window again within 10 seconds of the window being moved down for the second time, even though the obstacle was not yet been re-moved, the closing process is only stopped. During this time it is not possible to
automatically close the window. The force limiter is still switched on.
The force limiter is only switched off if you attempt to close the window again
within the next 10 seconds - the window will now close with full force!
If you wait longer than 10 seconds, the force limiter is switched on again.
Window convenience operation
First read and observe the introductory information and safety warn-ings
on page 47.
Convenience opening/closing of all windows can be operated by locking/unlock-
ing the vehicle as follows.
Settings the window convenience operation » Infotainment owner's manual ,
chapter Vehicle settings (button CAR) .
The prerequisite for ensuring that the convenience operating feature correctly is the automatic opening/closing of all windows is operational.
Opening and closing can take place in one of the following ways.
Opening
›
Press the symbol button
button on the remote control key.
›
Hold the key in the driver's lock in the unlock position.
›
Hold button
A
1)
in the opening position » Fig. 23 on page 48.
Closing
›
Press the symbol button
button on the remote control key.
›
Hold the key in the driver's lock in the lock position.
›
Hold button
A
1)
in the closing position » Fig. 23 on page 48.
›
In the KESSY system, hold a finger on the sensor
1
» Fig. 14 on page 38.
You can interrupt the opening or closing process for the windows immediately by
releasing the key or the the button
A
and interrupting the locking/unlocking.
Convenience opening or closing the window using the key in the driver's lock is
only possible within 45 seconds after locking the vehicle.
Operational faults
First read and observe the introductory information and safety warn-
ings
on page 47.
The automatic power windows do not work if the vehicle battery was disconnec- ted and connected while a window is open. The system must be activated.
Activation sequence:
1)
Convenience opening and closing the windows with the button
A
is possible immediately after un-
locking the vehicle or turning off the ignition and opening the driver's or front passenger's door.
49Unlocking and opening
Page 53 of 287
 Owners Manual ›Switch on the ignition.›Pull the top edge of the button and close the window.›
Release the button.
›
Pull the relevant button upwards again for approx. 3 seconds, and keep it press-
ed down.")
›Switch on the ignition.›Pull the top edge of the button and close the window.›
Release the button.
›
Pull the relevant button upwards again for approx. 3 seconds, and keep it press-
ed down.
Panoramic sliding/tilting roof (Octavia)
Introduction
This chapter contains information on the following subjects:
Operation
50
Convenience operation of sliding / tilting roof
51
The panoramic sliding/tilting roof (abbreviated in the following as 'sliding/tilting
roof') can only be operated when the ignition is turned on and when the outdoor temperature is higher than -20 °C.
The sliding/tilting roof can still be operated for approx. 10 minutes after switchingthe ignition off. However, as soon as the driver or front passenger's door is
opened it is no longer possible to operate the sliding/tilting roof.
CAUTION
■ Always close the sliding/tilting roof before disconnecting the battery.■If the battery has been disconnected and reconnected, it is possible that the
sliding/tilting roof does not operate correctly. Next, move the rotary switch into
position A
» Fig. 25 on page 50 , pull the recess firmly downwards and hold for-
wards firmly. The sliding/tilting roof opens and closes again after around 10 sec-
onds. Do not release the control dial until it has done so.
OperationFig. 25
Control dial for the sliding/tilting
roof
First read and observe the introductory information and safety warn-
ings on page 50.
Comfort position
›
Turn the switch to position
C
» Fig. 25 .
When the sliding/tilting roof is in the comfort position, the intensity of the wind noise is reduced.
Open partially
›
Turn the switch to a position in area
D
.
Open fully
›
Turn the switch to position
B
and hold it in this position (spring-tensioned po-
sition).
Tilting roof
›
Turn the switch to position
A
.
›
Press the switch in the region of the lug
E
towards the roof.
Closing
›
Turn the switch to position
A
.
›
Press the switch on the recess
E
down and pull forwards.
Force limiter
The sliding/tilting roof is fitted with a force limiter. The sliding/tilting roof stops and moves back several centimetres when it cannot be closed because there is
something in the way (e.g. ice). The sliding/tilting roof can be fully closed without
a force limiter by pressing the switch on the recess
E
down and then pushing it
forward until the sliding/tilting roof is fully closed » .
50Using the system
Page 54 of 287
 Owners Manual WARNINGWhen closing the sliding/tilting roof proceed with caution to avoid causing
crushing injuries – risk of injury!
CAUTION
During the winter it may be necessary to remove any ice and snow in the")
WARNINGWhen closing the sliding/tilting roof proceed with caution to avoid causing
crushing injuries – risk of injury!
CAUTION
During the winter it may be necessary to remove any ice and snow in the vicinity
of the sliding/tilting roof before opening it to prevent any damage to the opening
mechanism.
Note
The sliding / tilting roof is fitted with a force limiter. The sun blind is operated
manually.
Convenience operation of sliding / tilting roof
First read and observe the introductory information and safety warn-ings
on page 50.
The sliding / tilting roof can be operated by locking or unlocking using the key or
using the KESSY system with the aid of the sensor
1
» Fig. 14 on page 38.
Closing
The sliding/tilting roof can be closed as follows.
›
Press the symbol button button on the remote control key.
›
Hold the key in the driver's lock in the lock position.
›
In the KESSY system, hold a finger on the sensor
1
» Fig. 14 on page 38.
By releasing the lock or lifting your finger off the sensor
1
when using the KESSY
system, the closing process is immediately interrupted.
Tilting roof
›
Press the symbol button button on the remote control key.
WARNINGClose the sliding/tilting roof carefully – risk of injury. The force limiter does not
operate with the convenience closing.NoteThe sliding/tilting roof cannot be opened using the convenience operating fea-
ture.
Panoramic sliding/tilting roof (Octavia Estate)
Introduction
This chapter contains information on the following subjects:
Operation
52
Opening/closing the sun screen
52
Convenience operation of sliding / tilting roof
53
The panoramic sliding/tilting roof (abbreviated in the following as 'sliding/tilting
roof') can only be operated when the ignition is turned on and when the outdoor temperature is higher than -20 °C.
The sliding/tilting roof can still be operated for approx. 10 minutes after switchingthe ignition off. However, as soon as the driver or front passenger's door is
opened it is no longer possible to operate the sliding/tilting roof.
CAUTION
■ Always close the sliding/tilting roof before disconnecting the battery.■If, for example, the battery has been disconnected and reconnected, it is possi-
ble that the sliding/tilting roof does not operate correctly. Next, move the rotary
switch into position A
» Fig. 26 on page 52 , pull the recess firmly downwards
and hold forwards firmly. The sliding/tilting roof opens and closes again after
around 10 seconds. Do not release the control dial until it has done so.
■
If, for example, the battery has been disconnected and reconnected, it is possi-
ble that the sun screen does not operate correctly. Then turn the switch to posi-
tion
A
» Fig. 26 on page 52and press and hold the button
G
» Fig. 27 on
page 52. The sun screen opens and closes again after around 10 seconds. Do not
release the control dial until it has done so.
51Unlocking and opening
Page 55 of 287
 Owners Manual OperationFig. 26
Control dial for the sliding/tilting
roof
First read and observe the introductory information and safety warn-
ings on page 51.
Comfort position
›
Turn the switch to position
C")
OperationFig. 26
Control dial for the sliding/tilting
roof
First read and observe the introductory information and safety warn-
ings on page 51.
Comfort position
›
Turn the switch to position
C
» Fig. 26 .
When the sliding/tilting roof is in the comfort position, the intensity of the wind noise is reduced.
Open partially
›
Turn the switch to a position in area
D
.
Open fully
›
Turn the switch to position
B
and hold it in this position (spring-tensioned po-
sition).
Tilting roof
›
Turn the switch to position
A
.
›
Press the switch in the region
E
towards the roof.
Closing
›
Turn the switch to position
A
.
›
Press the switch on the recess
E
down and pull forwards.
Force limiter
The sliding/tilting roof is fitted with a force limiter. The sliding/tilting roof stops and moves back several centimetres when it cannot be closed because there is
something in the way (e.g. ice). The sliding/tilting roof can be fully closed without
a force limiter by pressing the switch on the recess
E
down and then pushing it
forward until the sliding/tilting roof is fully closed » .
WARNINGWhen closing the sliding/tilting roof proceed with caution to avoid causing
crushing injuries – risk of injury!
CAUTION
During the winter it may be necessary to remove any ice and snow in the vicinity
of the sliding/tilting roof before opening it to prevent any damage to the opening
mechanism.
Opening/closing the sun screen
Fig. 27
Buttons for sun screen
First read and observe the introductory information and safety warn- ings on page 51.
The sun screen can be closed or opened using the buttons » Fig. 27.
Opening
›
Briefly press the button
F
» Fig. 27 to open fully.
›
Press and hold the button
F
to open to the desired position.
The opening process stops when one releases the button.
Closing
›
Briefly press the button
G
» Fig. 27 to close fully.
›
Press and hold the button
F
to close in the desired position.
The closing process stops when one releases the button.
52Using the system
Page 56 of 287
Convenience operation of sliding / tilting roofFirst read and observe the introductory information and safety warn-ings
on page 51.
The sliding / tilting roof can be operated by locking or unlocking using the key or
using the KESSY system with the aid of the sensor
1
» Fig. 14 on page 38.
Closing
›
Press the symbol button on the key or hold the key in the locking cylinder of
the driver's door in the lock position, or for the KESSY system, keep your finger on the sensor
1
» Fig. 14 on page 38 » .
By releasing the lock or lifting your finger off the sensor
1
when using the KESSY
system, the closing process is immediately interrupted.
Tilting roof
›
Press the symbol button
button on the remote control key.
WARNINGClose the sliding/tilting roof carefully – risk of injury. The force limiter does not
operate with the convenience closing.
Note
The sliding/tilting roof cannot be opened using the convenience operating fea-
ture.
53Unlocking and opening
 1
1 2
2 3
3 4
4 5
5 6
6 7
7 8
8 9
9 10
10 11
11 12
12 13
13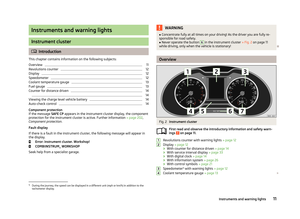 14
14 15
15 16
16 17
17 18
18 19
19 20
20 21
21 22
22 23
23 24
24 25
25 26
26 27
27 28
28 29
29 30
30 31
31 32
32 33
33 34
34 35
35 36
36 37
37 38
38 39
39 40
40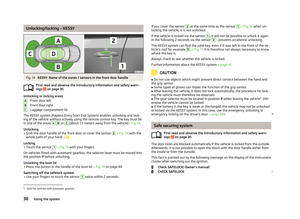 41
41 42
42 43
43 44
44 45
45 46
46 47
47 48
48 49
49 50
50 51
51 52
52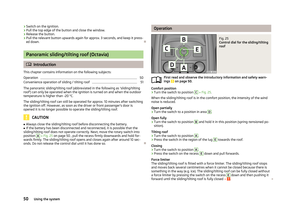 53
53 54
54 55
55 56
56 57
57 58
58 59
59 60
60 61
61 62
62 63
63 64
64 65
65 66
66 67
67 68
68 69
69 70
70 71
71 72
72 73
73 74
74 75
75 76
76 77
77 78
78 79
79 80
80 81
81 82
82 83
83 84
84 85
85 86
86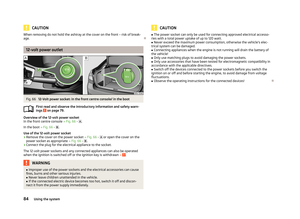 87
87 88
88 89
89 90
90 91
91 92
92 93
93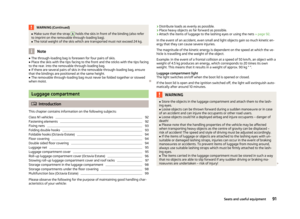 94
94 95
95 96
96 97
97 98
98 99
99 100
100 101
101 102
102 103
103 104
104 105
105 106
106 107
107 108
108 109
109 110
110 111
111 112
112 113
113 114
114 115
115 116
116 117
117 118
118 119
119 120
120 121
121 122
122 123
123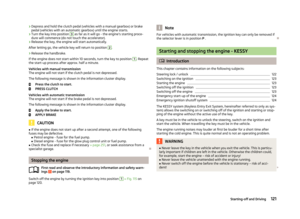 124
124 125
125 126
126 127
127 128
128 129
129 130
130 131
131 132
132 133
133 134
134 135
135 136
136 137
137 138
138 139
139 140
140 141
141 142
142 143
143 144
144 145
145 146
146 147
147 148
148 149
149 150
150 151
151 152
152 153
153 154
154 155
155 156
156 157
157 158
158 159
159 160
160 161
161 162
162 163
163 164
164 165
165 166
166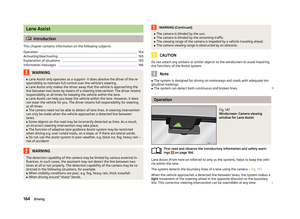 167
167 168
168 169
169 170
170 171
171 172
172 173
173 174
174 175
175 176
176 177
177 178
178 179
179 180
180 181
181 182
182 183
183 184
184 185
185 186
186 187
187 188
188 189
189 190
190 191
191 192
192 193
193 194
194 195
195 196
196 197
197 198
198 199
199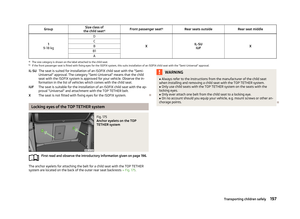 200
200 201
201 202
202 203
203 204
204 205
205 206
206 207
207 208
208 209
209 210
210 211
211 212
212 213
213 214
214 215
215 216
216 217
217 218
218 219
219 220
220 221
221 222
222 223
223 224
224 225
225 226
226 227
227 228
228 229
229 230
230 231
231 232
232 233
233 234
234 235
235 236
236 237
237 238
238 239
239 240
240 241
241 242
242 243
243 244
244 245
245 246
246 247
247 248
248 249
249 250
250 251
251 252
252 253
253 254
254 255
255 256
256 257
257 258
258 259
259 260
260 261
261 262
262 263
263 264
264 265
265 266
266 267
267 268
268 269
269 270
270 271
271 272
272 273
273 274
274 275
275 276
276 277
277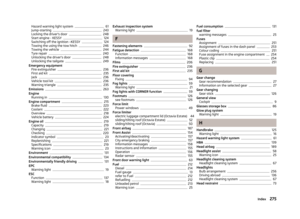 278
278 279
279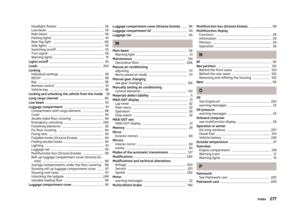 280
280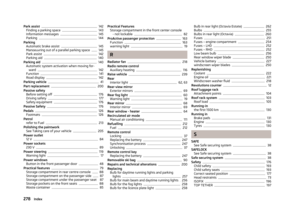 281
281 282
282 283
283 284
284 285
285 286
286 Owners Manual Convenience operation of sliding / tilting roofFirst read and observe the introductory information and safety warn-ings
on page 51.
The sliding / tilting roof can be operated by locking or unlocking")