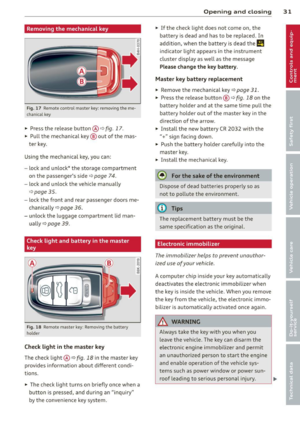
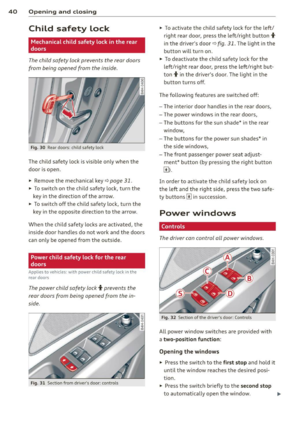
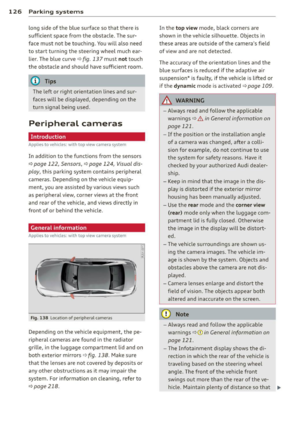
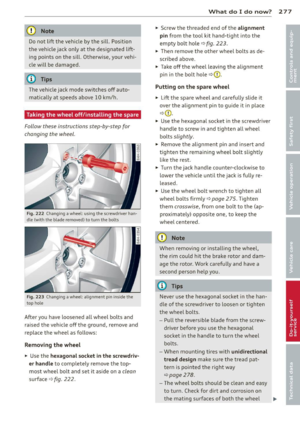
Page 113 of 318

Audi drive select 111
Adjusting the Individual mode
You can adjust the vehicle settings to your personal preferences.
"Se lect: ICARlf unction button> Set individ·
ual
control button. You can now adjust the
individual systems.
The
individual driving mode will automatical
ly be activated when you have finished config
uring the settings .
Systems Comfort
Engine
and Transmission balanced
Air suspension comfortable
Steering comfortable The equipment
in your vehicle will determine
which settings you can adjust. The following
table provides an overview of the characteris
tics of each driving mode.
Dynamic
balanced sporty
---~-
sporty
balanced
Dynamic steering* comfortable/ind ire ct balanced/direct sporty
sporty/direct
sporty
Sport
differential *
Curve light*
Belt tensioner
Adaptive cruise control* Engine sound* balanced
comfortable
Standard
comfortable
subtle agile
---~· balanced
Standard
---~· balanced
subtle/sportyal
sporty
Deployment t ime
adapted
sporty
sporty
al Subt le in the d riving position D and sporty i n the driving pos itio n S
© Tips
Your individual mode settings are auto
matically stored and assigned to the re
mote control key being used.
Raising/lowering the
vehicle
Raising the vehicle
You can raise your veh icle temporarily, for ex
ample to drive over a tall curb.
" Select the following in the MMI: ICARI func
tion button >
Raise control button.
" Wait for the arrows in the display to stop
blinking and the vehicle to reach its final po
sition .
Lowering the vehicle
" To lowe r the vehicle, select the following in
the MMI: ICARlfunction button>
Lower con
t rol button. "
Wait for the arrows in the display to stop
blinking and the vehicle to lower comp lete
ly.
(D Note
- Remember that your vehicle is not suita
ble for driv in g offroad eve n when it is
raised. There is not enough ground clear
ance.
- If the vehicle is raised, it will lower auto
matically when driving 62 mph (100 km/
h) or faster.
Driver messages
Air suspension: vehicle currently too low.
Level control running
Air suspension: vehicle currently too high.
Level control running
The driver message switches off when the lev
el control process is complete .
Page 114 of 318

112 Night vision assistant
Night vision assistant
Description
Applies to vehicles: with night v isio n ass istant
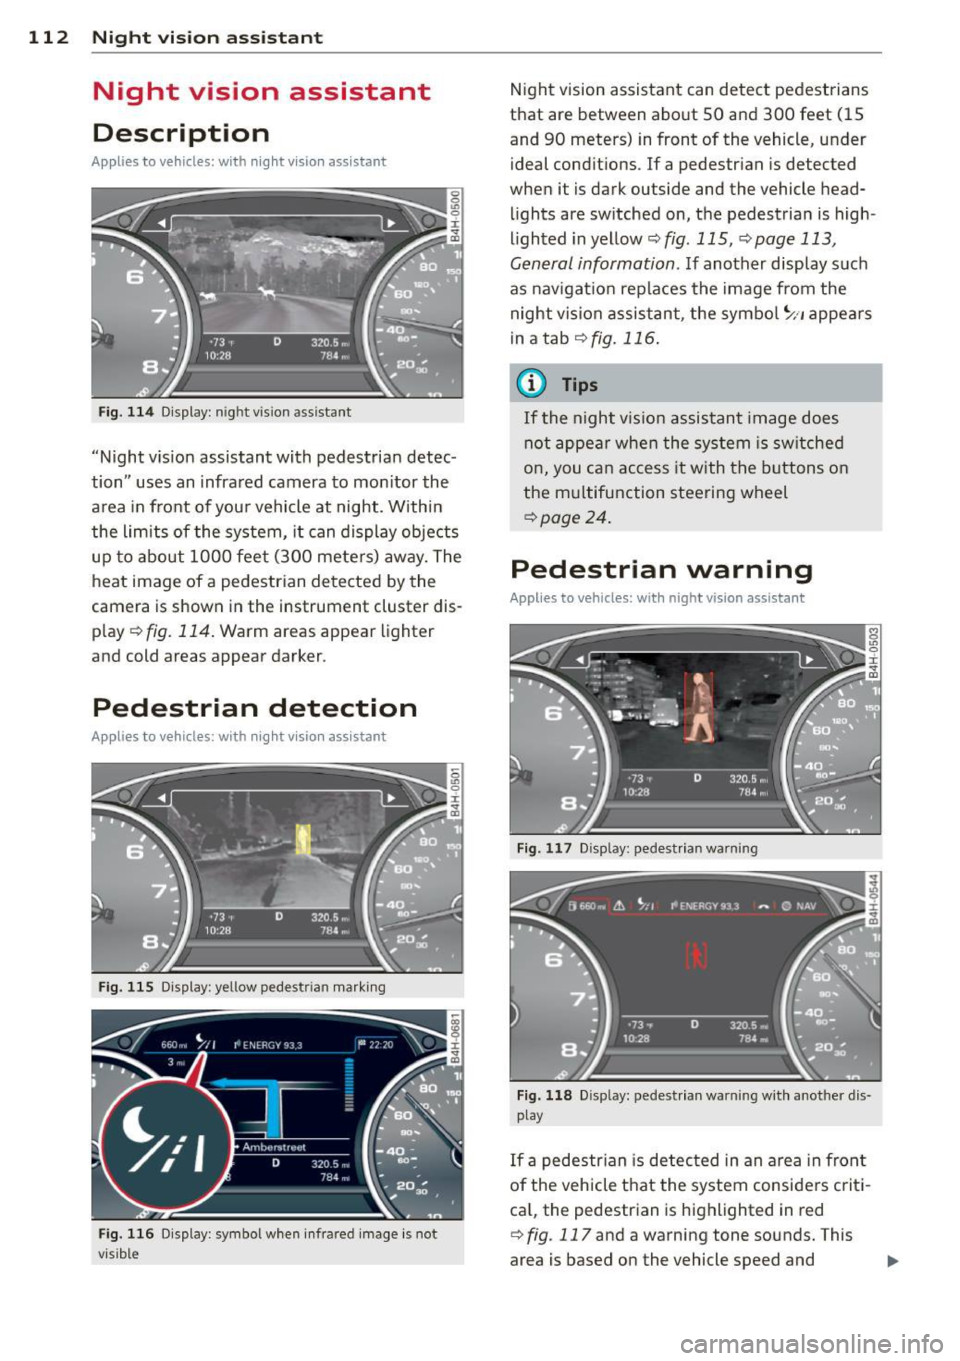
Fig. 114 Display: n ight vis ion assistant
"Night vis ion assistant with pedestrian detec
tion" uses an infrared camera to monitor the
area in front of you r vehicle at night. Within
the limits of the system, it can display objects
up to about 1000 feet (300 meters) away. The
heat image of a pedestrian detected by the
camera is shown in the instrument cluster dis
p lay ¢
fig. 114. Warm areas appear lighter
and cold areas appear darker.
Pedestrian detection
Applies to vehicles: with nig ht v isio n ass istant
Fig. 115 Display: yellow pedestr ian marking
Fig. 116 Display: symbol when infrared image is not
visib le
Night vision assistant can detect pedestrians
that are between about 50 and 300 feet (15
and 90 meters) in front of the vehicle, under
ideal conditions.
If a pedestrian is detected
when it is dark outside and the vehicle head
lights are switched on, the pedestrian is high
lighted in yellow¢
fig. 115, ¢page 113,
General information.
If another display such
as navigation replaces the image from the
night vision assistant, the symbo l
~11 appears
in a tab
¢fig . 116 .
(D Tips
If the night v ision assistant image does
not appear when the system is switched
on, you can access it with the buttons on
the multifunction steering wheel
¢page 24.
Pedestrian warning
Applies to vehicles: wit h night vision assistant
Fig. 117 D isp lay: pedestrian warning
Fig. 118 Disp lay: pedestr ian warning w ith another dis
play
If a pedestr ian is detected in an area in fron t
of the vehicle that the system considers criti
ca l, the pedestrian is highlighted in red
¢
fig . 117 and a warning tone sounds. This
area is based on the vehicle speed and
Page 115 of 318

steering angle. The pedestrian warning prompts you to pay even closer attention to
the area in front of the vehicle and to watch
out for pedestrians.
If another display such as the trip comp uter
replaces the image from the night vision as
sistant, the indicator light turns red when
there is a pedestrian warn ing .
c:> fig. 118 .
@ Tips
The pedestrian marking and warning tone
can be adjusted in the MMI
r=>poge 114.
General information
Applies to vehicles: with night v isio n ass istant
N 0
8 :i:
~
Fig. 119 Fron t of the veh icle: night vision ass istant
camera
The following situations may affect the func
tion of the night vision assistant system:
- poor v is ib ility such as snow, rain, fog or
heavy road spray
- dirty lens on the night vision assistant cam-
era
Make sure the night vision assistant camera
i::> fig. 119 is not cove red by stickers, deposits
or any other obstructions because that can
prevent the camera from working properly.
F or information on cleaning the lens, refer to
c:> page 218.
Pedestrian detection depends on the differ
ence in temperature between the person and
the background. Pedestrians may not be de
tected if the temperature difference is too
sma ll. The pedestrian highlighting feature is
deactivated at temperatures above 77 °F (25
0
() and when it is light outside.
Night vision assistant 113
A WARNING
Night vision assistant has limits and can
not always detect pedestr ians . Always pay
close attention to traffic and the area
around your vehicle even when night vision
assistant is switched on.
- Night vision assistant can only warn
about people located within the visual
range of the infrared camera. The visual
range corresponds to the image in the in
strument cluster display.
- Night vision assistant may not detect
peop le and highlight them if
- they are not in an upright posit ion, for
example if they are sitt ing, crouching
or lying down and/or
- if the outline in the display is incom
plete or interrupted, for example be
cause the person is part ially hidden by
a parked vehicle .
@ Tips
-Pedestrian detection and the pedestrian
warm ing are limited to objects that are
detected as pedestrians. The system
does not detect an imals. Even though
the shape and warmth radiated by each
object detected is evaluated, the system
does have limitations and it can give in
correct warnings .
- For technical reasons, the image pauses
in split second intervals.
Switching on and off
Applies to vehicles: wit h night vision assistant
Fig . 120 Area around th e ligh t sw itch: night vis ion as·
s istant button .,.
Page 116 of 318

114 Night vision assistant
• Switch the ignition on and turn the light
sw itch to the
AUTO position or tD .
• To sw itch night vision ass istant on, press
the~ ,, button
c> fig. 120 . The image from
the night vision camera appea rs in the in
strument cluster display .
• Press the button~ -, aga in to switc h night vi
s ion assistant off .
Settings in the MMI
Appl ies to vehicles: with night v isio n ass istant
Fig. 121 Disp la y: examp le of pede strian detect ion and
warn ing tone switc hed off
• Select : I CARI funct ion button > Car systems
control button > Driver assist > Night vision
assist.
Highlight pedestrians -
You can switch pedes
tr ian detection
on and off . If you sw itch pe
destrian detection off, the pedestr ian war ning
tone also switches off. The symbols
IJ and ~
appear in the upper right area of the instru
ment cluster display
c> fig. 121.
Warning tone -You can switch the tone for
the pedestrian warning
on and off . When the
warn ing tone is switched off, a ye llow symbol
for the deactivated wa rning tone with a line
through it appears in the upper right of the in
strument cluster display
c> fig. 121 .
Contrast -When the night vis ion assistant is
sw itched on and the image is visible in the in
strument cluster display, you can adjust the
contrast in the image from
Min to Max.
Driver messages
Appl ies to veh icles: with night visi on ass istant
Night vision assistant: system malfunction!
The system cannot work properly and is
switched off. See your authorized Audi dealer
for assistance .
Night vision assistant: not available
The system cannot detect properly under cur
rent cond itions and is switched off temporari
ly.
Night vision assistant: only available in dark
ness and with lights switched on
Night vision assistant only works when it is
dark outside and the headlights are on.
Night vision assistant: pedestrian detection
not available
T he system has deactivated the pedestrian de
tection function.
Page 117 of 318

Automatic Transmission
tiptronic (8-speed
transmission)
Introduction
Your vehicle is equipped with an electronically
controlled 8-speed automatic transmission .
Upshifting and downshifting occurs automati
cally and is controlled electronically. The driv
ing style continuously influences the selection
of the driving program.
When a
moderate driving style is used, the
transmission selects the most econom ical
driving mode. It will then change up early and
delay the downshifts to give better fuel econ
omy.
The transmission switches to a sporty mode
after a kick-down or when the driver uses a
sporty driving style characterized by quick ac
celerator pedal movements, heavy accelera
tion, frequent changes in speed and traveling
at the maximum speed.
If desired, the driver can also select the gears
manually (tiptronic mode) ¢ page 118.
Indicator in the display
Fig. 122 Display: selector lever pos it ion
@ -The current selector lever position is dis
played continuously. The gear is also dis
played in manual mode M.
@-This indicator appears temporarily if you
change the selector lever position or if you
press the button on the selector lever
Automatic Transmission 115
¢ page 115, fig. 123 . The current selector
lever position is shown with a white back
ground.
Selecting a selector lever position
Fig. 123 Selector lever
---R--- -t
--- N---_..
- D/S--
Fig. 124 Pressing the button o n the selector leve r
The current selector lever position is displayed
on the selector lever¢
fig. 123.
.. You may need to release the selector lever
lock depending on which selector lever posi
tion is selected and which one you would
like to select ¢
page 116, Selector lever
lock .
.. To engage the nearest selector lever posi
tion, move the selector lever forward/back
until you fee l the first pressure point. The
selector lever will return to its original posi
tion .
.. To skip over one (or two) selector lever posi
tions, move the selector lever past the first (and second) pressure point into the desired
position. The selector lever will return to its
original position.
For example, to move directly from the D se
lector lever position to P when stopping the
vehicle, you can shift past the N and R selector
lever positions . ..,.
Page 118 of 318

116 Automatic Transmission
Selector lever lock
The selector lever lock prevents you from se
l ecting a position unintentionally, causing the
vehicle to roll. When engaging some selector lever positions, you must press the button on
the selector lever<=>
fig. 123 and/or press the
brake pedal.
You must press the brake pedal to engage a
selector lever position when the engine is run
n ing while the vehicle is stationary. The ar
rows¢
fig. 124 indicate when you need to
press the button on the selector lever.
The selector lever does not lock if you shift
from D to R within one second . This allows
you to "rock" the vehicle to free it when it is
stuck.
P - Park
The whee ls are locked in this position. Only
shift into park when the vehicle is stationary
¢ & .To engage the P selector lever position,
press the button on the selector lever and
shift into the P position.
You can only shift out of park when the eng ine
is running and you are pressing the brake ped
al. Press the button on the selector lever to
release the park ing lock and select the des ired
selector lever posit ion.
P engages automatically when you switch the
engine off while D, Sor R is engaged or in
manual mode.
If you switch the engine off when N is engag
ed, the transmission remains in N for approxi
mately 30 minutes and then Pis engaged.
You must use the emergency release proce
dure to release the parking lock before towing
the vehicle
¢ page 120.
R - Reverse
The reverse gear is engaged in this position.
Only select reverse when the vehicle is sta
tionary and the engine is running at idle speed
¢ & .To engage the R se lector lever position,
press the button on the selector lever, press the
brake pedal and move the selector lever
into the R position.
T he back-up lights turn on when you select
the R selector lever position while the engine
is running .
N -Neutral
The transmission is in idle in this position. To
engage the N selector lever position , press
the button on the selector lever and shift int o
the N position.
If you switch the engine off when N is engag
ed, the transmission remains in N for approxi
mately 30 min utes and then Pis engaged.
You cannot select the N position when the ig
nition is switched off . When driving through
an automat ic car was h, first select the N posi
tion and then switch the engine off
¢page 216.
The vehicle cannot be locked when the selec
tor leve r is in the
N position.
D/S - Position for driving forward
In the D/S pos ition, the transmission can be
operated either in the normal mode Dor in
the sport mode S. You can only select the S se
lector lever position when Dis engaged. Move
the selecto r lever back to engage the S selec
tor lever position. To select the D selector lev
er position again when S is engaged, move the
selector lever back¢& . To shift from
N to D
when traveling at speeds below 1 mph (2km/
h), press the brake pedal and select the D se
lector lever position ¢
&.
In the normal mode D, the transmission auto
matically selects the suitable gear ratio.
It de
pends on engine load, vehicle speed and driv
ing style.
Select the
sport mode S for sporty driving.
T he vehicle makes full use of the engine's
power. Shift ing may become noticeab le when
acce lerat ing.
The S selector lever position engages auto
matically when yo u select the dynamic mode
in Audi drive select.
...
Page 119 of 318

& WARNING
-Never engage R or P wh ile driving. It
cou ld cause a crash .
-
-Power is sti ll transmitted to the whee ls
when the engine is running at idle. To prevent the vehicle from "creeping", you
must keep your foot on the brake in all
selector lever positions except P and N
when the engine is running. Do not inad
vertent ly press the accelerator pedal
when the veh icle is stationary . Otherwise
the vehicle will start to move immediate ly. This cou ld happen even if the parking
brake is activated.
- Before opening the hood, select the P se
lector lever position and set the par king
brake. This reduces the risk of a crash. A l
ways read and follow the applicable
warnings
¢page 226, Engine comport
ment.
- Never get out of the driver's seat when
the engine is running.
- If you must get out of the vehicle, move
the se lector lever securely into the P po
sit ion and apply the park ing brake .
@ Tips
-If you un intentionally shift into the N se
l ector lever position while dr iving, take
your foot off the accelerator pedal and
wait for the engine to slow down until it is idling before you shift into Dor S.
Driving tips
The gears shift outomoticolly .
Starting from a stop
"' Press and ho ld the brake pedal.
.,. Start the eng ine
q page 83.
"' Press the button on the se lector lever and
select the D, S or R selector lever position
¢ page 115.
"' Wait a moment until the transmission
shifts. You w ill not ice a slight movement
when the gear engages .
"' Re lease the brake pedal and press the accel
erato r peda l¢ _& .
Aut omat ic Tr ans missio n 11 7
Stopping temporarily
"' Press the b rake pedal to stop the veh icle,
for examp le at a traffic light . Do not press
the acce lerator pedal when doing this .
"' To prevent the vehicle from rolling when
you start driving, set the parking brake
when stopp ing on large inclines¢_& .
"' The parking brake will release automat ically
and the vehicle will start mov ing once you
press the acce lerator pedal.
Parking
If the selector lever is not in the P position
when you open the driver's door, the veh icle
could roll. The message
Transmission: Car
may roll! Shift to park !
appears.
"' Press and hold the brake pedal¢ _& .
"' Set the park ing brake.
"' To engage the P se lector lever position,
press the button on the selector lever and
shift into the P posit ion ¢
page 115 .
Under certa in conditions such as dr iv ing in the
mountains or when towing a trailer, it may be
helpful to switch to manual mode temporarily
to shift
manually to adapt to the dr iving con
ditions
¢ page 118.
On slopes, activate the parki ng brake first and
then move the selecto r leve r to the P position .
T his prevents too much st ress from be ing
placed on the locking mechanism.
& WARNING
Read and follow all WARNINGS ¢ .&. in Se
lecting o selector lever position on
page 117.
- The vehicle can also roll when the engine
is stopped.
- Do not press the accelerator pedal when
changing the selec tor lever position
while the vehicle is stationary and the engine is running . This could result in a
crash.
- Never engage R or P while driving . It
could cause a crash.
- Power is still transmitted to the wheels
when the engine is running at idle. To ..,.
Page 120 of 318

118 Autom atic Tran smissi on
preve nt the vehicle from "creep ing" , you
must keep your foot on the brake in all
selector lev er positions except P and N
when the e ng ine is r unning. Do not inad
vertently press the accelerator pe dal
w hen the veh icl e is stationary . Otherwise
the vehicle will s tart to move immediate
ly, even if the park ing brake is se t. This
cou ld result in a c rash.
- Do not ride the brakes or press the brake
peda l too often or too long when dr iving
down a hill. Constant braking causes the
brakes to ove rheat and s ubstant ially re
duces braking performance, increases
braking distance or causes comp lete fail
ure of the brake system.
Hill descent control
The hill descent control system assists the
driver when driving down declines.
H ill descent control is activated when these
lector lever is in D/S and you press t he b rake
pedal. The transmission automat ically se lects
a gear that is suitab le for the incline. Hill de
scent control tries to maintain the speed ach ieved at the time of brak ing, within physical
and techn ical limitations. If may still be nec
essary to adjust the speed with the brakes .
H ill descent control switches off once the de
cline levels out or you press the accelerator
pedal.
Hill descent control is also activated when the
speed is set by starting the cruise control sys
tem c:>
page 90.
A WARNING -
Hill descent control ca nnot overcome
physical limitations, so it may not be able
t o maintain a constant speed under all
condi tion s. Alw ays be ready to ap pl y the
bra kes.
Shifting manually
The shift paddles allow the driver to shift the
gears manually .
Fig . 1 25 Steer ing whee l: sh ift in g manually
" To shift to a higher or lowe r gear tempo rari
ly, tap the
0 or 0 shift padd le c:> fig. 125.
" To switch manual mode on, press the~
button. An M and the gear that is current ly
engaged appear in the instrument cluster
disp lay @ c:>
page 115, fig. 122.
" To shift up one gear, tap the rig ht shift pad
dle
0 c:> fig . 125 .
" To s hift down one gear, tap the left shift
paddle Q.
" To swi tch manual mode off, press the~
but ton again, or
" Move the se lector lever back and release it .
T he transm iss io n automatically sh ifts up or
down before cr itical engine spee d is reached.
T he transm iss ion only allows manual sh ifting
whe n the eng ine speed is w ith in the pe rmit
ted range .
The eng ine braking effect increases when you
downsh ift when going downhill .
Kick-down
Kick-down enables maximum acceleration .
When you press the accelerator pedal down
beyond the resistance point, the automatic
transmission downsh ifts into a lower gear, de
pending on veh icle speed and eng ine RPM . It
shifts up into the next higher gear once the
max imum specified engine RP M is reached .
Iii>