Page 81 of 318
 .
Fig. 81 Cockpit controls
Fig. 82 fou r zone auto matic cli mate")
Warm and cold 79
Operation
We recommend pressing the
I AUTO I button and setting the temperature to 72 °F (22 °C) .
Fig. 81 Cockpit controls
Fig. 82 fou r zone auto matic cli mate control: rear con
trols
Press the buttons to turn the functions on or
off . Use the dials to adj ust the temperature,
the blower speed and the a ir distribution. The
LED in a button w ill light up when the func
tion is sw itched on. The settings are shown in
the climate control display and are a lso shown
in the MMI display for a few seconds . The driv
e r and front passenger sett ings can be adj ust
in g separately.
You can also adjust the rear left and right
sides in the four zone automat ic climate con
trol*
~ fig . 82 .
IOFF I Switching the climate control
system on/off
The IOFFI button switches the climate control
system on or off .
It also switches on when you
turn the dial or press any button . Airflow from outside is
blocked when the climate control
system is switched off.
You can acti vate the residual heat functi on
whe n the ignition is off by pressing and hold
ing the ~ button . The residual heat from the
coolant is used to heat the vehicle i nterior.
The residua l heat function switches off auto
matically after about 30 minutes.
IAIC ! Switching cooling mode on/off
The air is not coo led and hum idity is not re
moved when cooling mode is switched off.
This can cause fog on the windows. Cooling
mode switches off automatically when the
outside temperature is be low zero.
1- 1 Switching recirculation mode on/off
In recircu lation mode, the air inside the vehi
cle is circulated and filtered. This prevents the
unfiltered air outside the vehicle from enter
ing the vehicle interior. We recommend
switching recirculation mode on when driving
through a tunnel or when sitting in traffic
¢ ,&. .
The !AUTO I button or~ button switches reci r
cu lation mode off.
IAUTO! Switching automatic mode on
Automatic mode maintains a cons tant tem
perature inside the vehicle. Air temperature,
~
Page 82 of 318
 and
84
°F (+28 °C) can be set. Outs")
80 Warm and cold
airflow and air distribution are controlled au
tomatically.
Adjusting the temperature
Temperatures between 60 °F (+16 °() and
84
°F (+28 °C) can be set. Outside of this
range,
lo or hi will appear in the climate con
trol system display. At both of these settings,
the climate control system runs continuously
at maximum cooling or heating power. There
is no temperature regulation.
~ Adjusting the airflow
You can adjust the airflow manually to suit
your needs. To have the airflow regulated au
tomatically, press the
! AUTO ! button.
~ Adjusting the air distribution
You can manually select the vents where the
air will flow. To have the air distribution regu
lated automatically, press the
IAUTOI button.
~ I lil* Adjusting Seat heating/
ventilation*
Pressing the button switches the seat heat
ing/ventilation on at the highest setting (level
3). The L EDs indicate the temperature level.
To reduce the temperature, press the button
again. To switch the seat heating/ventilation
off, press the button repeatedly until the LED
turns off.
After 10 minutes, the seat heating/ventilation
automatically switches from level 3 to level 2.
In vehicles without the four zone automatic
climate control*, buttons in the rear center
console control the seat heating for both out
er rear seats*.
~ Switch the defroster on/off
The windshield and side windows are defrost
ed or cleared of condensation as quickly as
possible. The maximum amount of air flows
mainly from the vents below the windshield.
Recirculation mode switches off. The tempera
ture is controlled automatically.
The
IAUTOI button switches the defroster off.
~ Switching rear window heater on/off
The rear window heater only operates when
the engine is running. It switches off auto
matically after 10 to 20 minutes, depending
on the outside temperature.
To prevent the rear window heater from
switching off automatically , press and hold
the~ button for more than 2 seconds. This
r ema ins stored until the ignition is switched
off.
I SYNC I Synchronization*
When synchronization is switched on, the set
tings for the driver's side are applied to the
front passenger's side (except for seat heat
ing/ventilation*). The rear seat is also
synchronized in vehicles with the 4-zone de
luxe automatic climate control system*. Syn
chronization switches off if the settings are
adjusted on the front passenger's side or in
the rear*.
You can synchronize the settings in a row by
pressing and holding a knob. For example, to
apply the settings for the front passenger's side to the driver's side, press and hold the
knob on the front passenger's side.
Air vents
You can open or close the center and rear
vents in the cockpit and the vents in the rear
center console and door pillars using the
ridged thumbwheels. The levers adjust the di
rection of the airflow from the vents.
,&. WARNING
- Do not use the recirculation mode for ex
tended periods of time. The windows
could fog up since no fresh air can enter
the vehicle. If the windows fog up, press
the air recirculation button again imme
diately to switch off the air recirculation
function or select defrost.
- Individuals with reduced sensitivity to
pain or temperature could develop burns
when using the seat heating function. To reduce the risk of injury, these individu-
als should not use seat heating . .,..
Page 83 of 318

(D Note
To avoid damage to the heating elements in the seats, do not kneel on the seats or
place heavy loads on a small area of the
seat.
Setup
The climate control system setup is accessed
through the MMI.
• Se lect: ICARI function button > Car systems
control button > A/C.
Rear cabin settings*
When this function is selected, all sett ings for
the rear can be adjusted through the climate
control system in the cockpit . The climate
control system settings cannot be adjusted in
the rear seat at the same time. This function
switches off after a certain period of time or
when one of the dials in the cockp it is press
ed .
Auto recirculation*
The sensitivity level of the automatic recircu
l ation mode can be set at various levels from
off to sensitive. The recirculation mode l"""I is
controlled on automatically. You must press
the ~ button if fog forms on the w indows .
Footwell temperature
You can adjust the footwe ll temperature so
that it is cooler or warmer.
A/C mode
The strength of the airflow can be adjusted to
light, medium o r strong .
Windshield heat*
When the defroster~ is switched on and the
Auto settin g is selec ted, the windshie ld de
froster is controlled automatically.
Solar roof*
Park ing vent ilation is controlled automat ically
in the
auto setting .
Warm and cold 81
When the ignition is off, solar-powered park
ing ventilation may switch on, as long as
- t here is sufficient sunlight,
- the outside temperatur e is not too low,
- the sunroof is closed or tilted and
-auto (MMI) is selected.
~ Steering wheel heating
App lies to vehicles: with heated steering wheel
The steering wheel rim can be heated .
Fig. 83 Steering column: steering wheel heating but ·
ton
~ 0
± ... CD
• Press the~ button to switch steering whee l
heating on/off. The message
Steering wheel
heating on! /Steering wheel heating off!
appears in the instrument cluster disp lay.
The temperature is maintained at a constant
level when steering wheel heating is switched
on.
T he steering wheel heating settings are stor
ed a utomatically and assigned to the remote
control key that is in use .
Page 84 of 318

82 On the road
On the road
Steering
Adjusting steering wheel position
The steering wheel position can be adjusted
for height and reach .
Fig. 84 Switch for steering whee l adjustment
F irst, adjust the driver's seat correctly.
• To adjust the height, press the switch up/
down. The steering column will continue
moving as long as you a re pressing the
switch.
• To move the steeri ng wheel forward or
back, press the switch forward/back . The
steering column wi ll continue moving as
long as you are pressing the switch .
There must be at least 10 inches (25 cm) be
tween your chest and the center of the steer ing wheel. If you cannot sit more than 10 in
ches (25 cm) from the steering wheel, see if
adaptive equipment is available to help you
reach the pedals and increase the distance
from the steering wheel.
For detai led informat ion on how to adjust the
driver's seat, see
Q page 58.
In vehicles with the memory function* , the
steering column settings are stored together
with the seat position.
A WARNING
Improper use of steering wheel adjust
ment and improper seating position can
cause serious personal injury . -
Adjust the steering wheel col umn only
when the vehicle is not mov ing to pre
vent loss of vehicle control.
- Adj ust the driver's seat or steering whee l
so that there is a m inimum of 10 inches
(25 cm) between your chest and the
steer ing wheel
Q page 135, fig . 153 . If
you cannot maintain th is m inimum dis
tance, the airbag system cannot p rotect
you properly.
- If physical limitations prevent you from sitt ing 10 inches (25 cm) or more from
the steering wheel, check wit h your au
thorized A udi dealer to see if adaptive
equipment is available .
- I f the steering wheel is al igned with your
face, the supplementa l driver's airbag
cannot provide as much protection in an
accident. Always make sure that the
steering whee l is aligned with your
chest.
- Always hold the steering wheel w ith your
hands at the 9 o'clock and 3 o'clock posi
tions to reduce the risk of persona l injury
if the dr iver's airbag dep loys.
- Never hold the steering wheel at the 12
o'clock position or with your hands inside
the steeri ng wheel rim or on t he steering
wheel hub. Holding the steer ing wheel
the wrong way can cause serious injuries
to the hands, arms and head if the driv
er's airbag deploys.
Easy entry feature
The easy entry feature makes it easier to en
ter and exit the vehicle by automatically ad
justing the steering wheel.
• Select in the MMI : ICAR lfunction button>
Car sy st e m s control button > Ve hicle set·
tin gs > Se ats > Driver's s eat > Ea sy entr y>
On .
When the easy entry feature is turned on, the
steering wheel moves up to the park position
whe n you switch off the ignition. Afte r you en-
ter the ve hicl e, the steering wheel moves to .,..
Page 85 of 318

the stored position as soon as you switch on
the ignition.
Starting and stopping
the engine
Starting the engine
This button switches on the ignition and
starts the engine.
Fig. 85 Center console: S TART ENGINE S TOP b utton
Switching the ignition on/off
• To switch the ignition on/off, press the
I START ENGINE STOPI button. Do not press
the brake pedal while doing this.
Starting the engine
• Press the brake pedal QA .
• Press the !START ENGINE STOPI button
Q fig . 85. The engine will start.
If the engine does not start immediately, the
starting process is automatically stopped af
ter a short time. Repeat starting procedure.
Start-Stop-System*:
When you stop and the Start -Stop -System*
turns off the engine, the ignition still remains
switched on.
- If you press the !S TART ENGINE STOPI but
ton now, the ignition will be switched off.
The engine will not start
¢page 89.
- Make sure that the ignit ion is switched off
before exiting the vehicle.
Switching the ignition/engine off
automatically*
The follow ing applies to vehicles with Start
Stop-System*: to prevent the battery from
On the road 83
draining, the ignition and the engine will
switch off automatically under the following
cond itions:
- The vehicle has already been driven.
- The driver's door is opened.
- The driver's seat belt is removed .
- The brake pedal is not pressed down.
- The vehicle is stationary.
In this case, the activated low beam will be re
placed by the side marker lights. The side
marker lights will switch off after a certain pe
riod of time or when you lock the vehicle .
A WARNING
-Never allow the engine to run in conf ined
spaces -danger of asphyx iation.
- Never turn off the engine until the vehi
cle has come to a complete stop.
- The brake booster and power steering
only work when the engine is running. If
the engine is off, you have to use more
force when steering or braking. Because
you cannot steer and brake as you usual
ly would, this could lead to crashes and
serio us injuries.
(D Note
- Avo id h igh engine rpm, full throttle and
heavy engine loads until the engine has
reached operating temperature - other
w ise you risk engine damage.
- The engine cannot be started by pushing
or towing the vehicle.
@ Tips
-After a co ld engine is started, there may
be a brief period of inc reased noise be
cause oil pressure must first build up in
the hydraulic valve adjusters. This is nor
ma l and not a cause for concern.
-If you leave the vehicle with the ignition
switched on, the ignition w ill switch off
after a certain period of time. Please
note that electrical equipment such as
exterior lights will sw itch off as well
when that happens.
Page 86 of 318

84 On th e road
Stopping the engine
• Bring your vehicle to a complete stop.
• Move the selecto r lever to the P or N posi
t ion .
• Pre ss the I START ENGINE STOP I button
¢ page 83, fig. 85.
When you s top and the Sta rt- Stop -Sys tem*
turns off the engine, the ignit ion remains on .
Press the
I STAR T ENGINE ST OP I button to
switch the ignition off during a stop phase.
Steering lock
The stee ring lo cks w hen you t urn the engine
off using the
I S TART ENGINE STOP I button
and open the dr iver's door . The locked steer
ing helps prevent vehicle theft .
Emergency off
If necessary, the eng ine ca n be sw itched off
with the selector lever in the R, Dor S pos i
tions . The eng ine stops if you press the
I START ENGINE STOP ! button at speeds be low
6 mph (10 km/h) .
A WARNING
-Never turn off the engine before the ve
hicle has come to a complete stop. The
full function of the brake booster and the power steering is not quara nteed. You
must use more force to turn or b rake if
necessary. Because you cannot stee r and
brake as you usua lly would, th is could
lead to c rashes and serious injur ies.
- For safety reasons, you shou ld always
par k your vehicle with the se lector lever
in P. Otherwise, the ve hicle co uld i nad
vertent ly roll away .
- After the engine has been switched off,
the radia tor fan can continue to run fo r
up to 10 min utes -even with the ign it ion
switched off. It can a lso switch on again
after some time if the coolant tempera
ture rises as the result of a heat buildup
or if the engine is hot and the engine
compartment is addit ionally heated by
the su n's rays.
(D Note
Do not stop the eng ine immediately after
hard or extended driving . Keep the eng ine
runn ing for approximate ly two minutes to
prevent excess ive heat bu ild-up.
Driver message in the instrument
cluster display
Ignition i s on
This message appears and a warning tone
sounds if you open the driver's door when the
ignition is sw itched on.
Press brake pedal to start eng ine
This message appears if you press the
I START ENGINE STOPI button to start the en
gine and do not depress the brake pedal. The
engine can only be started if the brake pedal
is depressed .
!!I Is key in the vehicle ?
If the indicator ligh t turns on and the mes
sage appears, the remote control key was re
moved from the vehicle whi le the engine was
runn ing . If the ignition key is not in the veh i
cle you will not be able to switch on the igni
tion or restart the engine after it has bee n
switched off . You will also not be able to lock
the ve hicle from the outs ide .
Shift to P , othe rwise v ehicle can roll away.
Doors do not lock if le ver is not in P .
This driver message appears for safety rea
sons if the transmission has not been shifted
to the P position when you switc h the ignition
off . Move the selector lever to the P position.
O therwise the vehicle is not p rotected from
r o ll ing a nd ca nnot be locked.
rJl Ke y i s not recognized . Hold back of ke y
aga inst marked area. See owner's manual.
If the indicator light turns on and this mes
sage appears, there is a malfunct ion
¢ page 85.
Tu rn off ignition before leaving c ar
Page 87 of 318

This message appears if the driver's door is
opened while the ignition is switched on . Al
ways sw itch
off the ignition if you are leaving
the vehicle . See also
<=:> page 83.
Shift to P and turn off ignition before leav
ing car , otherwise vehicle can roll away
This message appears if the driver's door is
opened while the ignition is sw itched on and
the selector lever is not in the P position. Shift
the selector lever into the P position and
sw itch
off the ign ition when you ex it the vehi
cle . Otherwise the vehicle could ro ll. See al so
¢page 83.
Starting the engine if there is a
malfunction
It may not be possible to start the engine un
der certain circumstances, for example if the
battery in the vehicle key is drained, if inter
ference has affected the key or if there is a
system malfunction .
I
----- ~
Fig . 86 Ce nter conso le /maste r key: starting th e en gine
if th ere is a malfunction
Requirement : The message Key not recog
nized. Hold back of key against marked area.
See owner's manual.
must appear and the in
d icato r
light m) must switch on.
• Hold the master key vert ical ly in the loca
t ion indicated
y>l) c::> fig. 86.
• Press the brake pedal c::> &. in Starting the
engine on page 83.
... press the ""I s=-= T,,.,A -= R=-= T =- E= N ,-,..,= G=I '""' N -=E '""'s=-= T,,., O""' P""' I button .
The engine will start .
• Drive to your authorized Audi dealer imme
diately to have the malfunction correc ted .
On the road 85
@ Tips
You can view the message again by press
i ng the
I START ENGINE STOP! button.
Electromechanical
parking brake
Operation
The electromechanical parking brake replaces
the hand brake.
Fig. 87 Center co nsole: Parking b rake
• Pull on the switch C®l ¢ fig. 87 ® to apply
the parking brake. The indicator light in the
switch illuminates.
• Step on the brake pedal or the accelerator
pedal and press the switch ©lat the same
time to release the park ing brake. The indi
cator light in the switch goes out.
Your vehicle is equipped with an electrome chanical parking brake . The parking brake is
designed to prevent the veh icle from rolling
unintentionally and replaces the hand brake .
In add ition to the normal functions of a tradi
tional hand brake, the electromechanical
parking brake provides various convenience
and safety functions.
When starting from rest
-The integral starting a ss ist helps you when
dr iving by automatically releasing the park
ing brake
¢ page 86, Starting from rest .
-When starting on inclines, the starting as -
sist prevents the vehicle from unintentional-
ly rolling back. The braking force of the
park ing brake is not re leased until sufficient
1111-
Page 88 of 318

86 On the road
driving force has been built up at the
wheels.
E mergency brake function
An emergency brake ensures t hat the vehicle
can be slowed down even if the
normal brakes
fail
c::> page 87, Emergency braking .
Indicator lights
-If the parking b rake is closed w ith the igni
t ion
sw itch ed on the indicator lights come
on - (USA models)/ . (Canada models)
i n the i nstr ument cluster and in the switch .
- If the par king brake is closed w ith the igni
t ion
s wit ched off the indicato r lights come
on - (USA models)/ . (Canada models)
in the instrument cluster and in the switch
for about 20 seconds.
.&_ WARNING
Do not press the accelerator peda l inadver
tently if the vehicle is stat ionary but the
eng ine is running and a gear is selected.
Otherw ise the vehicle will start to move
immed iate ly and could result in a crash .
@ Note
If the symbo l. in the display or the ind i
cator light
1111 (USA models) . (Cana
da models) in the instrument cluster flash
es, there is a malfunction in the brake sys
tem . Please refer to the detai led descrip
tion of the indicator lights
c::> page 14.
- If the indicato r light - (USA mod-
els) . (Canada mode ls) or
liJ turns
on, there may be a malfunction in the parking b rake
c::> poge 15.
(D Tips
- You can apply the pa rking brake at any
t ime - even w ith the ignition switched
off . T he ignit ion must be on in order to
r elease the parking brake.
- Occ asiona l noises when the par king
brake is applied and re leased are no rma l
and are not a ca use for concern .
- When the vehicle is par ked, the par king
brake goes through a se lf -test cycle at regu
lar interva ls. Any associated noises
are normal.
Parking
Parking
.,. Stop the vehicle with the foot brake .
.,. Pull the switch(®) to apply the parking
brake.
.,. Select the P selector lever position
c::>page 115.
.,. Turn the engine off c::> _&. .
In addit ion on inclin es and g rades
.,. Turn the steering whee l so that your vehicle
w ill roll aga inst the curb in ca se it should
start to move.
.&_ WARNING
- When you leave your vehicle - even if on
ly br iefly - always take the ignit io n key
wit h you. This applies pa rticularly when
children remain in the vehicle. Otherwise
the children co uld s tart the engine, re
lease the parking brake or operate elec
trica l equipment (e.g . power windows) .
There is the r isk o f an accident.
- When the vehicle is locked, no one - par
ticularly not children should rema in in
the vehicle. Locked doors make it more
d ifficult for emergency workers to get in
to the vehicle - putting lives at risk .
· Starting from rest
The starting assist function ensures that the
parking broke is released au tomatically upon
star ting.
Stopping a nd applying parking brak e
.,. Pull the switch(®) to apply the parking
brake.
St arting and automatically releasing the
parking brake
.,. When you start to drive as usual , the park
ing brake is a utomatically rel eased and your
vehicle beg ins to move. ..,..
 1
1 2
2 3
3 4
4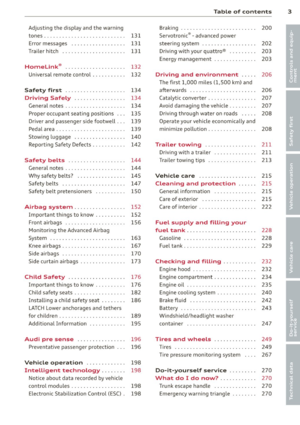 5
5 6
6 7
7 8
8 9
9 10
10 11
11 12
12 13
13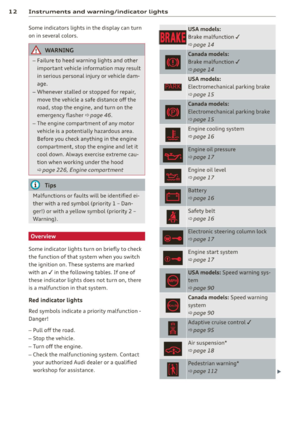 14
14 15
15 16
16 17
17 18
18 19
19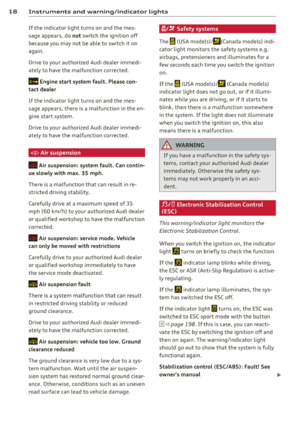 20
20 21
21 22
22 23
23 24
24 25
25 26
26 27
27 28
28 29
29 30
30 31
31 32
32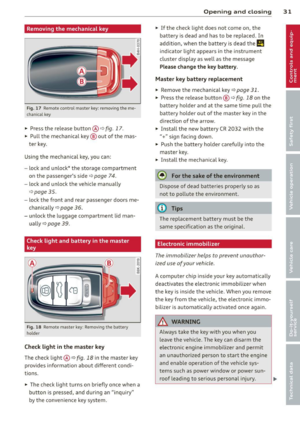 33
33 34
34 35
35 36
36 37
37 38
38 39
39 40
40 41
41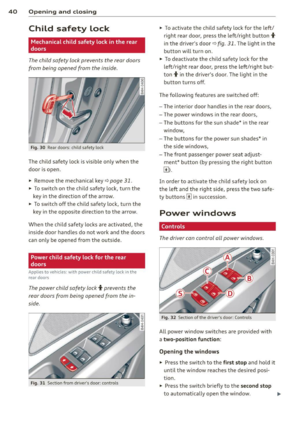 42
42 43
43 44
44 45
45 46
46 47
47 48
48 49
49 50
50 51
51 52
52 53
53 54
54 55
55 56
56 57
57 58
58 59
59 60
60 61
61 62
62 63
63 64
64 65
65 66
66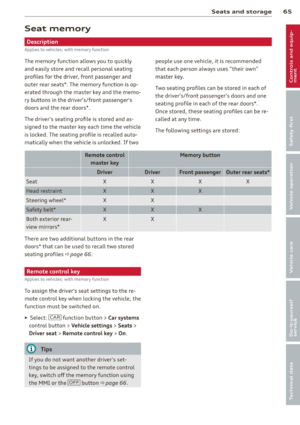 67
67 68
68 69
69 70
70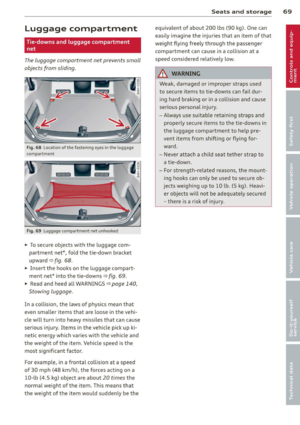 71
71 72
72 73
73 74
74 75
75 76
76 77
77 78
78 79
79 80
80 81
81 82
82 83
83 84
84 85
85 86
86 87
87 88
88 89
89 90
90 91
91 92
92 93
93 94
94 95
95 96
96 97
97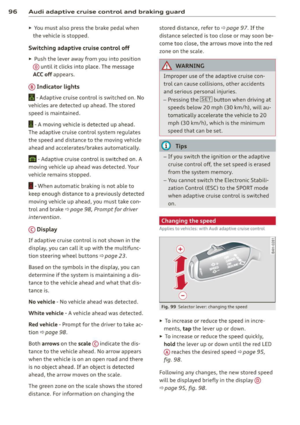 98
98 99
99 100
100 101
101 102
102 103
103 104
104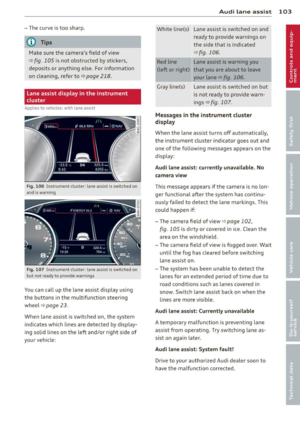 105
105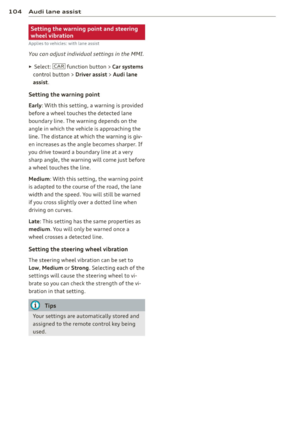 106
106 107
107 108
108 109
109 110
110 111
111 112
112 113
113 114
114 115
115 116
116 117
117 118
118 119
119 120
120 121
121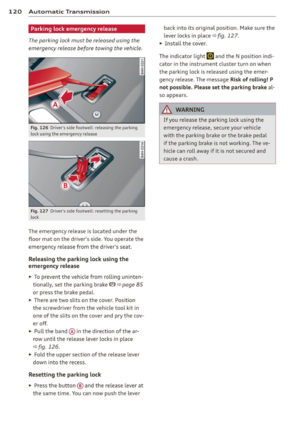 122
122 123
123 124
124 125
125 126
126 127
127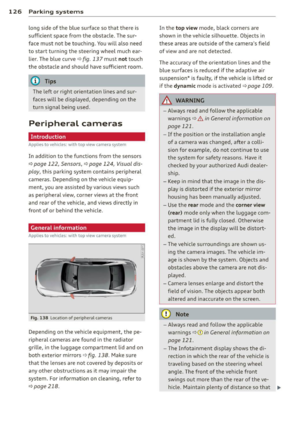 128
128 129
129 130
130 131
131 132
132 133
133 134
134 135
135 136
136 137
137 138
138 139
139 140
140 141
141 142
142 143
143 144
144 145
145 146
146 147
147 148
148 149
149 150
150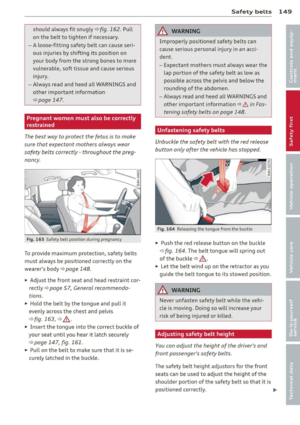 151
151 152
152 153
153 154
154 155
155 156
156 157
157 158
158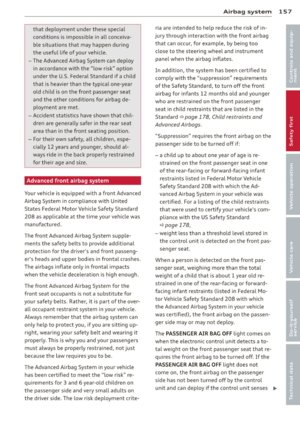 159
159 160
160 161
161 162
162 163
163 164
164 165
165 166
166 167
167 168
168 169
169 170
170 171
171 172
172 173
173 174
174 175
175 176
176 177
177 178
178 179
179 180
180 181
181 182
182 183
183 184
184 185
185 186
186 187
187 188
188 189
189 190
190 191
191 192
192 193
193 194
194 195
195 196
196 197
197 198
198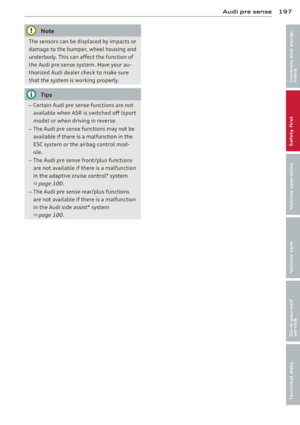 199
199 200
200 201
201 202
202 203
203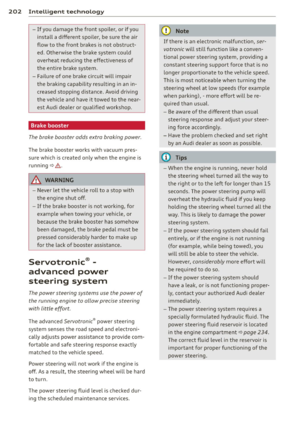 204
204 205
205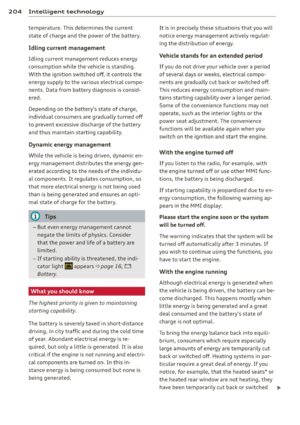 206
206 207
207 208
208 209
209 210
210 211
211 212
212 213
213 214
214 215
215 216
216 217
217 218
218 219
219 220
220 221
221 222
222 223
223 224
224 225
225 226
226 227
227 228
228 229
229 230
230 231
231 232
232 233
233 234
234 235
235 236
236 237
237 238
238 239
239 240
240 241
241 242
242 243
243 244
244 245
245 246
246 247
247 248
248 249
249 250
250 251
251 252
252 253
253 254
254 255
255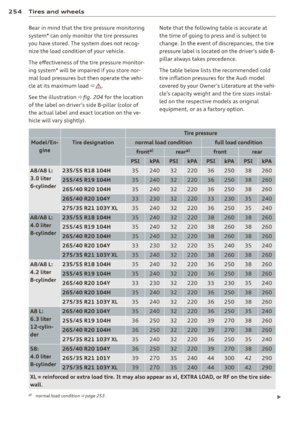 256
256 257
257 258
258 259
259 260
260 261
261 262
262 263
263 264
264 265
265 266
266 267
267 268
268 269
269 270
270 271
271 272
272 273
273 274
274 275
275 276
276 277
277 278
278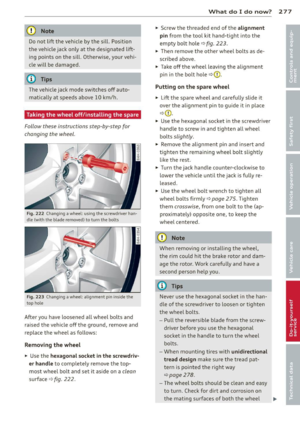 279
279 280
280 281
281 282
282 283
283 284
284 285
285 286
286 287
287 288
288 289
289 290
290 291
291 292
292 293
293 294
294 295
295 296
296 297
297 298
298 299
299 300
300 301
301 302
302 303
303 304
304 305
305 306
306 307
307 308
308 309
309 310
310 311
311 312
312 313
313 314
314 315
315 316
316 317
317