2012 MERCEDES-BENZ SL ROADSTER service
[x] Cancel search: servicePage 497 of 637
Media Interface mode
Connection options Overview
You will find the connection sockets in the
centre console stowage compartment.
Device-specific adapter cables are required
to connect external devices to the Media
Interface. These are supplied in country-spe-
cific versions with the Media Interface
(Y
page 494).
You can connect the following data carriers to
COMAND Online via the Media Interface:
R iPod ®
R iPhone ®
R certain MP3 players
i Store individual parts in a safe place.
Only use genuine Mercedes-Benz connec-
tion cables.
i iPod ®
and iPhone ®
are registered trade-
marks of Apple Inc., Cupertino, California,
USA.
i MP3 players that support MTP (
Media
Transfer Protocol) can be used.
This allows the MP3 player to be easily con- nected to the Media Interface and removed
after use. Audio data is played without
problems.
On some MP3 players, you have to activate
the relevant function; see the MP3 player
operating instructions.
Supported devices
For further details and a list of supported
devices, contact a Mercedes-Benz Service
Centre or visit the website at http://
www.mercedes-benz-mobile.com/
connect. Then, follow the instructions in the
"Media Interface" section. Connecting an external device Do not leave external devices in the vehicle.
At extreme temperatures, they cannot be
guaranteed to function correctly (see the
operating instructions of the device in ques-
tion). Examples of extreme temperatures are direct sunlight or very low outside tempera-
tures. Mercedes-Benz accepts no liability for
damage to external devices.
i Never connect more than one device at a
time. You will otherwise not be able to play
back from the external device.
USB hubs (devices with several USB con-
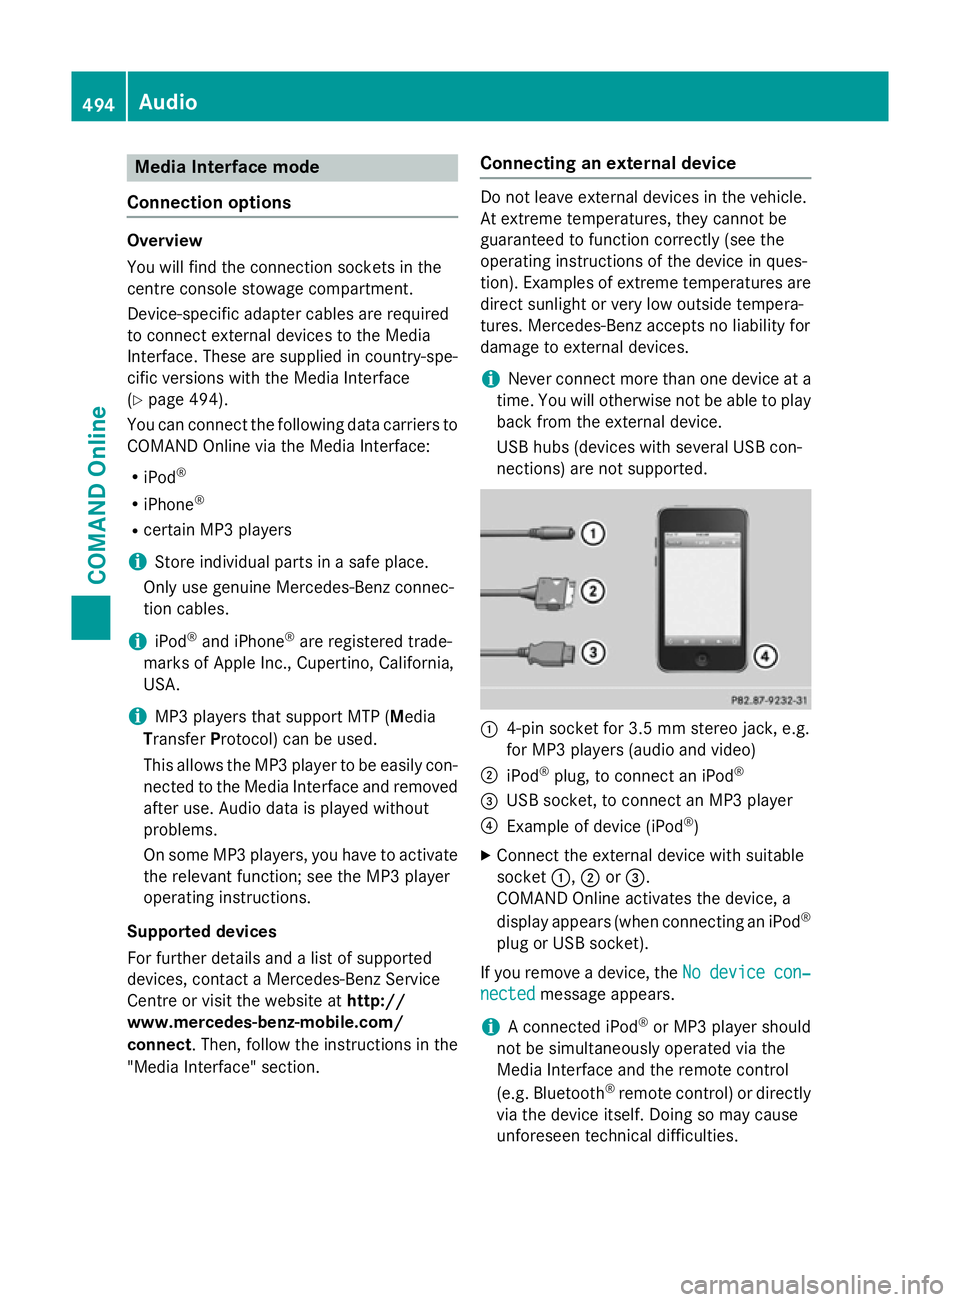
nections) are not supported. :
4-pin socket for 3.5 mm stereo jack, e.g.
for MP3 players (audio and video)
; iPod ®
plug, to connect an iPod ®
= USB socket, to connect an MP3 player
? Example of device (iPod ®
)
X Connect the external device with suitable
socket :,;or=.
COMAND Online activates the device, a
display appears (when connecting an iPod ®
plug or USB socket).
If you remove a device, the No Nodevice
device con‐
con‐
nected
nected message appears.
i A connected iPod ®
or MP3 player should
not be simultaneously operated via the
Media Interface and the remote control
(e.g. Bluetooth ®
remote control) or directly
via the device itself. Doing so may cause
unforeseen technical difficulties. 494
AudioCOMAND Online
Page 498 of 637
Applications (Apps) that are activated on
the connected device may lead to malfunc-
tions.
i Connecting a fully discharged iPod ®
or
MP3 player can result in an extended initi-
alisation period.
Error messages appear while the device is
being activated if:
R the connected device is not supported
(External device unavailable External device unavailable mes-
sage).
R the connected device consumes too much
power.
R the Media Interface connection is faulty.
R a mass storage device (e.g. USB memory
stick or USB hard drive) is connected to the Media Interface.
In this case the Please connect the Please connect the
device to the other USB port
device to the other USB port mes-
sage appears.
i The separate USB connection ensures
quick access and expanded media content
options.
i Information is available at any Mercedes-
Benz Service Centre.
Disconnecting an iPod ®
X Press the release buttons on iPod ®
plug ;
and pull the iPod ®
cable from the iPod ®
,
see the separate cable kit instructions.
Switching to Media Interface mode General notes
In extreme cases, starting up individual func-
tions can take up to several minutes; this
depends on the external device and its con-
tent (e.g. video podcasts).
Only use the original software to save files on
iPods ®
or MP3 players. Otherwise, some or all
functions may not be available. Switching on automatically
X Connect an external device (Y page 494).
COMAND Online activates the device (if
connected via the iPod ®
connector or USB
socket). The basic display then appears.
Switching on with the function button
The external device is connected to the Media Interface.
X Press the hfunction button one or more
times.
By pressing the function button repeatedly,
you can change the operating mode in the
following order: R audio CD/DVD/MP3 (disc)
R memory card mode
R MUSIC REGISTER
R USB memory
R Media Interface or audio AUX mode
R operation with Bluetooth ®
audio
Switching on using a number key
X Press the inumber key (for a DVD
changer) or the onumber key (for a
single DVD drive) number key.
This selects the connected external audio
device directly.
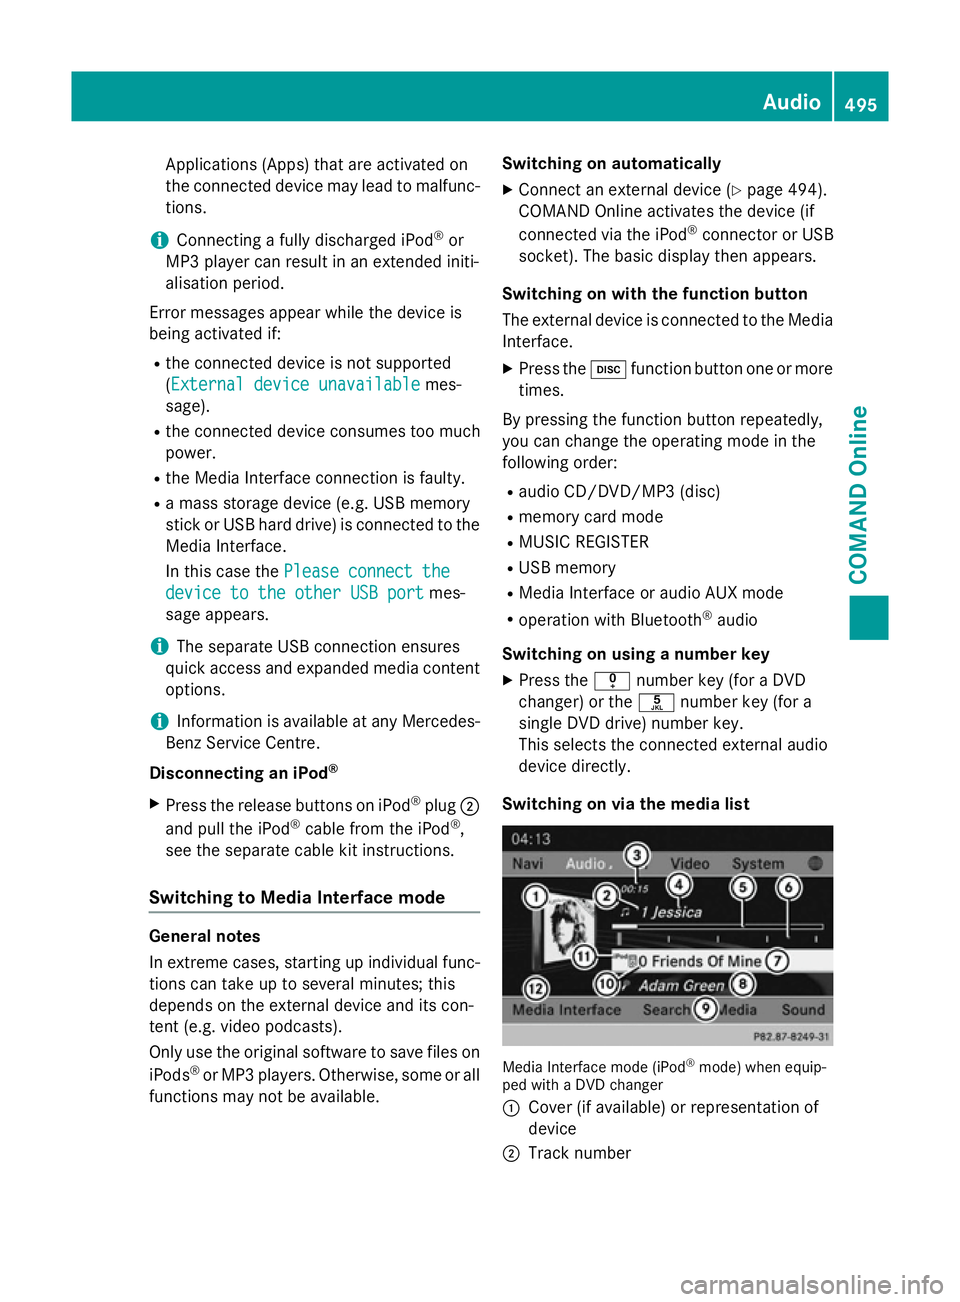
Switching on via the media list Media Interface mode (iPod
®
mode) when equip-
ped with a DVD changer
: Cover (if available) or representation of
device
; Track number Audio
495COMAND Online Z
Page 510 of 637
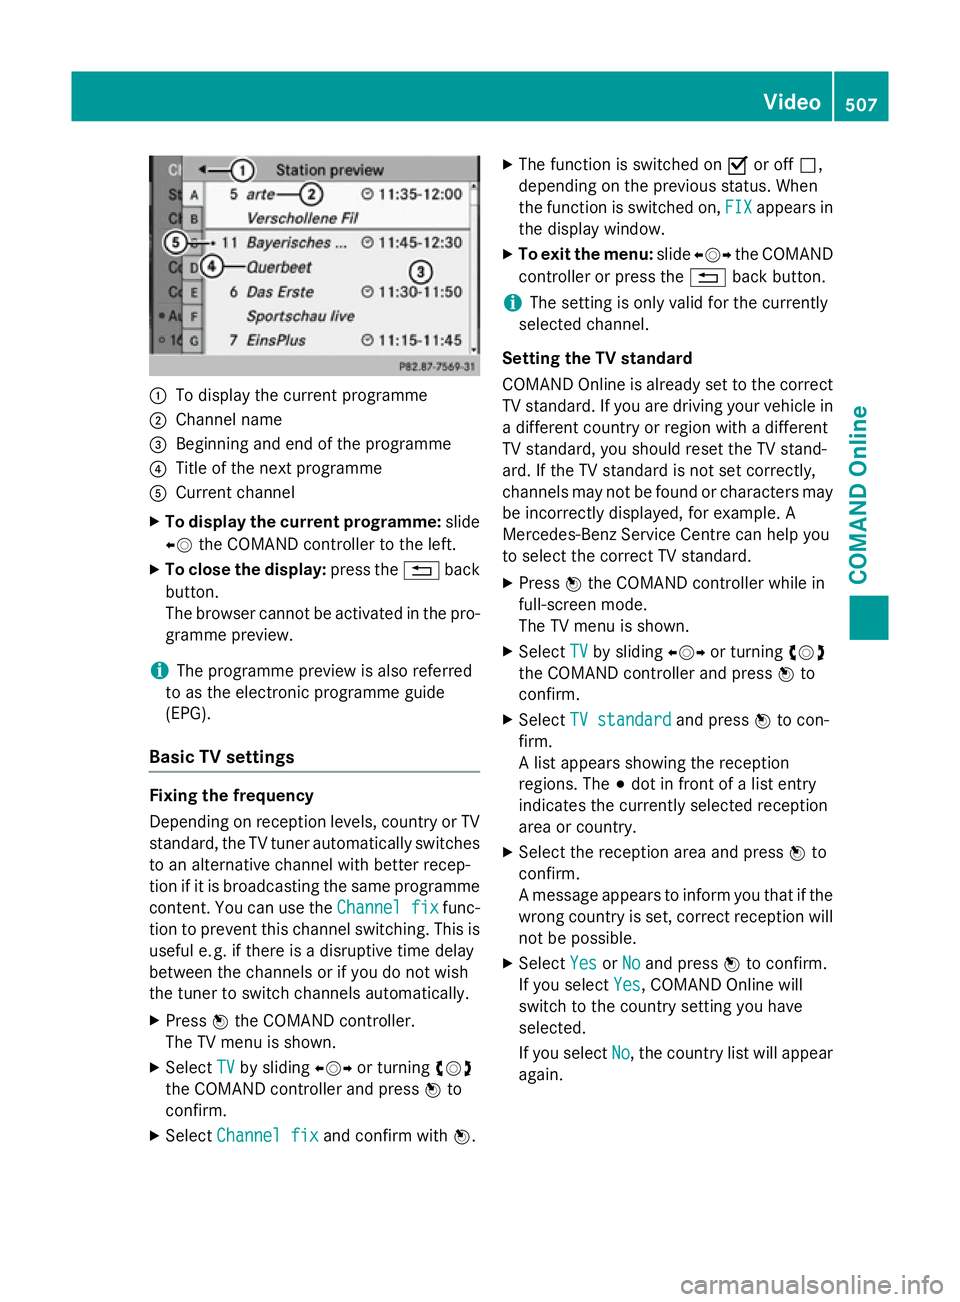
:
To display the current programme
; Channel name
= Beginning and end of the programme
? Title of the next programme
A Current channel
X To display the current programme: slide
XV the COMAND controller to the left.
X To close the display: press the%back
button.
The browser cannot be activated in the pro- gramme preview.
i The programme preview is also referred
to as the electronic programme guide
(EPG).
Basic TV settings Fixing the frequency
Depending on reception levels, country or TV
standard, the TV tuner automatically switches
to an alternative channel with better recep-
tion if it is broadcasting the same programme
content. You can use the Channel fix Channel fixfunc-
tion to prevent this channel switching. This is useful e. g. if there is a disruptive time delay
between the channels or if you do not wish
the tuner to switch channels automatically.
X Press Wthe COMAND controller.
The TV menu is shown.
X Select TV
TV by sliding XVYor turning cVd
the COMAND controller and press Wto
confirm.
X Select Channel fix
Channel fix and confirm with W.X
The function is switched on Oor off ª,
depending on the previous status. When
the function is switched on, FIX FIXappears in
the display window.
X To exit the menu: slideXVY the COMAND
controller or press the %back button.
i The setting is only valid for the currently
selected channel.
Setting the TV standard
COMAND Online is already set to the correct TV standard. If you are driving your vehicle in
a different country or region with a different
TV standard, you should reset the TV stand-
ard. If the TV standard is not set correctly,
channels may not be found or characters may be incorrectly displayed, for example. A
Mercedes-Benz Service Centre can help you
to select the correct TV standard.
X Press Wthe COMAND controller while in
full-screen mode.
The TV menu is shown.
X Select TV TVby sliding XVYor turning cVd
the COMAND controller and press Wto
confirm.
X Select TV standard
TV standard and pressWto con-
firm.
A list appears showing the reception
regions. The #dot in front of a list entry
indicates the currently selected reception
area or country.
X Select the reception area and press Wto
confirm.
A message appears to inform you that if the
wrong country is set, correct reception will not be possible.
X Select Yes YesorNo
No and press Wto confirm.
If you select Yes
Yes, COMAND Online will
switch to the country setting you have
selected.
If you select No No, the country list will appear
again. Video
507COMAND Online Z
Page 511 of 637
Teletext
Introduction
Teletext and data service functions are not
supported by all TV standards in all countries.
Teletext can only be received if there is no
interference in the picture reception. The tel-
etext or data service functions receive and
save all teletext pages for the currently selec- ted channel in the system memory. This
excludes any subpages. If you set a different
channel, the memory is cleared and refilled.
Switching teletext on/off X
Press Wthe COMAND controller while in
full-screen mode.
The TV menu is shown.
X To switch on: selectTeletext Teletext by sliding
XVY and turning cVdthe COMAND con-
troller and press Wto confirm.
X To switch off: press the%back button.
The TV picture appears.
Selecting a teletext page
X To access a page directly: press the cor-
responding number keys.
X To access the previous/next page: turn
cVd or slide ZVÆthe COMAND controller.
i You can only enter pages that are permis-
sible for teletext between 100 and 899.
Dynamic teletext page
A dynamic teletext page may be available.
This page consists of multiple sub-pages that are displayed at the bottom of the display via
1, 2,3,4, etc. X
To select a subpage: slide
XVY the COMAND controller.
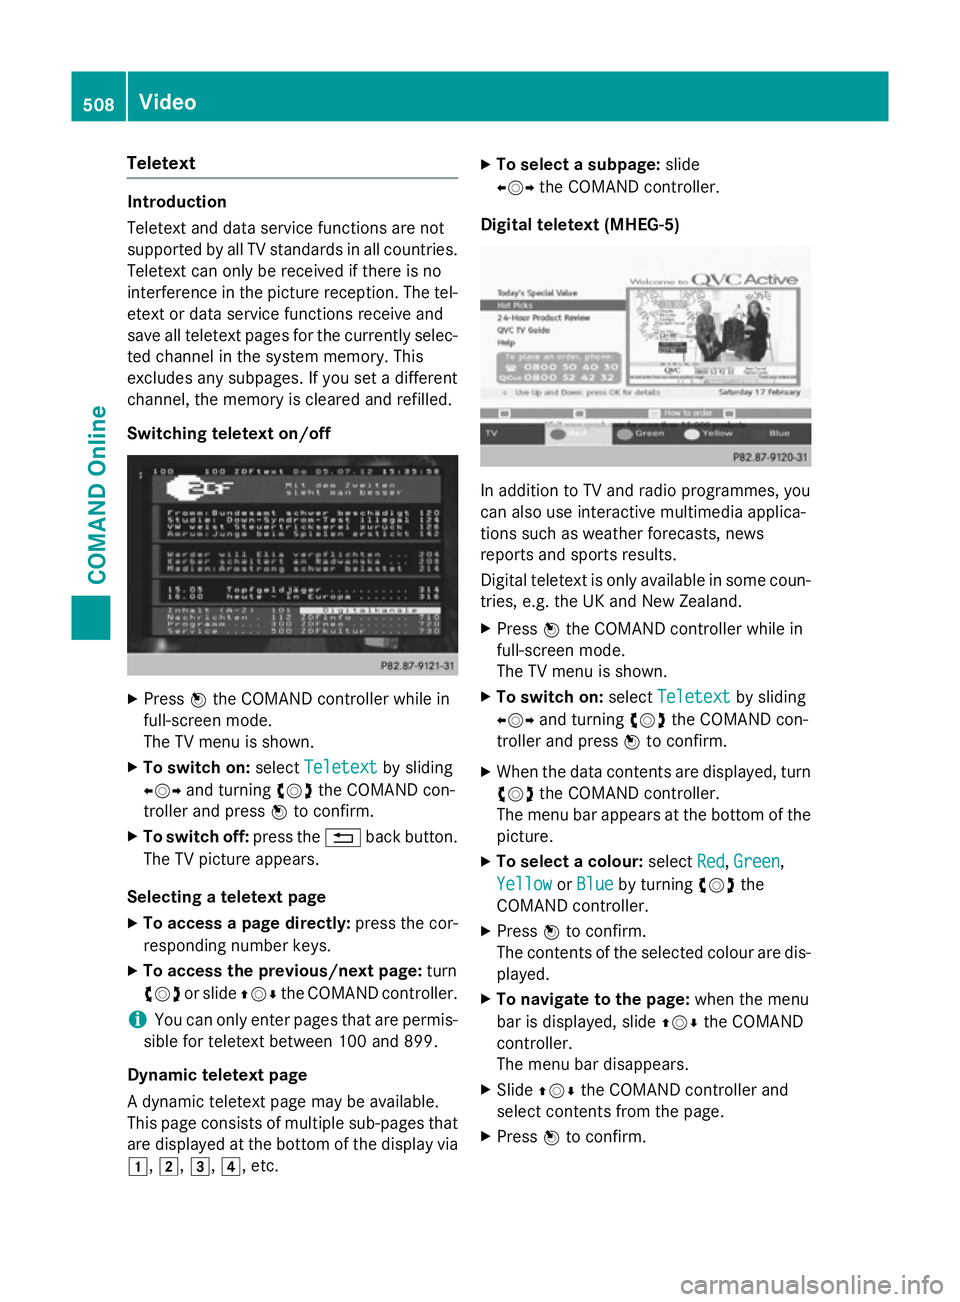
Digital teletext (MHEG-5) In addition to TV and radio programmes, you
can also use interactive multimedia applica-
tions such as weather forecasts, news
reports and sports results.
Digital teletext is only available in some coun-
tries, e.g. the UK and New Zealand.
X Press Wthe COMAND controller while in
full-screen mode.
The TV menu is shown.
X To switch on: selectTeletext Teletext by sliding
XVY and turning cVdthe COMAND con-
troller and press Wto confirm.
X When the data contents are displayed, turn
cVd the COMAND controller.
The menu bar appears at the bottom of the
picture.
X To select a colour: selectRed
Red,Green
Green,
Yellow
Yellow orBlue
Blue by turning cVdthe
COMAND controller.
X Press Wto confirm.
The contents of the selected colour are dis- played.
X To navigate to the page: when the menu
bar is displayed, slide ZVÆthe COMAND
controller.
The menu bar disappears.
X Slide ZVÆ the COMAND controller and
select contents from the page.
X Press Wto confirm. 508
VideoCOMAND Online
Page 513 of 637
for programme transmission may appear in
front of the audio language: with audio
explanations (for the visually impaired) in
stereo or for the hearing impaired. If a symbol
does not appear, the programme is either
broadcast in mono or the transmission prop-
erties are unknown.
Subtitles: when this function is activated,
shows subtitles in the selected language for
the programme currently broadcast (if avail-
able).
X In the "Tuner - Further Options" menu, con-
firm Language & Subtitles Language & Subtitles by pressing
W the COMAND controller (Y page 509).
A menu appears.
X To select the language: confirmAudio
Audio
Language
Language by pressing Wthe COMAND
controller.
X Select Prefer COMAND language Prefer COMAND language or one
of the available audio languages.
Switch the setting on Oor off ªor select
an available audio language.
If you select one of the available audio lan-
guages, e.g. English, this setting is used for
the current program only.
X To select subtitles: selectSubtitles Subtitles by
sliding ZVÆor turning cVdthe COMAND
controller and press Wto confirm.
X Select Subtitles
Subtitles and pressWto confirm.
Switch the subtitles on Oor off ª.
X Select Prefer COMAND language
Prefer COMAND language or one
of the available languages for subtitles.
Switch the setting on Oor off ªor select
an available language for subtitles.
If you select one of the available languages
for subtitles, e.g. English, this setting is
used for the current programme.
X To exit the menu: selectBack
Back and press
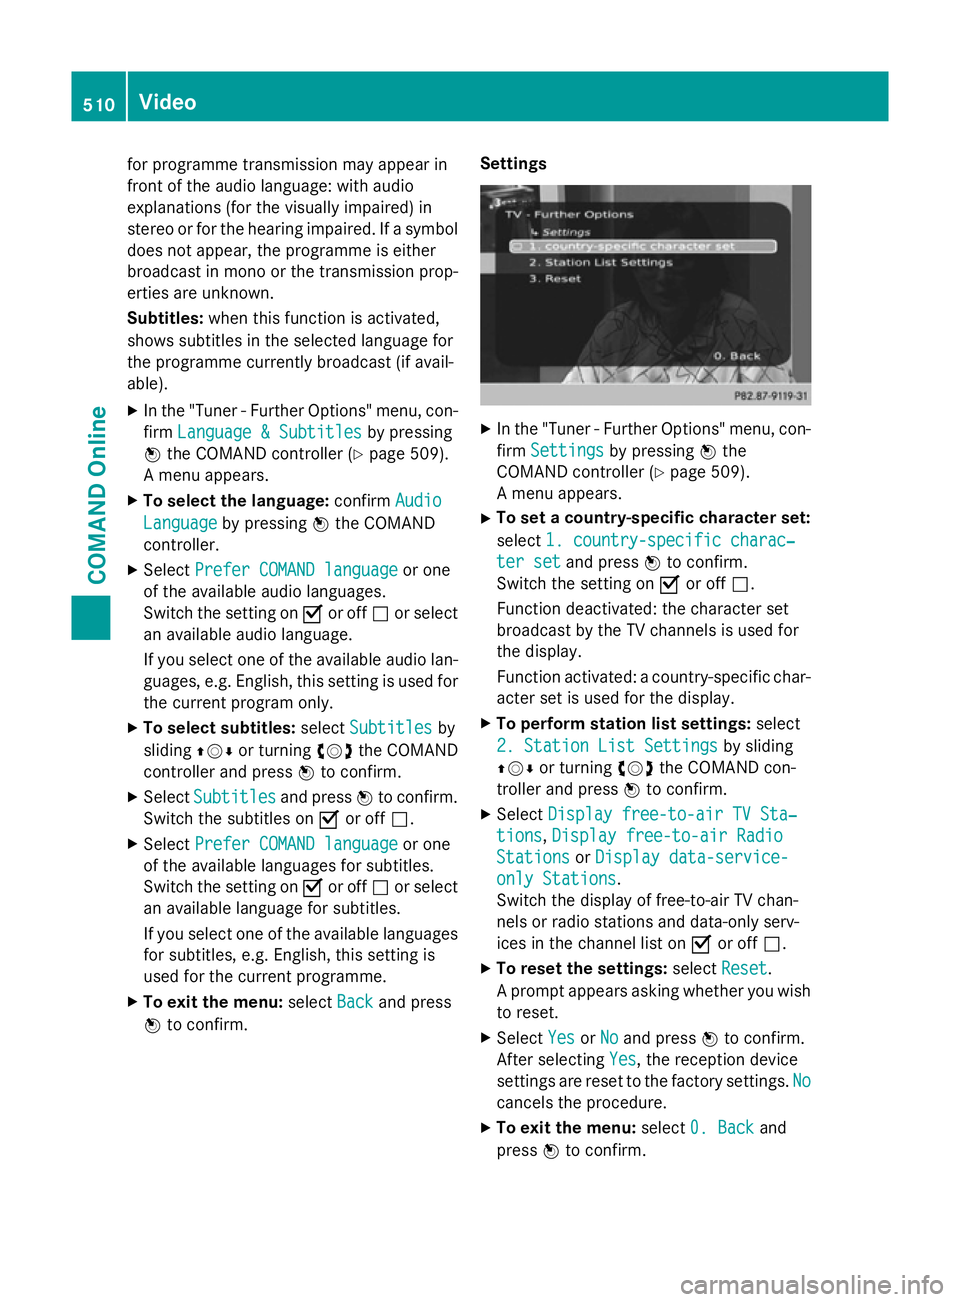
W to confirm. Settings X
In the "Tuner - Further Options" menu, con-
firm Settings Settings by pressing Wthe
COMAND controller (Y page 509).
A menu appears.
X To set a country-specific character set:
select 1. country-specific charac‐ 1. country-specific charac‐
ter set
ter set and press Wto confirm.
Switch the setting on Oor off ª.
Function deactivated: the character set
broadcast by the TV channels is used for
the display.
Function activated: a country-specific char-
acter set is used for the display.
X To perform station list settings: select
2. Station List Settings 2. Station List Settings by sliding
ZVÆ or turning cVdthe COMAND con-
troller and press Wto confirm.
X Select Display free-to-air TV Sta‐
Display free-to-air TV Sta‐
tions
tions, Display free-to-air Radio
Display free-to-air Radio
Stations
Stations orDisplay data-service-
Display data-service-
only Stations
only Stations.
Switch the display of free-to-air TV chan-
nels or radio stations and data-only serv-
ices in the channel list on Oor off ª.
X To reset the settings: selectReset Reset.
A prompt appears asking whether you wish to reset.
X Select Yes
YesorNo
No and press Wto confirm.
After selecting Yes Yes, the reception device
settings are reset to the factory settings. No No
cancels the procedure.
X To exit the menu: select0. Back
0. Back and
press Wto confirm. 510
VideoCOMAND Online
Page 514 of 637
Video DVD mode
Important safety notes G
WARNING
The CD/DVD drive is a class 1 laser product. If you open the housing of the CD/DVD drive,
invisible laser beams may be released. These laser beams may damage your retina. There is
a risk of injury.
You must not open the casing. Always have
maintenance work and repairs carried out at a
qualified specialist workshop. G
WARNING
Handling discs while driving will distract you
from traffic conditions. You could then lose
control of the vehicle. There is a risk of an
accident.
Handle discs only when the vehicle is station- ary.
Bear in mind that, at a speed of only 50 km/h, your vehicle is already covering a distance of
14 m per second.
Notes on discs !
Do not affix stickers or labels to the discs.
They could peel off and damage
COMAND Online. Stickers can cause the
disc to bend, which can result in read errors
and disc recognition problems.
! COMAND Online is designed to play discs
which comply with the EN 60908 standard. Therefore, you can only use discs with a
maximum thickness of 1.3 mm.
If you insert thicker discs, e.g. those that
contain data on both sides (DVD on one
side and audio data on the other), they can-
not be ejected and can damage the device.
Only use round discs with a diameter of
12 cm. Do not use discs with a diameter of
8 cm, even with an adapter.
You may encounter playback problems when
playing copied discs. There are a large variety of discs, DVD authoring software, writing software and writers available. This variety
means that there is no guarantee that the
system will be able to play discs that you have
copied yourself.
DVD playback requirements There are video DVDs available on the market
that do not conform to the current standards. Such DVDs may have picture, sound or other playback problems.
COMAND Online is capable of playing back
video DVDs produced according to the fol-
lowing standards:
R Region code 2 (for Europe) or region code 0
(no region code)
R PAL or NTSC standard
You will generally find the relevant details
either on the DVD itself or on the DVD case.
i If you insert a video DVD with a different
region code, you will see a message to this
effect.
i COMAND Online is set to region code 2 at
the factory. This setting can be changed at
a Mercedes-Benz Service Centre. This will
allow you to play video DVDs with a differ-
ent region code, provided that they are pro-
duced in accordance with the PAL or NTSC standard. The region code can be changed
a maximum of five times.
Function restrictions Depending on the DVD, it is possible that cer-
tain functions or actions will be temporarily
blocked or may not function at all. As soon as
you try to activate these functions or actions, you will see the Ksymbol in the display.
Inserting and removing DVDs X
Proceed as described in the "Inserting and
ejecting CDs and DVDs" section
(Y page 469). Video
511COMAND Online Z
Page 519 of 637
Subtitles and camera angle
These functions are not available on all DVDs.
The number of subtitle languages and camera
angles available depends on the content of
the DVD. It may also be possible to access the settings from the DVD menu.
X Show the DVD menu (Y page 514).
X Select DVD-Video DVD-Video in the menu by turning
cVd the COMAND controller and press W
to confirm.
X Select DVD functions
DVD functions and pressWto
confirm.
X Select Subtitles
Subtitles orCamera angle
Camera angle and
press Wto confirm.
In both cases, a menu appears. The #dot in
front of an entry indicates the current set-
ting.
X Select a setting by turning cVdthe
COMAND controller and press Wto con-
firm.
Interactive content DVDs may contain interactive content (e.g. a
video game). In a video game, for example,
you may be able to influence events by select- ing and triggering actions. The type and num- ber of actions depend on the DVD.
X Select an action by sliding ZVÆorXVY the
COMAND controller and press Wto exe-
cute it.
A menu appears and the first entry, Select Select,
is highlighted.
X Press Wthe COMAND controller. Video AUX operation
Connecting external video sources External video sources may have different
volumes, which can mean that system mes-
sages such as traffic announcements and
navigation system announcements are much louder. If necessary, deactivate the system
messages or adjust their volume manually. If your vehicle is equipped with the Media
Interface, you can connect an external video
source.
You require an additional audio/video cable
set to connect an external video source to the
Media Interface.
For more details, please contact a Mercedes- Benz Service Centre or visit http://
www.mercedes-benz.com/connect . Then,
follow the instructions in the "Media Inter-
face" section.
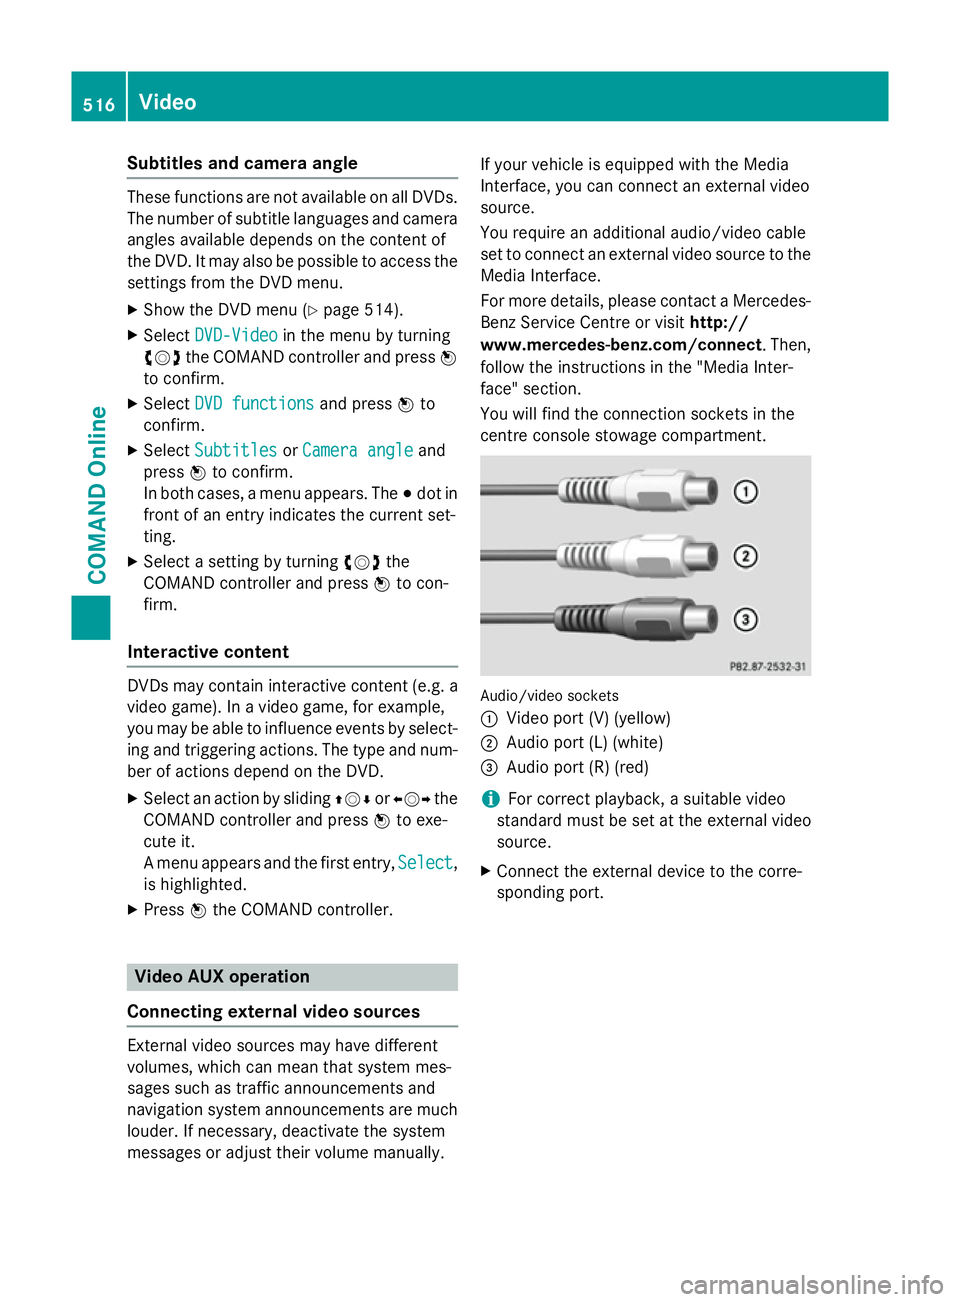
You will find the connection sockets in the
centre console stowage compartment. Audio/video sockets
:
Video port (V) (yellow)
; Audio port (L) (white)
= Audio port (R) (red)
i For correct playback, a suitable video
standard must be set at the external video
source.
X Connect the external device to the corre-
sponding port. 516
VideoCOMAND Online
Page 544 of 637
MP3 mode
X To select a track by skipping to a track:
press the =or; button on the
remote control.
or X Press the EorF button.
The skip forward function skips to the next track.
If the elapsed track time has exceeded 8
seconds, the function skips back to the
beginning of the track.
If the elapsed track time is less than 8 sec- onds, the function skips back to the begin-
ning of the previous track.
X To select a folder: press the:button
on the remote control.
X Highlight one of the two folder symbols
with the =or; button and press 9
to confirm.
Depending on your selection, the previous
or next folder is selected and the first track
is played.
Additional setting option:
R Adjusting the sound settings (Y page 525)
Video DVD mode X To hide a menu: confirmMenu
Menu with the 9
button.
The video image is played in full screen
mode.
Additional setting options: R Adjusting the brightness, contrast and col-
our (Y page 526)
R Changing the picture format (Y page 526)
R Adjusting the sound settings (Y page 525)AUX mode
Introduction You can connect one external video source to
each of the displays of the Rear Seat Enter-
tainment System (AUX display) and also one
external video source to the rear-compart- ment drive (AUX drive) with a sound and video
signal.
Please see the corresponding operating
instructions for information on how to oper-
ate the external video source.
For further details about external video sour- ces, please consult a Mercedes-Benz Service
Centre.
Connecting AUX equipment AUX drive
The AUX drive jacks are located on the
CD/DVD drive on the right next to the
CD/DVD eject button (Y
page 521).
AUX display
The AUX display jacks are on the side of the
screen (Y page 520).
Audio and video connection X Insert the audio plugs for the left and right
signals into the corresponding Land R
jacks.
X Insert the video plug into the Vjack.
Switching to AUX mode AUX drive
X
Select Aux Auxin the menu using the
9=; buttons on the remote
control and press the 9button to confirm.
The AUX menu appears.
X Select Source
Source from the AUX menu and
press the 9button to confirm.
X Select Disc drive Aux
Disc drive Aux and press the9
button to confirm.
You will hear and see the content of the
external video source if it is connected to
the CD/DVD drive and switched to play-
back. If no video image is available from the AUX source connected, you will see an
audio menu. Rear Seat Entertainment System
541COMAND Online Z