2012 MERCEDES-BENZ SL ROADSTER battery
[x] Cancel search: batteryPage 9 of 637
Authorised workshop
see Qualified specialist workshop
AUTO lights
Display message ............................ 257
see Lights
Automatic engine start (ECO start/
stop function) .................................... 159
Automatic engine switch-off (ECO
start/stop function) .......................... 159
Automatic headlamp mode .............. 127
Automatic transmission
Accelerator pedal position ............ .167
Automatic drive program .............. .169
Changing gear ............................... 167
Display message ............................ 269
Driving tips ................................... .167
Emergency running mode .............. 173
Engaging the park position ............ 164
Kickdown ....................................... 167
Manual drive program .................... 169
Manual drive program (vehicles
with Sports package AMG) ............ 170
Overview ........................................ 163
Problem (fault) ............................... 173
Program selector button ................ 167
Pulling away ................................... 158
Selector lever ................................ 163
Starting the engine ........................ 157
Steering wheel gearshift paddle s... 169
Transmission position display ........ 165
Transmission positions .................. 166
Automatic transmission emer-
gency running mode ......................... 173
AUX (audio)
Notes/socket ................................ 500
Switching to ................................... 500
AUX (video)
Connecting an external video
source ............................................ 516
Setting the volume and sound ....... 517
Showing/hiding the menu ............. 517
Switching to ................................... 517
AUX jacks ........................................... 521
CD/DVD drive ............................... 521
Avoiding an area ................................ 379 B
Back button ....................................... 296
BAS (Brake Assist System) ................. 71
BAS PLUS (Brake Assist System
PLUS) .................................................... 72
Battery (key)
Checking .......................................... 87
Important safety notes .................... 87
Replacing ......................................... 88
Battery (vehicle)
Charging ........................................ 584
Display message ............................ 259
Important safety notes .................. 582
Jump starting ................................. 586
Overview ........................................ 582
Belt
see Seat belts
Belt force limiter
Activation ......................................... 60
Function ........................................... 60
Belt tensioner
Activation ......................................... 51
Function ........................................... 60
Bird's-eye view (navigation) ............. 374
Blind Spot Assist
see Active Blind Spot Assist
Bluetooth®
Activating audio mode ................... 491
Activating/deactivating ................. 313
Conditions (telephone) .................. 389
Connecting another mobile
phone ............................................ 393
Connecting audio devices .............. 488
Device list ...................................... 489
Entering the passcode ................... 391
External authorisation .................... 392
General information ....................... 313
Interface ........................................ 388
Introduction ................................... 388
Reconnecting an audio device ....... 490
Searching for a mobile phone ........ 390
Setting s......................................... 313
Telephone basic menu ................... 394
Telephony ...................................... 389
Telephony notes ............................ 387
Bluetooth® audio basic display ....... 4916
Index
Page 19 of 637

Selecting favourites ....................... 455
Selecting/setting access data ....... 434
Internet radio
Calling up ....................................... 454
Searching for stations .................... 454
iPod® ................................. 494, 497, 498
Alphabetic track selection ............. 498
Connecting to Media Interface ...... 494
Selecting a category/playlist ......... 497
ISOFIX child seat securing system .... 64
iTunes® .............................................. 498 J
Jack Storage location ............................ 577
Using ............................................. 607
Jump starting (engine) ...................... 586K
Key Changing the battery ....................... 88
Checking the battery ....................... 87
Convenience opening feature ........ 101
Display message ............................ 272
Door central locking/unlocking ....... 85
Emergency key element ................... 86
Important safety notes .................... 84
Loss ................................................. 89
Modifying the programming ............. 86
Opening/closing the roof .............. 105
Overview .......................................... 84
Positions (ignition lock) ................. 155
Problem (malfunction) ..................... 89
Starting the engine ........................ 157
Key positions
Key ................................................ 155
KEYLESS GO .................................. 155
KEYLESS-GO
Convenience closing ...................... 101
Display message ............................ 272
Locking ............................................ 85
Removing the Start/Stop button ... 156
Start/Stop button .......................... 155
Starting the engine ........................ 157
Unlocking ......................................... 85 Kickdown
Driving tips .................................... 167
Manual drive progra m.................... 171 L
Lamps see Warning and indicator lamps
Lane Keeping Assist
see Active Lane Keeping Assist
Lane recommendations .................... 353
Explanation .................................... 353
Presentation .................................. 353
Lap time (RACETIMER) ...................... 245
Licence plate lamp (display mes-
sage) ................................................... 256
Light sensor (display message) ....... 257
Lights
Activating/deactivating the Intel-
ligent Light System ........................ 240
Activating/deactivating the inte-
rior lighting delayed switch-off ....... 241
Active light function ....................... 131
Automatic headlamp mod e............ 127
Cornering light function ................. 131
Dipped-beam headlamp s............... 127
Driving abroad ............................... 126
Foglamps (extended range) ........... 132
Hazard warning lamps ................... 130
Headlamp flashe r........................... 130
Light switch ................................... 126
Main-beam headlamp s................... 130
Misted up headlamp s.................... 133
Motorway mod e............................. 132
Parking lamps ................................ 129
Rear foglamp ................................. 128
Setting the ambient lighting
brightness (on-board computer) .... 241
Setting the ambient lighting col-
our (on-board computer) ................ 241
Side lamps ..................................... 128
Switching the daytime driving
lights on/off (on-board com-
puter) ............................................. 239
Switching the exterior lighting
delayed switch-off on/off (on-
board computer) ............................ 241
Switching the spotlight on/of f....... 240 16
Index
Page 32 of 637
Locking (in an emergency) ............... 93
Locking (key) ................................... 85
Lowering ........................................ 609
Pulling away ................................... 158
Raising ........................................... 607
Registration ..................................... 34
Securing from rolling away ............ 606
Tow-starting ................................... 588
Towing away .................................. 588
Transporting .................................. 591
Unlocking (in an emergency) ........... 93
Unlocking (key) ................................ 85
Vehicle data ................................... 629
Vehicle battery
see Battery (vehicle)
Vehicle data ....................................... 629
Vehicle dimensions ........................... 629
Vehicle emergency locking ................ 93
Vehicle identification number
see VIN
Vehicle identification plate .............. 622
Vehicle level
Active Body Control (AMG vehi-
cles) ............................................... 202
Active Body Control (except AMG
vehicles) ........................................ 199
Display message ............................ 260
Vehicle tool kit .................................. 577
Video
Operating the DVD ......................... 235
see Video DVD
Video DVD .......................................... 514
Automatic picture shutoff .............. 501
Data carrier .................................... 511
DVD menu ..................................... 514
Fast forward/rewind ...................... 513
Function restrictions ...................... 511
Interactive content ........................ 516
Operation ....................................... 511
Pause function ............................... 513
Playing conditions .......................... 511
Safety notes .................................. 511
Selecting ........................................ 514
Selecting a film/title ...................... 514
Selecting a scene/chapter ............ 513
Setting the audio format ................ 515
Setting the language ...................... 515 Setting the picture ......................... 502
Showing/hiding the menu ............. 512
Showing/hiding the navigation
menu ............................................. 512
Stop function ................................. 513
Subtitles ........................................ 516
Switching on .................................. 512
Video-AUX
Setting the picture ......................... 502
VIN ...................................................... 622 W
Warning and indicator lamps ABS ................................................ 275
Brakes ........................................... 275
Distance warning signal ................. 283
ESP® ............................................. 277
ESP® OFF ...................................... 278
LIM (cruise control) ........................ 182
LIM (DISTRONIC PLUS) .................. 186
LIM (variable SPEEDTRONIC) ......... 194
Overview .......................................... 42
PASSENGER AIRBAG OFF ................ 63
Reserve fuel ................................... 280
Seat belt ........................................ 274
SRS ................................................ 280
Tyre pressure monitor ................... 284
Warning triangle ................................ 576
Washer fluid
Display message ............................ 272
Waypoints .......................... 335, 337, 338
Accepting waypoints for the
route .............................................. 338
Creating ......................................... 335
Editing ........................................... 337
Entering ......................................... 335
Searching for a filling station when the fuel level is lo w........................ 338
Weather display (COMAND
Online) ........................................ 447, 448
Calling up the weather map ........... 448
Information chart ........................... 447
Selecting locations in the informa-
tion chart ....................................... 447
Selecting the location .................... 447
Selecting the location in the
weather map .................................. 448 Index
29
Page 37 of 637
G
WARNING
If you connect equipment to a diagnostics
connection in the vehicle, it can affect the
operation of the vehicle systems. This may
affect the operating safety of the vehicle.
There is a risk of an accident.
Do not connect any equipment to a diagnos-
tics connection in the vehicle. G
WARNING
Objects in the driver's footwell may restrict
the clearance around the pedals or block a
depressed pedal. This jeopardises the oper-
ating and road safety of the vehicle. There is a risk of an accident.
Stow all objects securely in the vehicle so that
they do not get into the driver's footwell.
Always fit the floormats securely and as pre-
scribed in order to ensure that there is always sufficient room for the pedals. Do not use
loose floormats and do not place several floor- mats on top of one another.
! If the engine is switched off and equip-
ment on the diagnostics connection is
used, the starter battery may discharge.
Connecting equipment to the diagnostics
connection can lead to emissions monitoring information being reset, for example. This
may lead to the vehicle failing to meet the
requirements of the next emissions test dur-
ing the main inspection. Qualified specialist workshop
A qualified specialist workshop has the nec-
essary special skills, tools and qualifications
to correctly carry out any necessary work on
your vehicle. This particularly applies to work
relevant to safety.
Observe the notes in the Service Booklet.
Always have the following work carried out at a qualified specialist workshop:
R work relevant to safety
R service and maintenance work R
repair work
R modifications, installations and conver-
sions
R work on electronic components
Mercedes-Benz recommends that you use a
Mercedes-Benz Service Centre. Vehicle registration
Mercedes-Benz may ask its Service Centres
to carry out technical inspections on certain
vehicles. The quality or safety of the vehicle is
improved as a result of the inspection.
Mercedes-Benz can only inform you about
vehicle checks if it has your registration data.
It is possible that your vehicle has not yet
been registered in your name in the following
cases:
R if your vehicle was not purchased at an
authorised specialist dealer.
R if your vehicle has not yet been examined at
a Mercedes-Benz Service Centre.
It is advisable to register your vehicle with a
Mercedes-Benz Service Centre.
Inform Mercedes-Benz as soon as possible
about any change in address or vehicle own-
ership. You can do this at a Mercedes-Benz
Service Centre, for example. Correct use
If you remove any warning stickers, you or
others could fail to recognise certain dangers.
Leave warning stickers in position.
Observe the following information when driv- ing your vehicle:
R the safety notes in this manual
R the technical data in this manual
R traffic rules and regulations
R laws and safety standards pertaining to
motor vehicles 34
Introduction
Page 89 of 637
X
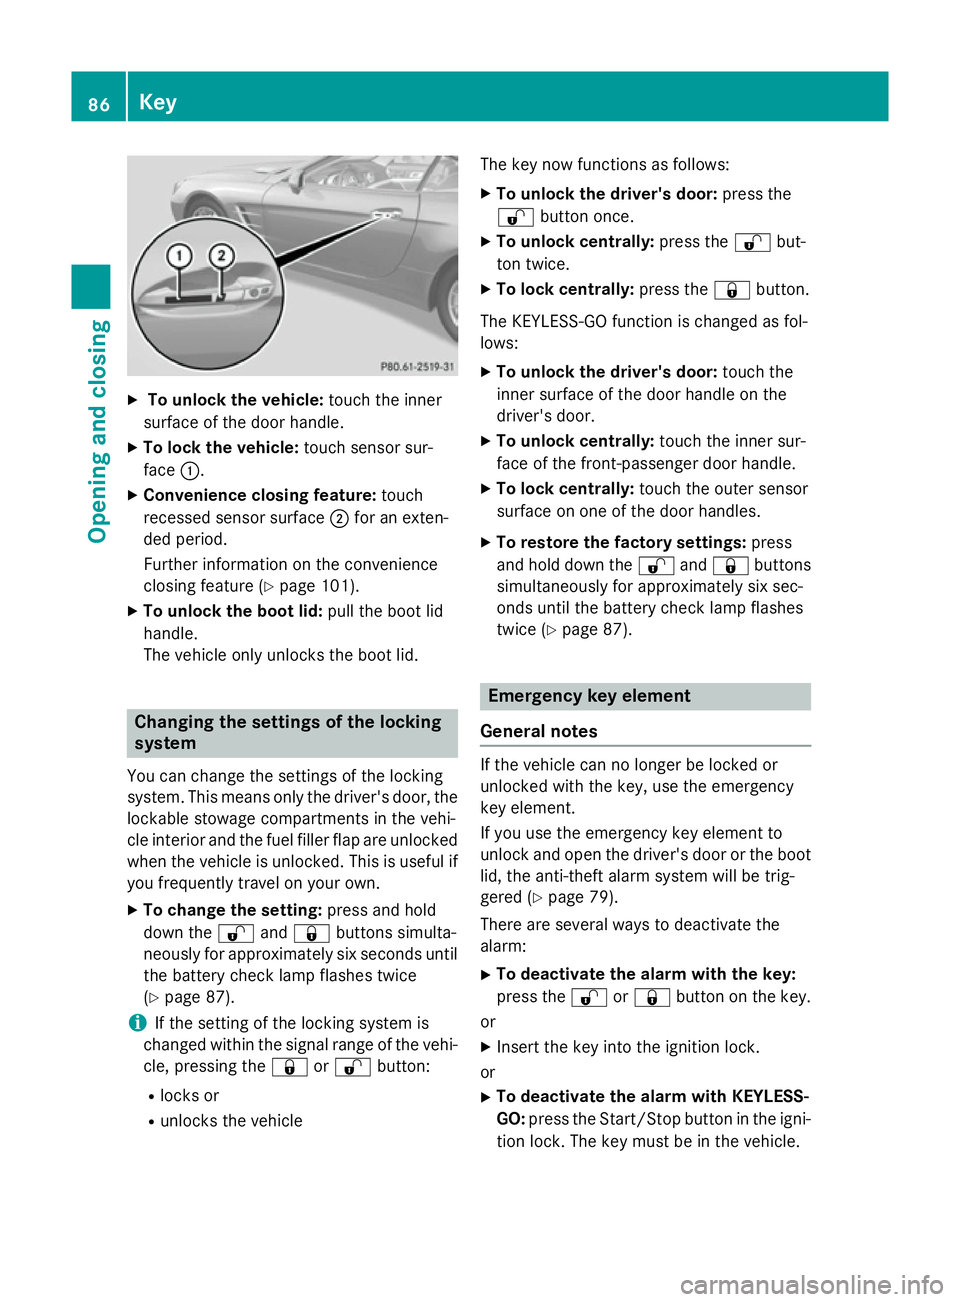
To unlock the vehicle: touch the inner
surface of the door handle.
X To lock the vehicle: touch sensor sur-
face :.
X Convenience closing feature: touch
recessed sensor surface ;for an exten-
ded period.
Further information on the convenience
closing feature (Y page 101).
X To unlock the boot lid: pull the boot lid
handle.
The vehicle only unlocks the boot lid. Changing the settings of the locking
system
You can change the settings of the locking
system. This means only the driver's door, the
lockable stowage compartments in the vehi-
cle interior and the fuel filler flap are unlocked when the vehicle is unlocked. This is useful if
you frequently travel on your own.
X To change the setting: press and hold
down the %and& buttons simulta-
neously for approximately six seconds until the battery check lamp flashes twice
(Y page 87).
i If the setting of the locking system is
changed within the signal range of the vehi- cle, pressing the &or% button:
R locks or
R unlocks the vehicle The key now functions as follows:
X To unlock the driver's door: press the
% button once.
X To unlock centrally: press the%but-
ton twice.
X To lock centrally: press the&button.
The KEYLESS-GO function is changed as fol-
lows:
X To unlock the driver's door: touch the
inner surface of the door handle on the
driver's door.
X To unlock centrally: touch the inner sur-
face of the front-passenger door handle.
X To lock centrally: touch the outer sensor
surface on one of the door handles.
X To restore the factory settings: press
and hold down the %and& buttons
simultaneously for approximately six sec-
onds until the battery check lamp flashes
twice (Y page 87). Emergency key element
General notes If the vehicle can no longer be locked or
unlocked with the key, use the emergency
key element.
If you use the emergency key element to
unlock and open the driver's door or the boot
lid, the anti-theft alarm system will be trig-
gered (Y page 79).
There are several ways to deactivate the
alarm:
X To deactivate the alarm with the key:
press the %or& button on the key.
or
X Insert the key into the ignition lock.
or
X To deactivate the alarm with KEYLESS-
GO: press the Start/Stop button in the igni-
tion lock. The key must be in the vehicle. 86
KeyOpening and closing
Page 90 of 637
or
X Lock or unlock the vehicle using KEYLESS-
GO. The key must be outside the vehicle.
If you unlock the vehicle using the emergency
key element, the fuel filler flap will not auto-
matically be unlocked.
X To unlock the fuel filler flap: insert the
key into the ignition lock.
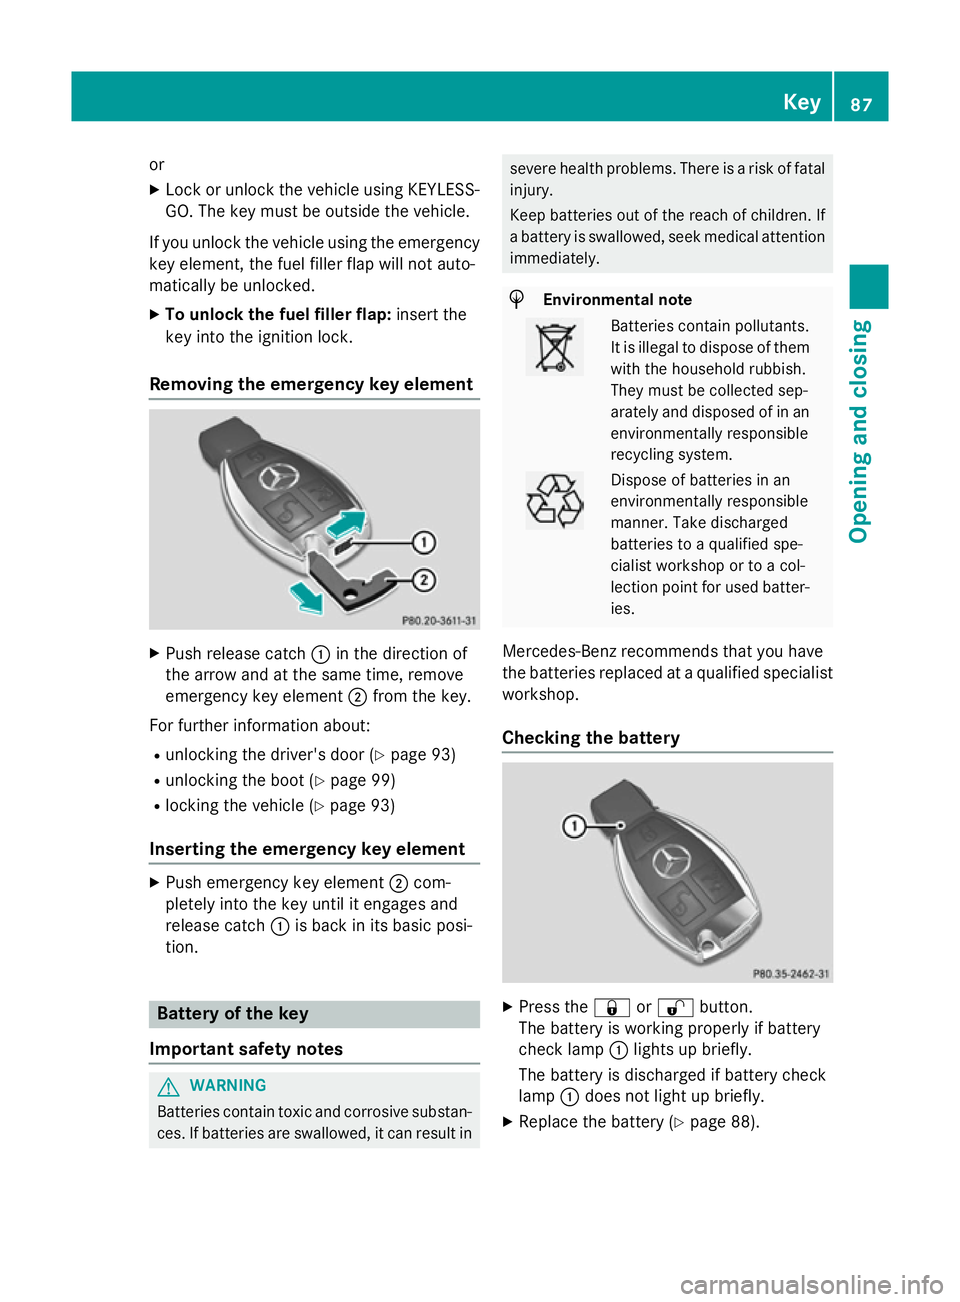
Removing the emergency key element X
Push release catch :in the direction of
the arrow and at the same time, remove
emergency key element ;from the key.
For further information about: R unlocking the driver's door (Y page 93)
R unlocking the boot (Y page 99)
R locking the vehicle (Y page 93)
Inserting the emergency key element X
Push emergency key element ;com-
pletely into the key until it engages and
release catch :is back in its basic posi-
tion. Battery of the key
Important safety notes G
WARNING
Batteries contain toxic and corrosive substan- ces. If batteries are swallowed, it can result in severe health problems. There is a risk of fatal
injury.
Keep batteries out of the reach of children. If
a battery is swallowed, seek medical attention immediately. H
Environmental note Batteries contain pollutants.
It is illegal to dispose of them
with the household rubbish.
They must be collected sep-
arately and disposed of in anenvironmentally responsible
recycling system. Dispose of batteries in an
environmentally responsible
manner. Take discharged
batteries to a qualified spe-
cialist workshop or to a col-
lection point for used batter-
ies.
Mercedes-Benz recommends that you have
the batteries replaced at a qualified specialist workshop.
Checking the battery X
Press the &or% button.
The battery is working properly if battery
check lamp :lights up briefly.
The battery is discharged if battery check
lamp :does not light up briefly.
X Replace the battery (Y page 88). Key
87Opening and closing Z
Page 91 of 637
i
If the key battery is checked within the
signal reception range of the vehicle, press- ing the &or% button:
R locks or
R unlocks the vehicle
i You can obtain a battery from any quali-
fied specialist workshop.
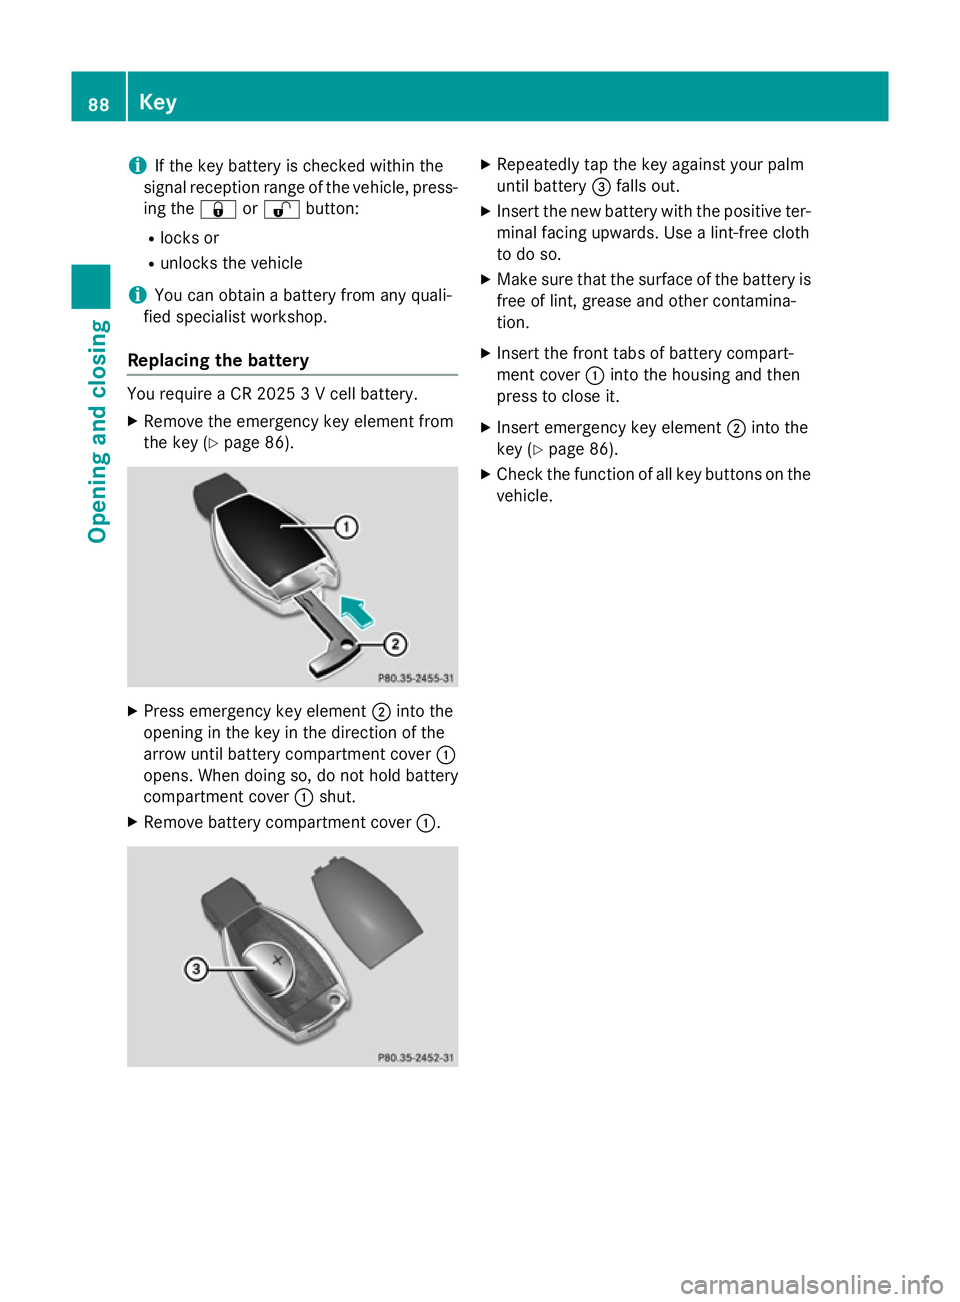
Replacing the battery You require a CR 2025 3 V cell battery.
X Remove the emergency key element from
the key (Y page 86). X
Press emergency key element ;into the
opening in the key in the direction of the
arrow until battery compartment cover :
opens. When doing so, do not hold battery
compartment cover :shut.
X Remove battery compartment cover :. X
Repeatedly tap the key against your palm
until battery =falls out.
X Insert the new battery with the positive ter-
minal facing upwards. Use a lint-free cloth
to do so.
X Make sure that the surface of the battery is
free of lint, grease and other contamina-
tion.
X Insert the front tabs of battery compart-
ment cover :into the housing and then
press to close it.
X Insert emergency key element ;into the
key (Y page 86).
X Check the function of all key buttons on the
vehicle. 88
KeyOpening and closing
Page 92 of 637
Problems with the key
Problem
Possible causes/consequences and
M
MSolutions You can no longer lock
or unlock the vehicle
using the key. The key battery is discharged or nearly discharged.
X Check the key battery (Y page 87) and replace it if necessary
(Y page 88).
If this does not work: X Lock (Y page 93) or unlock (Y page 93) the vehicle using the
emergency key element. The key is faulty.
X Lock (Y page 93) or unlock (Y page 93) the vehicle using the
emergency key element.
X Have the key checked at a qualified specialist workshop. You can no longer lock
or unlock the vehicle
using KEYLESS-GO. There is interference from a powerful source of radio waves.
X Lock/unlock the vehicle using the remote control function of
the key. To do this, hold the key as close as possible to the
vehicle and press the %or& button.
If the vehicle can also not be locked/unlocked using the remote
control function:
X Lock (Y page 93) or unlock (Y page 93) the vehicle using the
emergency key element. There is a fault with KEYLESS-GO.
X Lock/unlock the vehicle using the remote control function of
the key.
X Have KEYLESS-GO checked at a qualified specialist workshop.
If the vehicle can also not be locked/unlocked using the remote
control function: X Lock (Y page 93) or unlock (Y page 93) the vehicle using the
emergency key element.
X Have KEYLESS-GO checked at a qualified specialist workshop. You have lost a key. X
Have the key deactivated at a qualified specialist workshop.
X Report the loss immediately to the vehicle insurers.
X If necessary, have the locks changed as well. You have lost the emer-
gency key element. X
Report the loss immediately to the vehicle insurers.
X If necessary, have the locks changed as well. Key
89Opening and closing Z