2012 MERCEDES-BENZ SL ROADSTER length
[x] Cancel search: lengthPage 360 of 637
Destination or area of destination
reached
When you reach your destination, COMAND
Online displays a chequered flag and route
guidance is automatically ended.
If the destination is not in close proximity to a
digitised street, the Area
Area of ofdestination
destination
reached
reached message appears when the desti-
nation is reached.
Influencing route guidance Avoiding a section of the route blocked by
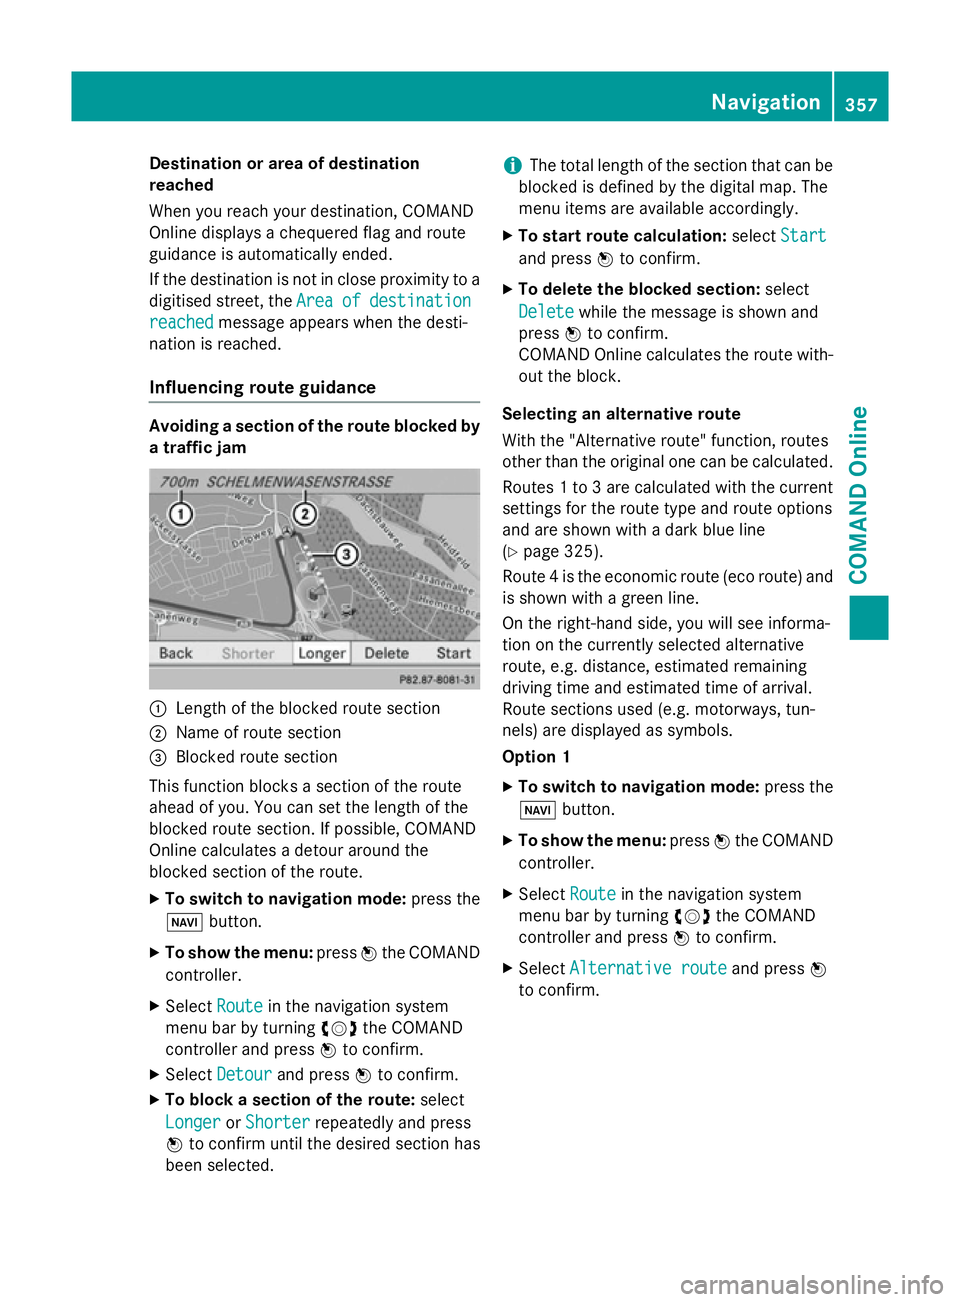
a traffic jam :
Length of the blocked route section
; Name of route section
= Blocked route section
This function blocks a section of the route
ahead of you. You can set the length of the
blocked route section. If possible, COMAND
Online calculates a detour around the
blocked section of the route.
X To switch to navigation mode: press the
Ø button.
X To show the menu: pressWthe COMAND
controller.
X Select Route
Route in the navigation system
menu bar by turning cVdthe COMAND
controller and press Wto confirm.
X Select Detour
Detour and press Wto confirm.
X To block a section of the route: select
Longer
Longer orShorter
Shorter repeatedly and press
W to confirm until the desired section has
been selected. i
The total length of the section that can be
blocked is defined by the digital map. The
menu items are available accordingly.
X To start route calculation: selectStart
Start
and press Wto confirm.
X To delete the blocked section: select
Delete Delete while the message is shown and
press Wto confirm.
COMAND Online calculates the route with-
out the block.
Selecting an alternative route
With the "Alternative route" function, routes
other than the original one can be calculated.
Routes 1 to 3 are calculated with the current settings for the route type and route options
and are shown with a dark blue line
(Y page 325).
Route 4 is the economic route (eco route) and is shown with a green line.
On the right-hand side, you will see informa-
tion on the currently selected alternative
route, e.g. distance, estimated remaining
driving time and estimated time of arrival.
Route sections used (e.g. motorways, tun-
nels) are displayed as symbols.
Option 1
X To switch to navigation mode: press the
Ø button.
X To show the menu: pressWthe COMAND
controller.
X Select Route
Route in the navigation system
menu bar by turning cVdthe COMAND
controller and press Wto confirm.
X Select Alternative route Alternative route and pressW
to confirm. Navigation
357COMAND Online Z
Page 362 of 637
If a mobile phone is connected to COMAND
Online and a phone number is included in
the destination information, you can call it
(Y page 390).
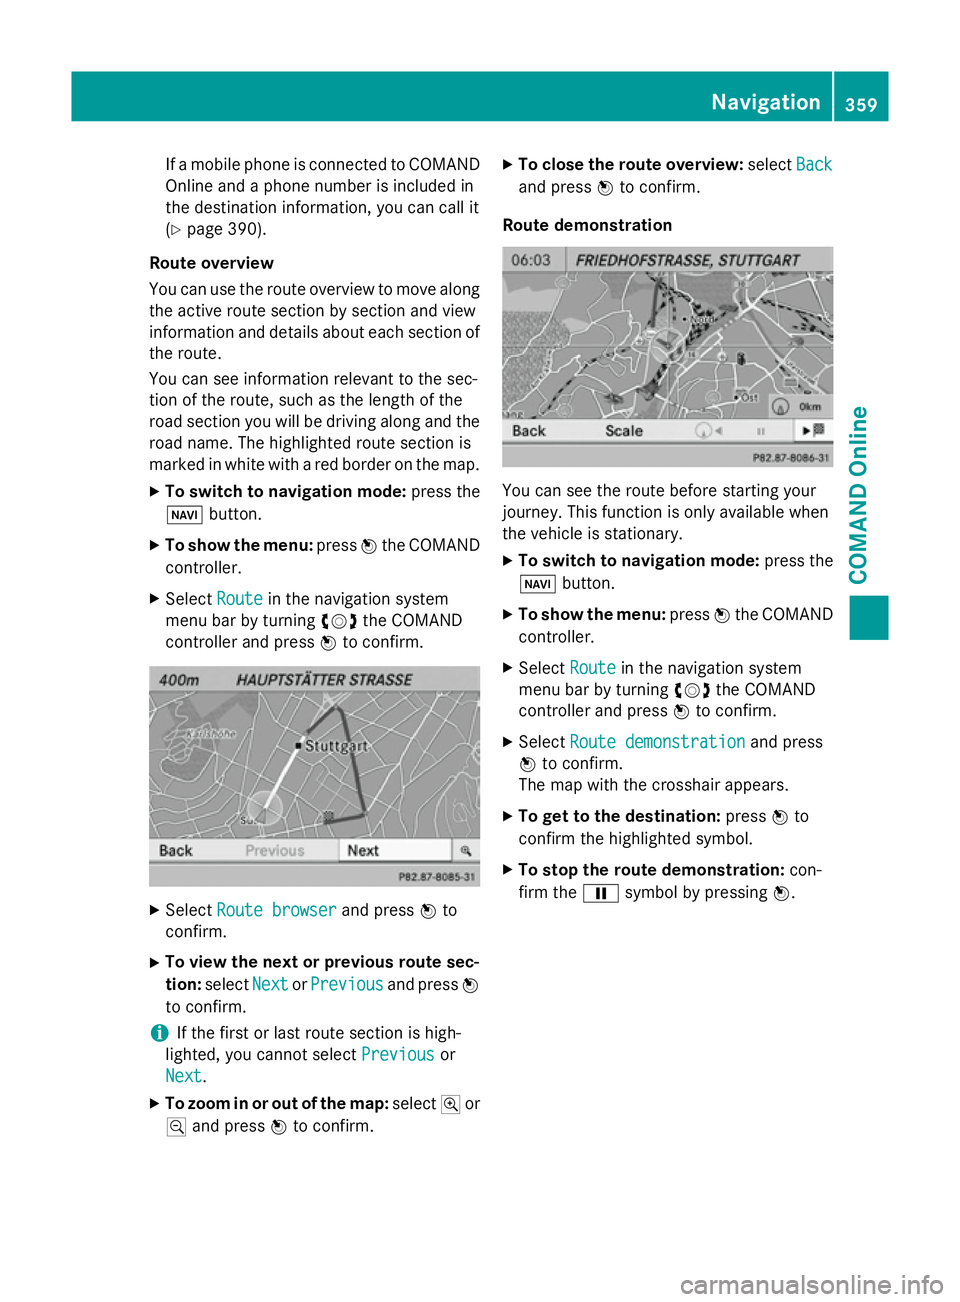
Route overview
You can use the route overview to move along the active route section by section and view
information and details about each section of
the route.
You can see information relevant to the sec-
tion of the route, such as the length of the
road section you will be driving along and the road name. The highlighted route section is
marked in white with a red border on the map.
X To switch to navigation mode: press the
Ø button.
X To show the menu: pressWthe COMAND
controller.
X Select Route
Route in the navigation system
menu bar by turning cVdthe COMAND
controller and press Wto confirm. X
Select Route browser Route browser and pressWto
confirm.
X To view the next or previous route sec-
tion: select Next
Next orPrevious
Previous and pressW
to confirm.
i If the first or last route section is high-
lighted, you cannot select Previous
Previous or
Next
Next.
X To zoom in or out of the map: selectNor
M and press Wto confirm. X
To close the route overview: selectBack
Back
and press Wto confirm.
Route demonstration You can see the route before starting your
journey. This function is only available when
the vehicle is stationary.
X To switch to navigation mode: press the
Ø button.
X To show the menu: pressWthe COMAND
controller.
X Select Route Routein the navigation system
menu bar by turning cVdthe COMAND
controller and press Wto confirm.
X Select Route demonstration
Route demonstration and press
W to confirm.
The map with the crosshair appears.
X To get to the destination: pressWto
confirm the highlighted symbol.
X To stop the route demonstration: con-
firm the Ësymbol by pressing W. Navigation
359COMAND Online Z
Page 431 of 637
vehicle. There is a risk of an accident. Only
operate this equipment when the traffic sit-
uation permits. If you cannot be sure of this,
stop the vehicle paying attention to road and traffic conditions and operate the equipment
with the vehicle stationary.
You must observe the legal requirements for
the country in which you are currently driving when operating COMAND Online.
X Call up the COMAND phone book
(Y page 401).
X Select MB Contact
MB Contact by turningcVdthe
COMAND controller.
There are two ways to contact the Mercedes-
Benz Customer Centre:
X Press Wthe COMAND controller to con-
firm.
or X Press the 6button on COMAND Online.
This initiates a call. When the call is con-
nected, a voice message prompts you to
confirm the data transmission by pressing
the stated number on the COMAND Online keypad. After confirmation, COMAND
Online sends the required vehicle data.
i Alternatively, you can initiate a call using
the multifunction steering wheel (see the
vehicle Owner's Manual).
During data transmission, you will see a cor-
responding symbol in the display. This may
take a moment. Then, you can select the
desired service and be connected to a spe-
cialist from the Mercedes-Benz Service
Centre.
i Contact your Mercedes-Benz Service
Centre for further information on
Mercedes-Benz Contact, the range of serv- ices offered and on using the function.
Demand-actuated service message To attain the optimal level of support in main-
taining your vehicle, you can arrange a service
appointment directly with the Mercedes-Benz
Customer Centre. As well as a warning in the instrument cluster, a window appears in the COMAND display. Here, a message actively
indicates that a service is required and this
message enables you to contact the
Mercedes-Benz Customer Centre directly.
You will see the message:
is is due
due soon.
soon. Would
Wouldyou
youlike
like to
tomake
make
a workshop appointment?
a workshop appointment?
X To arrange a service appointment:
select Call Now Call Now by turning cVdthe
COMAND controller and press Wto con-
firm.
After your confirmation, the vehicle data is sent via Mercedes-Benz Contact, and a
Customer Centre employee personally
deals with your appointment. The informa-
tion is then sent to your desired service
outlet.
They will then contact with you within 24
hours to confirm the following details:
R scope of service
R length of stay
R price
X To arrange a service appointment later:
select Call Later
Call Later and confirm with W.
The window is hidden, then reappears after a certain amount of time.
X To not arrange a service appointment:
select No Noand confirm with W.
The window is hidden and does not show
this maintenance requirement again.
Mercedes-Benz Contact Accident Assis- tance Mercedes-Benz emergency call system
active
Mercedes-Benz Contact Accident Assistance
is a supplement to the Mercedes-Benz emer-
gency call system (Y page 429). If an emer-
gency call to the Mercedes-Benz emergency
call centre has been triggered following an
accident, a voice connection with an operator
is established. Depending on the accident sit-
uation, the operator may then suggest that
you forward the call to Mercedes-Benz Con-
tact Accident Assistance. This will enable you 428
TelephoneCOMAND Online
Page 443 of 637
Saving access data under a new provider
name
X Select a provider from the list of mobile
phone network providers by turning cVd
the COMAND controller (Y page 435).
X Select the symbol to the right of the entry
by sliding VYthe COMAND controller and
press Wto confirm.
X Confirm Copy provider entry Copy provider entry by press-
ing W.
The access data is displayed.
X Edit the access data. A description of the
entry can be found under "Making entries"
in the "Manually setting the access data of
the mobile phone network provider" sec-
tion (Y page 437).
Deleting the access data of the mobile
phone network provider
X Select a provider from the list of mobile
phone network providers by turning cVd
the COMAND controller (Y page 435).
X Select the symbol to the right of the entry
by sliding VYthe COMAND controller and
press Wto confirm.
X Confirm Delete
Delete by pressing W.
A prompt appears asking whether you wish to delete the access data.
X Select Yes YesorNo
No and press Wto confirm.
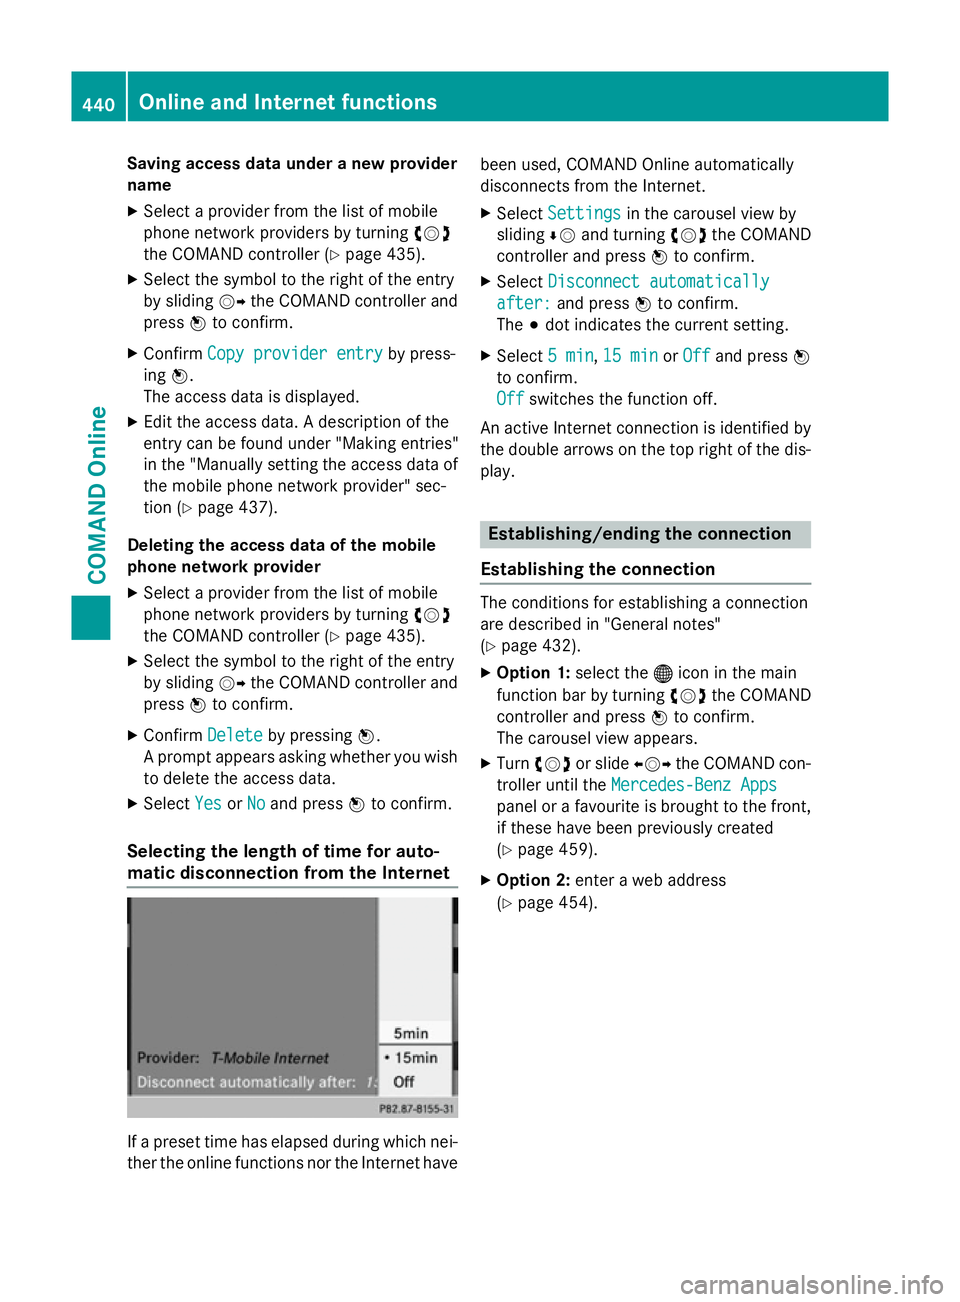
Selecting the length of time for auto-
matic disconnection from the Internet If a preset time has elapsed during which nei-
ther the online functions nor the Internet have been used, COMAND Online automatically
disconnects from the Internet.
X Select Settings
Settings in the carousel view by
sliding ÆVand turning cVdthe COMAND
controller and press Wto confirm.
X Select Disconnect automatically
Disconnect automatically
after:
after: and press Wto confirm.
The #dot indicates the current setting.
X Select 5 min
5 min,15 min
15 min orOff
Off and press W
to confirm.
Off Off switches the function off.
An active Internet connection is identified by the double arrows on the top right of the dis-
play. Establishing/ending the connection
Establishing the connection The conditions for establishing a connection
are described in "General notes"
(Y
page 432).
X Option 1: select the®icon in the main
function bar by turning cVdthe COMAND
controller and press Wto confirm.
The carousel view appears.
X Turn cVd or slide XVYthe COMAND con-
troller until the Mercedes-Benz Apps Mercedes-Benz Apps
panel or a favourite is brought to the front, if these have been previously created
(Y page 459).
X Option 2: enter a web address
(Y page 454). 440
Online and Internet functionsCOMAND Online
Page 482 of 637
All the tracks on the medium are played in
random order (e.g. track 3, 8, 5 etc.).
R Random track list
Random track list (MP3 mode only)
You will hear the tracks in the current play-
list or currently active folder (including all
subfolders) in random order.
i The
Normal track sequence
Normal track sequence option is
automatically selected when you change
the disc you are currently listening to or
when you select a different medium. If an
option is selected, it remains selected after COMAND Online is switched on or off.
Notes on MP3 mode General notes
Depending on the volume and format of the
MP3 data, the length of time required for
reading the data may increase.
Permissible data carriers
R CD-R and CD-RW
R DVD-R and DVD-RW
R DVD+R and DVD+RW
R SD memory card
R USB storage device
Permissible file systems R ISO 9660/Joliet standard for CDs
R UDF for audio and video DVDs
R FAT16, FAT32 and NTFS for SD memory
card and USB storage media
Multi-session CDs
For multi-session CDs, the content of the first session determines how COMAND Online will process the CD. COMAND Online plays only
one session and gives priority to the audio CD
session.
If possible, only play CDs on COMAND Online that have been written in one session.
File structure of a disc
When you create a disc with compressed
music files, the tracks can be organised in
folders. A folder may also contain subfolders. The disc may contain no more than eight
directory levels. Files beyond the eighth level
will not be recognised by the system.
i COMAND Online loads up to 15,000
tracks from the SD memory card or USB
storage medium.
Track and file names
When you create a disc with compressed
music files, you can assign names to the
tracks and folders.
COMAND Online uses these names accord-
ingly for the display. Folders that contain data other than MP3 or WMA tracks are not dis-
played by COMAND Online.
If MP3 or WMA files are stored in the root
directory itself, the root directory will also be
treated as a folder. COMAND Online will then show the name of the root directory as the
folder name.
You should observe the following when
assigning track names:
R track names must have at least one char-
acter.
R track names must have the extension
"mp3" or "wma".
R there must be a full stop between the track
name and the extension.
Example of a correct track name:
"Track1.mp3".
Permissible formats
COMAND supports the following formats:
R MPEG1 Audio Layer 3 (MP3)
R Microsoft Windows Media Audio V8 and V9
(WMA) without copy protection
Microsoft Windows Media Audio V2, V7, V8 and V9 (WMA)
R additional music files in AAC format with
the file extensions .aac, .mp4, .m4a
and .m4b, but not copy-protected iTunes
music files with the extension .m4p.
i If, in addition to MP3 files, there are other
music files in these audio formats stored on Audio
479COMAND Online Z
Page 587 of 637
!
Have the battery checked regularly at a
qualified specialist workshop.
Observe the service intervals in the Service
Booklet or contact a qualified specialist
workshop for more information.
! You should have all work involving the
battery carried out at a qualified specialist
workshop. In the exceptional case that it is
necessary for you to disconnect the battery yourself, make sure that:
R you switch off the engine and remove the
key. On vehicles with KEYLESS-GO,
ensure that the ignition is switched off.
Check that all the indicator lamps in the
instrument cluster are off. Otherwise,
electronic components, such as the
alternator, may be damaged.
R you first remove the negative terminal
clamp and then the positive terminal
clamp. Never swap the terminal clamps.
Otherwise, the vehicle's electronic sys-
tem may be damaged.
R the transmission is locked in position P
after disconnecting the battery. The vehi-
cle is secured against rolling away. You
can then no longer move the vehicle.
The battery and the cover of the positive
terminal clamp must be fitted securely dur- ing operation.
In order for the battery to achieve the maxi-
mum possible service life, it must always be
sufficiently charged.
Comply with safety precautions and take pro-
tective measures when handling batteries. WARNING
Fire, naked flames and smoking
are prohibited when handling the
battery. Avoid creating sparks.
Battery acid is caustic. Avoid con-
tact with the skin, eyes or clothing. Wear suitable protective clothing,
in particular gloves, an apron and a
face mask.
Immediately rinse acid splashes
off with clean water. Consult a doc- tor if necessary. Wear eye protection.
Keep children away.
Observe this Owner's Manual.
The vehicle battery, like other batteries, can
discharge over time if you do not use the
vehicle. In such cases, have the battery dis-
connected at a qualified specialist workshop.
You can also charge the battery with a
charger recommended by Mercedes-Benz.
For more information, please contact a quali- fied specialist workshop.
Have the battery charge checked more fre-
quently if you use the vehicle mainly for short
trips or if you leave it standing idle for a
lengthy period. Consult a qualified specialist
workshop if you wish to leave your vehicle
parked up for a long period of time.
i When you park the vehicle, remove the
key if you do not require any electrical con- sumers. The vehicle will then use very littleenergy, thus conserving battery power. Charging the battery
G
WARNING
During charging and jump-starting, explosive
gases can escape from the battery. There is a risk of an explosion.
Particularly avoid fire, naked flames, creating
sparks and smoking. Ensure there is sufficient 584
Battery (vehicle)Breakdown assistance
Page 589 of 637
Jump-starting
For the jump-starting procedure, use only the jump-starting connection point, consisting of a positive terminal and an earth point, in the engine compartment. G
WARNING
Battery acid is caustic. There is a risk of injury.
Avoid contact with the skin, eyes or clothing. Do not inhale any battery gases. Do not lean over the battery. Keep children away from batteries. Wash battery acid immediately with water and seek
medical attention. G
WARNING
During charging and jump-starting, explosive gases can escape from the battery. There is a risk of an explosion.
Particularly avoid fire, naked flames, creating sparks and smoking. Ensure there is sufficient
ventilation while charging and jump-starting. Do not lean over a battery. G
WARNING
During the charging process, a battery produces hydrogen gas. If a short circuit occurs or sparks
are created, the hydrogen gas can ignite. There is a risk of an explosion.
R Make sure that the positive terminal of a connected battery does not come into contact with
vehicle parts.
R Never place metal objects or tools on a battery.
R It is important that you observe the described order of the battery terminals when connecting
and disconnecting a battery.
R When jump-starting, make sure that the battery poles with identical polarity are connected.
R It is particularly important to observe the described order when connecting and disconnecting
the jump leads.
R Never connect or disconnect the battery terminals while the engine is running. G
WARNING
A discharged battery can freeze at temperatures below freezing point. When jump-starting the
vehicle or charging the battery, gases can escape from the battery. There is a risk of an explosion.
Allow the frozen battery to thaw out before charging it or jump-starting.
! Avoid repeated and lengthy starting attempts. Otherwise, the catalytic converter could be
damaged by the non-combusted fuel.
If the indicator/warning lamps do not light up at low temperatures, it is very likely that the
discharged battery has frozen. In this case you may neither jump-start the vehicle nor charge
the battery. The service life of a battery that has been thawed may be reduced. The starting
characteristics may be impaired, especially at low temperatures. Have the thawed battery
checked at a qualified specialist workshop. 586
Jump-startingBreakdown assistance
Page 632 of 637
Vehicle data
General notes
Please note that for the specified vehicle
data:
R the heights specified may vary as a result
of:
- tyres
- load
- condition of the suspension
- optional equipment
R optional equipment reduces the maximum
payload.
R vehicle-specific weight information can be
found on the vehicle identification plate
(Y page 622).
R only for certain countries: you can find vehi-
cle-specific vehicle data in the COC docu-
ments (CERTIFICATE OF CONFORMITY).
These documents are delivered with your
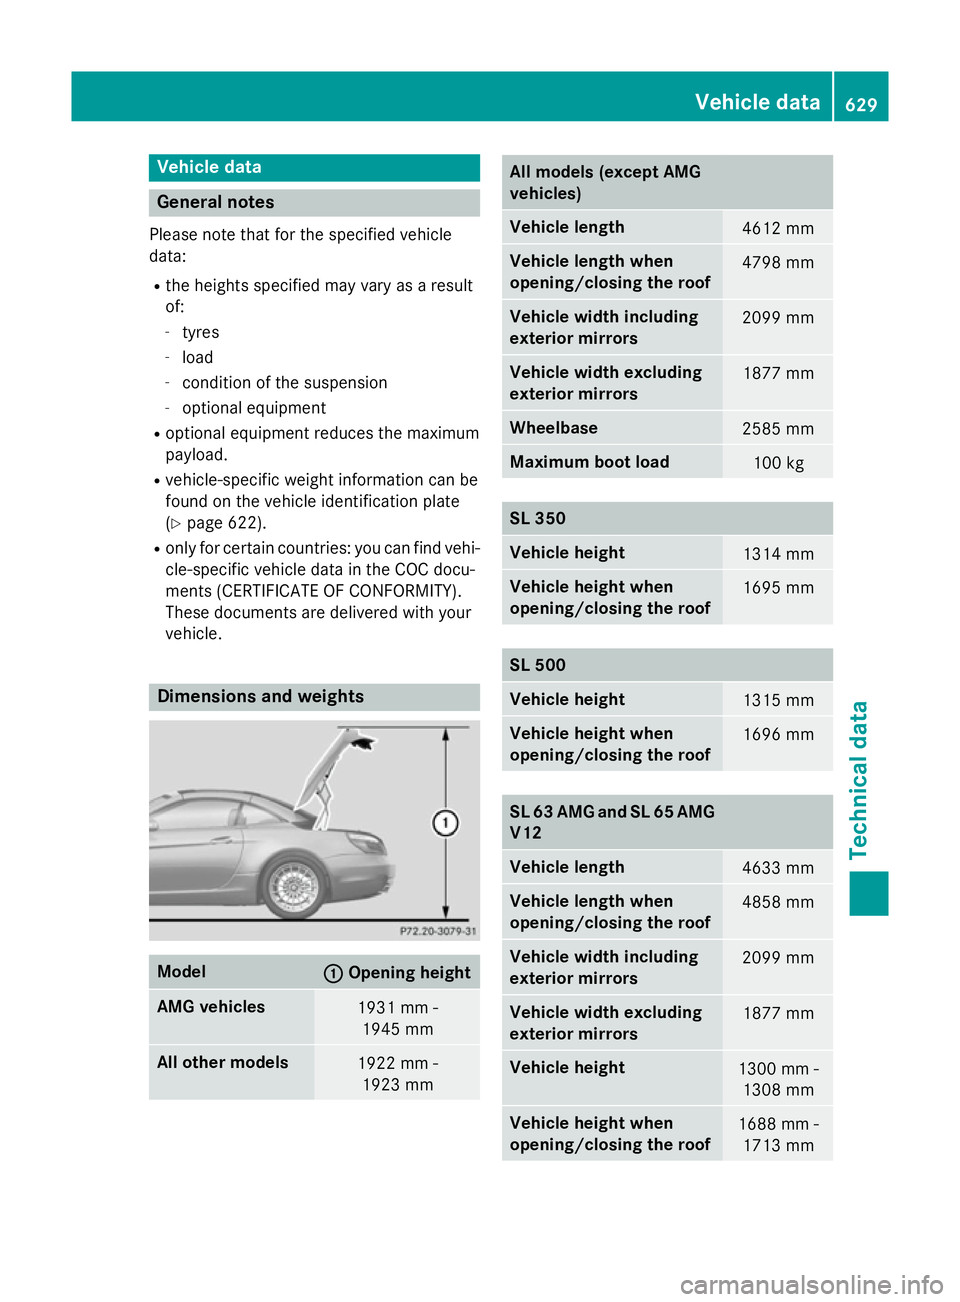
vehicle. Dimensions and weights
Model
: :
Opening height AMG vehicles
1931 mm -
1945 mm All other models
1922 mm -
1923 mm All models (except AMG
vehicles)
Vehicle length
4612 mm
Vehicle length when
opening/closing the roof
4798 mm
Vehicle width including
exterior mirrors
2099 mm
Vehicle width excluding
exterior mirrors
1877 mm
Wheelbase
2585 mm
Maximum boot load
100 kg
SL 350
Vehicle height
1314 mm
Vehicle height when
opening/closing the roof
1695 mm
SL 500
Vehicle height
1315 mm
Vehicle height when
opening/closing the roof
1696 mm
SL 63 AMG and SL 65 AMG
V12 Vehicle length
4633 mm
Vehicle length when
opening/closing the roof
4858 mm
Vehicle width including
exterior mirrors
2099 mm
Vehicle width excluding
exterior mirrors
1877 mm
Vehicle height
1300 mm -
1308 mm Vehicle height when
opening/closing the roof
1688 mm -
1713 mm Vehicle data
629Technical data Z