2012 MERCEDES-BENZ SL ROADSTER length
[x] Cancel search: lengthPage 28 of 637
SRS (Supplemental Restraint Sys-
tem)
Display message ............................2 55
Introduction ..................................... 51
Warning lamp ................................. 280
Warning lamp (function) ................... 51
Start/stop function
see ECO start/stop function
Starting (engine) ................................ 157
Station list ......................................... 464
Station pre-sets ................................. 465
Station search ................................... 465
STEER CONTROL .................................. 78
Steering (display message) .............. 271
Steering wheel
Adjusting (electrically) ................... 118
Button overview ............................... 43
Buttons (on-board computer) ......... 229
Cleaning ......................................... 573
Gearshift paddle s........................... 169
Important safety notes .................. 118
Storing settings (memory func-
tion) ............................................... 123
Steering wheel gearshift paddles .... 169
Stop function
Audio DVD ..................................... 474
Video DVD ..................................... 513
Stopwatch (RACETIMER) ................... 245
Storing channels
TV .................................................. 505
Storing stations
Radi o............................................. 466
Stowage areas ................................... 544
Stowage compartments
Armrest (under) ............................. 545
Centre console .............................. 545
Centre console (rear) ..................... 546
Cup holde r..................................... 548
Glove compartment ....................... 544
Important safety information ......... 544
Rear ............................................... 546
Spectacles compartment ............... 545
Stowage net ....................................... 546
Stowage space
Display message ............................ 271
Stowage net ................................... 546
Umbrella holde r............................. 545 Stowage well beneath the boot
floor
.................................................... 548
Street View ........................................ 335
Summer tyres .................................... 598
Sun visor ............................................ 549
Supplemental Restraint System
see SRS (Supplemental Restraint
System)
Surround lighting (on-board com-
puter) .................................................. 241
Surround sound ................................. 300
Surround sound (harman/
kardon® surround sound system)
Notes ............................................. 300
Switching on/of f........................... 301
Suspension tuning
Active Body Control (AMG vehi-
cles) ............................................... 203
Active Body Control (except AMG
vehicles) ........................................ 200
SETUP (on-board computer) .......... 244
Switching between summer and
standard time .................................... 311
Switching wavelength (radio) .......... 464
System settings
Bluetooth® .................................... 313
Date ............................................... 311
Language ....................................... 313
LINGUATRONIC (voice control) ...... 312
Text reader speed .......................... 312
Time ............................................... 311
Time zone ...................................... 311 T
Tail lamps Display message ............................ 256
see Lights
Tank
see Fuel tank
Technical data
Capacities ...................................... 622
Emergency spare wheel ................. 617
Information .................................... 620
Tyres/wheels ................................. 610
Vehicle data ................................... 629
Telephone .................................. 397, 399
Accepting a cal l............................. 236 Index
25
Page 117 of 637
!
To avoid damage to the seats and the seat
heating, observe the following information:
R do not spill any liquids on the seats. If
liquid is spilled on the seats, dry them as soon as possible.
R if the seat covers are damp or wet, do not
switch on the seat heating. The seat
heating should also not be used to dry
the seats.
R clean the seat covers as recommended;
see "Interior care".
R do not transport heavy loads on the
seats. Do not place sharp objects on the seat cushions, e.g. knives, nails or tools. The seats should only be occupied by
passengers, if possible.
R when the seat heating is in operation, do
not cover the seats with insulating mate-
rials, e.g. blankets, coats, bags, seat cov- ers, child seats or booster seats.
! Make sure that there are no objects in the
footwell or behind the seats when moving
the seat back. There is a risk that the seats and/or the objects could be damaged.
i The head restraints cannot be removed.
For more information, contact a qualified
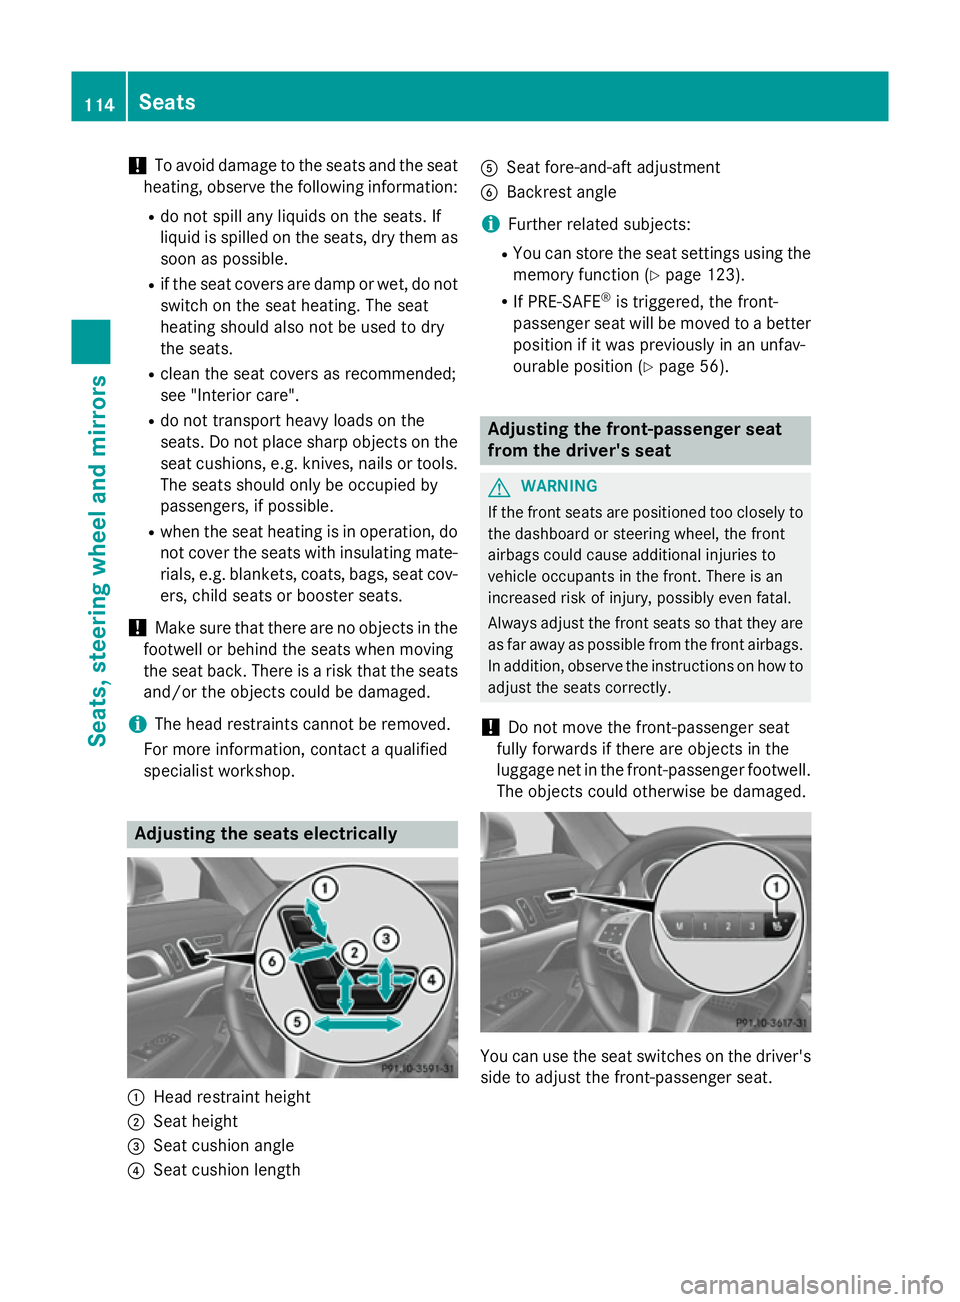
specialist workshop. Adjusting the seats electrically
:
Head restraint height
; Seat height
= Seat cushion angle
? Seat cushion length A
Seat fore-and-aft adjustment
B Backrest angle
i Further related subjects:
R You can store the seat settings using the
memory function (Y page 123).
R If PRE-SAFE ®
is triggered, the front-
passenger seat will be moved to a better
position if it was previously in an unfav-
ourable position (Y page 56). Adjusting the front-passenger seat
from the driver's seat
G
WARNING
If the front seats are positioned too closely to the dashboard or steering wheel, the front
airbags could cause additional injuries to
vehicle occupants in the front. There is an
increased risk of injury, possibly even fatal.
Always adjust the front seats so that they are
as far away as possible from the front airbags.
In addition, observe the instructions on how to
adjust the seats correctly.
! Do not move the front-passenger seat
fully forwards if there are objects in the
luggage net in the front-passenger footwell. The objects could otherwise be damaged. You can use the seat switches on the driver's
side to adjust the front-passenger seat. 114
SeatsSeats, steering wheel and mirrors
Page 118 of 637
X
To activate/deactivate: press button:.
If the indicator lamp in button :is lit, you can
access the following functions for the front-
passenger seat:
R seat adjustment
R call up the memory function Removing the seat belt from the seat
belt guide
G
WARNING
When driving off-road, your body is subject to forces from all directions due to the uneven
surface. You could be thrown from your seat,
for instance. There is a danger of injury.
Always wear a seat belt, even when driving off-
road. Both the driver's seat belt and the front-
passenger seat belt can be removed from the
seat belt guide. This makes it easier to move
the seats forward.
Before you drive off, the seat belt must be
inserted into the seat belt guide.
Observe the safety guidelines for seat belts
(Y page 57).
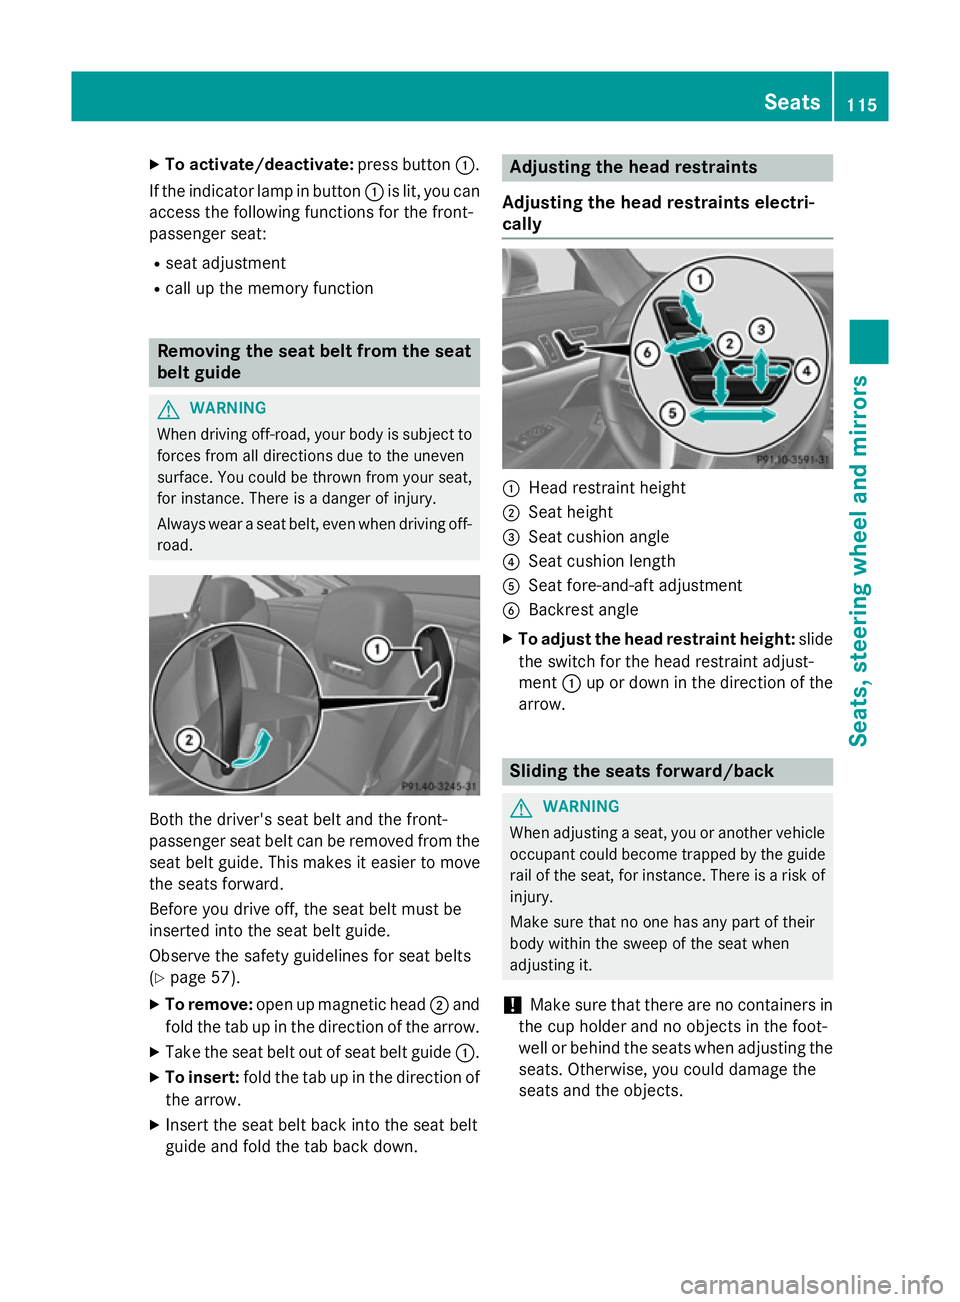
X To remove: open up magnetic head ;and
fold the tab up in the direction of the arrow.
X Take the seat belt out of seat belt guide :.
X To insert: fold the tab up in the direction of
the arrow.
X Insert the seat belt back into the seat belt
guide and fold the tab back down. Adjusting the head restraints
Adjusting the head restraints electri-
cally :
Head restraint height
; Seat height
= Seat cushion angle
? Seat cushion length
A Seat fore-and-aft adjustment
B Backrest angle
X To adjust the head restraint height: slide
the switch for the head restraint adjust-
ment :up or down in the direction of the
arrow. Sliding the seats forward/back
G
WARNING
When adjusting a seat, you or another vehicle occupant could become trapped by the guiderail of the seat, for instance. There is a risk of
injury.
Make sure that no one has any part of their
body within the sweep of the seat when
adjusting it.
! Make sure that there are no containers in
the cup holder and no objects in the foot-
well or behind the seats when adjusting the
seats. Otherwise, you could damage the
seats and the objects. Seats
115Seats, steering wheel and mirrors Z
Page 180 of 637
Applying and releasing manually
X
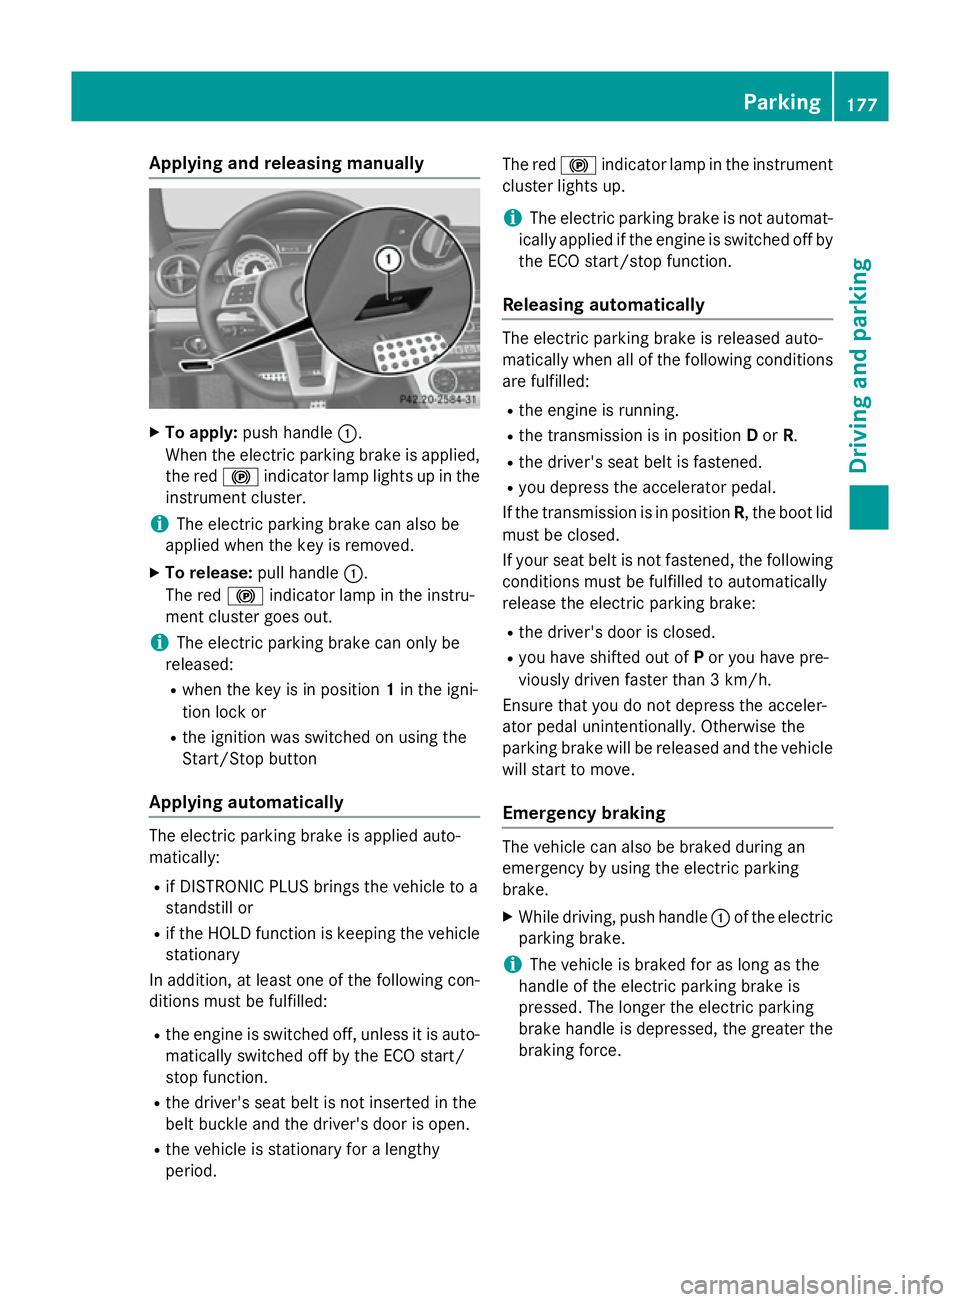
To apply: push handle :.
When the electric parking brake is applied, the red !indicator lamp lights up in the
instrument cluster.
i The electric parking brake can also be
applied when the key is removed.
X To release: pull handle:.
The red !indicator lamp in the instru-
ment cluster goes out.
i The electric parking brake can only be
released:
R when the key is in position 1in the igni-
tion lock or
R the ignition was switched on using the
Start/Stop button
Applying automatically The electric parking brake is applied auto-
matically:
R if DISTRONIC PLUS brings the vehicle to a
standstill or
R if the HOLD function is keeping the vehicle
stationary
In addition, at least one of the following con-
ditions must be fulfilled:
R the engine is switched off, unless it is auto-
matically switched off by the ECO start/
stop function.
R the driver's seat belt is not inserted in the
belt buckle and the driver's door is open.
R the vehicle is stationary for a lengthy
period. The red
!indicator lamp in the instrument
cluster lights up.
i The electric parking brake is not automat-
ically applied if the engine is switched off by
the ECO start/stop function.
Releasing automatically The electric parking brake is released auto-
matically when all of the following conditions
are fulfilled:
R the engine is running.
R the transmission is in position Dor R.
R the driver's seat belt is fastened.
R you depress the accelerator pedal.
If the transmission is in position R, the boot lid
must be closed.
If your seat belt is not fastened, the following conditions must be fulfilled to automatically
release the electric parking brake:
R the driver's door is closed.
R you have shifted out of Por you have pre-
viously driven faster than 3 km/h.
Ensure that you do not depress the acceler-
ator pedal unintentionally. Otherwise the
parking brake will be released and the vehicle will start to move.
Emergency braking The vehicle can also be braked during an
emergency by using the electric parking
brake.
X While driving, push handle :of the electric
parking brake.
i The vehicle is braked for as long as the
handle of the electric parking brake is
pressed. The longer the electric parking
brake handle is depressed, the greater the braking force. Parking
177Driving and pa rking Z
Page 217 of 637
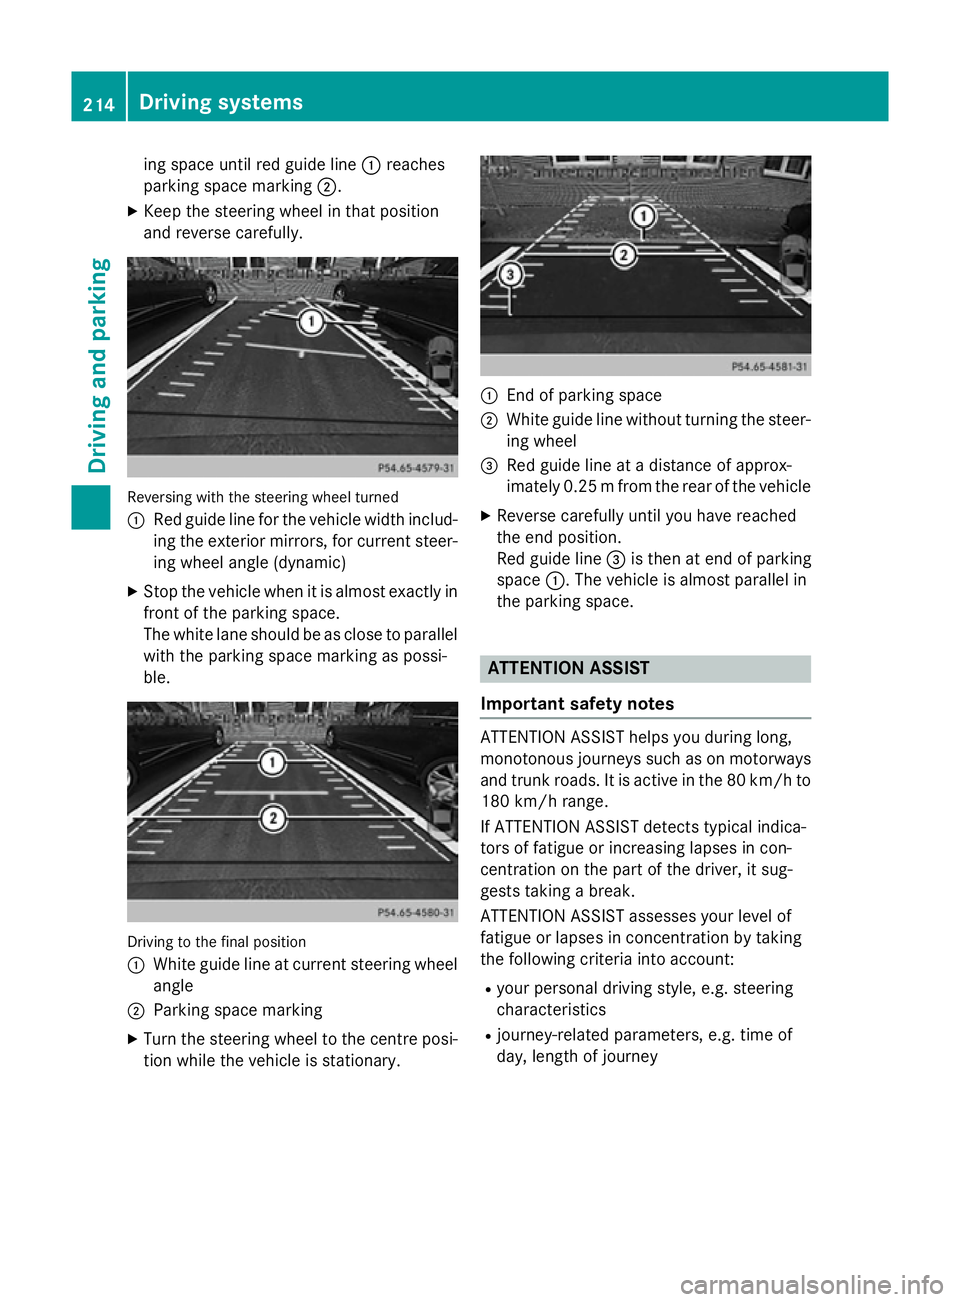
ing space until red guide line
:reaches
parking space marking ;.
X Keep the steering wheel in that position
and reverse carefully. Reversing with the steering wheel turned
:
Red guide line for the vehicle width includ-
ing the exterior mirrors, for current steer-
ing wheel angle (dynamic)
X Stop the vehicle when it is almost exactly in
front of the parking space.
The white lane should be as close to parallel with the parking space marking as possi-
ble. Driving to the final position
:
White guide line at current steering wheel
angle
; Parking space marking
X Turn the steering wheel to the centre posi-
tion while the vehicle is stationary. :
End of parking space
; White guide line without turning the steer-
ing wheel
= Red guide line at a distance of approx-
imately 0.25 mfrom the rear of the vehicle
X Reverse carefully until you have reached
the end position.
Red guide line =is then at end of parking
space :. The vehicle is almost parallel in
the parking space. ATTENTION ASSIST
Important safety notes ATTENTION ASSIST helps you during long,
monotonous journeys such as on motorways
and trunk roads. It is active in the 80 km/h to
180 km/h range.
If ATTENTION ASSIST detects typical indica-
tors of fatigue or increasing lapses in con-
centration on the part of the driver, it sug-
gests taking a break.
ATTENTION ASSIST assesses your level of
fatigue or lapses in concentration by taking
the following criteria into account:
R your personal driving style, e.g. steering
characteristics
R journey-related parameters, e.g. time of
day, length of journey 214
Driving systemsDriving and parking
Page 249 of 637
Deleting all laps
If you switch off the engine, the RACETIMER is
reset to "0" after 30 seconds. All laps are
deleted.
You cannot delete individual stored laps. If
you have stopped 16 laps, the current lap
does not have to be reset.
X Reset the current lap.
X Press ato confirm Reset Reset.
Reset Race Timer?
Reset Race Timer? appears in the multi-
function display.
X Press the :button to select Yes
Yes and
press the abutton to confirm.
All laps are deleted.
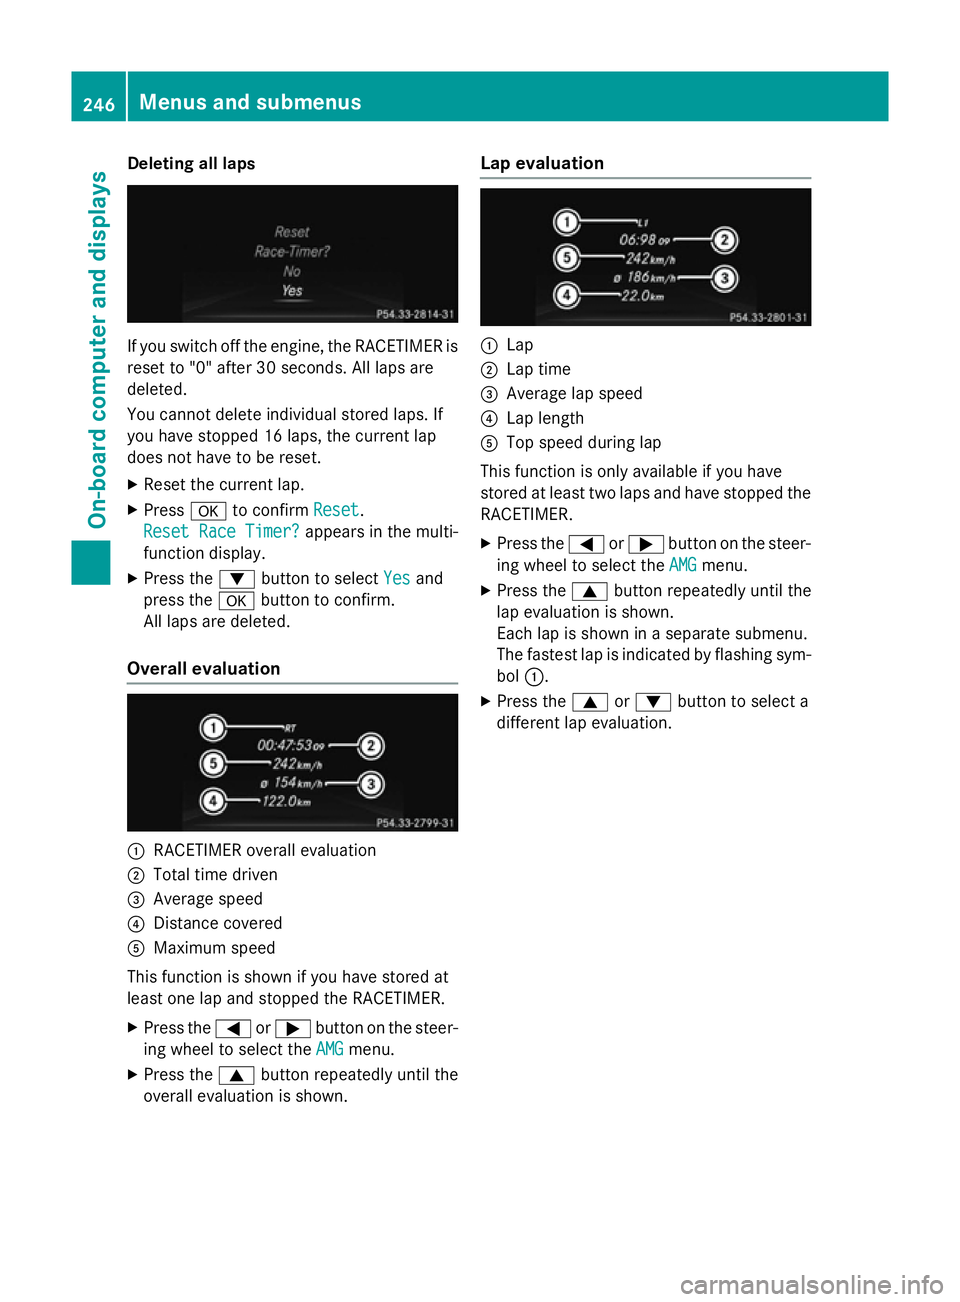
Overall evaluation :
RACETIMER overall evaluation
; Total time driven
= Average speed
? Distance covered
A Maximum speed
This function is shown if you have stored at
least one lap and stopped the RACETIMER.
X Press the =or; button on the steer-
ing wheel to select the AMG
AMGmenu.
X Press the 9button repeatedly until the
overall evaluation is shown. Lap evaluation :
Lap
; Lap time
= Average lap speed
? Lap length
A Top speed during lap
This function is only available if you have
stored at least two laps and have stopped the
RACETIMER.
X Press the =or; button on the steer-
ing wheel to select the AMG
AMG menu.
X Press the 9button repeatedly until the
lap evaluation is shown.
Each lap is shown in a separate submenu.
The fastest lap is indicated by flashing sym- bol :.
X Press the 9or: button to select a
different lap evaluation. 246
Menus and sub
menusOn-board computer and displays
Page 321 of 637
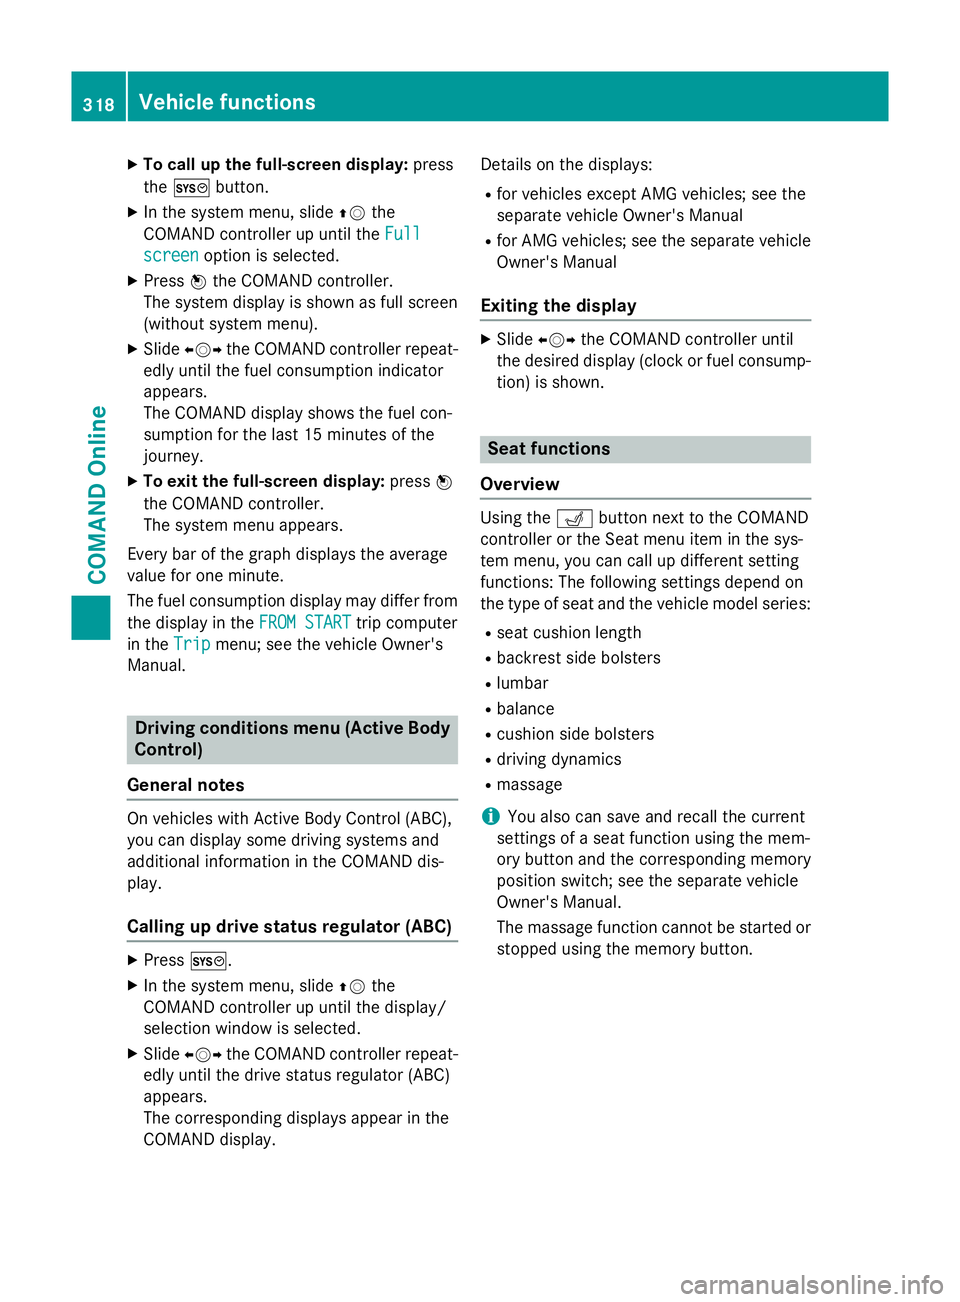
X
To call up the full-screen display: press
the W button.
X In the system menu, slide ZVthe
COMAND controller up until the Full Full
screen screen option is selected.
X Press Wthe COMAND controller.
The system display is shown as full screen
(without system menu).
X Slide XVY the COMAND controller repeat-
edly until the fuel consumption indicator
appears.
The COMAND display shows the fuel con-
sumption for the last 15 minutes of the
journey.
X To exit the full-screen display: pressW
the COMAND controller.
The system menu appears.
Every bar of the graph displays the average
value for one minute.
The fuel consumption display may differ from
the display in the FROM START FROM STARTtrip computer
in the Trip
Trip menu; see the vehicle Owner's
Manual. Driving conditions menu (Active Body
Control)
General notes On vehicles with Active Body Control (ABC),
you can display some driving systems and
additional information in the COMAND dis-
play.
Calling up drive status regulator (ABC) X
Press W.
X In the system menu, slide ZVthe
COMAND controller up until the display/
selection window is selected.
X Slide XVY the COMAND controller repeat-
edly until the drive status regulator (ABC)
appears.
The corresponding displays appear in the
COMAND display. Details on the displays:
R for vehicles except AMG vehicles; see the
separate vehicle Owner's Manual
R for AMG vehicles; see the separate vehicle
Owner's Manual
Exiting the display X
Slide XVY the COMAND controller until
the desired display (clock or fuel consump-
tion) is shown. Seat functions
Overview Using the
Tbutton next to the COMAND
controller or the Seat menu item in the sys-
tem menu, you can call up different setting
functions: The following settings depend on
the type of seat and the vehicle model series:
R seat cushion length
R backrest side bolsters
R lumbar
R balance
R cushion side bolsters
R driving dynamics
R massage
i You also can save and recall the current
settings of a seat function using the mem-
ory button and the corresponding memory
position switch; see the separate vehicle
Owner's Manual.
The massage function cannot be started or
stopped using the memory button. 318
Vehicle functionsCOMAND Online
Page 322 of 637
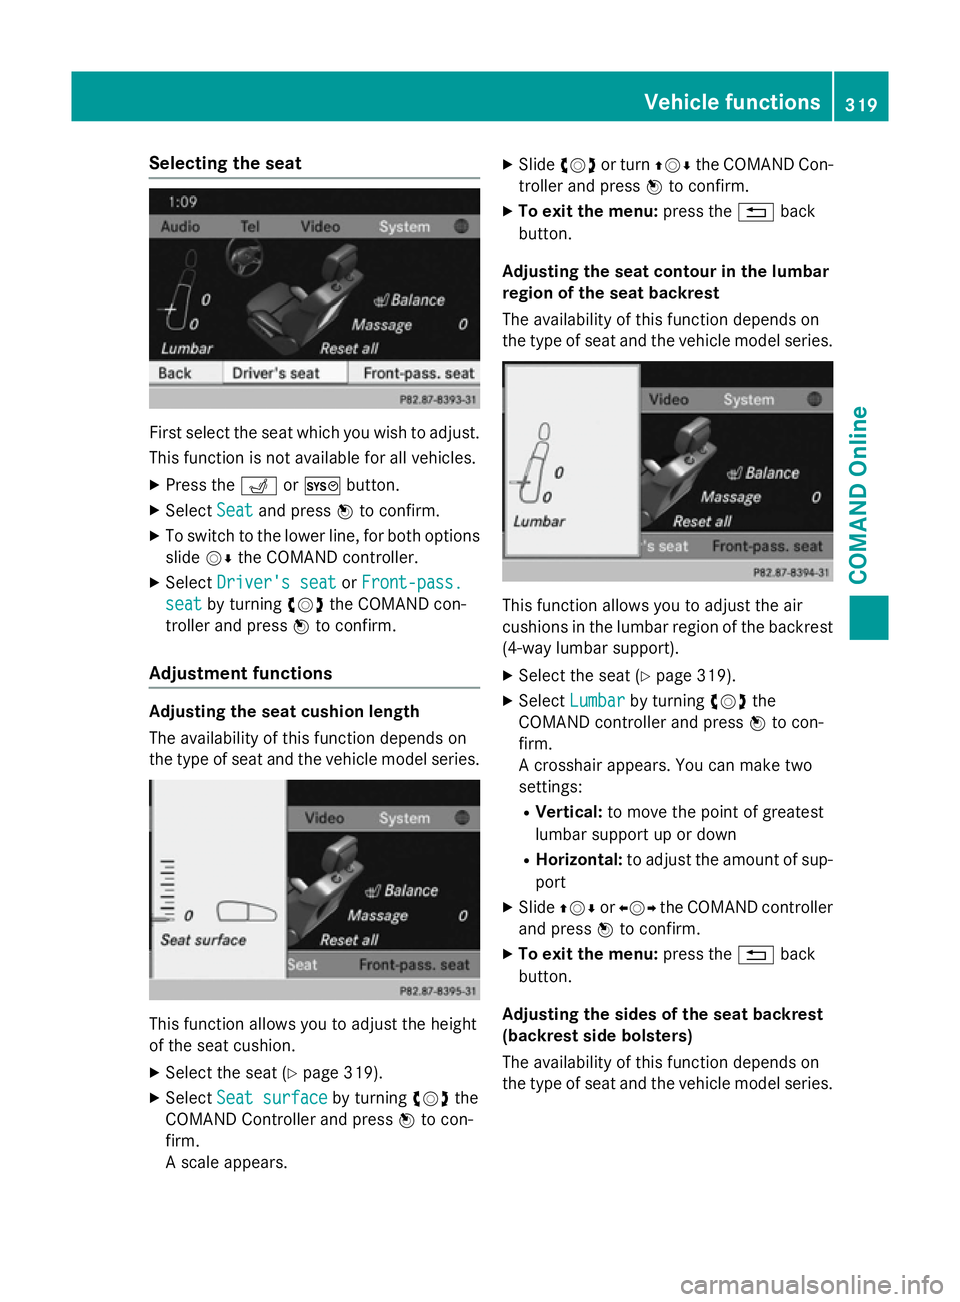
Selecting the seat
First select the seat which you wish to adjust.
This function is not available for all vehicles.
X Press the TorW button.
X Select Seat
Seat and press Wto confirm.
X To switch to the lower line, for both options
slide VÆthe COMAND controller.
X Select Driver's seat
Driver's seat orFront-pass.
Front-pass.
seat
seat by turning cVdthe COMAND con-
troller and press Wto confirm.
Adjustment functions Adjusting the seat cushion length
The availability of this function depends on
the type of seat and the vehicle model series. This function allows you to adjust the height
of the seat cushion.
X Select the seat (Y page 319).
X Select Seat surface
Seat surface by turningcVdthe
COMAND Controller and press Wto con-
firm.
A scale appears. X
Slide cVd or turn ZVÆthe COMAND Con-
troller and press Wto confirm.
X To exit the menu: press the%back
button.
Adjusting the seat contour in the lumbar
region of the seat backrest
The availability of this function depends on
the type of seat and the vehicle model series. This function allows you to adjust the air
cushions in the lumbar region of the backrest
(4-way lumbar support).
X Select the seat (Y page 319).
X Select Lumbar Lumbar by turning cVdthe
COMAND controller and press Wto con-
firm.
A crosshair appears. You can make two
settings:
R Vertical: to move the point of greatest
lumbar support up or down
R Horizontal: to adjust the amount of sup-
port
X Slide ZVÆ orXVY the COMAND controller
and press Wto confirm.
X To exit the menu: press the%back
button.
Adjusting the sides of the seat backrest
(backrest side bolsters)
The availability of this function depends on
the type of seat and the vehicle model series. Vehicle functions
319COMAND Online Z