2012 MERCEDES-BENZ SL ROADSTER key
[x] Cancel search: keyPage 523 of 637
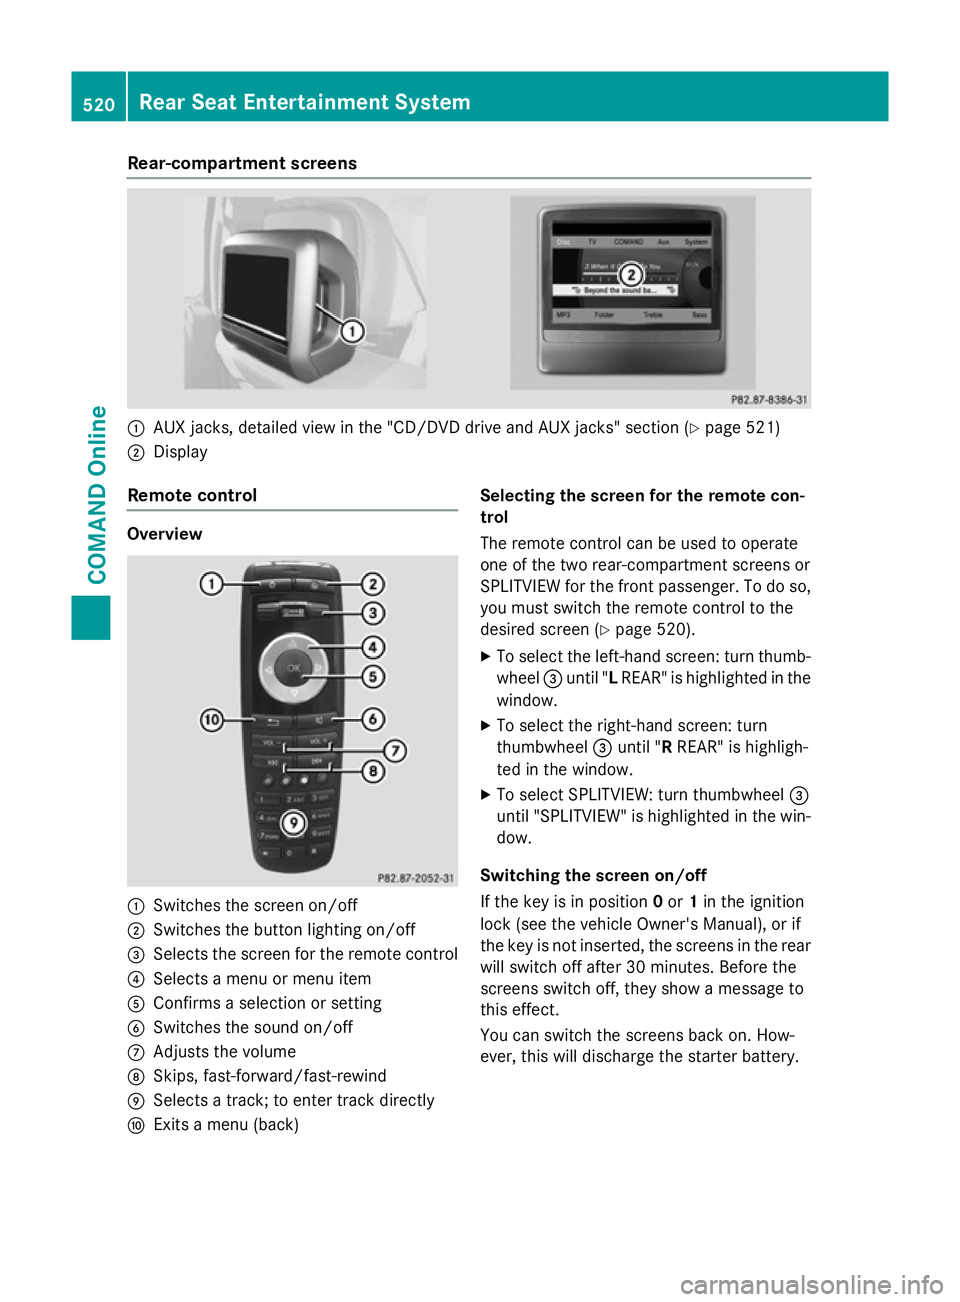
Rear-compartment screens
:
AUX jacks, detailed view in the "CD/DVD drive and AUX jacks" section (Y page 521)
; Display
Remote control Overview
:
Switches the screen on/off
; Switches the button lighting on/off
= Selects the screen for the remote control
? Selects a menu or menu item
A Confirms a selection or setting
B Switches the sound on/off
C Adjusts the volume
D Skips, fast-forward/fast-rewind
E Selects a track; to enter track directly
F Exits a menu (back) Selecting the screen for the remote con-
trol
The remote control can be used to operate
one of the two rear-compartment screens or
SPLITVIEW for the front passenger. To do so,
you must switch the remote control to the
desired screen (Y page 520).
X To select the left-hand screen: turn thumb-
wheel =until "L REAR" is highlighted in the
window.
X To select the right-hand screen: turn
thumbwheel =until "R REAR" is highligh-
ted in the window.
X To select SPLITVIEW: turn thumbwheel =
until "SPLITVIEW" is highlighted in the win-
dow.
Switching the screen on/off
If the key is in position 0or 1in the ignition
lock (see the vehicle Owner's Manual), or if
the key is not inserted, the screens in the rear
will switch off after 30 minutes. Before the
screens switch off, they show a message to
this effect.
You can switch the screens back on. How-
ever, this will discharge the starter battery. 520
Rear Seat Entertainment SystemCOMAND Online
Page 532 of 637
X
Select Track list
Track list (audio CD/DVD mode)
or Folder
Folder (MP3 mode) using
the :=; buttons on the remote
control, and confirm by pressing the 9
button.
or
X Press the 9button when the display/
selection window is active.
The track list appears. The #dot indicates
the current track.
X Select a track using the 9:buttons
and press the 9button to confirm.
Making a selection by entering the track
number directly
X Press the hbutton on the remote con-
trol.
The track entry display appears.
Example: track 2 X Press number button 2.
Example: track 12 X Press the corresponding number keys in
rapid succession.
X Wait for approximately three seconds after
making the entry.
You will hear the track that has been
entered. The corresponding basic menu
then reappears.
i It is not possible to enter numbers that
exceed the number of tracks on the CD or in
the currently active folder.
Fast forward/rewind X
With the display/selection window active,
press the =or; button on the
remote control repeatedly until you reach
the desired position.
or
X Press and hold the EorF button
until the desired position is reached. Selecting a folder This function is only available in MP3 mode.
X Select Folder Folder in MP3 mode using
the :=; buttons on the remote
control and press the 9button to confirm.
or
X Press the 9button when the display/
selection window is active.
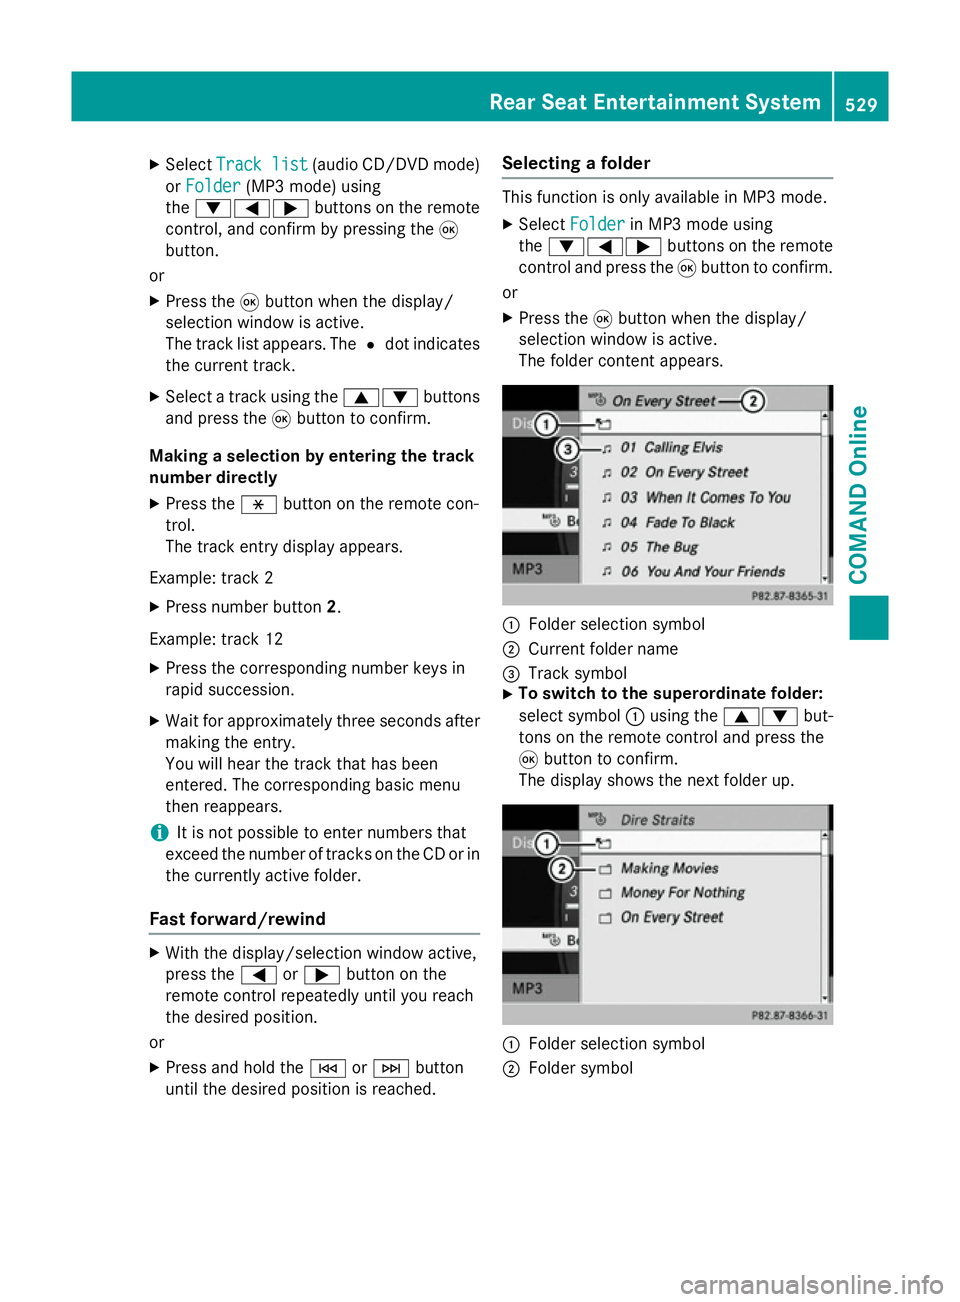
The folder content appears. :
Folder selection symbol
; Current folder name
= Track symbol
X To switch to the superordinate folder:
select symbol :using the 9: but-
tons on the remote control and press the
9 button to confirm.
The display shows the next folder up. :
Folder selection symbol
; Folder symbol Rear Seat Entertainment System
529COMAND Online Z
Page 536 of 637
X
To set a channel: enter the channel num-
ber using the number keys and press the 9
button to confirm.
or
X Press and hold the number key until the
entry line is hidden.
The channel is set.
i If you have not entered a programme
number, the first programme with ade-
quate reception will be set for a digital
channel.
i You can enter channels or programmes
available in your country even if the recep-
tion is currently not adequate.
If you enter channels that are either not
intended for or not allowed in your country,
the Invalid channel number
Invalid channel number message
appears.
Storing TV channels Storing channels manually
There are ten preset positions available.
X To show the menu: press the9button on
the remote control or confirm Menu Menuby
pressing the 9button while the control
menu is shown.
X Select Presets
Presets using the =; but-
tons and press the 9button to confirm.
The channel presets appear. The #dot
indicates under which preset the currently
selected channel is stored.
X To store a channel: select a preset using
the 9: buttons and press and hold
the 9button until you hear a tone.
or
X Press and hold a number button until you
hear a tone.
The TV picture then reappears.
Storing channels automatically
This function automatically stores channels
with adequate reception in order of their reception quality. Any channels stored man-
ually in the preset memory will be lost.
X To show the menu: press the9button on
the remote control or confirm Menu
Menu by
pressing the 9button while the control
menu is shown.
X Select Presets Presets using the =; but-
tons and press the 9button to confirm.
X Select Autostore
Autostore and press the 9button
to confirm.
The Rear Seat Entertainment System
searches for channels it can receive. The
available channels are automatically stored
in the preset positions.
Information about the current pro-
gramme This function is only available on digital TV
channels. If you are watching an analogue TV channel, this menu cannot be selected.
X To show the menu: press the9button on
the remote control or confirm Menu
Menu by
pressing the 9button while the control
menu is shown.
X Select Info Infousing the =; buttons
and press the 9button to confirm.
If the current TV channel provides the cor-
responding information, this will be dis-
played.
i It can take a few seconds for the infor-
mation to be displayed.
Displaying the current programme or
programme preview This function is only available on digital TV
channels. The programme preview is also
referred to as the electronic programme
guide (EPG).Rear Seat Entertainment System
533COMAND Online Z
Page 538 of 637
X
Select TV
TVusing the =; buttons and
press the 9button to confirm.
X Select TV standard
TV standard and press the9but-
ton to confirm.
A list appears showing the reception
regions. The #dot in front of a list entry
indicates the currently selected reception
area or country.
X Select the reception area and press the 9
button to confirm.
A message appears to inform you that if the
wrong country is set, correct reception will
not be possible.
X Select Yes YesorNo
No and press the 9button to
confirm.
If you select Yes
Yes , the Rear Seat Entertain-
ment System switches the country.
If you select No No, the country list will appear
again.
Teletext Switching teletext on/off
X To show the menu: press the9button on
the remote control.
or
X Select Menu
Menuwhile the control menu is
shown and press the 9button to confirm.
X To switch on: selectText
Text using the
=; buttons and press the 9button
to confirm.
The first teletext page is displayed.
X To switch off: press the%back button.
Selecting a teletext page
X To select a page directly: press the cor-
responding number keys on the remote
control.
X To call up the previous/next page: press
the 9 or: button.
i You can only enter pages that are permis-
sible for teletext between 100 and 899. Dynamic teletext page
A dynamic teletext page consists of several
subpages. The display automatically changes
to the next page after a certain time. Video DVD mode
Important safety notes G
WARNING
The CD/DVD drive is a class 1 laser product. If you open the housing of the CD/DVD drive,
invisible laser beams may be released. These laser beams may damage your retina. There is
a risk of injury.
You must not open the casing. Always have
maintenance work and repairs carried out at a
qualified specialist workshop.
General notes DVD playback requirements
You may encounter playback problems when
playing copied discs. There are a large variety
of discs, DVD authoring software, writing
software and writers available. This variety
means that there is no guarantee that the
Rear Seat Entertainment System will be able
to play video DVDs that you have copied your-
self.
Other information can be found under Video
(Y page 511). Information regarding
COMAND Online also applies to the Rear Seat
Entertainment System.
Function restrictions
Depending on the DVD, it is possible that cer-
tain functions or actions described in this
section will be temporarily blocked or may not function at all. As soon as you try to activate
these functions or actions, you will see the K
symbol in the display. Rear Seat Entertainment System
535COMAND Online Z
Page 540 of 637
X
To continue playback: selectÌand
press the 9button to confirm.
The menu is hidden.
Stop function X
To show the menu: press the9button on
the remote control.
or
X Select Menu
Menuwhile the control menu is
shown and press the 9button to confirm.
X To interrupt playback: selectÉand
press the 9button to confirm.
The Ë display changes to Ì. The
video image is hidden.
X To continue playback: selectÌand
press the 9button to confirm.
Playback continues from the point where it
was interrupted. The menu is hidden.
X To stop playback: while playback is inter-
rupted, select Éagain and press the 9
button to confirm.
Playback stops and returns to the begin-
ning of the DVD. Ìis highlighted.
X To restart playback: selectÌand
press the 9button to confirm.
Playback starts from the beginning of the
DVD.
Selecting a scene/chapter General notes
Also observe the information on the video
DVD mode (Y page 513).
Skipping forwards/backwards
X Press the =or; button on the
remote control.
or
X Press the EorF button.
The control menu (Y page 512) appears for
approximately eight seconds. Selecting a scene/chapter directly
The examples illustrate how to select scene/
chapter 5.
X Option 1: while the film is playing, press
the h button on the remote control.
X Press the corresponding number key, such
as 5.
X Option 2: while the film is playing, press
the 9button on the remote control and
show the menu.
X Select DVD-V DVD-Vand press the 9button to
confirm.
X Select DVD functions DVD functions and press the9
button to confirm.
X Select Scene
Scene selection
selection and press the 9
button to confirm.
X Select 5
5using the 9or: button and
press the 9button to confirm.
In both cases, playback will begin from the
5th scene/chapter after a brief pause.
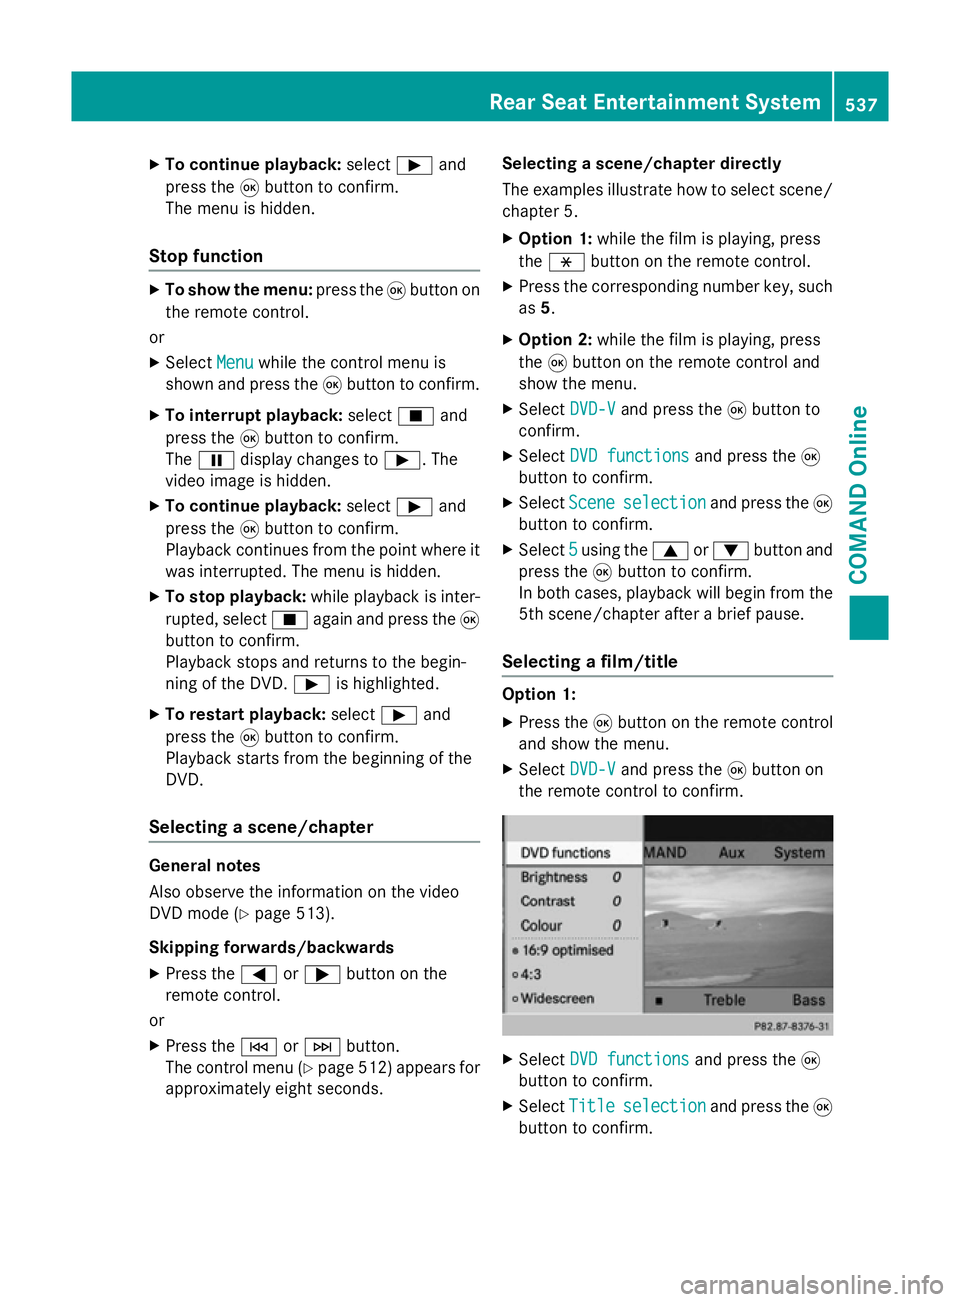
Selecting a film/title Option 1:
X Press the 9button on the remote control
and show the menu.
X Select DVD-V
DVD-Vand press the 9button on
the remote control to confirm. X
Select DVD functions DVD functions and press the9
button to confirm.
X Select Title Title selection
selection and press the 9
button to confirm. Rear Seat Entertainment System
537COMAND Online Z
Page 547 of 637
Useful information
i This Owner's Manual describes all mod-
els, series and optional equipment for your
vehicle that were available at the time of
going to press. National variations are pos- sible. Note that your vehicle may not be
equipped with all of the functions descri-
bed. This is also the case for systems and
functions relevant to safety.
i Read the information on qualified special-
ist workshops: (Y page 34). Stowage areas
Stowage spaces
Important safety notes G
WARNING
If you do not correctly store objects in the
vehicle interior, they can slip or be flung
around, thus striking vehicle occupants.
There is a risk of injury, especially when brak- ing or abruptly changing directions.
R Always store objects so that they cannot be
flung around in these or in similar situa-
tions.
R Always make sure that objects do not pro-
trude from stowage compartments, lug-
gage nets or stowage nets.
R Close lockable stowage compartments
while driving.
R Stow and secure objects that are heavy,
hard, pointy, sharp-edged, fragile or too
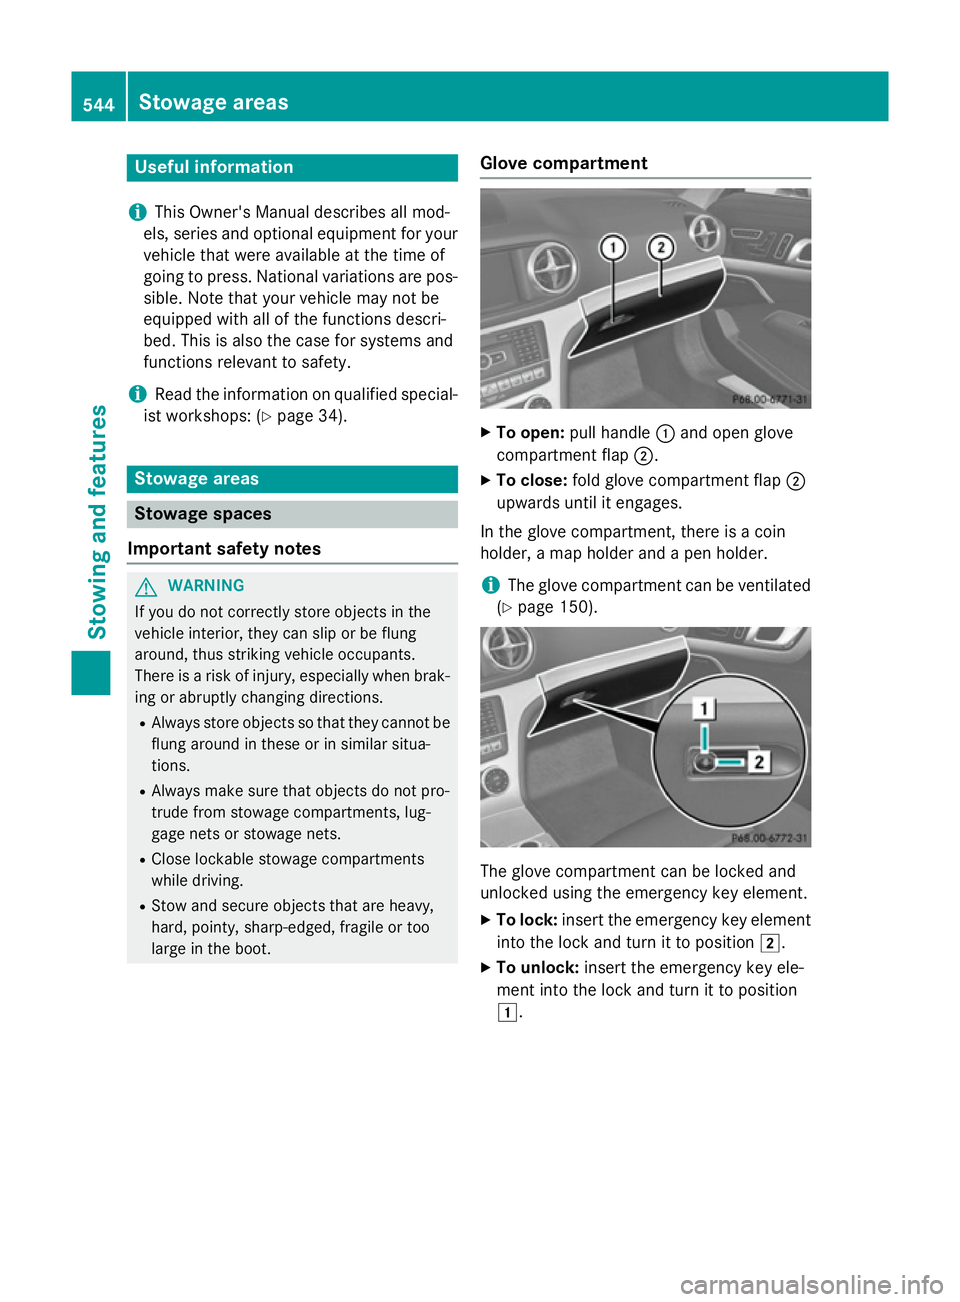
large in the boot. Glove compartment X
To open: pull handle :and open glove
compartment flap ;.
X To close: fold glove compartment flap ;
upwards until it engages.
In the glove compartment, there is a coin
holder, a map holder and a pen holder.
i The glove compartment can be ventilated
(Y page 150). The glove compartment can be locked and
unlocked using the emergency key element.
X To lock: insert the emergency key element
into the lock and turn it to position 2.
X To unlock: insert the emergency key ele-
ment into the lock and turn it to position
1. 544
Stowage areasStowing and features
Page 553 of 637
X
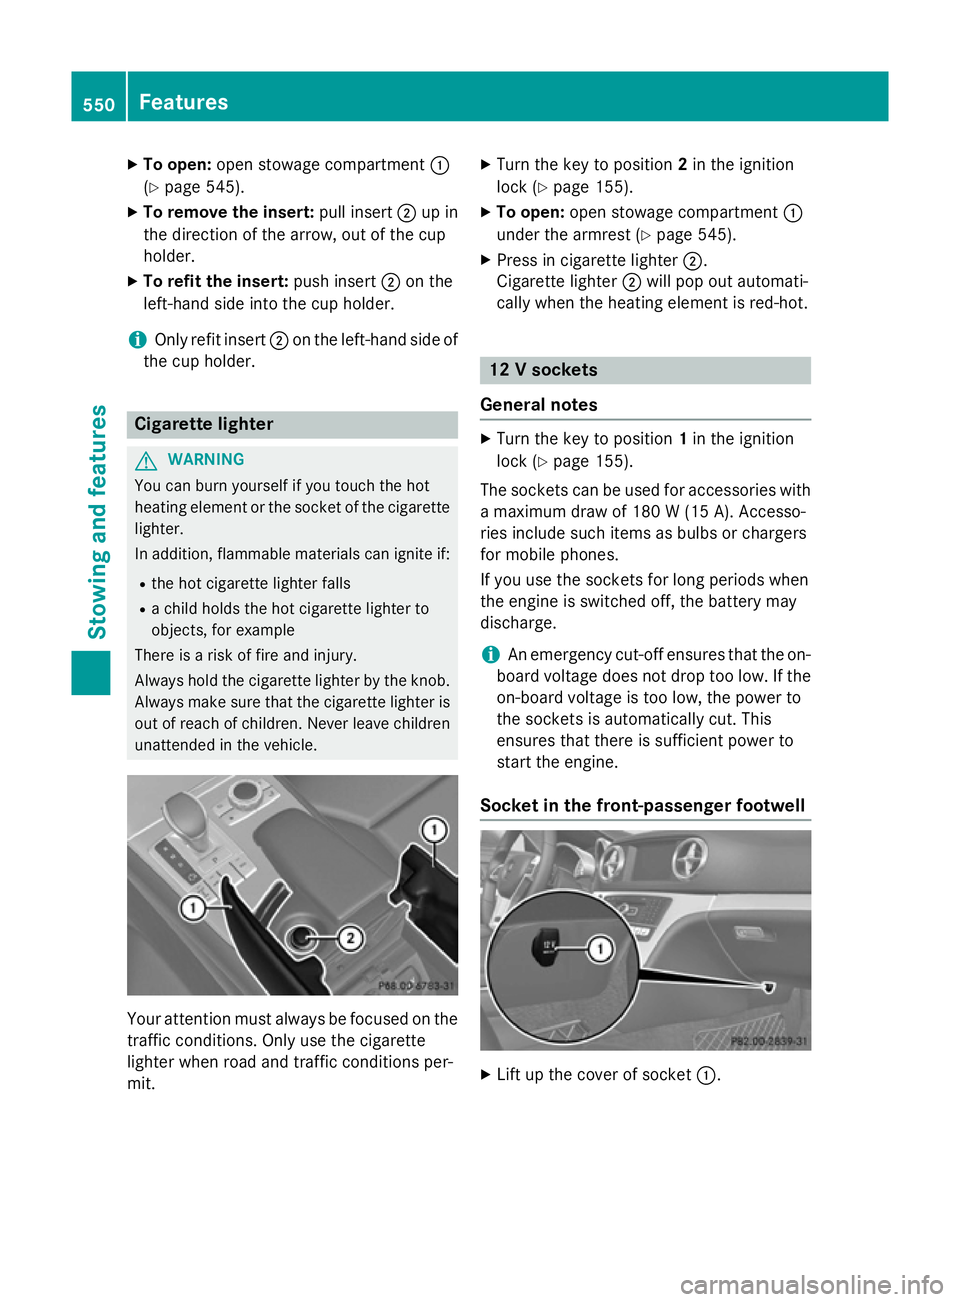
To open: open stowage compartment :
(Y page 545).
X To remove the insert: pull insert;up in
the direction of the arrow, out of the cup
holder.
X To refit the insert: push insert;on the
left-hand side into the cup holder.
i Only refit insert
;on the left-hand side of
the cup holder. Cigarette lighter
G
WARNING
You can burn yourself if you touch the hot
heating element or the socket of the cigarette lighter.
In addition, flammable materials can ignite if:
R the hot cigarette lighter falls
R a child holds the hot cigarette lighter to
objects, for example
There is a risk of fire and injury.
Always hold the cigarette lighter by the knob.
Always make sure that the cigarette lighter is
out of reach of children. Never leave children unattended in the vehicle. Your attention must always be focused on the
traffic conditions. Only use the cigarette
lighter when road and traffic conditions per-
mit. X
Turn the key to position 2in the ignition
lock (Y page 155).
X To open: open stowage compartment :
under the armrest (Y page 545).
X Press in cigarette lighter ;.
Cigarette lighter ;will pop out automati-
cally when the heating element is red-hot. 12 V sockets
General notes X
Turn the key to position 1in the ignition
lock (Y page 155).
The sockets can be used for accessories with a maximum draw of 180 W(15 A). Accesso-
ries include such items as bulbs or chargers
for mobile phones.
If you use the sockets for long periods when
the engine is switched off, the battery may
discharge.
i An emergency cut-off ensures that the on-
board voltage does not drop too low. If the
on-board voltage is too low, the power to
the sockets is automatically cut. This
ensures that there is sufficient power to
start the engine.
Socket in the front-passenger footwell X
Lift up the cover of socket :.550
FeaturesStowing and fea
tures
Page 555 of 637
More information on suitable mobile phones,
mobile phone brackets and on connecting
Bluetooth ®
-capable mobile phones with
COMAND Online can be obtained:
R at your Mercedes-Benz Service Centre
R on the Internet at http://www.mercedes-
benz.com/connect
i The functions and services available when
you use the phone depend on your mobile
phone model and service provider.
Using a mobile phone If the mobile phone is inserted in the mobile
phone bracket, the mobile phone will be
charged and connected with the exterior aer-
ial.
X Open the telephone compartment
(Y page 545).
X Place the mobile phone bracket into the
pre-installed fitting; see the separate instal-
lation instructions for the mobile phone fit-
ting.
X Insert the mobile phone into the mobile
phone bracket; see the separate installa-
tion instructions for the mobile phone fit-
ting.
Operating the mobile phone You can operate the telephone using the
6 and~ buttons on the multifunction
steering wheel. You can operate other mobile
phone functions via the on-board computer
(Y page 235).
When you remove the key from the ignition
lock, the mobile phone is disconnected from
the hands-free system. Active calls will first
be transferred to the mobile phone directly. Charge maintenance socket
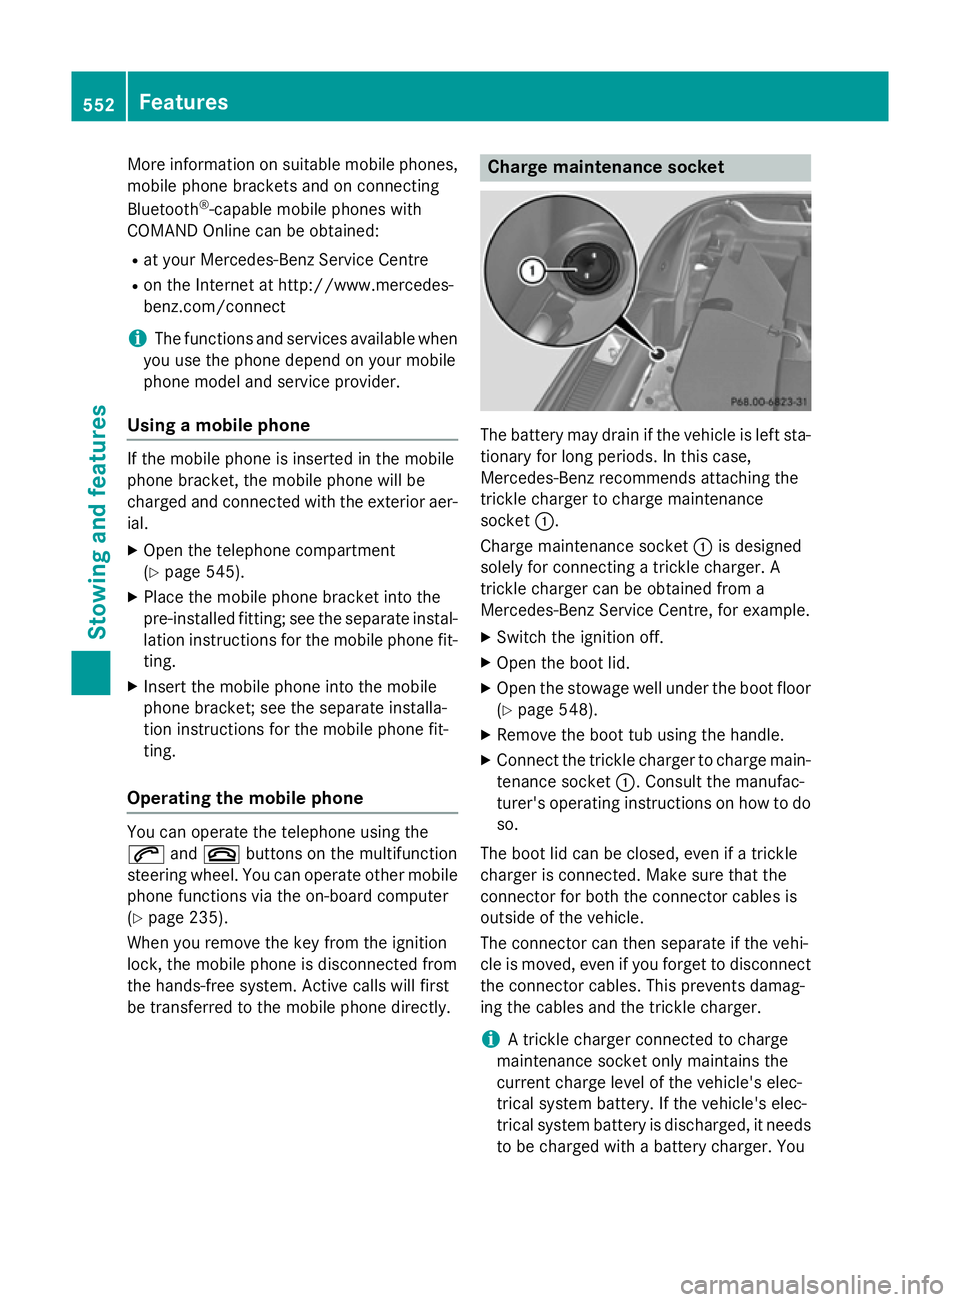
The battery may drain if the vehicle is left sta-
tionary for long periods. In this case,
Mercedes-Benz recommends attaching the
trickle charger to charge maintenance
socket :.
Charge maintenance socket :is designed
solely for connecting a trickle charger. A
trickle charger can be obtained from a
Mercedes-Benz Service Centre, for example.
X Switch the ignition off.
X Open the boot lid.
X Open the stowage well under the boot floor
(Y page 548).
X Remove the boot tub using the handle.
X Connect the trickle charger to charge main-
tenance socket :. Consult the manufac-
turer's operating instructions on how to do
so.
The boot lid can be closed, even if a trickle
charger is connected. Make sure that the
connector for both the connector cables is
outside of the vehicle.
The connector can then separate if the vehi-
cle is moved, even if you forget to disconnect
the connector cables. This prevents damag-
ing the cables and the trickle charger.
i A trickle charger connected to charge
maintenance socket only maintains the
current charge level of the vehicle's elec-
trical system battery. If the vehicle's elec-
trical system battery is discharged, it needs
to be charged with a battery charger. You 552
FeaturesStowing and features