2012 MERCEDES-BENZ SL ROADSTER height
[x] Cancel search: heightPage 8 of 637

Adjusting the vehicle height
Active Body Control (AMG vehi-
cles) .............................................. .202
Active Body Control (except AMG
vehicles) ........................................ 199
Adjusting the volume
COMAND ....................................... 299
Navigation messages ..................... 299
Traffic announcements .................. 299
AIR FLOW .......................................... .144
Air pressure
see Tyre pressure
Air vents
Glove compartment ....................... 150
Important safety notes .................. 150
Setting .......................................... .150
Setting the blower output of the
AIRSCARF vents ............................ .151
Setting the centre air vents ........... 150
Setting the side air vents .............. .150
Switching AIRSCARF on/off .......... 117
Air-conditioning system
see Climate control
Airbag
Headbag .......................................... 55
Airbags
Front airbag (driver, front
passenger) ....................................... 54
Important safety guidelines ............. 52
Sidebag ............................................ 54
Triggering ......................................... 51
AIRSCARF
Switching on/off ........................... 117
AIRSCARF vents
Setting the blower output .............. 151
Alarm
ATA (Anti-Theft Alarm system) ......... 79
Switching off (ATA) .......................... 79
Switching the function on/off
(ATA) ................................................ 79
Alarm system
see ATA (Anti-Theft Alarm system)
Alternate route .................................. 357
Ambient lighting
Setting the brightness (on-board
computer) ...................................... 241
Setting the colour (on-board com-
puter) ............................................. 241 AMG
Button for AMG menu .................... 168
SETUP ............................................ 168
AMG menu (on-board computer) ..... 244
Anti-glare film ................................... .559
Anti-lock braking system
see ABS (Anti-lock Braking System)
Anti-Theft Alarm system
see ATA (Anti-Theft Alarm system)
Aquaplaning ....................................... 181
Ashtray ............................................... 549
Assistance display (on-board com-
puter) ................................................. .237
Assistance menu (on-board com-
puter) ................................................. .237
ASSYST PLUS
Displaying a service message ....... .567
Hiding a service message .............. 567
Resetting the service interval dis-
play ................................................ 567
Service message ............................ 566
Special service requirements ......... 567
ATA (Anti-Theft Alarm system)
Activating/deactivating ................... 79
Function .......................................... .79
Interior motion sensor .....................80
Switching off the alarm .................... 79
Tow-away protectio n ........................80
ATTENTION ASSIST
Activating/deactivating ................. 238
Display message ............................ 261
Function/notes ............................ .214
Audio
Radio mode ................................... 462
Audio CD/DVD or MP3 mode
Switching to (Rear Seat Entertain-ment System) ................................ 528
Audio DVD
Pause function ............................... 474
Playback options ........................... 478
Safety notes .................................. 468
Setting the audio format ................ 478
Stop function ................................. 474
Switching to ................................... 472
Audio menu (COMAND Online) ......... 463
Audio menu (on-board computer) .... 234 Index
5
Page 68 of 637
An incorrectly fitted child restraint system
could come loose and seriously or even fatally injure the child or other vehicle occupants.
When fitting the child restraint system, always
make sure that it is engaged correctly in the
ISOFIX securing loops on both sides. X
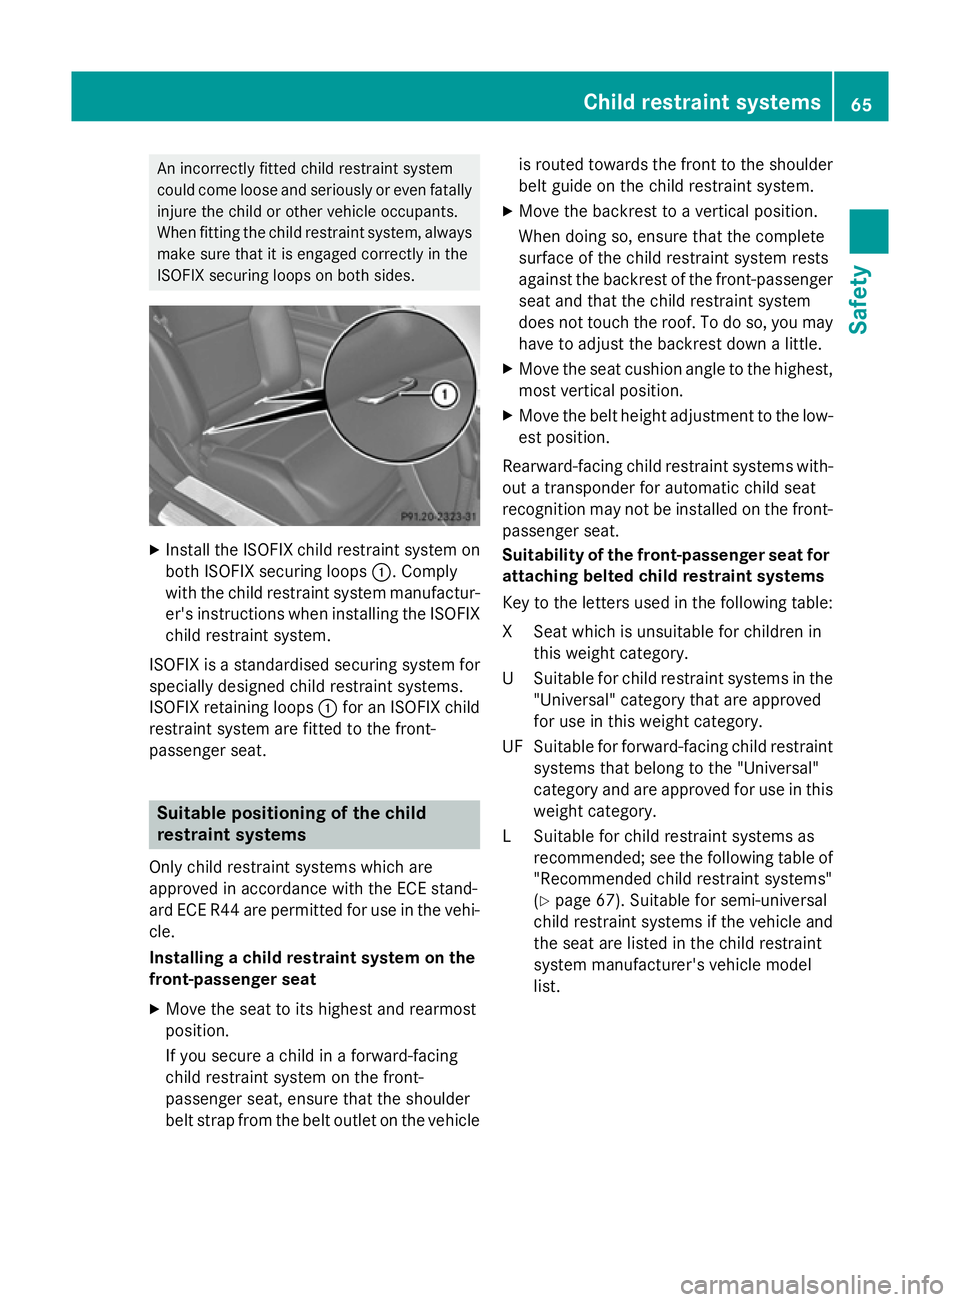
Install the ISOFIX child restraint system on
both ISOFIX securing loops :. Comply
with the child restraint system manufactur- er's instructions when installing the ISOFIXchild restraint system.
ISOFIX is a standardised securing system for
specially designed child restraint systems.
ISOFIX retaining loops :for an ISOFIX child
restraint system are fitted to the front-
passenger seat. Suitable positioning of the child
restraint systems
Only child restraint systems which are
approved in accordance with the ECE stand-
ard ECE R44 are permitted for use in the vehi- cle.
Installing a child restraint system on the
front-passenger seat
X Move the seat to its highest and rearmost
position.
If you secure a child in a forward-facing
child restraint system on the front-
passenger seat, ensure that the shoulder
belt strap from the belt outlet on the vehicle is routed towards the front to the shoulder
belt guide on the child restraint system.
X Move the backrest to a vertical position.
When doing so, ensure that the complete
surface of the child restraint system rests
against the backrest of the front-passenger
seat and that the child restraint system
does not touch the roof. To do so, you may have to adjust the backrest down a little.
X Move the seat cushion angle to the highest,
most vertical position.
X Move the belt height adjustment to the low-
est position.
Rearward-facing child restraint systems with- out a transponder for automatic child seat
recognition may not be installed on the front-
passenger seat.
Suitability of the front-passenger seat for attaching belted child restraint systems
Key to the letters used in the following table:
XS eat which is unsuitable for children in
this weight category.
US uitable for child restraint systems in the
"Universal" category that are approved
for use in this weight category.
UF Suitable for forward-facing child restraint systems that belong to the "Universal"
category and are approved for use in this
weight category.
LS uitable for child restraint systems as
recommended; see the following table of
"Recommended child restraint systems"
(Y page 67). Suitable for semi-universal
child restraint systems if the vehicle and
the seat are listed in the child restraint
system manufacturer's vehicle model
list. Child restraint systems
65Safety Z
Page 70 of 637
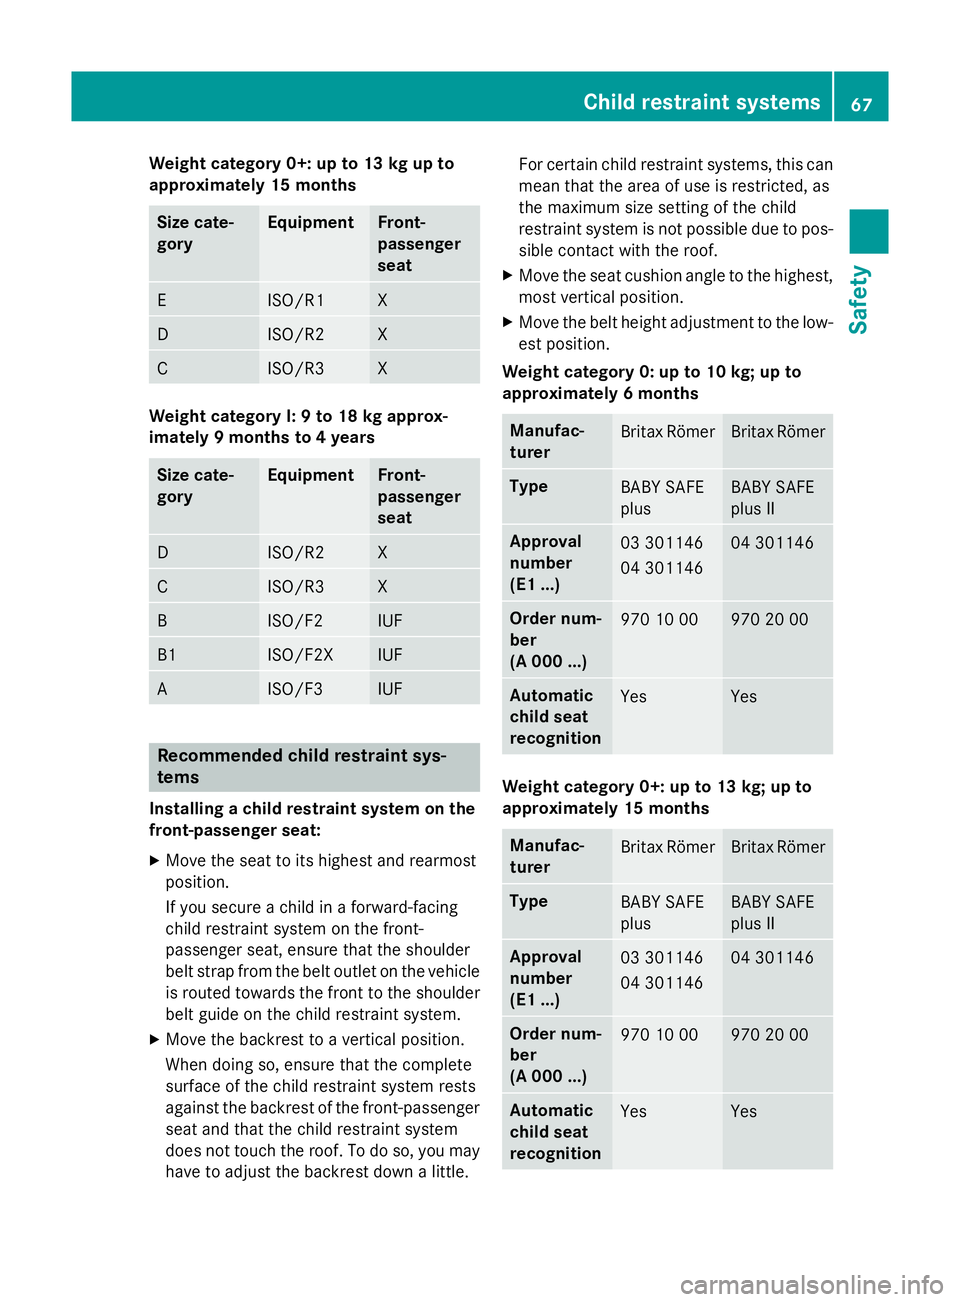
Weight category 0+: up to 13 kg up to
approximately 15 months Size cate-
gory Equipment Front-
passenger
seat
E ISO/R1 X
D ISO/R2 X
C ISO/R3 X
Weight category I: 9 to 18 kg approx-
imately 9 months to 4 years
Size cate-
gory Equipment Front-
passenger
seat
D ISO/R2 X
C ISO/R3 X
B ISO/F2 IUF
B1 ISO/F2X IUF
A ISO/F3 IUF
Recommended child restraint sys-
tems
Installing a child restraint system on the
front-passenger seat:
X Move the seat to its highest and rearmost
position.
If you secure a child in a forward-facing
child restraint system on the front-
passenger seat, ensure that the shoulder
belt strap from the belt outlet on the vehicle is routed towards the front to the shoulder
belt guide on the child restraint system.
X Move the backrest to a vertical position.
When doing so, ensure that the complete
surface of the child restraint system rests
against the backrest of the front-passenger
seat and that the child restraint system
does not touch the roof. To do so, you may have to adjust the backrest down a little. For certain child restraint systems, this can
mean that the area of use is restricted, as
the maximum size setting of the child
restraint system is not possible due to pos- sible contact with the roof.
X Move the seat cushion angle to the highest,
most vertical position.
X Move the belt height adjustment to the low-
est position.
Weight category 0: up to 10 kg; up to
approximately 6 months Manufac-
turer
Britax Römer Britax Römer
Type
BABY SAFE
plus BABY SAFE
plus II
Approval
number
(E1 ...)
03 301146
04 301146 04 301146
Order num-
ber
(A 000 ...)
970 10 00 970 20 00
Automatic
child seat
recognition
Yes Yes
Weight category 0+: up to 13 kg; up to
approximately 15 months
Manufac-
turer
Britax Römer Britax Römer
Type
BABY SAFE
plus BABY SAFE
plus II
Approval
number
(E1 ...)
03 301146
04 301146 04 301146
Order num-
ber
(A 000 ...)
970 10 00 970 20 00
Automatic
child seat
recognition
Yes YesChild restraint systems
67Safety Z
Page 116 of 637
Seats
Important safety notes
G
WARNING
If children adjust the seats, they could
become trapped, especially if they are unat-
tended. There is a risk of injury.
When leaving the vehicle, always take the key with you and lock the vehicle. Never leave
children unattended in the vehicle. G
WARNING
If the driver's seat is not engaged, it can move unexpectedly while the vehicle is in motion.
This could cause you to lose control of the
vehicle. There is a risk of an accident.
Always make sure that the driver's seat is
engaged before starting the engine. G
WARNING
If you adjust the seat height carelessly, you or other vehicle occupants could be trapped andthereby injured. Children in particular could
accidentally press the electrical seat adjust-
ment buttons and become trapped. There is a
risk of injury.
While moving the seats, make sure that your
hands or other body parts do not get under the
lever assembly of the seat adjustment sys-
tem. G
WARNING
When adjusting a seat, you or another vehicle occupant could become trapped by the guiderail of the seat, for instance. There is a risk of
injury.
Make sure that no one has any part of their
body within the sweep of the seat when
adjusting it. G
WARNING
The head restraints cannot provide the inten-
ded protection unless they are fitted and
adjusted correctly. There is an increased risk of injury to the head and neck in the event of
an accident or sudden braking, for example.
Always drive with the head restraints fitted.
Ensure that the centre of the head restraints
support the back of each vehicle occupant's
head at eye level before driving off. G
WARNING
You could lose control of the vehicle while
driving if you:
R adjust the driver's seat, steering wheel or
mirror
R fasten the seat belt.
There is a risk of an accident.
Adjust the driver's seat, steering wheel or
mirror and fasten the seat belt before starting
the engine.
! To avoid damage to the seats and the seat
heating, observe the following information:
R do not spill any liquids on the seats. If
liquid is spilled on the seats, dry them as
soon as possible.
R if the seat covers are damp or wet, do not
switch on the seat heating. The seat
heating should also not be used to dry
the seats.
R clean the seat covers as recommended;
see the "Interior care" section.
R do not transport heavy loads on the
seats. Do not place sharp objects on the
seat cushions, e.g. knives, nails or tools. The seats should only be occupied by
passengers, if possible.
R when the seat heating is in operation, do
not cover the seats with insulating mate- rials, e.g. blankets, coats, bags, seat cov-
ers, child seats or booster seats. Seats
113Seats, steering wheel and mirrors Z
Page 117 of 637
!
To avoid damage to the seats and the seat
heating, observe the following information:
R do not spill any liquids on the seats. If
liquid is spilled on the seats, dry them as soon as possible.
R if the seat covers are damp or wet, do not
switch on the seat heating. The seat
heating should also not be used to dry
the seats.
R clean the seat covers as recommended;
see "Interior care".
R do not transport heavy loads on the
seats. Do not place sharp objects on the seat cushions, e.g. knives, nails or tools. The seats should only be occupied by
passengers, if possible.
R when the seat heating is in operation, do
not cover the seats with insulating mate-
rials, e.g. blankets, coats, bags, seat cov- ers, child seats or booster seats.
! Make sure that there are no objects in the
footwell or behind the seats when moving
the seat back. There is a risk that the seats and/or the objects could be damaged.
i The head restraints cannot be removed.
For more information, contact a qualified
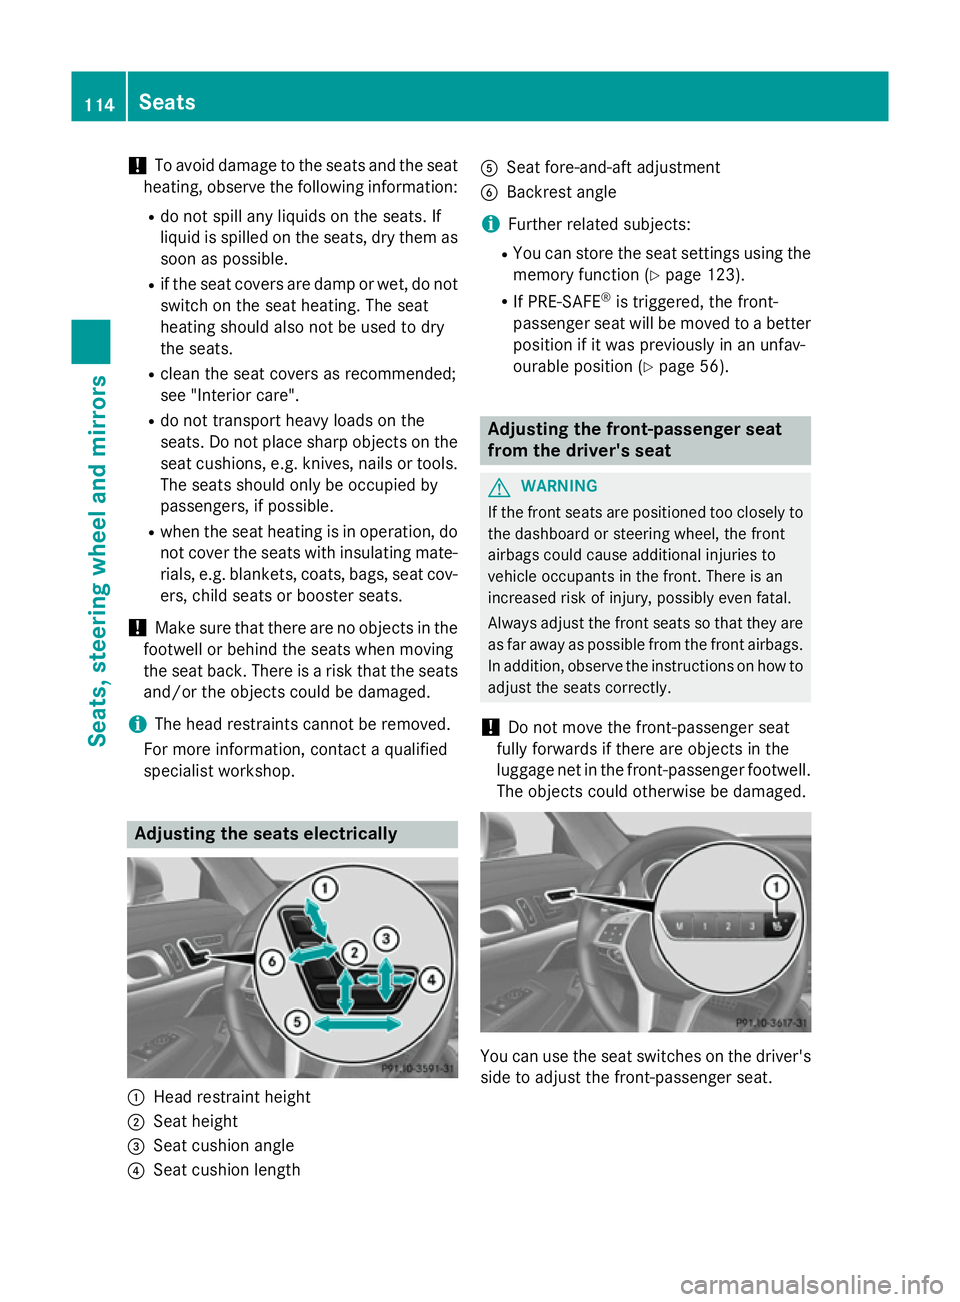
specialist workshop. Adjusting the seats electrically
:
Head restraint height
; Seat height
= Seat cushion angle
? Seat cushion length A
Seat fore-and-aft adjustment
B Backrest angle
i Further related subjects:
R You can store the seat settings using the
memory function (Y page 123).
R If PRE-SAFE ®
is triggered, the front-
passenger seat will be moved to a better
position if it was previously in an unfav-
ourable position (Y page 56). Adjusting the front-passenger seat
from the driver's seat
G
WARNING
If the front seats are positioned too closely to the dashboard or steering wheel, the front
airbags could cause additional injuries to
vehicle occupants in the front. There is an
increased risk of injury, possibly even fatal.
Always adjust the front seats so that they are
as far away as possible from the front airbags.
In addition, observe the instructions on how to
adjust the seats correctly.
! Do not move the front-passenger seat
fully forwards if there are objects in the
luggage net in the front-passenger footwell. The objects could otherwise be damaged. You can use the seat switches on the driver's
side to adjust the front-passenger seat. 114
SeatsSeats, steering wheel and mirrors
Page 118 of 637
X
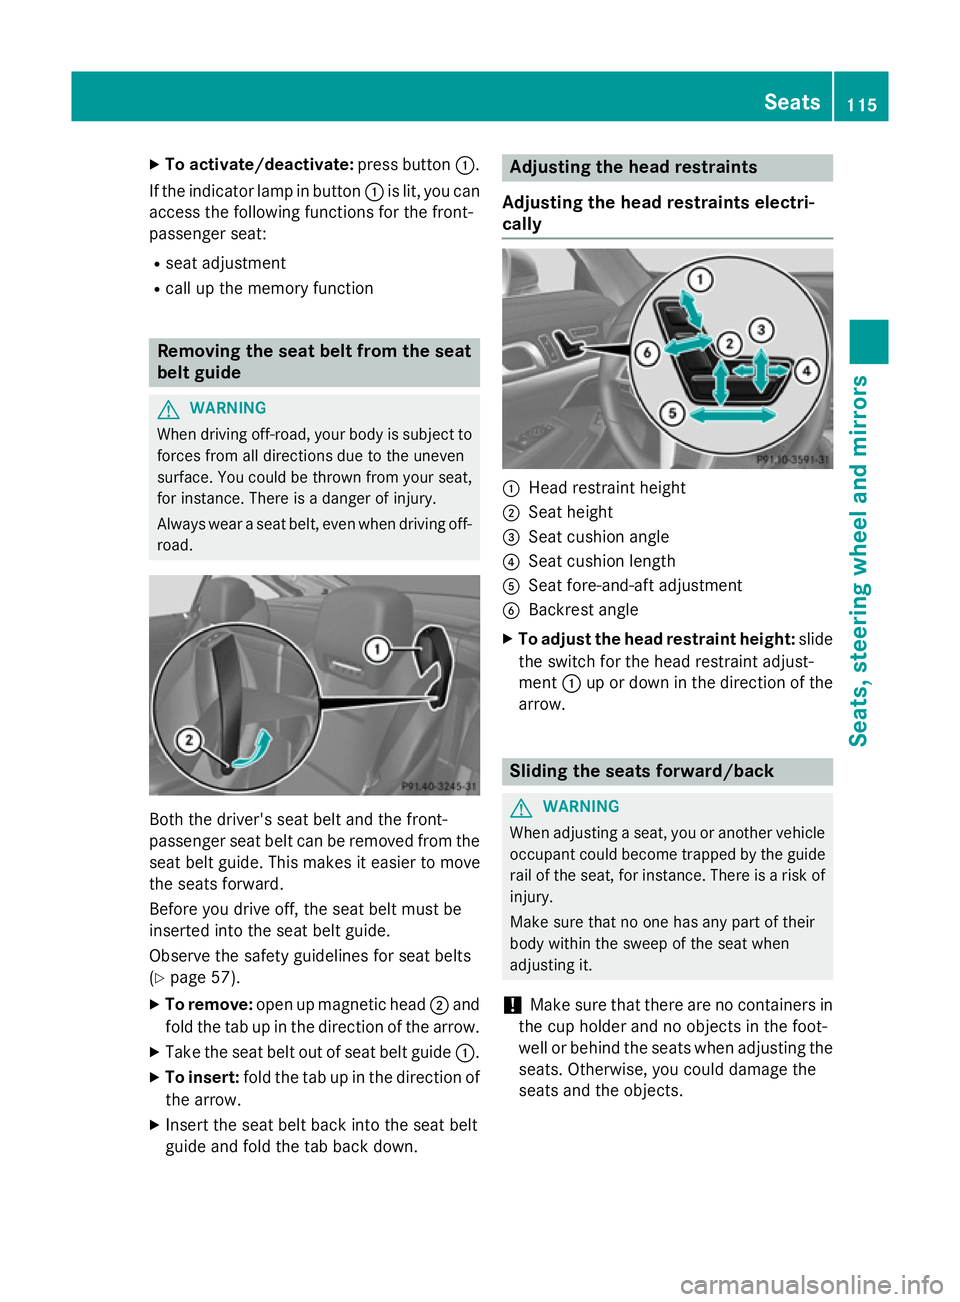
To activate/deactivate: press button:.
If the indicator lamp in button :is lit, you can
access the following functions for the front-
passenger seat:
R seat adjustment
R call up the memory function Removing the seat belt from the seat
belt guide
G
WARNING
When driving off-road, your body is subject to forces from all directions due to the uneven
surface. You could be thrown from your seat,
for instance. There is a danger of injury.
Always wear a seat belt, even when driving off-
road. Both the driver's seat belt and the front-
passenger seat belt can be removed from the
seat belt guide. This makes it easier to move
the seats forward.
Before you drive off, the seat belt must be
inserted into the seat belt guide.
Observe the safety guidelines for seat belts
(Y page 57).
X To remove: open up magnetic head ;and
fold the tab up in the direction of the arrow.
X Take the seat belt out of seat belt guide :.
X To insert: fold the tab up in the direction of
the arrow.
X Insert the seat belt back into the seat belt
guide and fold the tab back down. Adjusting the head restraints
Adjusting the head restraints electri-
cally :
Head restraint height
; Seat height
= Seat cushion angle
? Seat cushion length
A Seat fore-and-aft adjustment
B Backrest angle
X To adjust the head restraint height: slide
the switch for the head restraint adjust-
ment :up or down in the direction of the
arrow. Sliding the seats forward/back
G
WARNING
When adjusting a seat, you or another vehicle occupant could become trapped by the guiderail of the seat, for instance. There is a risk of
injury.
Make sure that no one has any part of their
body within the sweep of the seat when
adjusting it.
! Make sure that there are no containers in
the cup holder and no objects in the foot-
well or behind the seats when adjusting the
seats. Otherwise, you could damage the
seats and the objects. Seats
115Seats, steering wheel and mirrors Z
Page 121 of 637
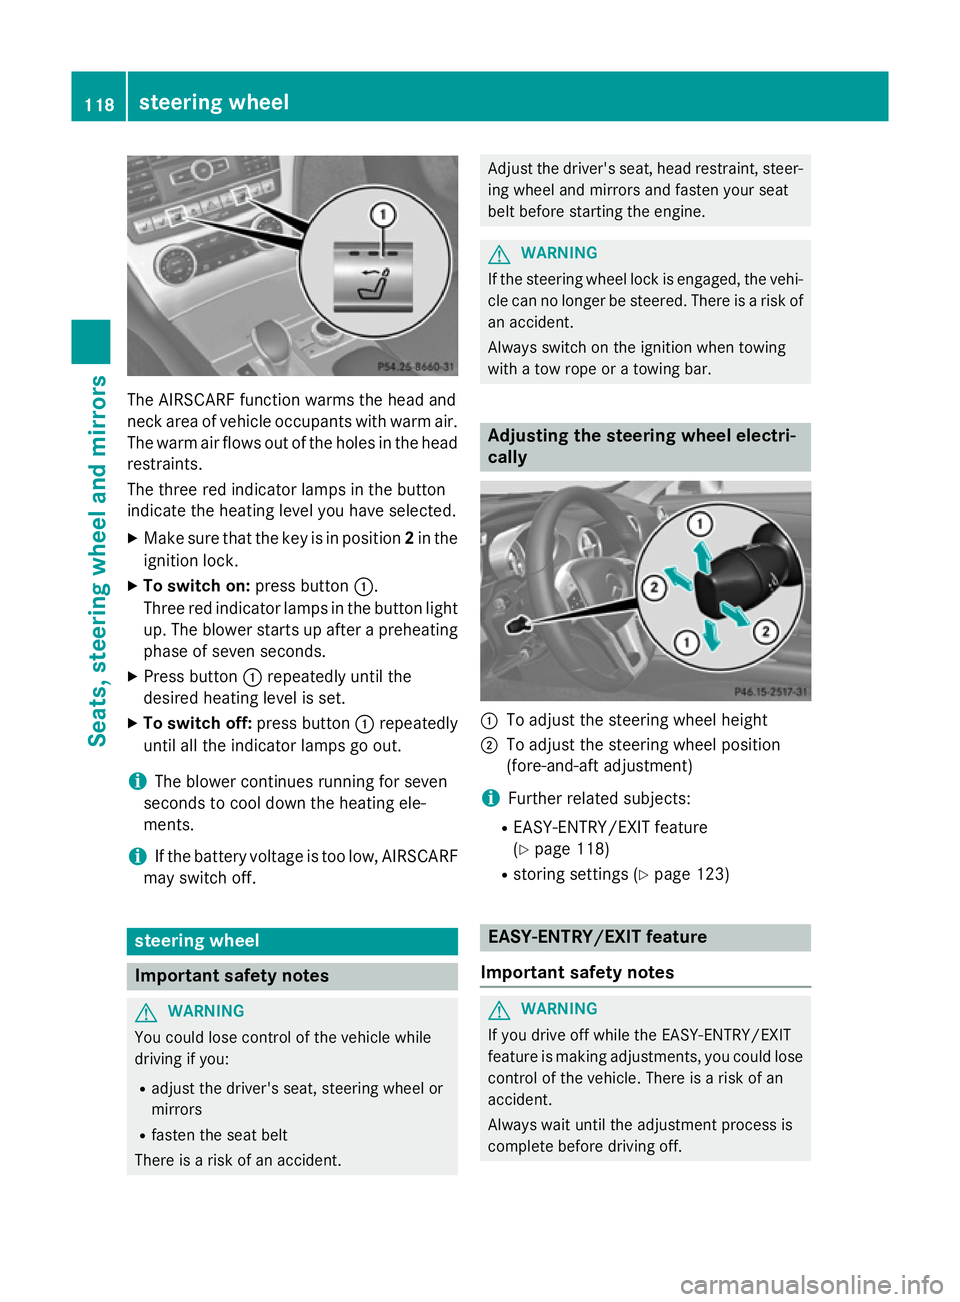
The AIRSCARF function warms the head and
neck area of vehicle occupants with warm air.
The warm air flows out of the holes in the head restraints.
The three red indicator lamps in the button
indicate the heating level you have selected.
X Make sure that the key is in position 2in the
ignition lock.
X To switch on: press button:.
Three red indicator lamps in the button light up. The blower starts up after a preheating
phase of seven seconds.
X Press button :repeatedly until the
desired heating level is set.
X To switch off: press button:repeatedly
until all the indicator lamps go out.
i The blower continues running for seven
seconds to cool down the heating ele-
ments.
i If the battery voltage is too low, AIRSCARF
may switch off. steering wheel
Important safety notes
G
WARNING
You could lose control of the vehicle while
driving if you:
R adjust the driver's seat, steering wheel or
mirrors
R fasten the seat belt
There is a risk of an accident. Adjust the driver's seat, head restraint, steer-
ing wheel and mirrors and fasten your seat
belt before starting the engine. G
WARNING
If the steering wheel lock is engaged, the vehi- cle can no longer be steered. There is a risk of
an accident.
Always switch on the ignition when towing
with a tow rope or a towing bar. Adjusting the steering wheel electri-
cally
:
To adjust the steering wheel height
; To adjust the steering wheel position
(fore-and-aft adjustment)
i Further related subjects:
R EASY-ENTRY/EXIT feature
(Y page 118)
R storing settings (Y page 123) EASY-ENTRY/EXIT feature
Important safety notes G
WARNING
If you drive off while the EASY-ENTRY/EXIT
feature is making adjustments, you could lose
control of the vehicle. There is a risk of an
accident.
Always wait until the adjustment process is
complete before driving off. 118
steering wheelSeats, steering wheel and mirrors
Page 202 of 637
i
After using it several times in short suc-
cession, RACE START will be unavailable
until a certain distance has been driven. Adaptive Damping System
General notes The adjustable suspension system adapts to
the particular driving conditions. Adjustment
depends on your individual selection, i.e.
sporty or comfortable. Your selection
remains stored even if you remove the key
from the ignition lock.
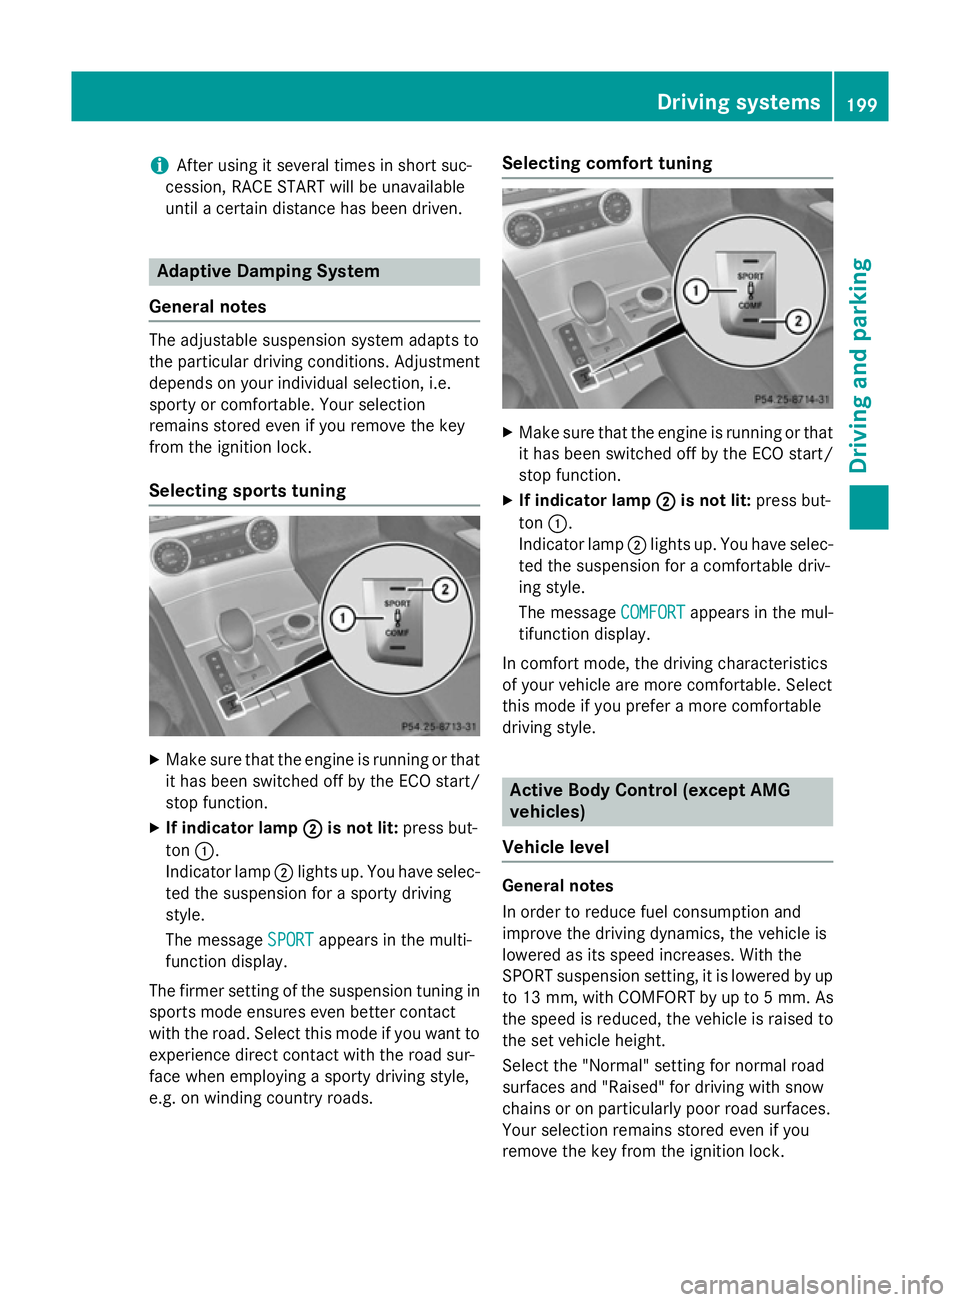
Selecting sports tuning X
Make sure that the engine is running or that
it has been switched off by the ECO start/
stop function.
X If indicator lamp ;
; is not lit: press but-
ton :.
Indicator lamp ;lights up. You have selec-
ted the suspension for a sporty driving
style.
The message SPORT
SPORT appears in the multi-
function display.
The firmer setting of the suspension tuning in
sports mode ensures even better contact
with the road. Select this mode if you want to experience direct contact with the road sur-
face when employing a sporty driving style,
e.g. on winding country roads. Selecting comfort tuning
X
Make sure that the engine is running or that
it has been switched off by the ECO start/
stop function.
X If indicator lamp ; ;is not lit: press but-
ton :.
Indicator lamp ;lights up. You have selec-
ted the suspension for a comfortable driv-
ing style.
The message COMFORT COMFORTappears in the mul-
tifunction display.
In comfort mode, the driving characteristics
of your vehicle are more comfortable. Select
this mode if you prefer a more comfortable
driving style. Active Body Control (except AMG
vehicles)
Vehicle level General notes
In order to reduce fuel consumption and
improve the driving dynamics, the vehicle is
lowered as its speed increases. With the
SPORT suspension setting, it is lowered by up
to 13 mm, with COMFORT by up to 5 mm. As the speed is reduced, the vehicle is raised to
the set vehicle height.
Select the "Normal" setting for normal road
surfaces and "Raised" for driving with snow
chains or on particularly poor road surfaces.
Your selection remains stored even if you
remove the key from the ignition lock. Driving systems
199Driving and parking Z