2012 MERCEDES-BENZ SL ROADSTER height
[x] Cancel search: heightPage 203 of 637
Important safety notes
G
WARNING
The vehicle is slightly lowered if you:
R have selected the SPORT suspension tun-
ing at normal level and
R switch off the engine
Persons in the vicinity of the wheel arch or the underbody may thus become trapped. There
is a risk of injury.
Make sure that nobody is in the vicinity of thewheel arch or the underbody when you switch
off the engine.
! When the engine is switched off, the vehi-
cle is lowered if SPORT suspension tuning
has been selected at the normal level. The
vehicle is automatically lowered by approx- imately 10 mm. Make sure when parking
that you position your vehicle so that it
does not make contact with the kerb as the
vehicle is lowered. Your vehicle could oth-
erwise be damaged.
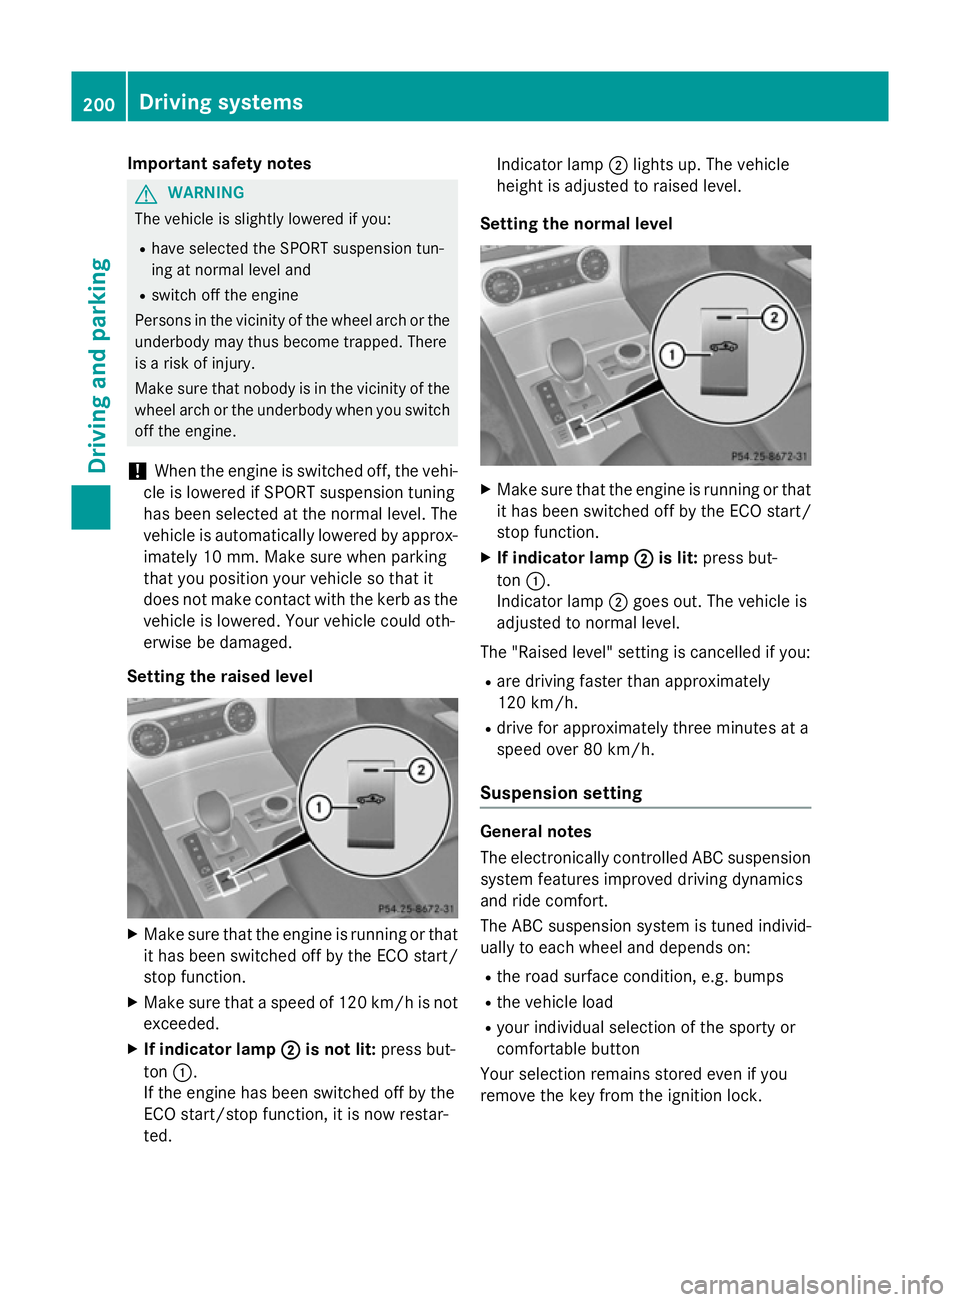
Setting the raised level X
Make sure that the engine is running or that
it has been switched off by the ECO start/
stop function.
X Make sure that a speed of 120 km/h is not
exceeded.
X If indicator lamp ;
; is not lit: press but-
ton :.
If the engine has been switched off by the
ECO start/stop function, it is now restar-
ted. Indicator lamp
;lights up. The vehicle
height is adjusted to raised level.
Setting the normal level X
Make sure that the engine is running or that
it has been switched off by the ECO start/
stop function.
X If indicator lamp ; ;is lit: press but-
ton :.
Indicator lamp ;goes out. The vehicle is
adjusted to normal level.
The "Raised level" setting is cancelled if you:
R are driving faster than approximately
120 km/h.
R drive for approximately three minutes at a
speed over 80 km/h.
Suspension setting General notes
The electronically controlled ABC suspension
system features improved driving dynamics
and ride comfort.
The ABC suspension system is tuned individ-
ually to each wheel and depends on:
R the road surface condition, e.g. bumps
R the vehicle load
R your individual selection of the sporty or
comfortable button
Your selection remains stored even if you
remove the key from the ignition lock. 200
Driving systemsDriving and pa
rking
Page 205 of 637
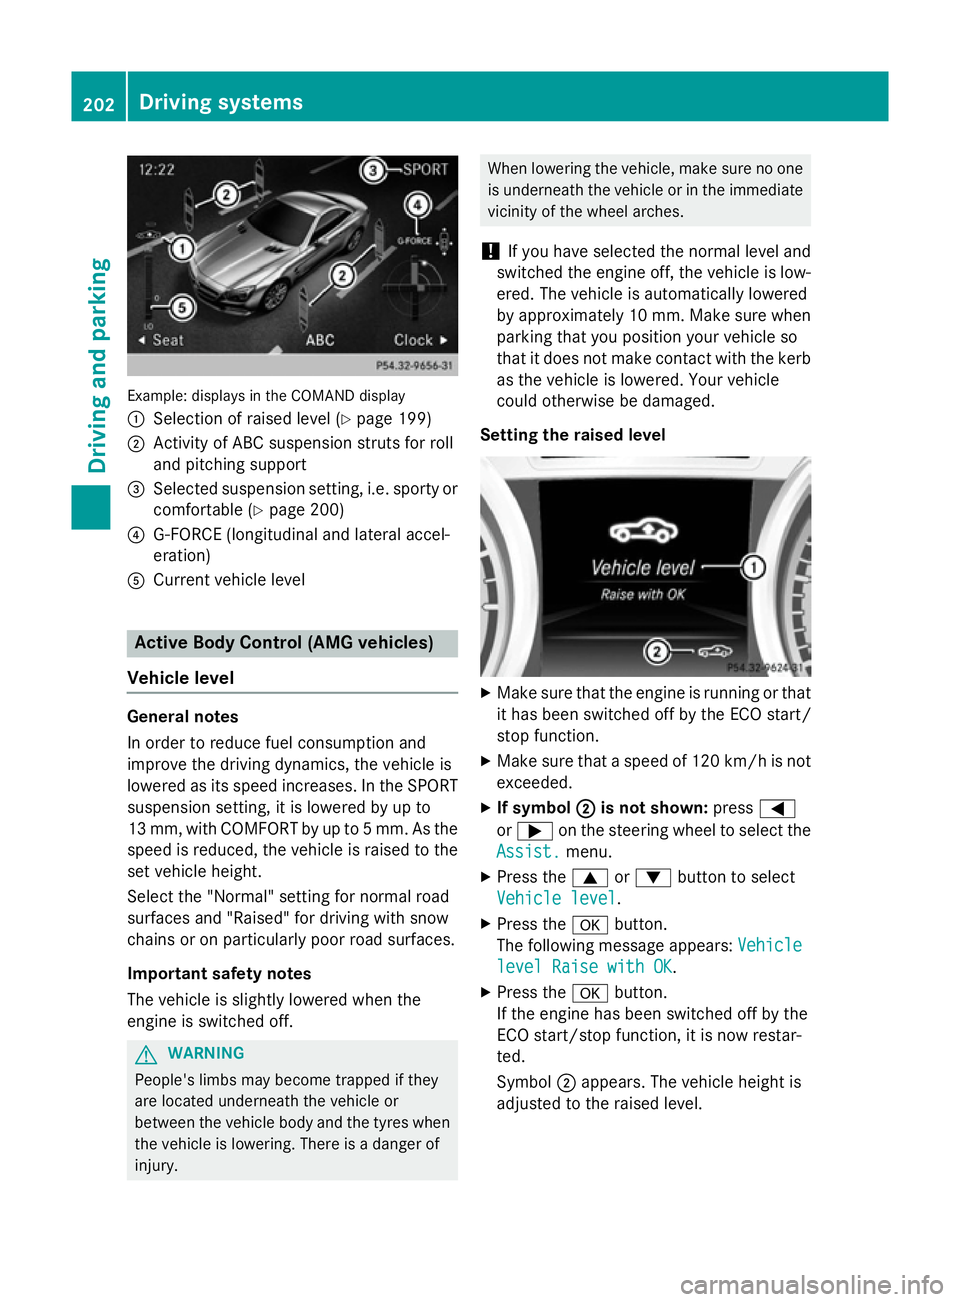
Example: displays in the COMAND display
: Selection of raised level (Y page 199)
; Activity of ABC suspension struts for roll
and pitching support
= Selected suspension setting, i.e. sporty or
comfortable (Y page 200)
? G-FORCE (longitudinal and lateral accel-
eration)
A Current vehicle level Active Body Control (AMG vehicles)
Vehicle level General notes
In order to reduce fuel consumption and
improve the driving dynamics, the vehicle is
lowered as its speed increases. In the SPORT
suspension setting, it is lowered by up to
13 mm, with COMFORT by up to 5 mm. As the
speed is reduced, the vehicle is raised to the set vehicle height.
Select the "Normal" setting for normal road
surfaces and "Raised" for driving with snow
chains or on particularly poor road surfaces.
Important safety notes
The vehicle is slightly lowered when the
engine is switched off. G
WARNING
People's limbs may become trapped if they
are located underneath the vehicle or
between the vehicle body and the tyres when the vehicle is lowering. There is a danger of
injury. When lowering the vehicle, make sure no one
is underneath the vehicle or in the immediate
vicinity of the wheel arches.
! If you have selected the normal level and
switched the engine off, the vehicle is low-
ered. The vehicle is automatically lowered
by approximately 10 mm. Make sure when
parking that you position your vehicle so
that it does not make contact with the kerb
as the vehicle is lowered. Your vehicle
could otherwise be damaged.
Setting the raised level X
Make sure that the engine is running or that
it has been switched off by the ECO start/
stop function.
X Make sure that a speed of 120 km/h is not
exceeded.
X If symbol ; ;is not shown: press=
or ; on the steering wheel to select the
Assist.
Assist. menu.
X Press the 9or: button to select
Vehicle level
Vehicle level.
X Press the abutton.
The following message appears: Vehicle
Vehicle
level Raise with OK
level Raise with OK.
X Press the abutton.
If the engine has been switched off by the
ECO start/stop function, it is now restar-
ted.
Symbol ;appears. The vehicle height is
adjusted to the raised level. 202
Driving systemsDriving an
d parking
Page 211 of 637
sharp angle. Otherwise, you may damage
the wheels or tyres.
Active Parking Assist may also display spaces not suitable for parking, e.g.:
R parking or stopping prohibitions
R in front of driveways or entrances and exits
R unsuitable surfaces
Parking tips:
R on narrow roads, drive as closely as possi-
ble past the parking space.
R parking spaces that are littered or over-
grown might be identified or measured
incorrectly.
R parking spaces that are partially occupied
by trailer drawbars might not be identified
as such or be measured incorrectly.
R snowfall or heavy rain may lead to a parking
space being measured inaccurately.
R pay attention to the PARKTRONIC
(Y page 205) warning messages during the
parking procedure.
R at any time, you can intervene in the steer-
ing procedure to correct it. Active Parking
Assist will then be cancelled.
R when transporting a load which protrudes
from your vehicle, you should not use
Active Parking Assist.
R never use Active Parking Assist when snow
chains are fitted.
R make sure that the tyre pressures are
always correct. This has a direct influence
on the parking characteristics of the vehi-
cle.
Parking Important safety notes
Objects located above the height range of
Active Parking Assist will not be detected
when the parking space is measured. These
are not taken into account when the parking
procedure is calculated, e.g. overhanging
loads, tail sections or loading ramps of goods vehicles. In some circumstances, Active Park- ing Assist may therefore guide you into the
parking space too early. G
WARNING
If objects are located above the detection
range, Active Parking Assist may start to steer into the parking space too soon. As a result,
you could cause a collision. There is a risk of
an accident.
If objects are located above the detection
range, stop the vehicle and switch Active
Parking Assist off. G
WARNING
Active Parking Assist merely aids you by inter- vening actively in the steering. There is a risk
of accident if you do not apply the brakes
yourself.
Always apply the brakes yourself when park-
ing and manoeuvring.
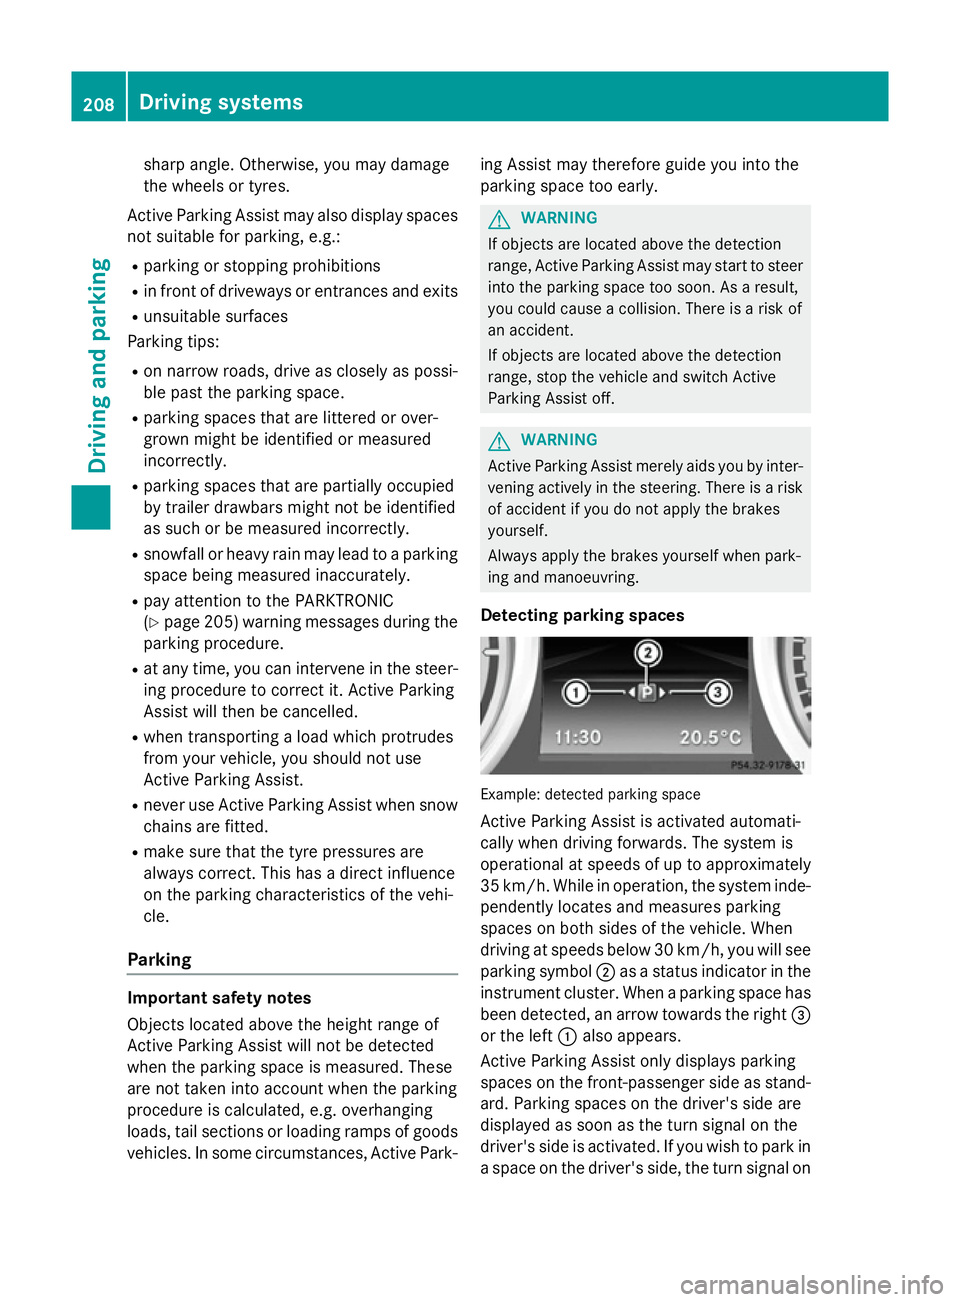
Detecting parking spaces Example: detected parking space
Active Parking Assist is activated automati-
cally when driving forwards. The system is
operational at speeds of up to approximately 35 km/h. While in operation, the system inde- pendently locates and measures parking
spaces on both sides of the vehicle. When
driving at speeds below 30 km/h, you will see
parking symbol ;as a status indicator in the
instrument cluster. When a parking space has
been detected, an arrow towards the right =
or the left :also appears.
Active Parking Assist only displays parking
spaces on the front-passenger side as stand- ard. Parking spaces on the driver's side are
displayed as soon as the turn signal on the
driver's side is activated. If you wish to park in
a space on the driver's side, the turn signal on 208
Driving systemsDriving and parking
Page 322 of 637
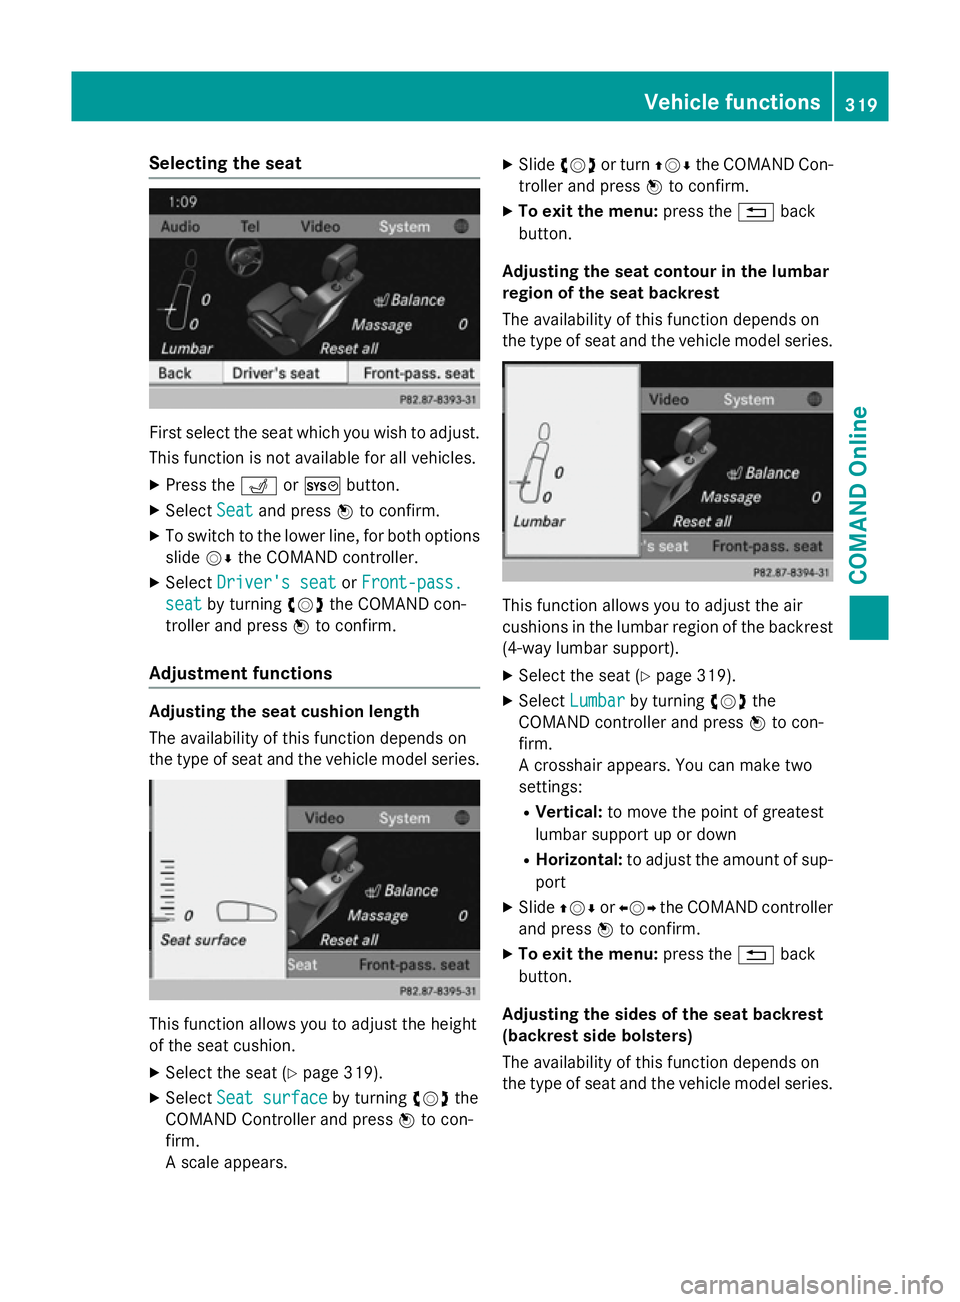
Selecting the seat
First select the seat which you wish to adjust.
This function is not available for all vehicles.
X Press the TorW button.
X Select Seat
Seat and press Wto confirm.
X To switch to the lower line, for both options
slide VÆthe COMAND controller.
X Select Driver's seat
Driver's seat orFront-pass.
Front-pass.
seat
seat by turning cVdthe COMAND con-
troller and press Wto confirm.
Adjustment functions Adjusting the seat cushion length
The availability of this function depends on
the type of seat and the vehicle model series. This function allows you to adjust the height
of the seat cushion.
X Select the seat (Y page 319).
X Select Seat surface
Seat surface by turningcVdthe
COMAND Controller and press Wto con-
firm.
A scale appears. X
Slide cVd or turn ZVÆthe COMAND Con-
troller and press Wto confirm.
X To exit the menu: press the%back
button.
Adjusting the seat contour in the lumbar
region of the seat backrest
The availability of this function depends on
the type of seat and the vehicle model series. This function allows you to adjust the air
cushions in the lumbar region of the backrest
(4-way lumbar support).
X Select the seat (Y page 319).
X Select Lumbar Lumbar by turning cVdthe
COMAND controller and press Wto con-
firm.
A crosshair appears. You can make two
settings:
R Vertical: to move the point of greatest
lumbar support up or down
R Horizontal: to adjust the amount of sup-
port
X Slide ZVÆ orXVY the COMAND controller
and press Wto confirm.
X To exit the menu: press the%back
button.
Adjusting the sides of the seat backrest
(backrest side bolsters)
The availability of this function depends on
the type of seat and the vehicle model series. Vehicle functions
319COMAND Online Z
Page 379 of 637
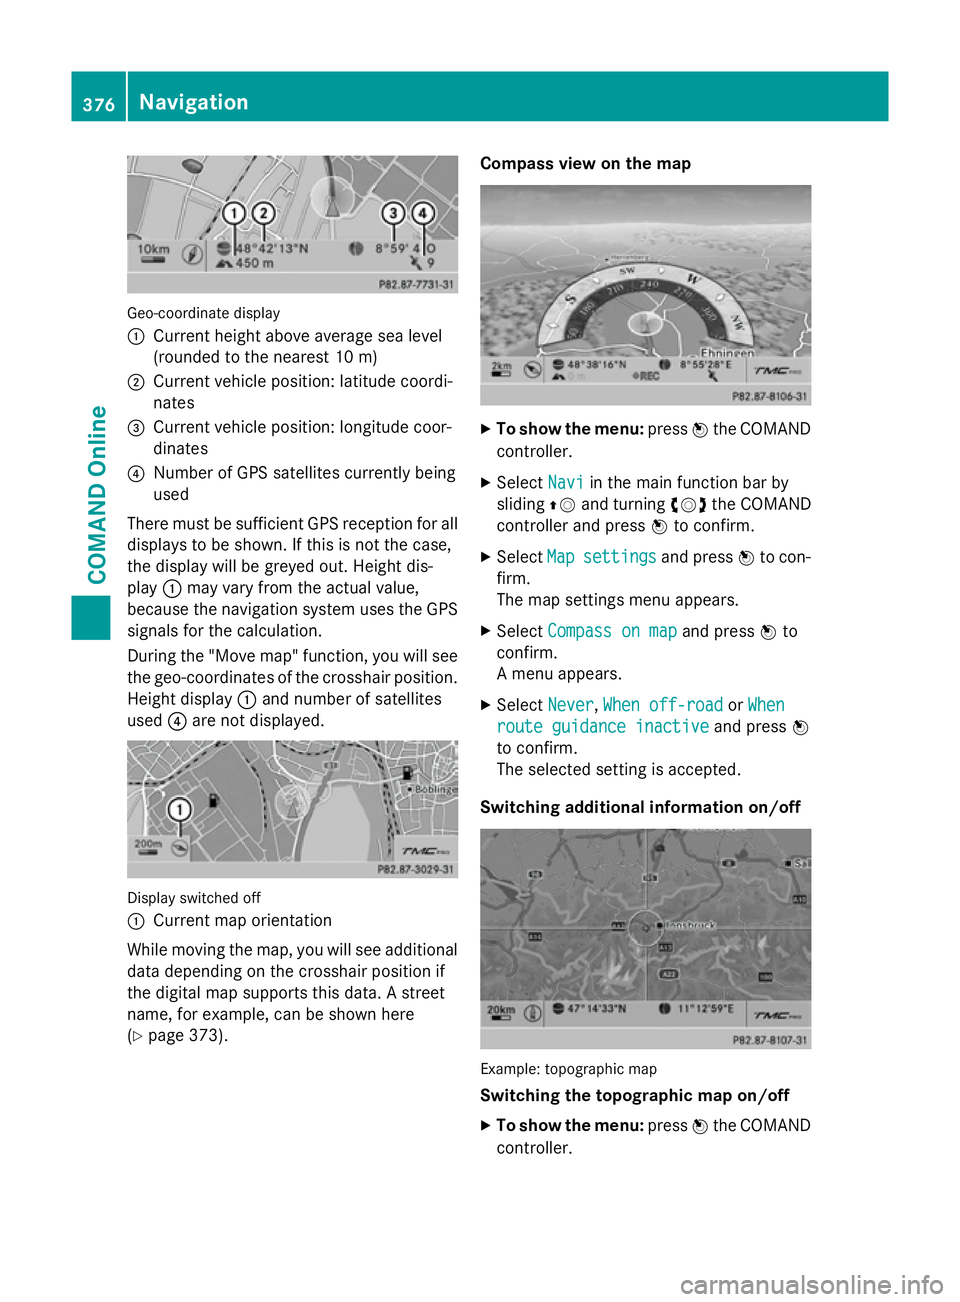
Geo-coordinate display
:
Current height above average sea level
(rounded to the nearest 10 m)
; Current vehicle position: latitude coordi-
nates
= Current vehicle position: longitude coor-
dinates
? Number of GPS satellites currently being
used
There must be sufficient GPS reception for all
displays to be shown. If this is not the case,
the display will be greyed out. Height dis-
play :may vary from the actual value,
because the navigation system uses the GPS
signals for the calculation.
During the "Move map" function, you will see
the geo-coordinates of the crosshair position. Height display :and number of satellites
used ?are not displayed. Display switched off
:
Current map orientation
While moving the map, you will see additional data depending on the crosshair position if
the digital map supports this data. A street
name, for example, can be shown here
(Y page 373). Compass view on the map
X
To show the menu: pressWthe COMAND
controller.
X Select Navi Naviin the main function bar by
sliding ZVand turning cVdthe COMAND
controller and press Wto confirm.
X Select Map
Mapsettings
settings and pressWto con-
firm.
The map settings menu appears.
X Select Compass on map Compass on map and pressWto
confirm.
A menu appears.
X Select Never Never, When off-road
When off-road orWhen
When
route guidance inactive
route guidance inactive and pressW
to confirm.
The selected setting is accepted.
Switching additional information on/off Example: topographic map
Switching the topographic map on/off
X To show the menu: pressWthe COMAND
controller. 376
NavigationCOMAND Online
Page 384 of 637
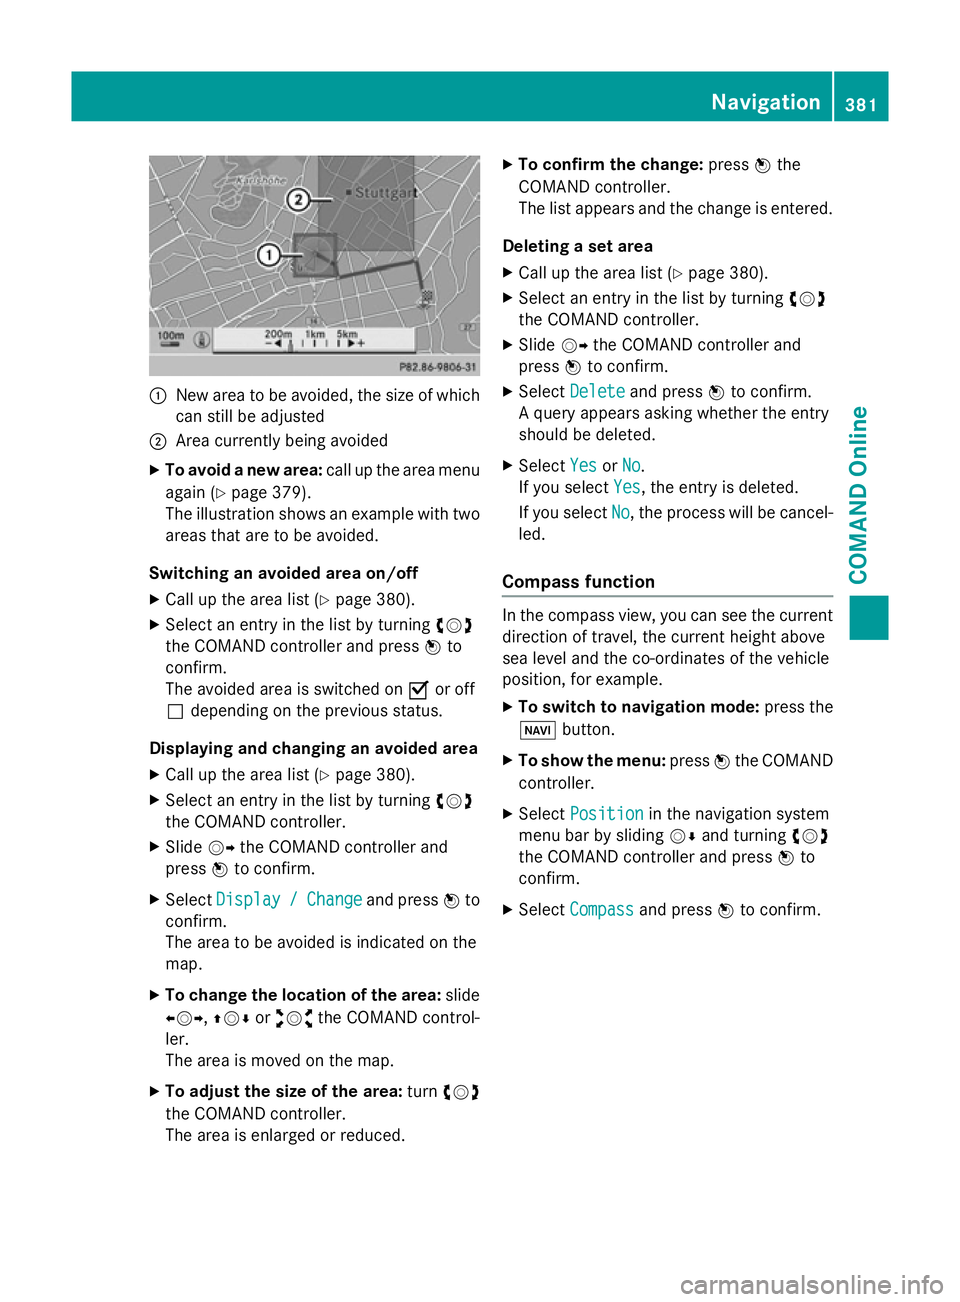
:
New area to be avoided, the size of which
can still be adjusted
; Area currently being avoided
X To avoid a new area: call up the area menu
again (Y page 379).
The illustration shows an example with two areas that are to be avoided.
Switching an avoided area on/off
X Call up the area list (Y page 380).
X Select an entry in the list by turning cVd
the COMAND controller and press Wto
confirm.
The avoided area is switched on Oor off
ª depending on the previous status.
Displaying and changing an avoided area X Call up the area list (Y page 380).
X Select an entry in the list by turning cVd
the COMAND controller.
X Slide VYthe COMAND controller and
press Wto confirm.
X Select Display
Display / /Change
Change and press Wto
confirm.
The area to be avoided is indicated on the
map.
X To change the location of the area: slide
XVY, ZVÆoraVb the COMAND control-
ler.
The area is moved on the map.
X To adjust the size of the area: turncVd
the COMAND controller.
The area is enlarged or reduced. X
To confirm the change: pressWthe
COMAND controller.
The list appears and the change is entered.
Deleting a set area
X Call up the area list (Y page 380).
X Select an entry in the list by turning cVd
the COMAND controller.
X Slide VYthe COMAND controller and
press Wto confirm.
X Select Delete
Delete and press Wto confirm.
A query appears asking whether the entry
should be deleted.
X Select Yes YesorNo
No.
If you select Yes
Yes, the entry is deleted.
If you select No
No, the process will be cancel-
led.
Compass function In the compass view, you can see the current
direction of travel, the current height above
sea level and the co-ordinates of the vehicle
position, for example.
X To switch to navigation mode: press the
Ø button.
X To show the menu: pressWthe COMAND
controller.
X Select Position Position in the navigation system
menu bar by sliding VÆand turning cVd
the COMAND controller and press Wto
confirm.
X Select Compass
Compass and press Wto confirm. Navigation
381COMAND Online Z
Page 566 of 637
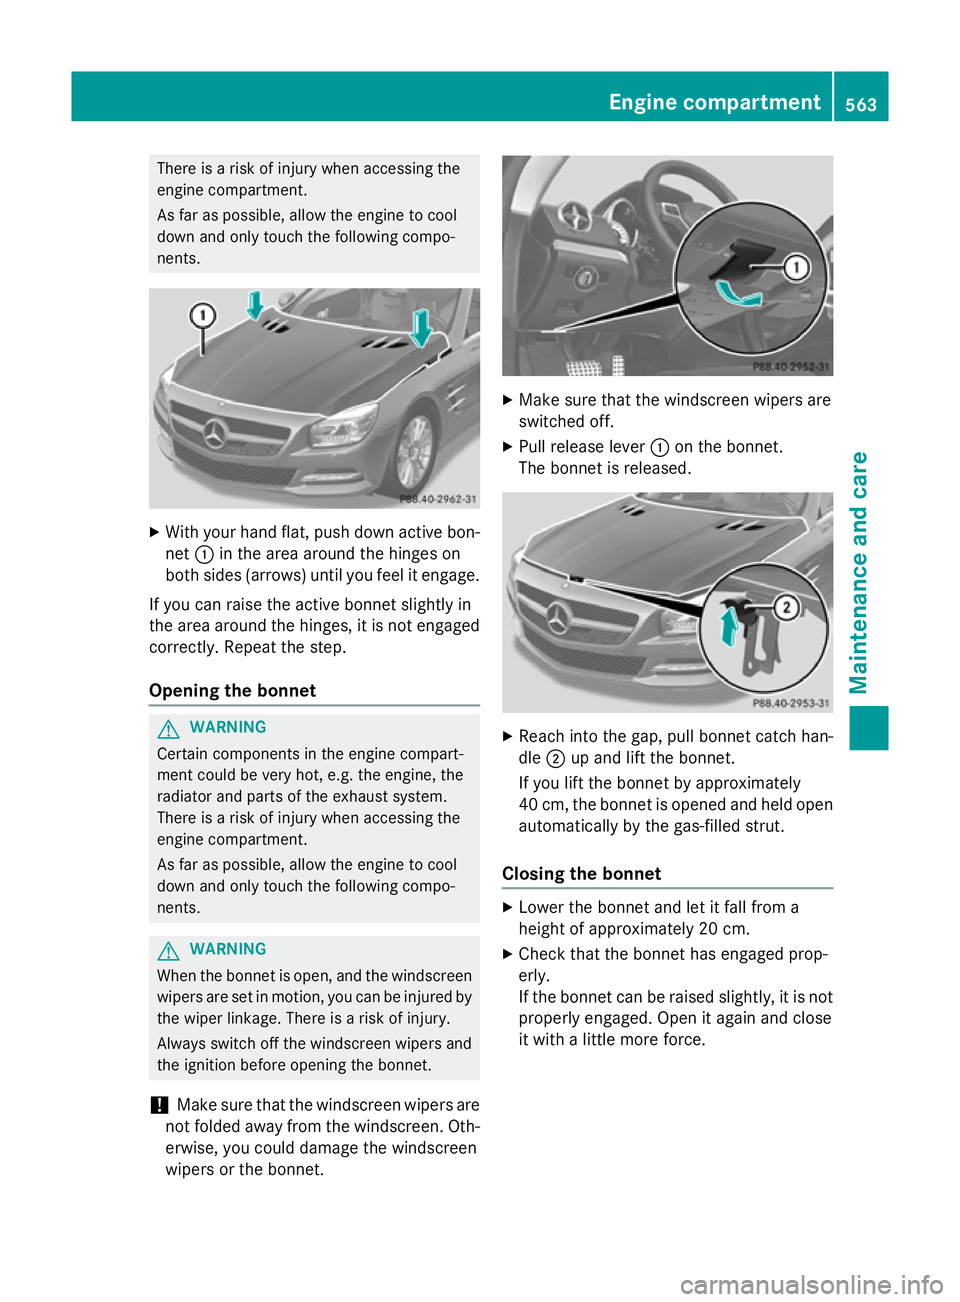
There is a risk of injury when accessing the
engine compartment.
As far as possible, allow the engine to cool
down and only touch the following compo-
nents. X
With your hand flat, push down active bon-
net :in the area around the hinges on
both sides (arrows) until you feel it engage.
If you can raise the active bonnet slightly in
the area around the hinges, it is not engaged correctly. Repeat the step.
Opening the bonnet G
WARNING
Certain components in the engine compart-
ment could be very hot, e.g. the engine, the
radiator and parts of the exhaust system.
There is a risk of injury when accessing the
engine compartment.
As far as possible, allow the engine to cool
down and only touch the following compo-
nents. G
WARNING
When the bonnet is open, and the windscreen wipers are set in motion, you can be injured by
the wiper linkage. There is a risk of injury.
Always switch off the windscreen wipers and
the ignition before opening the bonnet.
! Make sure that the windscreen wipers are
not folded away from the windscreen. Oth-
erwise, you could damage the windscreen
wipers or the bonnet. X
Make sure that the windscreen wipers are
switched off.
X Pull release lever :on the bonnet.
The bonnet is released. X
Reach into the gap, pull bonnet catch han-
dle ;up and lift the bonnet.
If you lift the bonnet by approximately
40 cm, the bonnet is opened and held open automatically by the gas-filled strut.
Closing the bonnet X
Lower the bonnet and let it fall from a
height of approximately 20 cm.
X Check that the bonnet has engaged prop-
erly.
If the bonnet can be raised slightly, it is not
properly engaged. Open it again and close
it with a little more force. Engine compartment
563Maintenance and care Z
Page 610 of 637
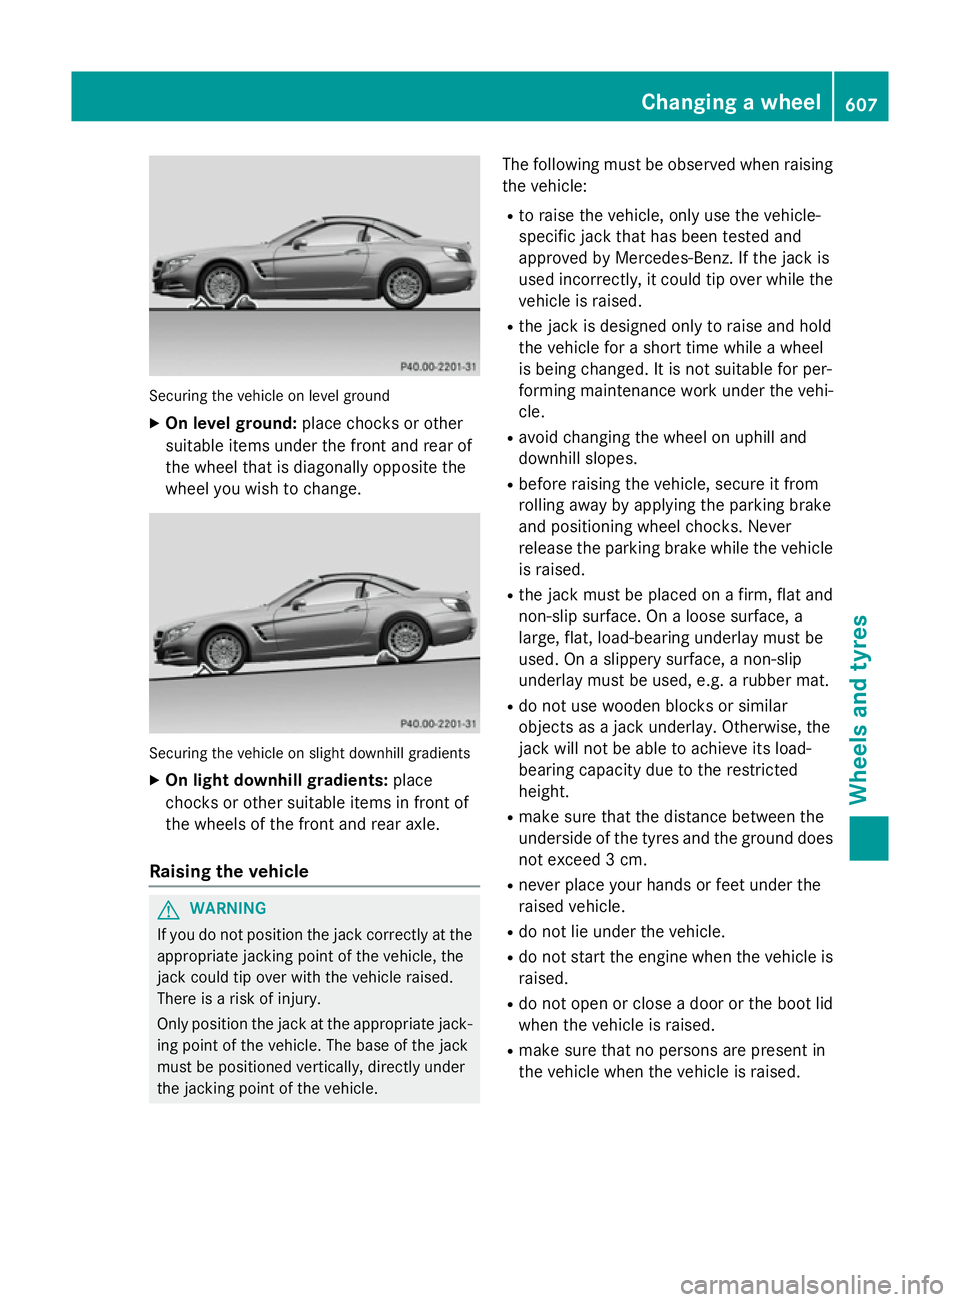
Securing the vehicle on level ground
X On level ground: place chocks or other
suitable items under the front and rear of
the wheel that is diagonally opposite the
wheel you wish to change. Securing the vehicle on slight downhill gradients
X On light downhill gradients: place
chocks or other suitable items in front of
the wheels of the front and rear axle.
Raising the vehicle G
WARNING
If you do not position the jack correctly at the appropriate jacking point of the vehicle, the
jack could tip over with the vehicle raised.
There is a risk of injury.
Only position the jack at the appropriate jack-
ing point of the vehicle. The base of the jack
must be positioned vertically, directly under
the jacking point of the vehicle. The following must be observed when raising
the vehicle:
R to raise the vehicle, only use the vehicle-
specific jack that has been tested and
approved by Mercedes-Benz. If the jack is
used incorrectly, it could tip over while the
vehicle is raised.
R the jack is designed only to raise and hold
the vehicle for a short time while a wheel
is being changed. It is not suitable for per-
forming maintenance work under the vehi- cle.
R avoid changing the wheel on uphill and
downhill slopes.
R before raising the vehicle, secure it from
rolling away by applying the parking brake
and positioning wheel chocks. Never
release the parking brake while the vehicle
is raised.
R the jack must be placed on a firm, flat and
non-slip surface. On a loose surface, a
large, flat, load-bearing underlay must be
used. On a slippery surface, a non-slip
underlay must be used, e.g. a rubber mat.
R do not use wooden blocks or similar
objects as a jack underlay. Otherwise, the
jack will not be able to achieve its load-
bearing capacity due to the restricted
height.
R make sure that the distance between the
underside of the tyres and the ground does
not exceed 3 cm.
R never place your hands or feet under the
raised vehicle.
R do not lie under the vehicle.
R do not start the engine when the vehicle is
raised.
R do not open or close a door or the boot lid
when the vehicle is raised.
R make sure that no persons are present in
the vehicle when the vehicle is raised. Changing a wheel
607Wheels and tyres Z