2011 INFINITI QX56 fuse
[x] Cancel search: fusePage 1526 of 5598

DEF-34
< DTC/CIRCUIT DIAGNOSIS >
WIPER DEICER
WIPER DEICER
Component Function CheckINFOID:0000000006299454
1.CHECK WIPER DEICER
1. Select Active Test (“REAR DEFOGGER”) mode of “BCM” using CONSULT-III.
2. Touch “ON”.
3. Check that the front window heating wire is getting warmer.
Is the inspection result normal?
YES >> Wiper deicer is OK.
NO >> Refer to DEF-34, "
Diagnosis Procedure"
Diagnosis ProcedureINFOID:0000000006299455
1.CHECK FUSE
1. Turn ignition switch OFF.
2. Check 15 A fuse [No.75, located in fuse block (J/B)]
Is the inspection result normal?
YES >> GO TO 2.
NO >> Replace the blown fuse after repairing the affected circuit if a fuse is blown.
2.CHECK POWER SUPPLY CIRCUIT
1. Turn ignition switch ON.
2. Check voltage between wiper deicer harness connector and ground.
Is the inspection result normal?
YES >> GO TO 3.
NO >> GO TO 4.
3.CHECK GROUND CIRCUIT
1. Turn ignition switch OFF.
2. Disconnect wiper deicer connector.
3. Check continuity between wiper deicer harness connector and ground.
Is the inspection result normal?
YES >> GO TO 5.
NO >> Repair or replace harness between rear window defogger and ground.
4.CHECK WIPER DEICER CIRCUIT
1. Turn ignition switch OFF.
2. Disconnect wiper deicer relay connector and wiper deicer connector.
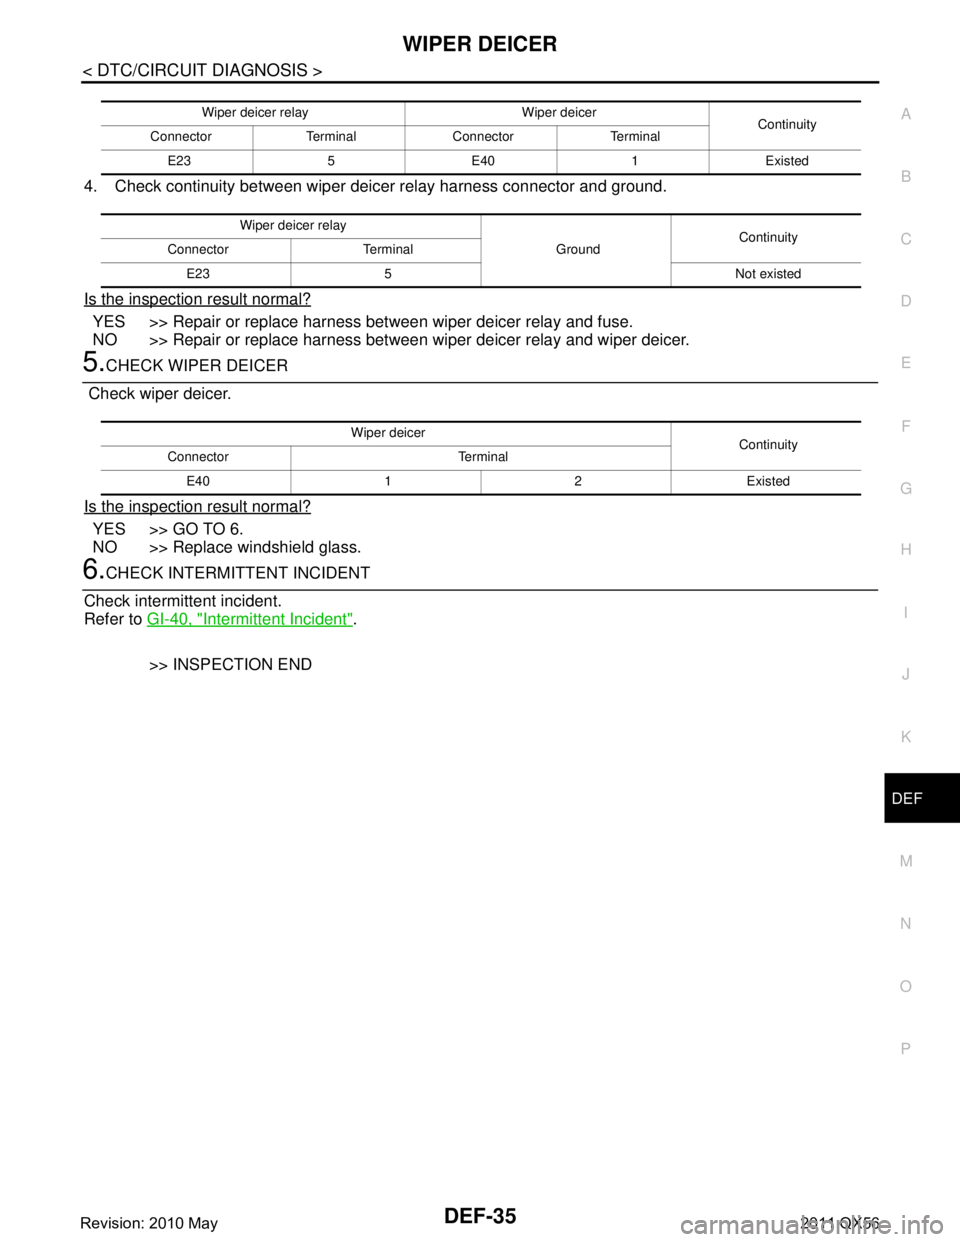
3. Check continuity between wiper deicer relay harness connector and wiper deicer harness connector.
(+)
(–) Condition Voltage (V)
(Approx.)
Wiper deicer
Connector Terminal
E40 1 Ground Rear window defogger switch: ON Battery voltage
Rear window defogger switch: OFF 0
Wiper deicer
GroundContinuity
Connector Terminal
E40 2 Existed
Revision: 2010 May2011 QX56
Page 1527 of 5598

WIPER DEICERDEF-35
< DTC/CIRCUIT DIAGNOSIS >
C
DE
F
G H
I
J
K
M A
B
DEF
N
O P
4. Check continuity between wiper deicer relay harness connector and ground.
Is the inspection result normal?
YES >> Repair or replace harness between wiper deicer relay and fuse.
NO >> Repair or replace harness between wiper deicer relay and wiper deicer.
5.CHECK WIPER DEICER
Check wiper deicer.
Is the inspection result normal?
YES >> GO TO 6.
NO >> Replace windshield glass.
6.CHECK INTERMITTENT INCIDENT
Check intermittent incident.
Refer to GI-40, "
Intermittent Incident".
>> INSPECTION END
Wiper deicer relay Wiper deicer Continuity
Connector Terminal Connector Terminal
E235E401Existed
Wiper deicer relay GroundContinuity
Connector Terminal
E23 5 Not existed
Wiper deicer Continuity
Connector Terminal
E40 1 2 Existed
Revision: 2010 May2011 QX56
Page 1545 of 5598

PRECAUTIONSDLK-9
< PRECAUTION >
C
DE
F
G H
I
J
L
M A
B
DLK
N
O P
5. When the repair work is completed, re-connect both battery cables. With the brake pedal released, turn
the push-button ignition switch from ACC position to ON position, then to LOCK position. (The steering
wheel will lock when the push-button ignition switch is turned to LOCK position.)
6. Perform self-diagnosis check of a ll control units using CONSULT-III.
Precautions For Xenon Headlamp ServiceINFOID:0000000006225830
WARNING:
Comply with the follow ing warnings to prevent any serious accident.
Disconnect the battery cable (neg ative terminal) or the power supply fuse before installing, remov-
ing, or touching the xenon headlamp (bulb included). The xenon headlamp contains high-voltage
generated parts.
Never work with wet hands.
Check the xenon headlamp ON-OFF status after assem bling it to the vehicle. Never turn the xenon
headlamp ON in other conditions. Connect th e power supply to the vehicle-side connector.
(Turning it ON outside the lamp case m ay cause fire or visual impairments.)
Never touch the bulb glass immediately afte r turning it OFF. It is extremely hot.
CAUTION:
Comply with the follow ing cautions to prevent an y error and malfunction.
Install the xenon bulb securely. (I nsufficient bulb socket installation may melt the bulb, the connec-
tor, the housing, etc. by high-vol tage leakage or corona discharge.)
Never perform HID circuit inspection with a tester.
Never touch the xenon bulb glass with ha nds. Never put oil and grease on it.
Dispose of the used xenon bulb after p acking it in thick vinyl without breaking it.
Never wipe out dirt and cont amination with organic solven t (thinner, gasoline, etc.).
WorkINFOID:0000000006225831
After removing and installing the opening/closing parts, be sure to carry out fitting adjustments to check their
operational.
Check the lubrication level, damage, and wear of each part. If necessary, grease or replace it.
Revision: 2010 May2011 QX56
Page 1620 of 5598

DLK-84
< DTC/CIRCUIT DIAGNOSIS >
B2401 IGNITION POWER SUPPLY CIRCUIT
B2401 IGNITION POWER SUPPLY CIRCUIT
DTC LogicINFOID:0000000006225878
DTC DETECTION LOGIC
DTC CONFIRMATION PROCEDURE
1.PERFORM DTC CONFIRMATION PROCEDURE
1. Turn ignition switch ON and wait for at least 1 second.
2. Check “Self Diagnostic Result” mode of “AUTOMAT IC BACK DOOR CONTROL UNIT” using CONSULT-
III.
Is DTC detected?
YES >> Refer to DLK-84, "Diagnosis Procedure".
NO >> INSPECTION END
Diagnosis ProcedureINFOID:0000000006225879
1.CHECK FUSE
1. Turn ignition switch OFF.
2. Check 10A fuse, [No. 4, located in fuse block (J/B)].
Is the inspection result normal?
YES >> GO TO 2.
NO >> Replace the blown fuse after repairing the affected circuit if a fuse is blown.
2.CHECK POWER SUPPLY CIRCUIT
1. Turn ignition switch OFF.
2. Disconnect automatic back door control unit connector.
3. Check voltage between automatic back door control unit harness connector and ground.
Is the measurement value normal?
YES >> Check intermittent incident. Refer to GI-40, "Intermittent Incident".
NO >> Repair or replace harness.
DTC CONSULT-III display
description DTC detecting condition Possible cause
B2401 IGN OPEN When the automatic back door control unit detects
the following condition for 0.3 second or more
Power supply condition (OFF) of automatic back
door control unit and Ignition position signal (ON)
from BCM via CAN Fuse
Harness or connectors
(Ignition power supply condition
circuit is open or shorted)
(+)
(− ) Condition Vo l ta g e
(Approx.)
Automatic back door control unit
Connector Terminal
B26 9 Ground Ignition switch ON Battery voltage
OFF 0 V
Revision: 2010 May2011 QX56
Page 1652 of 5598

DLK-116
< DTC/CIRCUIT DIAGNOSIS >
POWER SUPPLY AND GROUND CIRCUIT
POWER SUPPLY AND GROUND CIRCUIT
AUTOMATIC BACK DOOR CONTROL UNIT
AUTOMATIC BACK DOOR CONTROL UNIT : Diagnosis ProcedureINFOID:0000000006225920
1.CHECK FUSE, FUSIBLE LINK AND CIRCUIT BREAKER
Check that the following fuse, fusible link and circuit breaker are not fusing.
Is the fuse fusing?
YES >> Replace the blown fuse or fusible link after repairing the affected circuit if a fuse or fusible link is blown.
NO >> GO TO 2.
2.CHECK POWER SUPPLY CIRCUIT
1. Turn ignition switch OFF.
2. Disconnect automatic back door control module connector.
3. Check voltage between automatic back door control module harness connector and ground.
Is the measurement value normal?
YES >> GO TO 3.
NO >> Repair or replace harness.
3.CHECK GROUND CIRCUIT
Check continuity between automatic back door control module harness connector and ground.
Does continuity exist?
YES >> INSPECTION END
NO >> Repair or replace harness.
Fuse and fusible link No. Signal name
T (30A) Battery power supply
9 (10A)
4 (10A) Ignition power supply
(+)
(− ) Condition Vol tag e
(Approx.)
Automatic back door control module
Connector Terminal
B26 9
Ground Ignition switch ON
Battery voltage
10
—
28
Automatic back door control module
GroundContinuity
Connector Terminal
B26 34 Existed
Revision: 2010 May2011 QX56
Page 1679 of 5598

INTELLIGENT KEY WARNING BUZZERDLK-143
< DTC/CIRCUIT DIAGNOSIS >
C
DE
F
G H
I
J
L
M A
B
DLK
N
O P
INTELLIGENT KEY WARNING BUZZER
Component Function CheckINFOID:0000000006225958
1.CHECK FUNCTION
1. Select “INTELLIGENT KEY” of “BCM” using CONSULT-III.
2. Select “OUTSIDE BUZZER ” in “ACTIVE TEST” mode.
3. Touch “On” or “Off” to check that it works normally.
Is the inspection result normal?
YES >> Intelligent Key warning buzzer is OK.
NO >> Refer to DLK-143, "
Diagnosis Procedure".
Diagnosis ProcedureINFOID:0000000006225959
1.CHECK FUSE
1. Turn ignition switch OFF.
2. Check 10 A fuse, [No. 6, located in fuse block (J/B)].
Is the inspection result normal?
YES >> GO TO 2.
NO >> Replace the blown fuse after repairing the affected circuit if a fuse is blown.
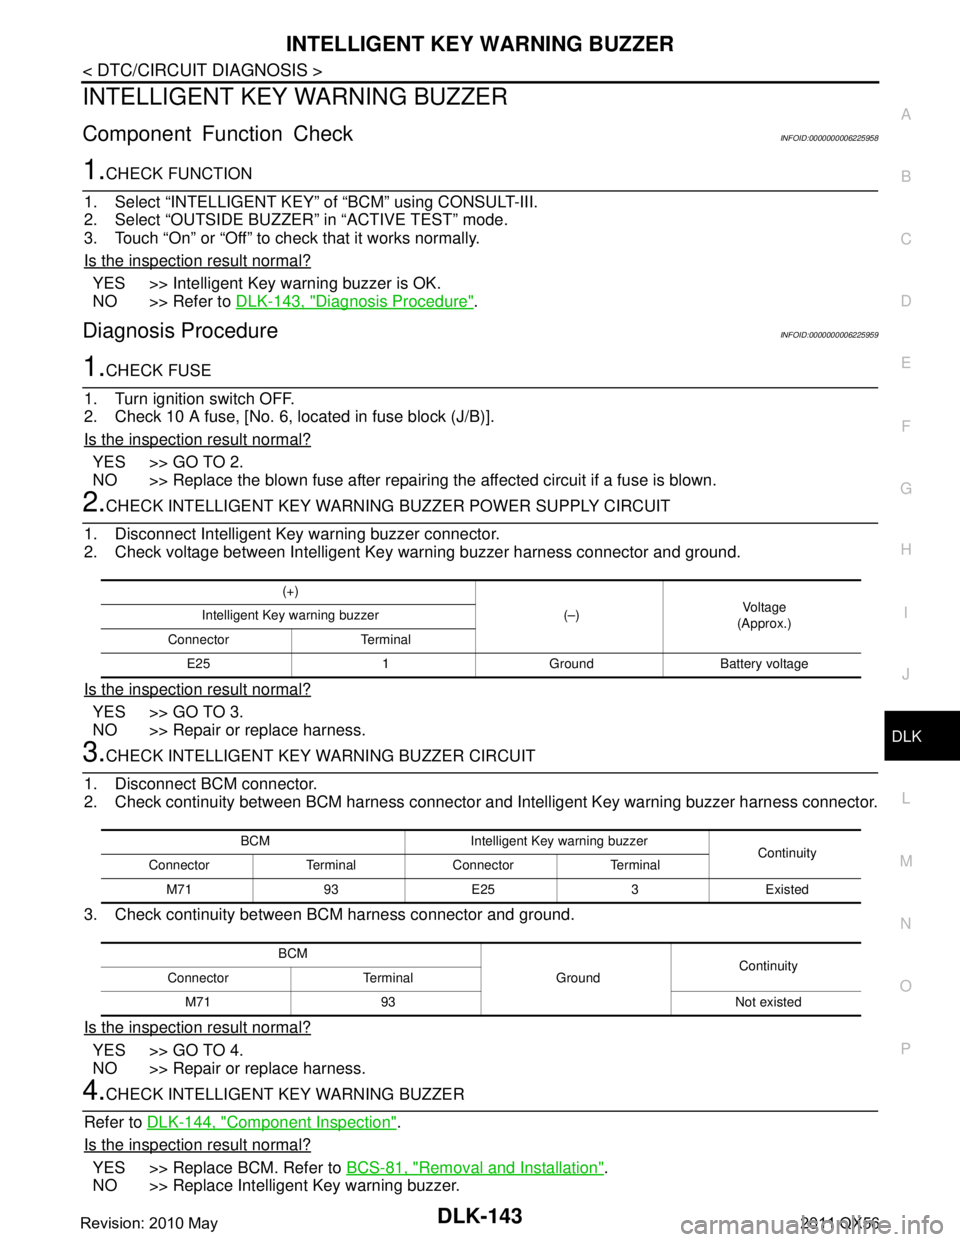
2.CHECK INTELLIGENT KEY WARNING BUZZER POWER SUPPLY CIRCUIT
1. Disconnect Intelligent Key warning buzzer connector.
2. Check voltage between Intelligent Key warning buzzer harness connector and ground.
Is the inspection result normal?
YES >> GO TO 3.
NO >> Repair or replace harness.
3.CHECK INTELLIGENT KEY WARNING BUZZER CIRCUIT
1. Disconnect BCM connector.
2. Check continuity between BCM harness connector and Intelligent Key warning buzzer harness connector.
3. Check continuity between BCM harness connector and ground.
Is the inspection result normal?
YES >> GO TO 4.
NO >> Repair or replace harness.
4.CHECK INTELLIGENT KEY WARNING BUZZER
Refer to DLK-144, "
Component Inspection".
Is the inspection result normal?
YES >> Replace BCM. Refer to BCS-81, "Removal and Installation".
NO >> Replace Intelligent Key warning buzzer.
(+)
(–)Vo l ta g e
(Approx.)
Intelligent Key warning buzzer
Connector Terminal E25 1 Ground Battery voltage
BCM Intelligent Key warning buzzer Continuity
Connector Terminal Connector Terminal
M71 93 E25 3 Existed
BCM GroundContinuity
Connector Terminal
M71 93 Not existed
Revision: 2010 May2011 QX56
Page 1699 of 5598

AUTOMATIC BACK DOOR WARNING BUZZERDLK-163
< DTC/CIRCUIT DIAGNOSIS >
C
DE
F
G H
I
J
L
M A
B
DLK
N
O P
AUTOMATIC BACK DOOR WARNING BUZZER
Diagnosis ProcedureINFOID:0000000006225990
1.CHECK FUSE
1. Turn ignition switch OFF.
2. Check 10 A fuse, [No.9, located in fuse block (J/B)].
Is the inspection result normal?
YES >> GO TO 2.
NO >> Replace the blown fuse after repairing the affected circuit if a fuse is blown.
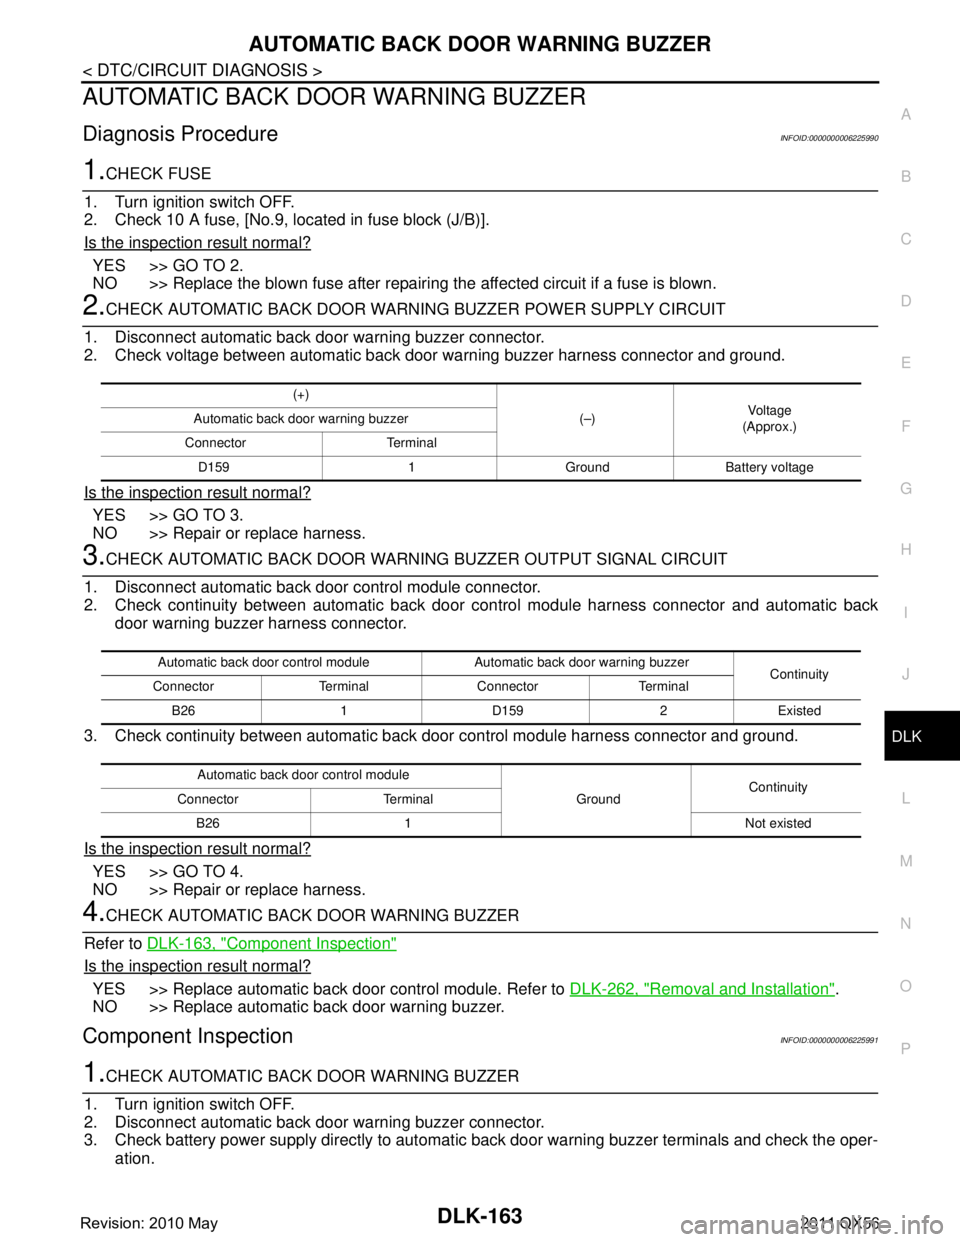
2.CHECK AUTOMATIC BACK DOOR WARNI NG BUZZER POWER SUPPLY CIRCUIT
1. Disconnect automatic back door warning buzzer connector.
2. Check voltage between automatic back door warning buzzer harness connector and ground.
Is the inspection result normal?
YES >> GO TO 3.
NO >> Repair or replace harness.
3.CHECK AUTOMATIC BACK DOOR WARNING BUZZER OUTPUT SIGNAL CIRCUIT
1. Disconnect automatic back door control module connector.
2. Check continuity between automatic back door control module harness connector and automatic back
door warning buzzer harness connector.
3. Check continuity between automatic back door control module harness connector and ground.
Is the inspection result normal?
YES >> GO TO 4.
NO >> Repair or replace harness.
4.CHECK AUTOMATIC BACK DOOR WARNING BUZZER
Refer to DLK-163, "
Component Inspection"
Is the inspection result normal?
YES >> Replace automatic back door control module. Refer to DLK-262, "Removal and Installation".
NO >> Replace automatic back door warning buzzer.
Component InspectionINFOID:0000000006225991
1.CHECK AUTOMATIC BACK DOOR WARNING BUZZER
1. Turn ignition switch OFF.
2. Disconnect automatic back door warning buzzer connector.
3. Check battery power supply directly to automatic back door warning buzzer terminals and check the oper-
ation.
(+)
(–)Voltag e
(Approx.)
Automatic back door warning buzzer
Connector Terminal D159 1 Ground Battery voltage
Automatic back door control module Automatic back door warning buzzer Continuity
Connector Terminal Connector Terminal
B26 1 D159 2 Existed
Automatic back door control module GroundContinuity
Connector Terminal
B26 1 Not existed
Revision: 2010 May2011 QX56
Page 1702 of 5598

DLK-166
< DTC/CIRCUIT DIAGNOSIS >
INTEGRATED HOMELINK TRANSMITTER
INTEGRATED HOMELINK TRANSMITTER
Component Function CheckINFOID:0000000006256149
1.CHECK FUNCTION
Check that system receiver (garage door opener, et c.) operates with original hand-held transmitter.
Is the inspection result normal?
YES >> GO TO 2.
NO >> Receiver or hand-held transmitter is malfunctioning.
2.CHECK ILLUMINATE
1. Turn ignition switch OFF.
2. Does red light of transmitter illuminat e when any transmitter button is pressed?
Is the inspection result normal?
YES >> GO TO 3.
NO >> Refer to DLK-166, "
Diagnosis Procedure".
3.CHECK TRANSMITTER
Check transmitter with Tool*.
*:For details, refer to Technical Service Bulletin.
Is the inspection result normal?
YES >> Receiver or hand-held transmitter malfunction, not vehicle related.
NO >> Replace auto anti-dazzling inside mirror (integrated homelink transmitter).
Diagnosis ProcedureINFOID:0000000006256150
1.CHECK POWER SUPPLY
1. Turn ignition switch OFF.
2. Disconnect auto anti-dazzling inside mirror (integrated homelink transmitter) connector.
3. Check voltage between auto anti-dazzling inside mirro r (integrated homelink transmitter) harness connec-
tor and ground.
Is the inspection result normal?
YES >> GO TO 2.
NO-1 >> Check 10 A fuse [No. 6 located in the fuse block (J/B)].
NO-2 >> Harness for open or short between fuse and aut o anti-dazzling inside mirror (integrated homelink
transmitter).
2.CHECK GROUND CIRCUIT
Check continuity between auto anti-dazzling inside mi rror (integrated homelink transmitter) harness connector
and ground.
Is the inspection result normal?
YES >> GO TO 3.
NO >> Repair or replace harness.
(+)
(–)Vo l ta g e
(Approx.)
Auto anti-dazzling inside mirror
(Integrated homelink transmitter)
Connector Terminal
R25 6
Ground Battery voltage
10
Auto anti-dazzling inside mirror
(Integrated homelink transmitter) GroundContinuity
Connector Terminal
R25 8 Existed
Revision: 2010 May2011 QX56