2009 SUBARU TRIBECA window
[x] Cancel search: windowPage 710 of 2453
WW-15
Front Wiper Arm
WIPER AND WASHER SYSTEMS
7. Front Wiper Arm
A: REMOVAL
CAUTION:
When standing up the wiper arm, be sure to
stand up the driver’s side wiper arm first, and
then passenger’s side wiper arm next. Also,
when putting the wiper arms back, be sure to
start with passenger’s side first, then driver’s
side next. Doing this in the reverse order may
cause the driver’s side wiper blade to hit the
passenger’s side wiper arm and cause damage.
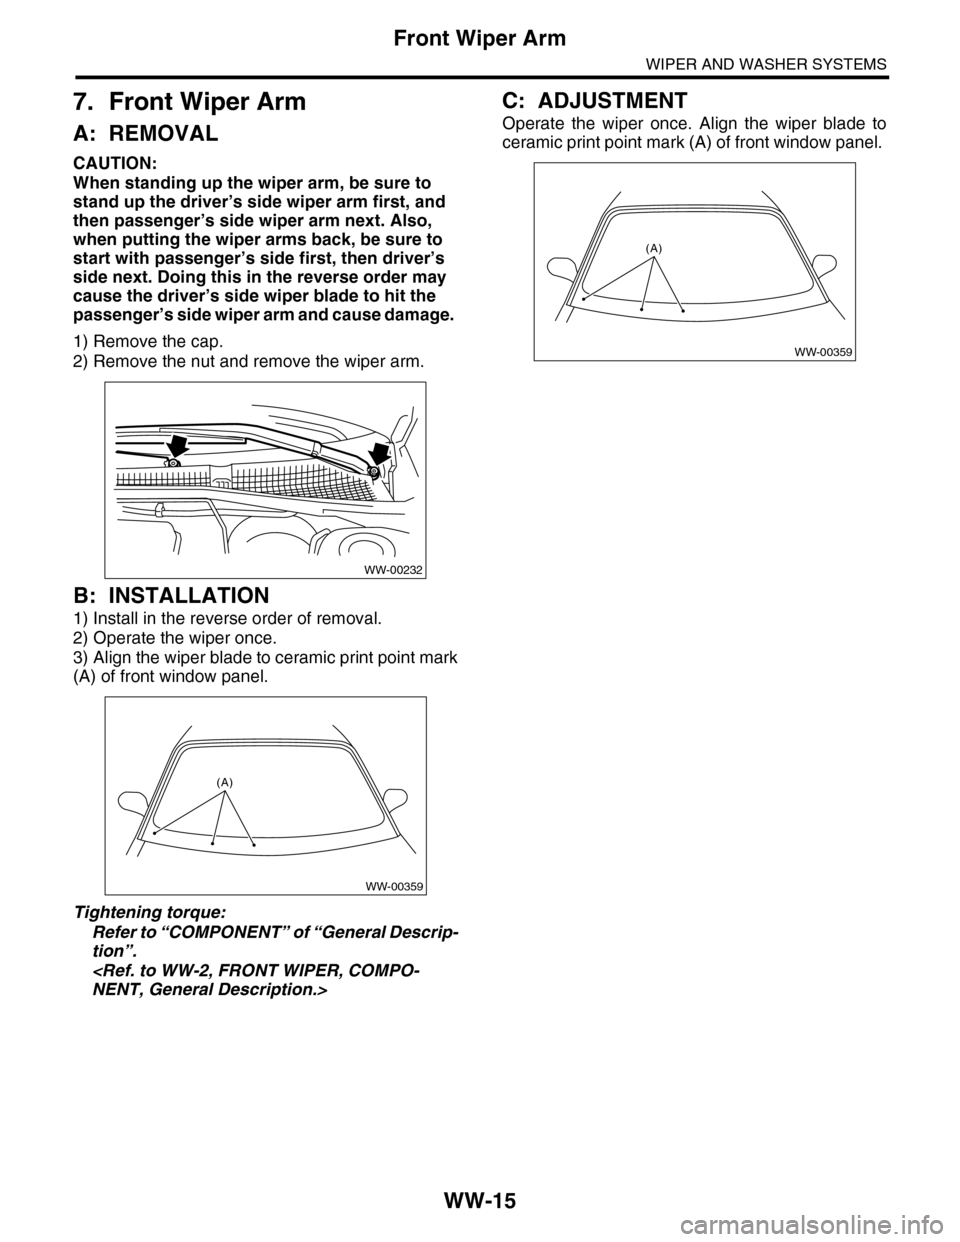
1) Remove the cap.
2) Remove the nut and remove the wiper arm.
B: INSTALLATION
1) Install in the reverse order of removal.
2) Operate the wiper once.
3) Align the wiper blade to ceramic print point mark
(A) of front window panel.
Tightening torque:
Refer to “COMPONENT” of “General Descrip-
tion”.
C: ADJUSTMENT
Operate the wiper once. Align the wiper blade to
ceramic print point mark (A) of front window panel.
WW-00232
WW-00359
(A)
WW-00359
(A)
Page 1880 of 2453
ME(H6DO)-14
General Description
MECHANICAL
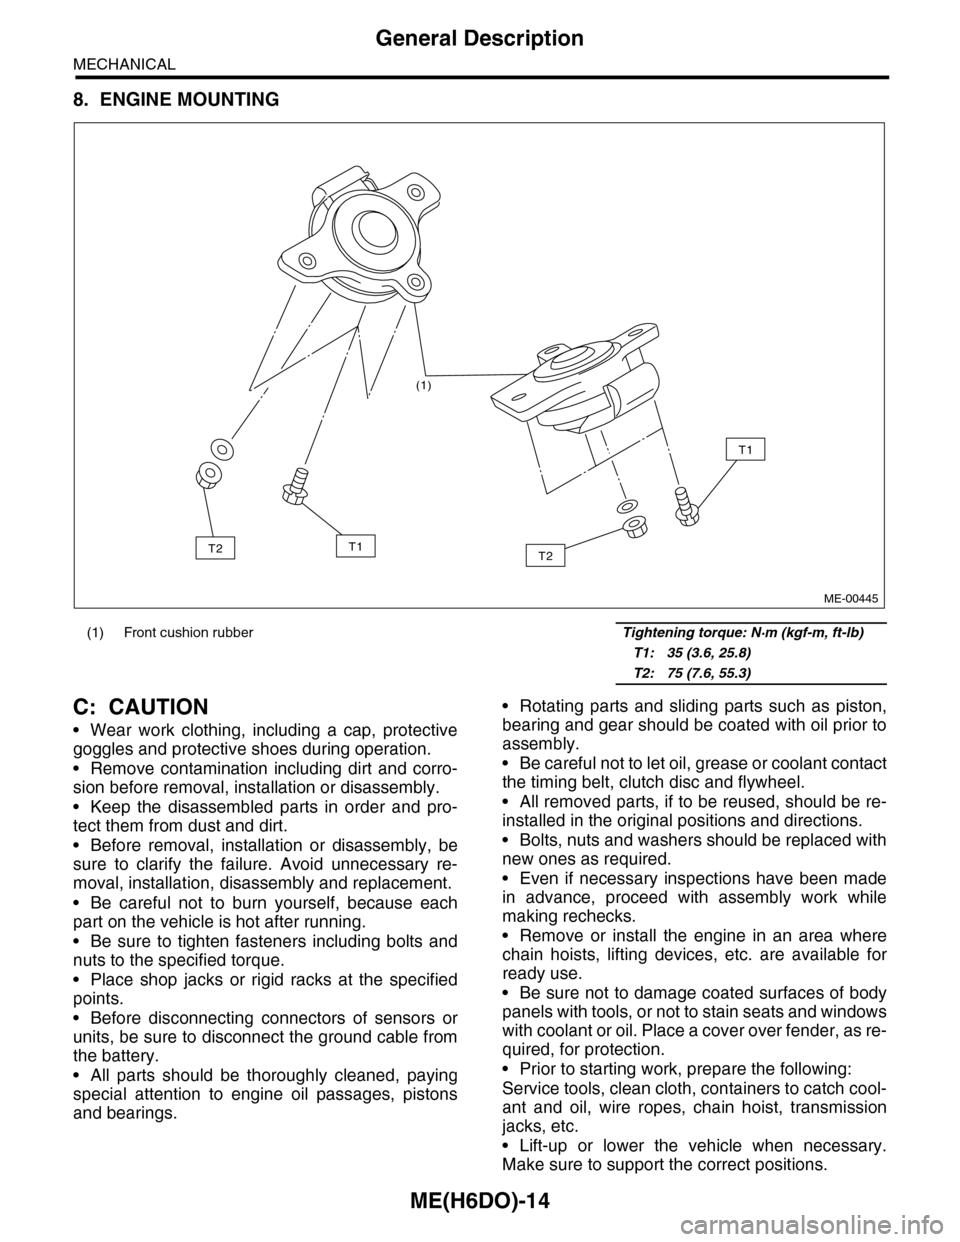
8. ENGINE MOUNTING
C: CAUTION
•Wear work clothing, including a cap, protective
goggles and protective shoes during operation.
•Remove contamination including dirt and corro-
sion before removal, installation or disassembly.
•Keep the disassembled parts in order and pro-
tect them from dust and dirt.
•Before removal, installation or disassembly, be
sure to clarify the failure. Avoid unnecessary re-
moval, installation, disassembly and replacement.
•Be careful not to burn yourself, because each
part on the vehicle is hot after running.
•Be sure to tighten fasteners including bolts and
nuts to the specified torque.
•Place shop jacks or rigid racks at the specified
points.
•Before disconnecting connectors of sensors or
units, be sure to disconnect the ground cable from
the battery.
•All parts should be thoroughly cleaned, paying
special attention to engine oil passages, pistons
and bearings.
•Rotating parts and sliding parts such as piston,
bearing and gear should be coated with oil prior to
assembly.
•Be careful not to let oil, grease or coolant contact
the timing belt, clutch disc and flywheel.
•All removed parts, if to be reused, should be re-
installed in the original positions and directions.
•Bolts, nuts and washers should be replaced with
new ones as required.
•Even if necessary inspections have been made
in advance, proceed with assembly work while
making rechecks.
•Remove or install the engine in an area where
chain hoists, lifting devices, etc. are available for
ready use.
•Be sure not to damage coated surfaces of body
panels with tools, or not to stain seats and windows
with coolant or oil. Place a cover over fender, as re-
quired, for protection.
•Prior to starting work, prepare the following:
Service tools, clean cloth, containers to catch cool-
ant and oil, wire ropes, chain hoist, transmission
jacks, etc.
•Lift-up or lower the vehicle when necessary.
Make sure to support the correct positions.
(1) Front cushion rubber Tightening torque: N·m (kgf-m, ft-lb)
T1: 35 (3.6, 25.8)
T2: 75 (7.6, 55.3)
(1)
T2
T1
T1T2
ME-00445
Page 2104 of 2453
5AT-88
Front Differential Assembly
AUTOMATIC TRANSMISSION
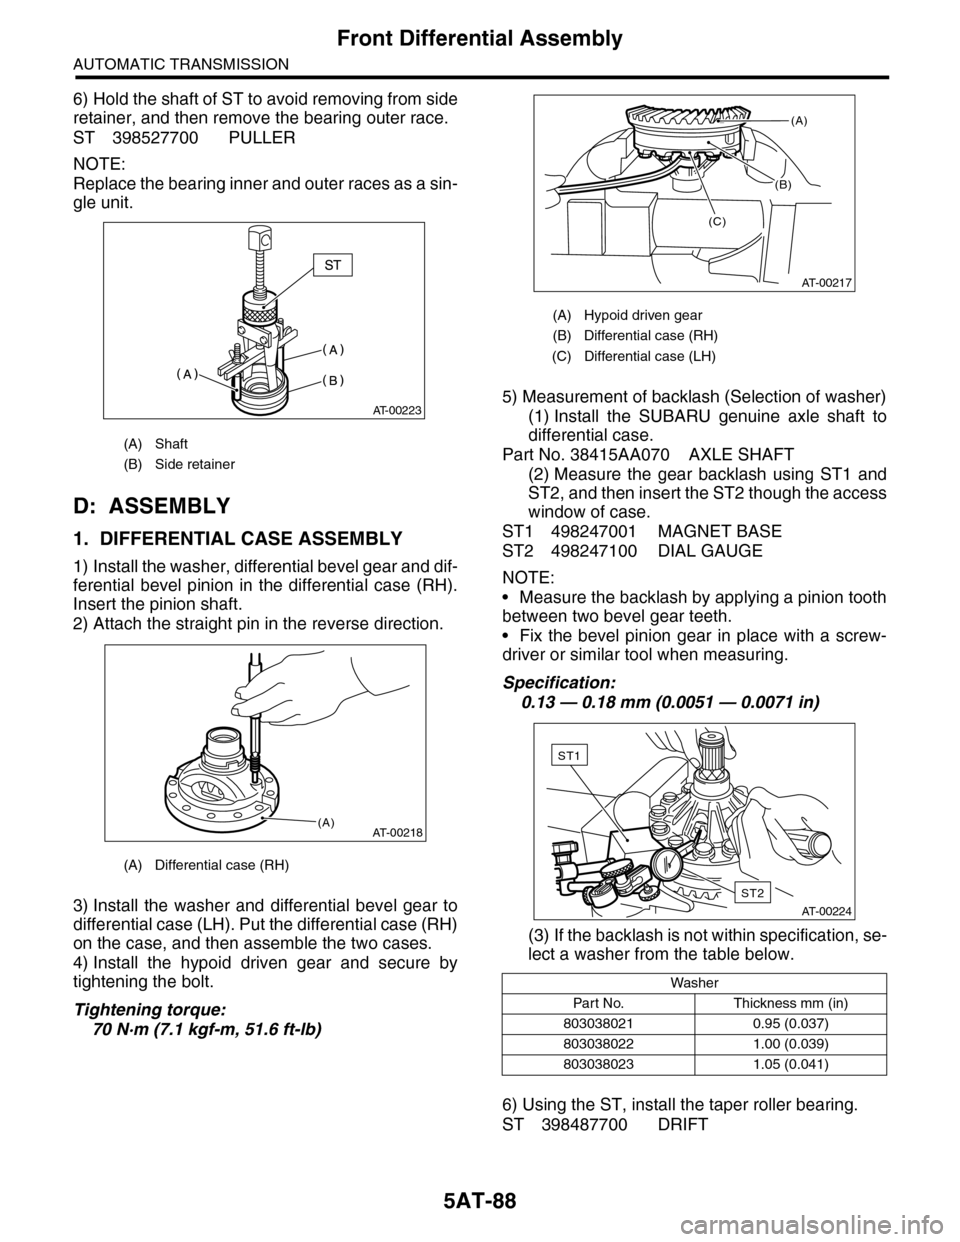
6) Hold the shaft of ST to avoid removing from side
retainer, and then remove the bearing outer race.
ST 398527700 PULLER
NOTE:
Replace the bearing inner and outer races as a sin-
gle unit.
D: ASSEMBLY
1. DIFFERENTIAL CASE ASSEMBLY
1) Install the washer, differential bevel gear and dif-
ferential bevel pinion in the differential case (RH).
Insert the pinion shaft.
2) Attach the straight pin in the reverse direction.
3) Install the washer and differential bevel gear to
differential case (LH). Put the differential case (RH)
on the case, and then assemble the two cases.
4) Install the hypoid driven gear and secure by
tightening the bolt.
Tightening torque:
70 N·m (7.1 kgf-m, 51.6 ft-lb)
5) Measurement of backlash (Selection of washer)
(1) Install the SUBARU genuine axle shaft to
differential case.
Part No. 38415AA070 AXLE SHAFT
(2) Measure the gear backlash using ST1 and
ST2, and then insert the ST2 though the access
window of case.
ST1 498247001 MAGNET BASE
ST2 498247100 DIAL GAUGE
NOTE:
•Measure the backlash by applying a pinion tooth
between two bevel gear teeth.
•Fix the bevel pinion gear in place with a screw-
driver or similar tool when measuring.
Specification:
0.13 — 0.18 mm (0.0051 — 0.0071 in)
(3) If the backlash is not within specification, se-
lect a washer from the table below.
6) Using the ST, install the taper roller bearing.
ST 398487700 DRIFT
(A) Shaft
(B) Side retainer
(A) Differential case (RH)
AT-00223
AT-00218(A)
(A) Hypoid driven gear
(B) Differential case (RH)
(C) Differential case (LH)
Washer
Par t N o. Thickness mm (in)
803038021 0.95 (0.037)
803038022 1.00 (0.039)
803038023 1.05 (0.041)
(B)
AT-00217
(A)
(C)
AT-00224
ST2
ST1
Page 2304 of 2453
WI-20
Power Supply Circuit
WIRING SYSTEM
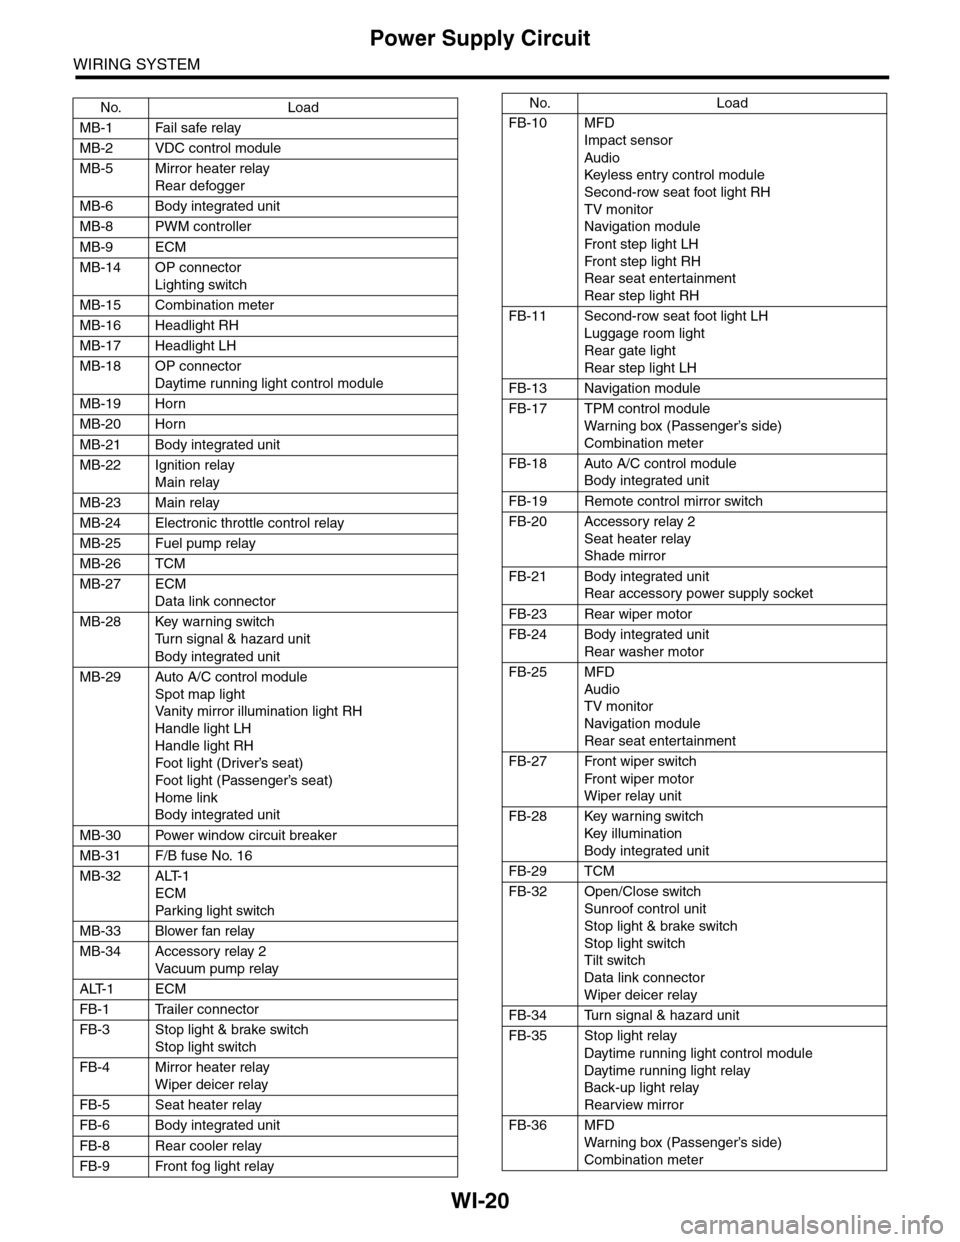
No. Load
MB-1 Fail safe relay
MB-2 VDC control module
MB-5 Mirror heater relay
Rear defogger
MB-6 Body integrated unit
MB-8 PWM controller
MB-9 ECM
MB-14 OP connector
Lighting switch
MB-15 Combination meter
MB-16 Headlight RH
MB-17 Headlight LH
MB-18 OP connector
Daytime running light control module
MB-19 Horn
MB-20 Horn
MB-21 Body integrated unit
MB-22 Ignition relay
Main relay
MB-23 Main relay
MB-24 Electronic throttle control relay
MB-25 Fuel pump relay
MB-26 TCM
MB-27 ECM
Data link connector
MB-28 Key warning switch
Tu r n s i g n a l & h a z a r d u n i t
Body integrated unit
MB-29 Auto A/C control module
Spot map light
Va n i t y m i r r o r i l l u m i n a t i o n l i g h t R H
Handle light LH
Handle light RH
Foot light (Driver’s seat)
Foot light (Passenger’s seat)
Home link
Body integrated unit
MB-30 Power window circuit breaker
MB-31 F/B fuse No. 16
MB-32 ALT-1
ECM
Par king light switch
MB-33 Blower fan relay
MB-34 Accessory relay 2
Va c u u m p u m p r e l ay
ALT-1 ECM
FB-1 Trailer connector
FB-3 Stop light & brake switch
Stop light switch
FB-4 Mirror heater relay
Wiper deicer relay
FB-5 Seat heater relay
FB-6 Body integrated unit
FB-8 Rear cooler relay
FB-9 Front fog light relay
FB-10 MFD
Impact sensor
Audio
Keyless entr y control module
Second-row seat foot light RH
TV monitor
Navigation module
Fr o n t s te p li gh t LH
Fr o n t s te p li gh t RH
Rear seat entertainment
Rear step light RH
FB-11 Second-row seat foot light LH
Luggage room light
Rear gate light
Rear step light LH
FB-13 Navigation module
FB-17 TPM control module
War ning box (Passenger’s side)
Combination meter
FB-18 Auto A/C control module
Body integrated unit
FB-19 Remote control mirror switch
FB-20 Accessory relay 2
Seat heater relay
Shade mirror
FB-21 Body integrated unit
Rear accessory power supply socket
FB-23 Rear wiper motor
FB-24 Body integrated unit
Rear washer motor
FB-25 MFD
Audio
TV monitor
Navigation module
Rear seat entertainment
FB-27 Front wiper switch
Fr o n t wi p er mo t or
Wiper relay unit
FB-28 Key warning switch
Key illumination
Body integrated unit
FB-29 TCM
FB-32 Open/Close switch
Sunroof control unit
Stop light & brake switch
Stop light switch
Tilt switch
Data link connector
Wiper deicer relay
FB-34 Turn signal & hazard unit
FB-35 Stop light relay
Daytime running light control module
Daytime running light relay
Back-up light relay
Rearview mirror
FB-36 MFD
War ning box (Passenger’s side)
Combination meter
No. Load
Page 2305 of 2453
WI-21
Power Supply Circuit
WIRING SYSTEM
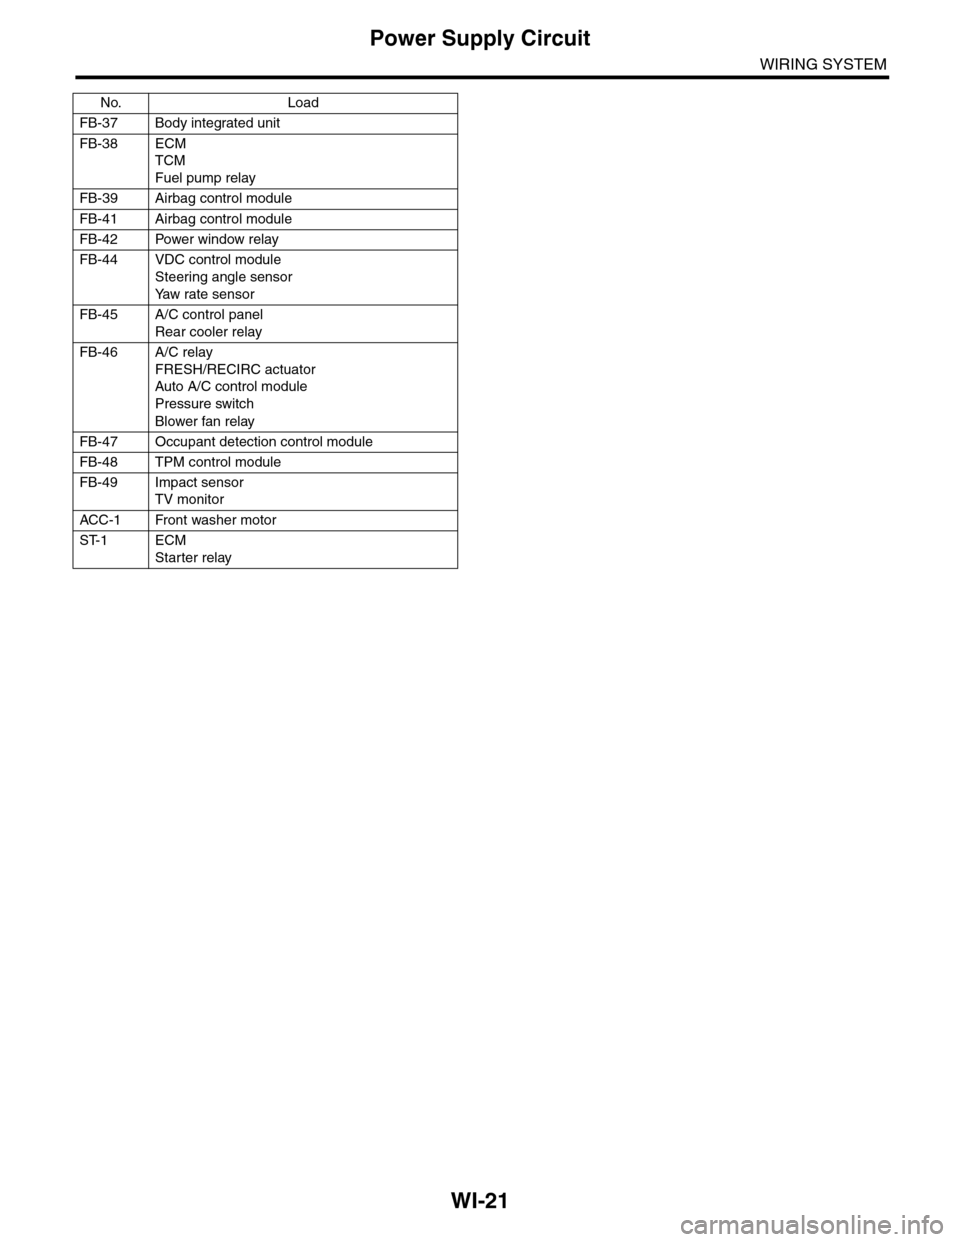
FB-37 Body integrated unit
FB-38 ECM
TCM
Fuel pump relay
FB-39 Airbag control module
FB-41 Airbag control module
FB-42 Power window relay
FB-44 VDC control module
Steering angle sensor
Ya w r a t e s e n s o r
FB-45 A/C control panel
Rear cooler relay
FB-46 A/C relay
FRESH/RECIRC actuator
Auto A/C control module
Pressure switch
Blower fan relay
FB-47 Occupant detection control module
FB-48 TPM control module
FB-49 Impact sensor
TV monitor
ACC -1 Front washer motor
ST-1 ECM
Starter relay
No. Load
Page 2306 of 2453
WI-22
Ground Circuit
WIRING SYSTEM
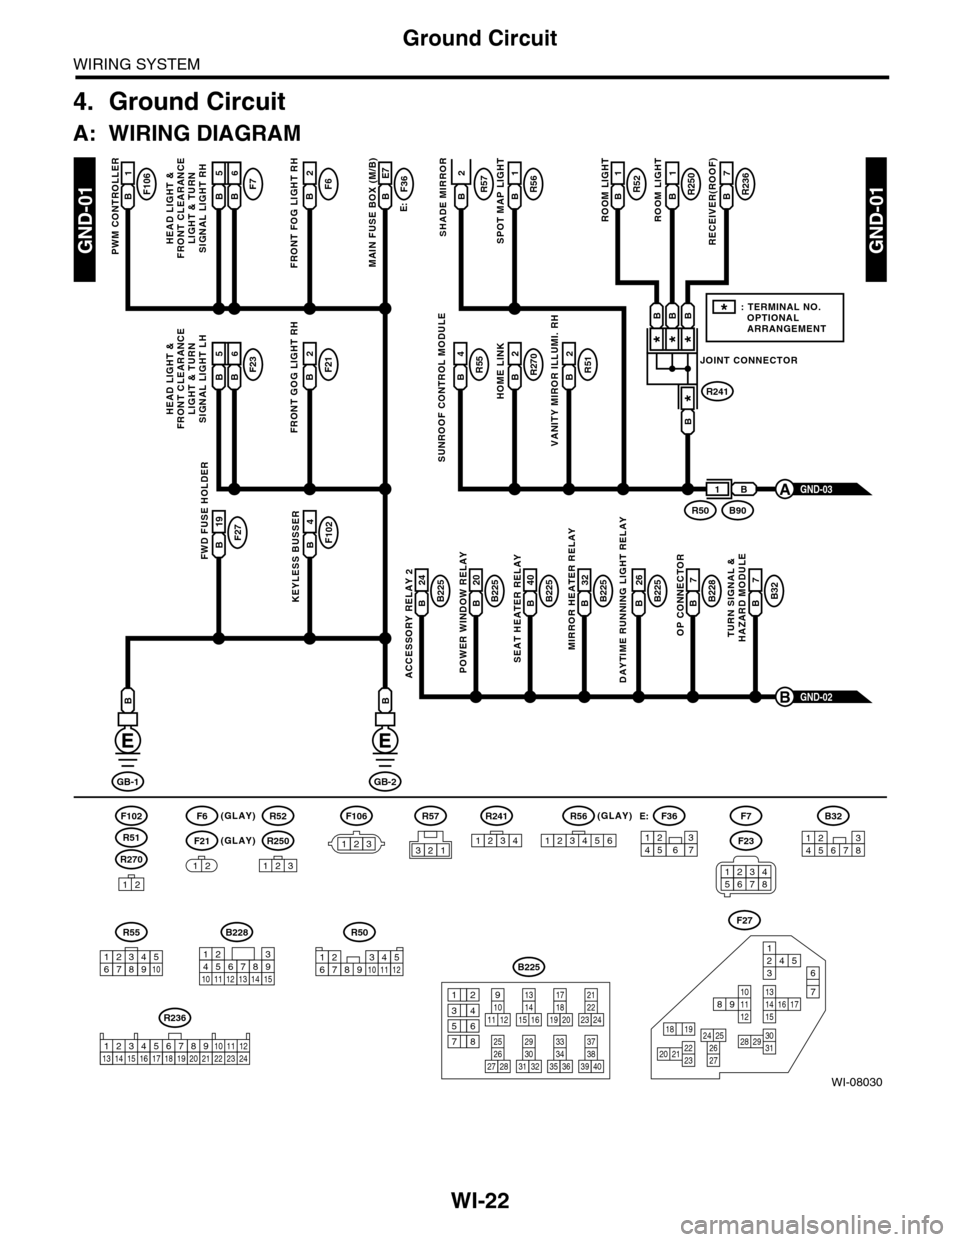
4. Ground Circuit
A: WIRING DIAGRAM
WI-08030
GND-01GND-01
F106B1
PWM CONTROLLER
F6(GLAY)(GLAY)
(GLAY)
F102
R270
F21
F7F6B2
FRONT FOG LIGHT RH
E:
F36B E7
MAIN FUSE BOX (M/B)
R55B4R51B2
VANITY MIROR ILLUMI. RH
R270B2
HOME LINK
R52B1
1
ROOM LIGHT
R250R57B1
ROOM LIGHT
R236B7
RECEIVER(ROOF)SHADE MIRROR
B225B 26
DAYTIME RUNNING LIGHT RELAY
F27B 19FWD FUSE HOLDER
F102B4
KEYLESS BUSSERB225B 24
ACCESSORY RELAY 2
B225B 40
SEAT HEATER RELAY
B225B 20
POWER WINDOW RELAY
B228B7
OP CONNECTOR
B32B7
TURN SIGNAL &HAZARD MODULE
B225B 32
MIRROR HEATER RELAY
GND-02B
GB-1
B
GB-2
B
B
12
12
R52
R250
123
F7
F23
R57
B228
131415
123456789101112
F27
13141516 17
27
24 252620 212223
29303128
89101112
12534
7
6
1918
B225
13141516
17
27
24
2526
20
212223
293031283235
33343738393640
8
9101112
12
534
761918
B32
12345678
SUNROOF CONTROL MODULE
HEAD LIGHT &FRONT CLEARANCELIGHT & TURNSIGNAL LIGHT RH
GND-03A
R51
234510 111678912
R50
F106
123
B A16B5B6
F23F21B2
FRONT GOG LIGHT RH
HEAD LIGHT &FRONT CLEARANCELIGHT & TURNSIGNAL LIGHT LH
B A16B5B6
R56B
SPOT MAP LIGHT
JOINT CONNECTOR
R241
***
*
B90R50
B
B
BBB
1
*: TERMINAL NO. OPTIONAL ARRANGEMENT
123
R56
1234561234567
F36E:
R55
12346789510
R241
1234
R236
123 8910413 14 15 1656711121718192021222324
2
34561278
Page 2309 of 2453
WI-25
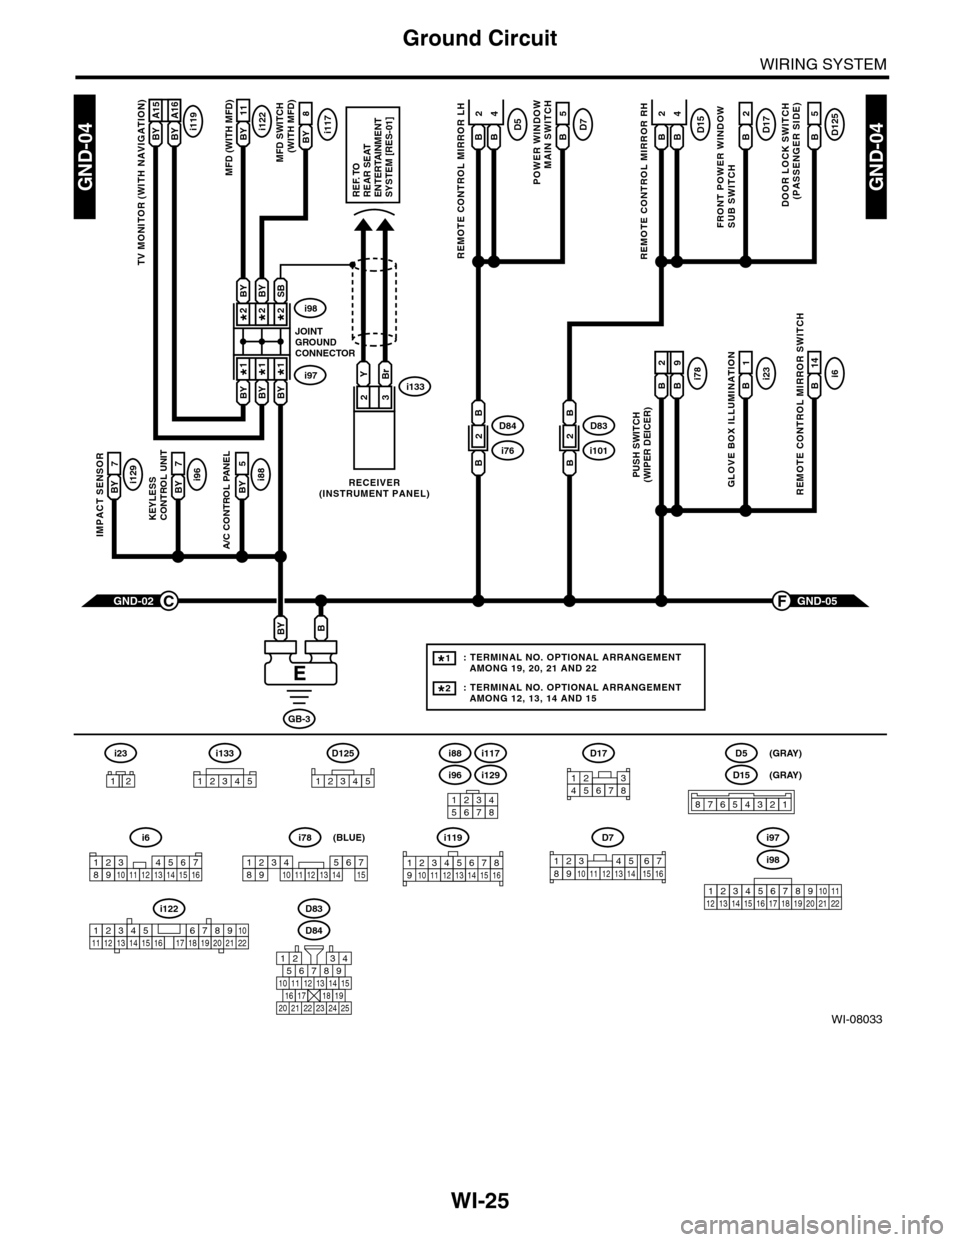
Ground Circuit
WIRING SYSTEM
WI-08033
GND-04GND-04
i117BYi122BY 11
8
A/C CONTROL PANEL
i88BY 5
23
GND-05F
KEYLESS CONTROL UNIT
i96BY 7
IMPACT SENSOR
i129BY 7
TV MONITOR (WITH NAVIGATION)
i119BY A15BY A16
GND-02C
GB-3
BBY
D83
MFD (WITH MFD)MFD SWITCH (WITH MFD)
i96
12345678
i6
42
14
REMOTE CONTROL MIRROR SWITCH
i97i133
i98
JOINTGROUNDCONNECTOR
RECEIVER(INSTRUMENT PANEL)
2*2*
1*1*
2*
1*
BYBi231
GLOVE BOX ILLUMINATION
Bi789
PUSH SWITCH(WIPER DEICER)
B
2
BBYBY
SBBYBY
YBr
REF. TOREAR SEATENTERTAINMENT SYSTEM [RES-01]
: TERMINAL NO. OPTIONAL ARRANGEMENT AMONG 19, 20, 21 AND 22
: TERMINAL NO. OPTIONAL ARRANGEMENT AMONG 12, 13, 14 AND 15
1*
2*
D125
5
DOOR LOCK SWITCH(PASSENGER SIDE)
BD17
2
FRONT POWER WINDOW SUB SWITCH
POWER WINDOW
MAIN SWITCH
BD75
BD15
REMOTE CONTROL MIRROR RH
BB
42D5
REMOTE CONTROL MIRROR LH
BB
i1012D83
B
B
i762D84
B
B
D84
i88
i129
i117
567821943
10
2422 23 25
1112131415161718192021
i98
i97
12345678910111213141516171819202122
D7
12345689101112131514716
D17
12345678
D5
D15
87654321
(GRAY)
(GRAY)
i6
12345678910111213141516
i119
123 8910412 13 14 15 1656711
i133
12345
12345678910111213141516171819202122
i122
i78
123456789101112131415
(BLUE)
i23
12
D125
12345
Page 2310 of 2453
WI-26
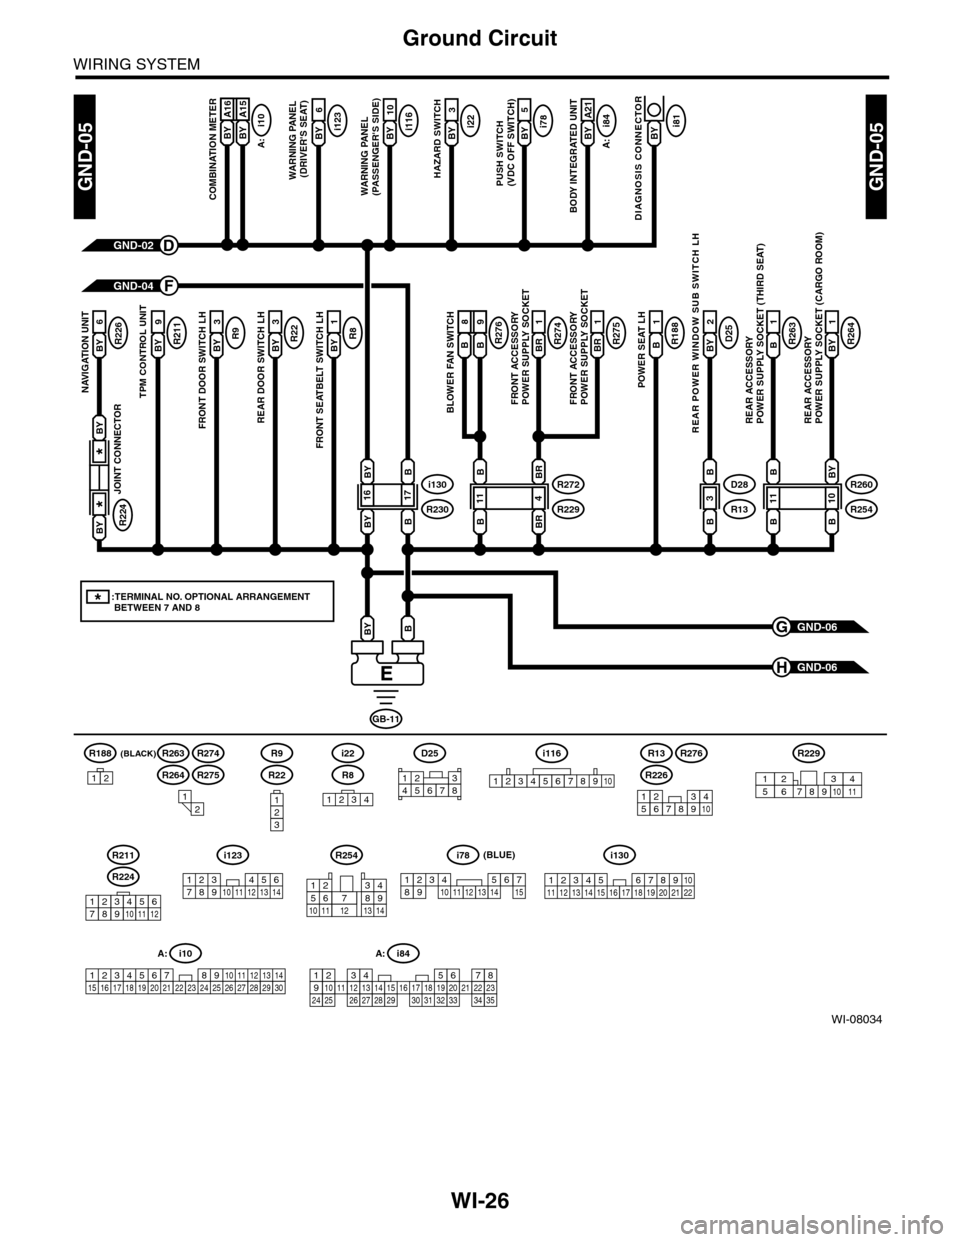
Ground Circuit
WIRING SYSTEM
WI-08034
GND-05GND-05
GND-06G
GND-06H
(BLACK)R188
B A16
COMBINATION METER
GND-02D
GND-04F
GB-11
BBY
BY A16BY A15BY 2
A21
BODY INTEGRATED UNIT
i78BY 2
5
PUSH SWITCH(VDC OFF SWITCH)
i22BY 2
3
HAZARD SWITCH
i116BY 2
10
WARNING PANEL (PASSENGER'S SIDE)
R8BY 2
1
FRONT SEATBELT SWITCH LH
R22BY 2
3
REAR DOOR SWITCH LH
R9BY
3
FRONT DOOR SWITCH LH
R211BY
9
TPM CONTROL UNIT
R226BY
6
NAVIGATION UNIT
R264BY 2
1
REAR ACCESSORY POWER SUPPLY SOCKET (CARGO ROOM)
R263B2
1
REAR ACCESSORY POWER SUPPLY SOCKET (THIRD SEAT)
D25BY
2
REAR POWER WINDOW SUB SWITCH LH
R188B
1
POWER SEAT LH
R275BR
1
R274BR
1
FRONT ACCESSORY POWER SUPPLY SOCKETFRONT ACCESSORY POWER SUPPLY SOCKET
i123BY 2
6
WARNING PANEL (DRIVER'S SEAT)
A:
i10
B A16
BLOWER FAN SWITCH
B8B9R276
A:
i84
i130
R230
B
1716
B
BY
BY
R272
R229
BR
411
BR
B
B
R260
R254
BY
1011
B
B
B
D28
R13
B
3
B
i81BY
DIAGNOSIS CONNECTOR
R224
JOINT CONNECTOR
*
*
BY
BY
*:TERMINAL NO. OPTIONAL ARRANGEMENT BETWEEN 7 AND 8
1234
i116
12345678910
i10
19 20 2115 16 17 182223242526272829301234568910 11 12 13 147
A:
R8
i22
123
R22
R9
12
12345678910
A: i84
1234567891011121415161718192021222324252627282930313233343513
123456789101112
R224
R211
R226
R13R276
R264
R263R274
R275
R254
12
10115634897131412
R229
8791012543611
D25
12345678
123 8910411 12 13 14 15 16567171819202122
i130i123
123 45678910 11 12 13 14
i78
123456789101112131415
(BLUE)
12