Page 33 of 95
 (MR 4")
54A-3
WINDOWS
Front side door sliding window: Removal - Refitting
54A
REMOVAL
I - REMOVAL PREPARATION OPERATION
aRemove:
-the front side door trim (see Front side door trim:
Removal - Refitting) (MR 412, 72A, Side opening
element trim),
-the interior weatherstrip,
-the door seal film (see Door sealing film: Remo-
val - Refitting) (MR 312, 65A, Opening elements
sealing).
II - OPERATION FOR REMOVAL OF PART
CONCERNED
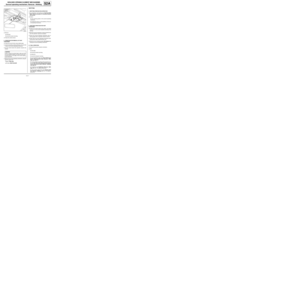
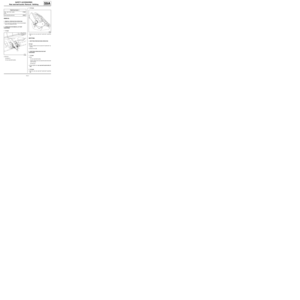
aLower the window in order to access the bolts (1) of
the front side sliding door window.
aRemove the bolts (1) from the front side sliding door
window.aRemove the front side sliding door window.
REFITTING
I - REFITTING OPERATION FOR PART
CONCERNED
aRefit:
-the front side door sliding window ,
-the bolts (1) to the front side sliding door window.
aCarry out a function test.
II - FINAL OPERATION.
aReplace the door sealing film (see Door sealing
film: Removal - Refitting) (MR 312, 65A, Opening
elements sealing).
aRefit:
-the interior weatherstrip,
-the door trim (see Front side door trim: Removal
- Refitting) (MR 412, 72A, Side opening element
trim). Note:
When removing the seal film, it must be replaced (
(see Door sealing fi lm: Removal - Refitting) ).
119279
119292
Page 34 of 95
 (71A, Body inter")
54A-4
WINDOWS
Rear quarter panel window: Removal - Refitting
54A
REMOVAL
I - REMOVAL PREPARATION OPERATION
aRemove:
-the rear panel trim (see Rear panel lining: Remo-
val - Refitting) (71A, Body internal trim),
-the rear quarter panel trim (see Quarter panel
trim: Removal - Refitting) (71A, Body internal
trim).
-the B-pillar upper trim (see B-pillar upper trim:
Removal - Refitting) (71A, Body internal trim).
aProtect the edges of the quarter panel window using
masking tape.
II - OPERATION FOR REMOVAL OF PART
CONCERNED
aBegin cutting the cement bead.
REFITTING
I - REFITTING PREPARATION OPERATION
aAlways replace the stops and shims.
aFor preparation and bonding (see Technical Note
560A).II - REFITTING OPERATION FOR PART
CONCERNED
aBond the rear quarter panel window.
aEqual out the clearances and shut lines.
aRemove the tabs from the stops when the adhesive
has dried.
III - FINAL OPERATION.
aRefit:
-the B-pillar upper trim (see B-pillar upper trim:
Removal - Refitting) (71A, Body internal trim),
-the rear quarter panel trim (see Quarter panel
trim: Removal - Refitting) (71A, Body internal
trim).
-the rear panel trim (see Rear panel lining: Remo-
val - Refitting) (71A, Body internal trim).
119267
Note:
Leave a minimum clearance of 3.5 mm between
the rear quar ter panel window and the upper
section of the panelwork. This clearance is
necessary for fitting the transverse bars.
Page 35 of 95
 (MR 411,
85A, Wiping - W")
54A-5
WINDOWS
Rear screen: Removal - Refitting
54A
REMOVAL
I - REMOVAL PREPARATION OPERATION
aRemove the rear screen wiper arm (see Rear
screen wiper arm: Removal - Refitting) (MR 411,
85A, Wiping - Washing).
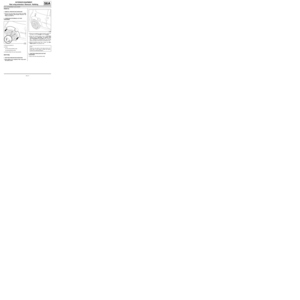
aUnclip the exterior trim (1) from the rear screen.
aRemove the tailgate trim (see Tailgate trim: Remo-
val - Refitting) (MR 412, 73A, Non-side opening
element trim).
aDisconnect the rear screen de-icer connectors.II - OPERATION FOR REMOVAL OF PART
CONCERNED
aProtect the edges of the rear screen using masking
tape.
aBegin cutting the cement bead.
REFITTING
I - REFITTING PREPARATIONS OPERATION
aAlways replace the stops and shims.
aFor preparation and bonding of the rear screen win-
dow, see Technical Note 560A, General window
and sunroof bonding procedure.
II - REFITTING OPERATION FOR PART
CONCERNED
aBond the rear screen (two people are required for
this operation).
aEqual out the clearances and shut lines.
aRemove the tabs from the stops when the adhesive
has dried.
III - FINAL OPERATION.
aConnect the rear screen de-icer connectors.
aRefit the tailgate trim (see Tailgate trim: Removal -
Refitting) (MR 412, 73A, Non-side opening element
trim).
aClip on the rear screen exterior trim (1) .
119525
119290
Page 36 of 95
54A-6
WINDOWS
Rear screen: Removal - Refitting
54A
aRefit the rear screen wiper arm (see Rear screen
wiper arm: Removal - Refitting) (MR 411, Mecha-
nical 85A, Wiping - Washing).
Page 37 of 95

54A-7
WINDOWS
Sunroof fixed window: Removal - Refitting
54A
REMOVAL
I - REMOVAL PREPARATION OPERATION
aLock the airbag computer using the Diagnostic tool
(see Fault finding - Replacement of components)
(MR 413, 88C, Airbags and seat belt pretensioners).
aDisconnect the battery (see Battery: Removal - Re-
fitting) (MR 411, 80A, Battery).
aRemove:
-the headlining (see Headlining: Removal - Refit-
ting) (MR 412, 71A, Body internal trim),
-the roof protection strips (see 55A, Exterior pro-
tection, Roof protection strip: Removal - Refit-
ting, page 55A-17) .
aProtect:
-the sunroof's fixed window surround and the rear
section of the roof using masking tape,
-the inside of the vehicle.II - REMOVAL OPERATION FOR PART
CONCERNED
aCut the cement bead; this operation requires two
people.
aRemove the fixed window from the sunroof.
REFITTING
I - REFITTING PREPARATIONS OPERATION
aPosition the new shims on the sunroof operating me-
chanism.
aFor preparation and bonding (see Technical Note
560A).
II - REFITTING OPERATION FOR PART
CONCERNED
aBond the sunroof fixed window using the specific
support (this operation requires two people):
-Support: PARV 202,
-set of arch supports: APARV 200 ESP. Equipment required
Diagnostic tool
IMPORTANT
To avoid any risk of triggering when working on or
near a pyrotechnic component (airbags or preten-
sioners), lock the airbag computer using the dia-
gnostic tool.
When this function is activated, all the trigger lines
are inhibited and the airbag warning light on the ins-
trument panel lights up contin uously (ignition on).
IMPORTANT
Never handle the pyrotechnic systems (pretensio-
ners or airbags) near to a source of heat or naked
flame - they may be triggered.
121153
Page 38 of 95
54A-8
WINDOWS
Sunroof fixed window: Removal - Refitting
54A
Respect the clearances and shut lines
aObserve the 6 mm clearance between the sunroof
fixed window (1) and the sunroof mobile panel (2) .
aThe sunroof's fixed window (1) should be slightly
lower than its mobile panel (2) .
aArrange the lateral clearances so that they are
equal.
III - FINAL OPERATION.
aRefit:
-the headlining (see Headlining: Removal - Refit-
ting) (MR 412, 71A, Body internal trim),
-the roof protection strips (see 55A, Exterior pro-
tection, Roof protection strip: Removal - Refit-
ting, page 55A-17) .
aConnect the battery (see Battery: Removal - Refit-
ting) (MR 411, 80A, Battery).
aUnlock the airbag computer using Diagnostic tool
(see Fault finding - Replacement of components)
(MR 413, 88C, Airbags and pretensioners).
113525
Page 39 of 95
55A-1
EXTERIOR PROTECTION
Front bumper: Removal - Refitting
55A
REMOVAL
I - REMOVAL PREPARATION OPERATION
aPosition the vehicle on a two-post lift (see Vehicle:
Towing and lifting) (MR 412, 02A, Lifting equip-
ment).
aRemove:
-the front wheels (see Wheel: Removal - Refitting)
(MR 411, 35A, Wheels and tyres),
-the front wheel arch liners (see 55A, Exterior pro-
tection, Front wheel arch liner: Removal - Refit-
ting, page 55A-18) .
II - OPERATION FOR REMOVAL OF PART
CONCERNED
aRemove the bolts (1) .aRemove the bolts (2) .
aRemove the bolts (3) .
119261
119263
119262
Page 40 of 95
55A-2
EXTERIOR PROTECTION
Front bumper: Removal - Refitting
55A
aUnclip the side sections of the front bumper (4) .
aDetach the top section of the front bumper (5) .
aRemove the front bumper (6) (this operation requi-
res two people).
aDisconnect the front fog light connector (depending
on the equipment level).
REFITTING
I - REFITTING OPERATION FOR PART
CONCERNED
aConnect the front fog light connector (depending on
the equipment level).
aRefit the front bumper (this operation requires two
people).
aClip on the side sections of the front bumper.aRefit the bolts (2) , (3) and (1) .
II - FINAL OPERATION.
aRefit:
-the front wheel arch liners (see 55A, Exterior pro-
tection, Front wheel arch liner: Removal - Refit-
ting, page 55A-18) ,
-the front wheels (see Wheel: Removal - Refitting)
(MR 411, 35A, Wheels and tyres).
119272
119273


 (MR 411, Mecha-
nical 85A, Wiping - Washing).")
 and the sunroof mobile panel (2) .
aT")
 (MR 412, 02A, Lifti")
 .
aDetach the top section of the front bumper (5) .
aRemove the front bumper (6) (this")