Page 49 of 95
55A-11
EXTERIOR PROTECTION
Rear bumper: Removal - Refitting
55A
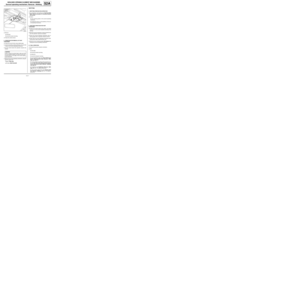
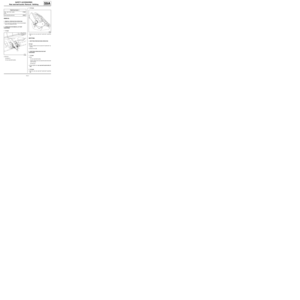
aRemove the bolts (4) .aRemove the bolts (6) .
aUnclip the rear bumper at (5) .
aRemove the rear bumper at (6) (this operation requi-
res two people).
aDisconnect the number plate light connector. EQUIPMENT LEVEL EA0 or EQUIPMENT LEVEL
EA1 or EQUIPMENT LEVEL EA3 or EQUIPMENT
LEVEL EA5 or EQUIPMENT LEVEL EAG or EQUI-
PMENT LEVEL EZ2 or EQUIPMENT LEVEL EZ4
119259
EQUIPMENT LEVEL SPORT
132043
119254
Page 50 of 95
55A-12
EXTERIOR PROTECTION
Rear bumper: Removal - Refitting
55A
aDisconnect the proximity sensor connector.
REFITTING
I - REFITTING OPERATION FOR PART
CONCERNED
aConnect the proximity sensor connector.
aConnect the number plate light connector.
aRefit the rear bumper (this operation requires two
people).
II - FINAL OPERATION
aClip on the side extenders of the rear bumper in or-
der (7) , (8) , (9) , (10) , (11) .
aRefit the rear lights (see Rear wing light: Removal
- Refitting) (81A, Rear lighting).aCarry out a function test on all functions.
REAR PROXIMITY RADAR
REAR PROXIMITY RADAR
EQ UIPMENT LEVEL SPORT
132043
Page 51 of 95

55A-13
EXTERIOR PROTECTION
Rear bumper: Stripping - Rebuilding
55A
STRIPPING
I - STRIPPING PREPARATION OPERATION
aRemove the rear bumper (see 55A, Exterior pro-
tection, Rear bumper: Removal - Refitting, page
55A-10) .
II - STRIPPING OPERATION FOR PART
CONCERNED
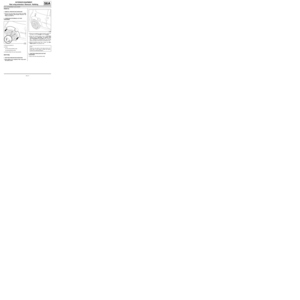
aRemove the proximity radars (see Proximity radar:
Removal - Refitting) (87F, Parking distance con-
trol).
aRemove:
-the number plate lights (see Number plate light:
Removal - Refitting) (81A, Rear lighting),
-the electrical wiring.
aUnclip the outer impact strips.
REBUILDING
I - REBUILDING OPERATION FOR PART
CONCERNED
aClip on the outer impact strips.
aRefit:
-the electrical wiring,
-the number plate lights (see Number plate light:
Removal - Refitting) (81A, Rear lighting).
aRefit the proximity radars (see Proximity radar: Re-
moval - Refitting) (87F, Parking distance control).
II - FINAL OPERATION.
aRefit the rear bumper (see 55A, Exterior protec-
tion, Rear bumper: Removal - Refitting, page
55A-10) . REAR PROXIMITY RADAR
EQUIPMENT LEVEL EA0 or EQUIPMENT LEVEL
EA1 or EQUIPMENT LEVEL EA3 or EQUIPMENT
LEVEL EA5
120801
EQUIPMENT LEVEL EA0 or EQUIPMENT LEVEL
EA1 or EQUIPMENT LEVEL EA3 or EQUIPMENT
LEVEL EA5
REAR PROXIMITY RADAR
Page 52 of 95
55A-14
EXTERIOR PROTECTION
Rear bumper: Conversion
55A
ADAPTATION
a
aDrill the rear bumper around the marking (1) using
an angular cutter or using the special tool (part no.:
77 11 419 232).
aFinish off using a small file.Note:
When a rear bumper is replaced, the replace-
ment part needs to be modified before it is pain-
ted so that the proximity sensors can be fitted.
120800
Page 53 of 95
55A-15
EXTERIOR PROTECTION
Front side door protective strip: Removal - Refitting
55A
REMOVAL
OPERATION FOR REMOVAL OF PART
CONCERNED
aRemove the bolt (1) .
aSlide the door rubbing strip towards the rear of the
vehicle.
REFITTING
REFITTING OPERATION FOR PART CONCERNED
aSlide the door moulding towards the front of the ve-
hicle.
aRefit the bolt (1) .
119275
119291
Page 54 of 95
55A-16
EXTERIOR PROTECTION
Rear wing protective strip: Removal - Refitting
55A
REMOVAL
OPERATION FOR REMOVAL OF PART
CONCERNED
aUnclip the clip from the front section of the rear wing
protective strip using the (Car. 1363).aProtect the rear wing using masking tape.
aSlide the wing protective strip towards the rear of the
vehicle.
aRemove the rear wing protective strip.
REFITTING
I - REFITTING PREPARATIONS OPERATION
aReplace the rear wing protective strip clip if neces-
sary.
II - REFITTING OPERATION FOR PART
CONCERNED
aSlide the wing protective strip towards the front of
the vehicle.
aClip the clip onto the front section of rear wing pro-
tective strip. Special tooling required
Car. 1363Set of tr im removal levers.119284
119285
Page 55 of 95
55A-17
EXTERIOR PROTECTION
Roof protection strip: Removal - Refitting
55A
REMOVAL
I - REMOVAL PREPARATION OPERATION
aOpen the moving panel.
II - REMOVAL OPERATION FOR PART
CONCERNED
aUnclip the rear protective strip from the roof (1) .
aRemove the rear protective strip from the roof in the
direction (2) .a
aRemove:
-the bolt (4) ,
-the front protective strip from the roof in the direc-
tion shown (5) .
REFITTING
REFITTING OPERATION FOR PART CONCERNED
aRefit:
-the front protective strip to the roof,
-the bolt (4) ,
-the rear protective strip to the roof.
aClip on the rear roof protective strip (1) .
121151
124863
Note:
When removing the front protective strip from the
roof, it is necessary on some vehicles to detach
the end (3) of the front protective strip from the
roof carefully, as it may be bonded with the
windscreen.
Page 56 of 95
55A-18
EXTERIOR PROTECTION
Front wheel arch liner: Removal - Refitting
55A
REMOVAL
I - REMOVAL PREPARATION OPERATION
aPosition the vehicle on a two-post lift (see Vehicle:
Towing and lifting) (MR 411, 02A, Lifting equip-
ment).
aRemove the front wheels (see Wheel: Removal -
Refitting) (MR 411, 35A, Wheels and tyres).II - OPERATION FOR REMOVAL OF PART
CONCERNED
aRemove clips (1) .
aRemove:
-the bolts (2) and (3) ,
-the front wheel arch liner starting at the front sec-
tion.
119264
119265


 .aRemove the bolts (6) .
aUnclip the rear bumper at (5) .
aRemove the rear bumper at (6) (this operation requi-
re")

 using
an angular cutter or using the special tool (part no.:
77 11 419 232).
aFinish o")
 .
aSlide the door rubbing strip towards the r")


 (MR 411,")