Page 9 of 95

51A-6
SIDE OPENING ELEMENT MECHANISMS
Front side door electric window mechanism: Removal - Refitting51A
REMOVAL
I - REMOVAL PREPARATION OPERATION
aRemove:
-the front side door trim (see Front side door trim:
Removal - Refitting) (MR 412, 72A, Side opening
element trim),
-the door sealing film (see Door sealing film: Re-
moval - Refitting) (MR 412, 65A, Opening ele-
ment sealing),
-the front side sliding door window (see 54A, Win-
dows, Front side door sliding window: Removal
- Refitting, page 54A-3) or keep it in the raised po-
sition with masking tape.
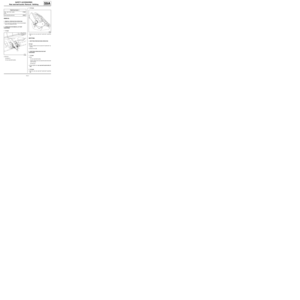
II - REMOVAL OPERATION FOR PART
CONCERNED
aRemove:
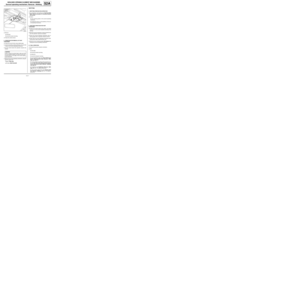
-the bolts (1) ,
-the bolts (2) .
aDisconnect the window winder mechanism supply
connector.
aRemove the window lift mechanism.
REFITTING
I - REFITTING OPERATION FOR PART
CONCERNED
aRefit the window lift mechanism.
aConnect the window winder mechanism supply con-
nector.
aRefit:
-the window winder mechanism bolts without tighte-
ning them,
-the front side sliding door window (see 54A, Win-
dows, Front side door sliding window: Removal
- Refitting, page 54A-3) or keep it in the raised po-
sition with masking tape.
a
aTorque tighten the electric window winder mecha-
nism bolts ( 6.5 Nm) following the tightening order:
-bolt (3) ,
-bolt (4) ,
-bolt (5) .
aCarry out a function test. Tightening torquesm
electr ic window winder
mechanism bolts6.5 Nm
119280
119280
Note:
When refitting the window winder mechanism,
follow the tightening order of the bolts.
The tightening order ensures the window winder
mechanism is correctly aligned.
Page 10 of 95
51A-7
SIDE OPENING ELEMENT MECHANISMS
Front side door electric window mechanism: Removal - Refitting51A
II - FINAL OPERATION.
aRefit:
-the door sealing film (see Door sealing film: Re-
moval - Refitting) (MR 412, 65A, Opening ele-
ment sealing),
-the front side door trim (see Front side door trim:
Removal - Refitting) (MR 412, 72A, Side opening
element trim),
aInitialise the window winder motor (see Electric
window: Initialisation) (MR 413, 87D, Electric win-
dows - Sunroof).
Page 11 of 95

51A-8
SIDE OPENING ELEMENT MECHANISMS
Front side door manual window winder mechanism: Removal - Refitting51A
REMOVAL
I - REMOVAL PREPARATION OPERATION
aRemove:
-the front side door trim (see Front side door trim:
Removal - Refitting) (MR 412, 72A, Side opening
element trim),
-the door sealing film (see Door sealing film: Re-
moval - Refitting) (MR 412, 65A, Opening ele-
ment sealing),
-the front side sliding door window (see 54A, Win-
dows, Front side door sliding window: Removal
- Refitting, page 54A-3) or keep it in the raised po-
sition with masking tape.
II - REMOVAL OPERATION FOR PART
CONCERNED
aRemove:
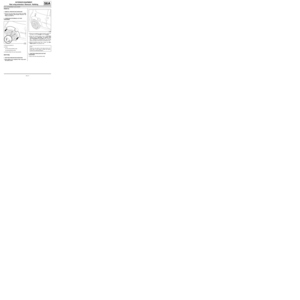
-the bolts (1) ,
-the bolts (2) .
aRemove the window lift mechanism.
REFITTING
I - REFITTING OPERATION FOR PART
CONCERNED
aCheck that there is sealing foam on the manual win-
dow winder mechanism.
aRefit:
-the window winder mechanism,
-the window winder mechanism bolts without tighte-
ning them,
-the front side sliding door window (see 54A, Win-
dows, Front side door sliding window: Removal
- Refitting, page 54A-3) or keep it in the raised po-
sition with masking tape.
a
aTorque tighten the manual window winder mecha-
nism bolts ( 6.5 Nm) following the tightening order:
-bolt (3) ,
-bolt (4) ,
-bolt (5) .
aCarry out a function test. Tightening torquesm
manual window winder
mechanism bolts6.5 Nm
121455
121455
Note:
When refitting the window winder mechanism,
follow the tightening order of the bolts.
The tightening order ensures the window winder
mechanism is correctly aligned.
Page 12 of 95
51A-9
SIDE OPENING ELEMENT MECHANISMS
Front side door manual window winder mechanism: Removal - Refitting51A
II - FINAL OPERATION.
aRefit:
-the door sealing film (see Door sealing film: Re-
moval - Refitting) (MR 412, 65A, Opening ele-
ment sealing),
-the front side door trim (see Front side door trim:
Removal - Refitting) (MR412, 72A, Side opening
elements trim).
Page 13 of 95

51A-10
SIDE OPENING ELEMENT MECHANISMS
Front side door check strap: Removal - Refitting
51A
REMOVAL
I - REMOVAL PREPARATION OPERATION
aRemove the front side door trim ( (see Front side
door trim: Removal - Refitting) ).
1 - Vehicle with front speakers
aRemove:
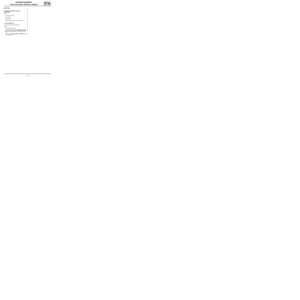
-the speaker mounting bolts (1) ,
-the speaker mounting.
aDisconnect the speaker connector.
2 - Vehicle without front speakers
aRemove the sealing film ( (see Door sealing film:
Removal - Refitting) ).II - OPERATION FOR REMOVAL OF PART
CONCERNED
aRemove:
-the bolt (2) ,
-the bolts (3) ,
-the front side door check strap from inside the door
box section.
REFITTING
I - REFITTING OPERATION FOR PART
CONCERNED
aRefit:
-the front side door check strap through the inside of
the door box section,
-the bolts (3) ,
-the bolt (2) .
II - FINAL OPERATION.
1 - Vehicle with front speakers
aConnect the speaker connector.
aRefit:
-the speaker mounting,
-the speaker mounting bolts (1) ,
-the front side door trim ( (see Front side door
trim: Removal - Refitting) ).
119282
119258
Page 14 of 95
51A-11
SIDE OPENING ELEMENT MECHANISMS
Front side door check strap: Removal - Refitting
51A
2 - Vehicle without front speakers
aRefit:
-the sealing film ( (see Door sealing film: Removal
- Refitting) ),
-the front side door trim ( (see Front side door
trim: Removal - Refitting) ).
Page 15 of 95

52A-1
NON-SIDE OPENING ELEMENT MECHANISMS
Bonnet lock: Removal - Refitting
52A
REMOVAL
I - REMOVAL PREPARATION OPERATION
aRemove the front bumper (see 55A, Exterior pro-
tection, Front bumper: Removal - Refitting, page
55A-1) .
II - OPERATION FOR REMOVAL OF PART
CONCERNED
aRemove:
-the bonnet catch nuts (1) through the openings (2)
in the front upper cross member,
-partially the bonnet catch.aUnclip:
-the clip (3) using a flat screwdriver,
-the bonnet opening cable sleeve stop (4) .
aRemove the bonnet catch.
REFITTING
I - REFITTING OPERATION FOR PART
CONCERNED
aClip on:
-the clip (3) ,
-the bonnet opening cable sleeve stop (4) .
aRefit:
-the bonnet catch,
-the bonnet catch nuts (1) .
aPretighten the bonnet catch nuts.
aAdjust the play and flush fitting of the bonnet ( (see
Bonnet: Adjustment) ).
aTorque tighten the bonnet catch nuts (21 Nm).
II - FINAL OPERATION.
aRefit the front bumper (see 55A, Exterior protec-
tion, Front bumper: Removal - Refitting, page
55A-1) . Tightening torquesm
bonnet catch nuts21 Nm
121039
121038
Page 16 of 95
 ),
-the bat")
52A-2
NON-SIDE OPENING ELEMENT MECHANISMS
Bonnet release cable: Removal - Refitting
52A
REMOVAL
I - REMOVAL PREPARATION OPERATION
aRemove:
-the battery ( (see Battery: Removal - Refitting) ),
-the battery tray ( (see Battery tray: Removal - Re-
fitting) ),
-the front wheel arch liner (see 55A, Exterior pro-
tection, Front wheel arch liner: Removal - Refit-
ting, page 55A-18) ,
-the front bumper (see 55A, Exterior protection,
Front bumper: Removal - Refitting, page 55A-1)
,
-the bonnet catch (see 52A, Non-side opening ele-
ment mechanisms, Bonnet lock: Removal - Re-
fitting, page 52A-1) ,
-the front door sill lining ( (see Front door sill
lining: Removal - Refitting) ).
II - OPERATION FOR REMOVAL OF PART
CONCERNED
aRemove the bolt (1) .
aUnclip the bonnet release catch.
aNote the route of the bonnet release cable.
aRemove the bulkhead cable routing blanking piece.
aRemove the bonnet release cable.
REFITTING
I - REFITTING OPERATION FOR PART
CONCERNED
aRefit:
-the bonnet opening cable,
-the bulkhead cable routing blanking piece.
aClip on the bonnet release catch.
aRefit the bolt (1) .
II - FINAL OPERATION.
aRefit:
-the front door sill lining ( (see Front door sill
lining: Removal - Refitting) ),
-the bonnet catch (see 52A, Non-side opening ele-
ment mechanisms, Bonnet lock: Removal - Re-
fitting, page 52A-1) ,
-the front bumper (see 55A, Exterior protection,
Front bumper: Removal - Refitting, page 55A-1)
,
-the front wheel arch liner (see 55A, Exterior pro-
tection, Front wheel arch liner: Removal - Refit-
ting, page 55A-18) ,
-the battery tray ( (see Battery tray: Removal - Re-
fitting) ),
-the battery ( (see Battery: Removal - Refitting) ).
121145


")