Page 17 of 95
52A-3
NON-SIDE OPENING ELEMENT MECHANISMS
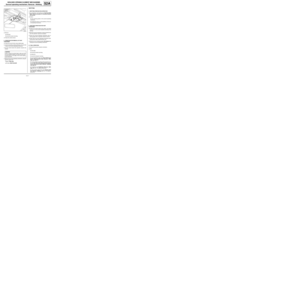
Tailgate lock: Removal - Refitting
52A
REMOVAL
I - REMOVAL PREPARATION OPERATION
aRemove the tailgate trim ( (see Tailgate trim: Re-
moval - Refitting) ).
a
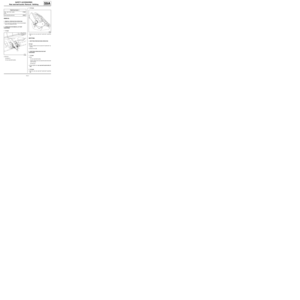
Unlock the tailgate lock by pushing lug (1) with a
screwdriver.II - OPERATION FOR REMOVAL OF PART
CONCERNED
aRemove:
-the bolts (2) from the boot lock,
-the lock from inside the tailgate.
aDisconnect the connector from the tailgate lock.
REFITTING
I - REFITTING OPERATION FOR PART
CONCERNED
aConnect the connector to the tailgate lock.
aRefit:
-the lock from inside the tailgate,
-the bolts (2) on the boot lock.
aTorque tighten the boot lock bolts (8 Nm ).
II - FINAL OPERATION.
aRefit the tailgate trim ( (see Tailgate trim: Removal
- Refitting) ). Tightening torquesm
boot lock bolts8 Nm100232
Note:
If there is an electrical fault it is possible to open
the tailgate manually.
Carry out this operation from inside the vehicle.
119288
Page 18 of 95
52A-4
NON-SIDE OPENING ELEMENT MECHANISMS
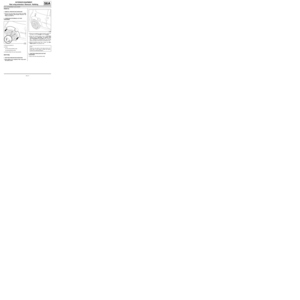
Tailgate strut: Removal - Refitting
52A
REMOVAL
I - REMOVAL PREPARATION OPERATION
a
II - OPERATION FOR REMOVAL OF PART
CONCERNED
aExtract the clips (1) without removing them.
aRemove the struts whilst holding the tailgate.
REFITTING
I - REFITTING PREPARATION OPERATION
aPosition the clips on the struts.
II - REFITTING OPERATION FOR PART
CONCERNED
aOffer up and clip in the struts.WARNING
Note the direction in which the tailgate gas struts
are fitted before removal.
120369
Page 19 of 95
52A-5
NON-SIDE OPENING ELEMENT MECHANISMS
Tailgate exterior opening control: Removal - Refitting
52A
REMOVAL
I - REMOVAL PREPARATION OPERATION
aRemove the tailgate trim (see Tailgate trim: Remo-
val - Refitting) (MR 412, 73A, Non-side opening
element trim).
II - REMOVAL OPERATION FOR PART
CONCERNED
aDisconnect:
-the pipe (1) ,
-the connector (2) .
aRemove:
-the bolts (3) ,
-the badge,
-the exterior opening control for the tailgate
REFITTING
I - REFITTING OPERATION FOR PART
CONCERNED
aRefit:
-the tailgate exterior opening control,
-the badge.
aTighten the bolts according to the tightening order
(4) , (5) and (6) .
aConnect:
-the pipe (1) ,
-the connector (2) .
II - FINAL OPERATION.
aRefit the tailgate trim (see Tailgate trim: Removal -
Refitting) (MR 412, 73A, Non-side opening element
trim).
121220
121220
Page 20 of 95

52A-6
NON-SIDE OPENING ELEMENT MECHANISMS
Sunroof operating mechanism: Removal - Refitting
52A
REMOVAL
I - REMOVAL PREPARATION OPERATION
aPartially open the sunroof mobile panel.
aLock the airbag computer using the Diagnostic tool
(see Fault finding - Replacement of components)
(MR 413, 88C, Airbags and seat belt pretensioners).
aDisconnect the battery (see Battery: Removal - Re-
fitting) (MR 411, 80A, Battery).
aRemove:
-the sunroof console (see Sunroof switch: Remo-
val - Refitting) (MR 411, 87D, Electric window win-
ders - Sunroof),
-the sun visors (see 57A, Interior equipment, Sun
visor: Removal - Refitting, page 57A-16) ,
-the A-pillar trims (see Windscreen pillar trim: Re-
moval - Refitting) (MR 412, 71A, Body internal
trim),
-the rear bench seatback (depending on equipment
level) (see Rear bench seatback: Removal - Re-
fitting) (MR 412, 76A, Rear seat frames and run-
ners),
-the rear parcel shelf side trim panels (see Rear
parcel shelf side trim: Removal - Refitting) (MR
412, 71A, Body internal trim),-the rear panel trims (see Rear panel lining: Re-
moval - Refitting) (MR 412, 71A, Body internal
trim),
-the B-pillar upper trims (see B-pillar upper trim:
Removal - Refitting) (MR 412, 71A, Body internal
trim),
-the rear quarter panel trims (see Quarter panel
trim: Removal - Refitting) (MR 412, 71A, Body in-
ternal trim),
-the headlining (see Headlining: Removal - Refit-
ting) (MR 412, 71A, Body internal trim),
-the cross member mounting of the sunroof sun vi-
sor (see 52A, Non-side opening element mecha-
nisms, Sunroof sun visors: Removal - Refitting,
page 52A-15) ,
-the roof protection strips (see 55A, Exterior pro-
tection, Roof protection strip: Removal - Refit-
ting, page 55A-17) .
aRemove:
-the bolts (1) ,
-the sunroof computer mounting.
aDisconnect the sunroof computer connectors. Equipment required
Diagnostic tool
IMPORTANT
To avoid any risk of triggering when working on or
near a pyrotechnic component (airbags or preten-
sioners), lock the airbag computer using the dia-
gnostic tool.
When this function is activated, all the trigger lines
are inhibited and the airbag warning light on the ins-
trument panel lights up contin uously (ignition on).
IMPORTANT
Never handle the pyrotechnic systems (pretensio-
ners or airbags) near to a source of heat or naked
flame - they may be triggered.
121396
Page 21 of 95
 ,
-the sunroof console mounting.
aProtect the vehicle interior.
II - OPERATION F")
52A-7
NON-SIDE OPENING ELEMENT MECHANISMS
Sunroof operating mechanism: Removal - Refitting
52A
aRemove:
-the bolts (2) ,
-the sunroof console mounting.
aProtect the vehicle interior.
II - OPERATION FOR REMOVAL OF PART
CONCERNED
aProtect the sunroof frame using masking tape.
ainsert the threading needle preferably at the front left
or right of the sunroof operating mechanism.
aCut the cement bead (this operation requires two
people).
aRemove the sunroof operating mechanism using the
specific support (x2):
-Support: PARV 202,
-arch sets: APARV 200 ESP.
REFITTING
I - REFITTING PREPARATION OPERATION
aFor preparation and bonding see Technical Note
560A, General procedure for bonding windows
and sunroof.
aPosition:
-the two centring guides on the sunroof operating
mechanism,
-the positioning shims on the periphery of the sun-
roof operating mechanism.
II - REFITTING OPERATION FOR PART
CONCERNED
aPosition the cement bead at the interior roof panel
surround or on the sunroof cassette according to the
marking.
aBond the sunroof mechanism using the special sup-
port (this operation requires two people).
aCentre the sunroof operating mechanism with in-
dexing guides with an operator inside the vehicle.
aCheck that the sunroof operating mechanism posi-
tioning shims make contact with the roof.
aRemove the two indexing guides 30 minutes after
bonding the sunroof operating mechanism.
III - FINAL OPERATION.
aConnect the sunroof computer connectors.
aRefit:
-the bolts (2) ,
-the sunroof console mounting,
-the bolts (1) ,
-the sunroof computer mounting,
-the roof protection strips (see 55A, Exterior pro-
tection, Roof protection strip: Removal - Refit-
ting, page 55A-17) ,
-the cross member mounting of the sunroof sun vi-
sor (see 52A, Non-side opening element mecha-
nisms, Sunroof sun visors: Removal - Refitting,
page 52A-15) ,
-the headlining (see Headlining: Removal - Refit-
ting) (MR 412, 71A, Body internal trim),
-the rear quarter panel trims (see Quarter panel
trim: Removal - Refitting) (MR 412, 71A, Body in-
ternal trim),
121715
WARNING
When cutting the cement bead, make sure that
the wire passes between the panel and the posi-
tioning shims on the edge of the sunroof opera-
ting mechanism.
Page 22 of 95
 (MR 412, 71A, Body internal
trim")
52A-8
NON-SIDE OPENING ELEMENT MECHANISMS
Sunroof operating mechanism: Removal - Refitting
52A
-the B-pillar upper trims (see B-pillar upper trim:
Removal - Refitting) (MR 412, 71A, Body internal
trim),
-the rear panel trims (see Rear panel lining: Re-
moval - Refitting) (MR 412, 71A, Body internal
trim),
-the rear parcel shelf side trim panels (see Rear
parcel shelf side trim: Removal - Refitting) (MR
412, 71A, Body internal trim),
-the rear bench seatback (depending on equipment
level) (see Rear bench seatback: Removal - Re-
fitting) (MR 412, 76A, Rear seat frames and run-
ners),
-the A-pillar trims (see Windscreen pillar trim: Re-
moval - Refitting) (MR 412, 71A, Body internal
trim),
-the sunroof console (see Sunroof switch: Remo-
val - Refitting) (MR 411, 87D, Electric window win-
ders - Sunroof),
-the sun visors (see 57A, Interior equipment, Sun
visor: Removal - Refitting, page 57A-16) .
aConnect the battery (see Battery: Removal - Refit-
ting) (MR 411, 80A, Battery).
aUnlock the airbag computer using the Diagnostic
tool (see Fault finding - Replacement of compo-
nents) (MR 413, 88C, Airbags and seat belt preten-
sioners).
aInitialise the sunroof motor (see Electric sunroof:
Initialisation) (MR 413, 87D, Electric windows - Su-
nroof).
Page 23 of 95
52A-9
NON-SIDE OPENING ELEMENT MECHANISMS
Sunroof mobile panel: Removal - Refitting
52A
REMOVAL
I - REMOVAL PREPARATION OPERATION
aOpen the sunroof.
aRemove:
-the detachable rail bolt (1) ,
-the static rail.
aPress the button (2) in the central section.
aRotate the outer part completely (3) to the left, whilst
pressing the button (2) .
aHold this position for 3 seconds.
aRelease for 1 second the pressure on the button (2)
.
aPress the button (2) until it reaches the position (4)
on the sunroof deflector (the mobile panel moves in
“step” mode). Tightening torquesm
detachable rail bolt2.5 N.m
121492
121391
121493
Page 24 of 95

52A-10
NON-SIDE OPENING ELEMENT MECHANISMS
Sunroof mobile panel: Removal - Refitting
52A
II - REMOVAL OPERATION FOR PART
CONCERNED
aLift the front section of the mobile panel to detach
the operating slides.
aManually remove the mobile panel from the front
(this operation requires two people).
aRemove the sliding guides (5) .
REFITTING
I - REFITTING PREPARATION OPERATION
aRefit the sliding guides on the mobile panel.
aPosition the sliding guides on the mobile panel at (6)
.II - REFITTING OPERATION FOR PART
CONCERNED
aInsert the mobile panel linkages (7) into the sunroof
operating mechanism rails (8) (this operation requi-
res two people).
aCheck that the front sections of the side rails and the
operating slides are correctly positioned.
aRefit the front section of the mobile panel to the ope-
rating slides.
109103
121494
121495
109074
Note:
Before refitting the front section of the mobile
panel to the operating slides, check that the sli-
ding guides are still in position (6) .


 ).
a
U")
 with")

 ,
-the stati")