Page 65 of 95
56A-8
EXTERIOR EQUIPMENT
Door mirror: Removal - Refitting
56A
REMOVAL
I - REMOVAL PREPARATION OPERATION
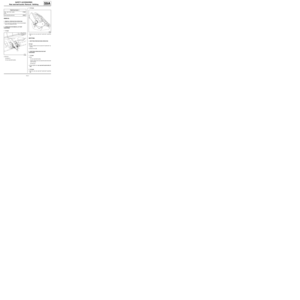
aUnclip door mirror trim .II - OPERATION FOR REMOVAL OF PART
CONCERNED
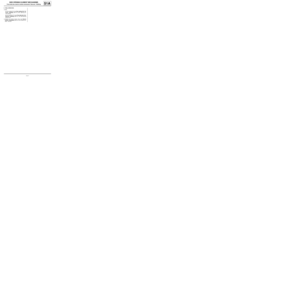
aRemove:
-the bolts (1) ,
-the door mirror.
aDisconnect the supply connectors (depending on
equipment level).
REFITTING
I - REFITTING OPERATION FOR PART
CONCERNED
aConnect the supply connector (depending on equip-
ment level).
aRefit:
-the door mirror,
-the bolts (1) .
II - FINAL OPERATION.
aClip on the door mirror trim.
119276
119266
Page 66 of 95
56A-9
EXTERIOR EQUIPMENT
Door mirror casing: Removal - Refitting
56A
REMOVAL
I - REMOVAL PREPARATION OPERATION
aRemove the door mirror glass (see 56A, Exterior
equipment, Door mirror glass: Removal - Refit-
ting, page 56A-10) .
II - OPERATION FOR REMOVAL OF PART
CONCERNED
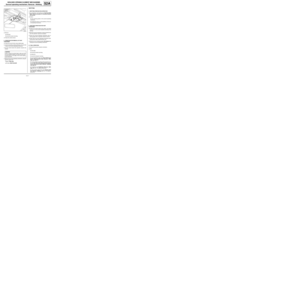
aUnclip the door mirror casing (1) .
aFold in the door mirror.
aRemove the door mirror casing.
REFITTING
I - REFITTING OPERATION FOR PART
CONCERNED
aClip the door mirror casing in position.
II - FINAL OPERATION.
aRefit the door mirror glass (see 56A, Exterior equi-
pment, Door mirror glass: Removal - Refitting,
page 56A-10) .
121164
121163
Page 67 of 95
56A-10
EXTERIOR EQUIPMENT
Door mirror glass: Removal - Refitting
56A
REMOVAL
OPERATION FOR REMOVAL OF PART
CONCERNED
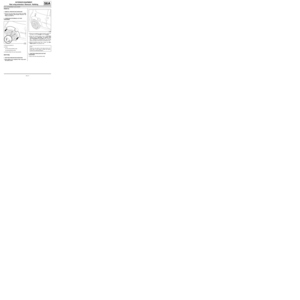
aUnclip the door mirror glass using the (Car. 1363).
aDisconnect the supply connectors (depending on
equipment level).
REFITTING
REFITTING OPERATION FOR PART CONCERNED
aConnect the supply connectors (depending on equi-
pment level).
aClip the door mirror glass in position.Special tooling required
Car. 1363Set of tr im removal levers.
120620
Page 68 of 95

56A-11
EXTERIOR EQUIPMENT
Side decorative strips: Removal - Refitting
56A
a
REMOVAL
I - REMOVAL PREPARATION OPERATION
aRemove:
-the front door exterior weatherstrip (see Front side
door exterior weatherstrip: Removal - Refitting)
,
-the front door glass run channel (see Front side
door window run channel: Removal - Refitting) .
II - REMOVAL OPERATION FOR PART
CONCERNED
aStrip off the side decorative strip using a hot air gun.
REFITTING
I - REFITTING PREPARATIONS OPERATION
aClean the adhesive surface of the film with heptane
and wipe with a lint-free cloth.II - REFITTING OPERATION FOR PART
CONCERNED
aPosition the decorative strip to be bonded to the
door pillar and visually centre it with the rear quarter
panel window end piece (1) .
aHold the lower section of the decorative strip in place
with masking tape.
aTurn back the top of the decorative strip and pull
away the protective paper to mark.
aStick the side decorative strip down taking care to
keep it properly aligned.
aPull away the protective paper from the upper sec-
tion of the decorative strip.
aPull away the protective paper from the upper sec-
tion of the decorative strip.
aStick down the upper section smoothing it with a
plastic spatula from bottom to top in a continuous
movement.
aPull away the masking tape from the lower section of
the side decorative strip.
aSmooth from top to bottom with the plastic spatula in
a continuous movement, gradually pulling away the
protective paper following the progression of the
bonding taking care to ensure that it stays aligned. Note:
Once removed, the side decorative strips cannot
be refitted and must be replaced each time.
120790
120790
WARNING
Do not press too heavily on the plastic spatula
otherwise you may stretch and deform the side
decorative strip.
Page 69 of 95
56A-12
EXTERIOR EQUIPMENT
Side decorative strips: Removal - Refitting
56A
aStick down the side decorative strip to the two edges
using the plastic spatula.
aSmooth edge with a movement from the rear to the
front ensuring that the side decorative strip is pro-
perly bonded on the run channel side.
aFold back edge gradually over its entire length with
the plastic spatula and finish the application with
your thumb along the interior of the upright.
III - FINAL OPERATION.
aRefit:
-the front door channel (see Front side door win-
dow run channel: Removal - Refitting) ,
-the front door exterior weatherstrip (see Front side
door exterior weatherstrip: Removal - Refitting)
.
120790
Page 70 of 95
56A-13
EXTERIOR EQUIPMENT
Sill panel extension: Removal - Refitting
C44, and EQUIPMENT LEVEL SPORT
56A
REMOVAL
I - REMOVAL PREPARATION OPERATION
a
Remove the front sill panel trim (see Front door sill
lining: Removal - Refitting) (71A, Body internal
trim).
II - OPERATION FOR REMOVAL OF PART
CONCERNED
aRemove the clips (1) .aUnclip the sill panel extender at (2) .
aRemove the bolts (3) .
aUnclip the sill panel extender at (4) and (5) .
aRemove the sill panel extender. Note:
It is not necessary to remove the front sill panel
trim except when removing and refitting the sill
panel extender mountings.
131787
131788
Page 71 of 95
 .
aRemove the sill panel extender mountings.
REFITTING
I - REFITTING PREPAR")
56A-14
EXTERIOR EQUIPMENT
Sill panel extension: Removal - Refitting
C44, and EQUIPMENT LEVEL SPORT
56A
aDrill out rivets (5) .
aRemove the sill panel extender mountings.
REFITTING
I - REFITTING PREPARATION OPERATION
aCheck the condition of the clips and replace them if
necessary.aApply a strip of masking tape at (6) to protect the
rear wing extender.
a
Inject WAX FOR HOLLOW SECTIONS into the sill
panel to protect the rivets (see Anti-corrosion pro-
tection product: Description) (04E, Paint).
II - REFITTING OPERATION FOR PART
CONCERNED
aRefit the sill panel extender mountings.
aRefit the sill panel extender.
aClip the sill panel extender (2) .
aRefit clips (1) .
III - FINAL OPERATION.
aRefit the front sill panel trim (see Front door sill
lining: Removal - Refitting) (71A, Body internal
trim).
131790
WARNING
To avoid any risk of corrosion after the localised
stripping of the panel, reapply the protective coa-
ting (see Technical Note 0592A).
131790
Note:
It is not necessar y to inject WAX FOR HOLLOW
SECTIONS except when removing and refitting
the sill panel extender mountings.
Page 72 of 95

56A-15
EXTERIOR EQUIPMENT
Rear wing extension: Removal - Refitting
C44, and EQUIPMENT LEVEL SPORT
56A
REMOVAL
I - REMOVAL PREPARATION OPERATION
aRemove the rear bumper side extender (see 55A,
Exterior protection, Rear bumper: Removal - Re-
fitting, page 55A-10) .
II - OPERATION FOR REMOVAL OF PART
CONCERNED
aRemove the bolts (1) .
aUnclip:
-the rear wing extender at (2) ,
-the centring device at (3) .
aCarefully detach the rear wing extender.
REFITTING
I - REFITTING PREPARATION OPERATION
aparts always to be replaced: Rear wing exten-
sion (50,07,16,04).aRemove any adhesive residue (4) with a rotary era-
ser (Part no.: 77 11 419 046 or 77 11 419 047).
aClean the bonding areas using a LINT-FREE
CLOTH soaked in HEPTANE (see Vehicle: Parts
and consumables for the repair) (04B, Consuma-
bles - Products) by pressing firmly and moving
slowly from back to front and in one direction only.
aWipe the bonding areas with a clean, dry LINT-
FREE CLOTH in one direction only.
II - REFITTING OPERATION FOR PART
CONCERNED
aClip on the rear wing extender at (2) .
131783
131786
Note:
Chec k for any stains on the clean and dry lint-
free cloth. If any traces of stains are found,
resume the cleaning procedure.


")

.
aDisconnect the supply connec")

