Page 25 of 95
52A-11
NON-SIDE OPENING ELEMENT MECHANISMS
Sunroof mobile panel: Removal - Refitting
52A
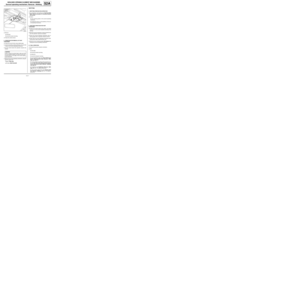
aOpen the mobile panel ensuring the guide brackets
are inserted into the side rails of the sunroof opera-
ting mechanism.
III - FINAL OPERATION.
aRefit:
-the detachable rail,
-the detachable rail bolt (3) ,
aTorque tighten the detachable rail bolt (2.5 N.m).
aInitialise the sunroof motor (see Electric sunroof:
Initialisation) (MR 413, 87D, Electric windows - Su-
nroof).
109102
Note:
In the event that the sunroof mobile panel jams, it
is necessary to remove the headlining (see Hea-
dlining: Removal - Refitting) (MR 412, 71A,
Body internal trim).
Page 26 of 95
52A-12
NON-SIDE OPENING ELEMENT MECHANISMS
Sunroof mobile panel guide: Removal - Refitting
PANORAMIC SUNROOF
52A
REMOVAL
I - REMOVAL PREPARATION OPERATION
aRemove the sunroof mobile panel (see 52A, Non-
side opening element mechanisms, Sunroof mo-
bile panel: Removal - Refitting, page 52A-9) .
II - OPERATION FOR REMOVAL OF PART
CONCERNED
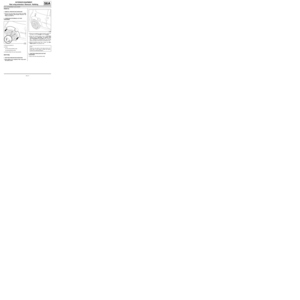
aUnclip the sunroof mobile panel guides using a
screwdriver at (1) then at (2) .aRemove the sunroof mobile panel guides at (3) and
(4) .
REFITTING
I - REFITTING PREPARATION OPERATION
a Note:
It is always necessary to replace the four mobile
panel guides at the same time.
138998
138994
138995
139287
Note:
Respect the position of the sunroof mobile panel
guides (A) and (B) .
Page 27 of 95

52A-13
NON-SIDE OPENING ELEMENT MECHANISMS
Sunroof mobile panel guide: Removal - Refitting
PANORAMIC SUNROOF
52A
aUse a LINT-FREE CLOTH soaked in HEPTANE
(see Vehicle: Parts and consumables for the re-
pair) (04B, Consumables - Products) to clean the
areas (5) of the sunroof mobile panel guides.
aWipe the areas (5) with a clean and dry LINT-FREE
CLOTH (see Vehicle: Parts and consumables for
the repair) (04B, Consumables - Products).
aUsing a fine brush, lightly grease areas (5) only with
OPENING ELEMENT GREASE (see Vehicle:
Parts and consumables for the repair) (04B, Con-
sumables - Products).
II - REFITTING OPERATION FOR PART
CONCERNED
a
aRefit the sunroof mobile panel guides at (6) and (7) .aClip on the sunroof mobile panel guides at (8) until
the locking noise can be heard.
III - FINAL OPERATION
aRefit the mobile panel to the sunroof (see 52A, Non-
side opening element mechanisms, Sunroof mo-
bile panel: Removal - Refitting, page 52A-9) .
138993
Note:
Before refitting the sunroof mobile panel guides,
check that there are no foreign bodies in the clip-
ping area.
138996
138997
Page 28 of 95
52A-14
NON-SIDE OPENING ELEMENT MECHANISMS
Sunroof deflector: Removal - Refitting
52A
REMOVAL
I - REMOVAL PREPARATION OPERATION
aOpen the sunroof mobile panel.
II - OPERATION FOR REMOVAL OF PART
CONCERNED
aRemove the deflector bolts (1) .aRemove the deflector by pivoting it (2) towards the
rear.
REFITTING
I - REFITTING OPERATION FOR PART
CONCERNED
aRefit the deflector at (2) .
aPosition the deflector return spring.
aKeep applying pressure to the deflector.
aRefit the deflector bolts (1) .
aTorque tighten the deflector bolts (2.5 Nm).
II - FINAL OPERATION.
aInitialise the sunroof motor (see Electric sunroof:
Initialisation) (MR 413, 87D, Electric windows - Su-
nroof). Tightening torquesm
deflector bolts2.5 Nm
121490
121491
Page 29 of 95

52A-15
NON-SIDE OPENING ELEMENT MECHANISMS
Sunroof sun visors: Removal - Refitting
PANORAMIC SUNROOF
52A
REMOVAL
I - REMOVAL PREPARATION OPERATION
aLock the airbag computer using the Diagnostic tool
(see Fault finding - Replacement of components)
(88C, Airbags and pretensioners).
aDisconnect the battery (see Battery: Removal - Re-
fitting) (80A, Battery).
aRemove the headlining (see Headlining: Removal -
Refitting) (71A, Body internal trim).II - OPERATION FOR REMOVAL OF PART
CONCERNED
aUnroll the sun visors fully.
aRemove the roof middle cross member bolts (2) .
aRemove the stops (3) .
aRoll the sun visors.
aRemove the « sunroof sun visors - roof centre cross
member » assembly.
REFITTING
I - REFITTING OPERATION FOR PART
CONCERNED
aBring together the « sunroof sun visors - roof centre
cross member » assembly.
aEngage the sun visors into the guide runners.
aUnroll the sun visors fully.
aRefit:
-the stops (3) ,
-the roof middle cross member bolts (2) .
aTorque tighten the roof middle cross member
bolts (4 N.m ). Equipment required
Diagnostic tool
Tightening torquesm
roof middle cross mem-
ber bolts4 N.m
IMPORTANT
To avoid any risk of triggering when working on or
near a pyrotechnic component (airbags or preten-
sioners), lock the airbag computer using the dia-
gnostic tool.
When this function is activated, all the trigger lines
are inhibited and the airbag warning light on the ins-
trument panel lights up contin uously (ignition on).
IMPORTANT
Never handle the pyrotechnic systems (pretensio-
ners or airbags) near to a source of heat or naked
flame - they may be triggered.
121222
Note:
Do not remove the bolts (1) from the visor retai-
ning yokes; the visors are connected to the mid-
dle cross member.
Page 30 of 95
52A-16
NON-SIDE OPENING ELEMENT MECHANISMS
Sunroof sun visors: Removal - Refitting
PANORAMIC SUNROOF
52A
II - FINAL OPERATION
aCarry out a function test.
aRefit the headlining (see Headlining: Removal -
Refitting) (71A, Body internal trim).
aConnect the battery (see Battery: Removal - Refit-
ting) (80A, Battery).
aUnlock the airbag computer using the Diagnostic
tool (see Fault finding - Replacement of compo-
nents) (88C, Airbags and pretensioners).
Page 31 of 95
 (MR 411,
85A, Washing -")
54A-1
WINDOWS
Windscreen: Removal - Refitting
54A
REMOVAL
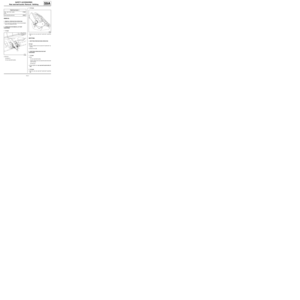
I - REMOVAL PREPARATION OPERATION
aRemove the windscreen wiper arms (see Winds-
creen wiper arm: Removal - Refitting) (MR 411,
85A, Washing - Wiping).
aRemove the lower trim pieces (1) from the winds-
creen.
aRemove:
-the scuttle panel grille (see 56A, Exterior equip-
ment, Scuttle panel grille: Removal - Refitting,
page 56A-1) ,
-the interior rear-view mirror (see 57A, Interior
equipment, Interior rear-view mirror: Removal -
Refitting, page 57A-14) ,
-the A-pillar trims (see Windscreen pillar trim: Re-
moval - Refitting) (MR 412, 71A, Body internal
trim).
aDisconnect the rain and light sensor (depending on
the equipment level).II - REMOVAL OPERATION FOR PART
CONCERNED
aRemove the seal (2) from the windscreen.
aProtect the windscreen surround using masking ta-
pe.
aPosition the dashboard protector (Car. 1818).
a
aCut the cement bead. Special tooling required
Car. 1818Instr ument panel protector
Note:
Leave the rain sensor in place on the old winds-
creen during the replacement operation (depen-
ding on the equipment level).
119268
119271
108156
Note:
When cutting the cement bead, take care not to
cut the wiring harness.
Page 32 of 95
 on the windscreen.
aFor preparation and")
54A-2
WINDOWS
Windscreen: Removal - Refitting
54A
REFITTING
I - REFITTING PREPARATIONS OPERATION
aPosition the retaining shims and stops.
aPosition the seal (2) on the windscreen.
aFor preparation and bonding (see Technical Note
560A).
II - REFITTING OPERATION FOR PART
CONCERNED
aBond the windscreen (this operation requires two
people).
aRespect the following clearances and flush fitting:
- « Windscreen - Roof » ,
- « Windscreen - A-pillar » .
aHold the windscreen in position with masking tape.
III - FINAL OPERATION.
aReplace the rain and light sensor adhesive base
(depending on the equipment level) (see Rain and
light sensor: Removal - Refitting) (MR 411, 85A,
Wiping - Washing).
aConnect the rain and light sensor (depending on the
equipment level).
aRefit:
-the A-pillar trims (see Windscreen pillar trim: Re-
moval - Refitting) (MR 412, 71A, Body internal
trim),
-the interior rear-view mirror (see 57A, Interior
equipment, Interior rear-view mirror: Removal -
Refitting, page 57A-14) ,
-the scuttle panel grille (see 56A, Exterior equip-
ment, Scuttle panel grille: Removal - Refitting,
page 56A-1) ,
-the lower windscreen trims (1) ,
-the windscreen wiper arms (see Windscreen wi-
per arm: Removal - Refitting) (MR 411, 85A, Wi-
pers - Washers).