Page 193 of 408

____________________________________________ A_ d_a--' p'-- t·_ ,v _e_ A_ ir_ S_u_ s_,_ p_e _n_ s_ io_ n _ __._
Setting the Driving Modes
The driving modes are set in MM/.
Fig . 212 MMI display:
Settings
The ignition must be switched on to set the driv ing modes.
- Pressthe(CAR]fu nction button. The main menu
Adaptive Air Suspension appears => fig. 212.
- Select the desired mode with the control knob.
Please note that not every driving mode can be selected in every
driving situation. For example, it is not possible to switch to lift
mode at speeds above 50 mph (80 km/h). This mode is shown
greyed
out in the MMI display.
For additional information on the driving modes::;>
page 189,
"Chassis Controls" . •
Con tro ls and eq uip
ment
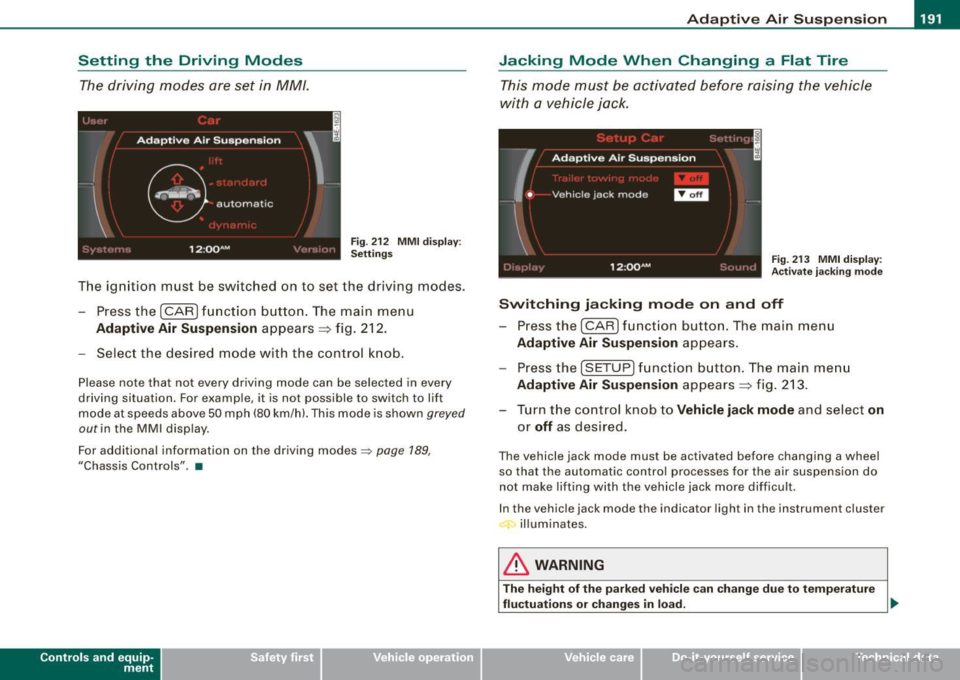
Jacking Mode When Changing a Flat Tire
This mode must be activated before raising the vehicle
with a vehicle jack.
Fig. 213 MMI display:
Activate jacking mode
Switching jacking mode on and off
- Press the (CAR] function button. The main menu
Adaptive Air Suspension appears.
Press the (SETUP) function button. The main menu
Adaptive Air Suspension appears => fig. 213.
- Turn the control knob to
Vehicle jack mode and select on
or off as desired.
The vehicle jack mode must be activated before changing a wheel
so that the automatic control processes for the air suspension do
not make lifting with the vehicle jack more difficult .
In the vehicle jack mode the indicator light in the instrument cluster
illuminates.
& WARNING
The height of the parked vehicle can change due to temperature
fluctuations or changes in load. _,,
Vehicle care I I irechnical data
Page 194 of 408
![AUDI S8 2009 Owners Manual ....... _A_ d_ a --=- p_t_ i_v _e_ A_ ir_ S_u_ s_,_ p_e_ n_ s_io _ n _____________________________________________ _
[ i] Tips
The vehicle jack mode is switched off automatically at speeds AUDI S8 2009 Owners Manual ....... _A_ d_ a --=- p_t_ i_v _e_ A_ ir_ S_u_ s_,_ p_e_ n_ s_io _ n _____________________________________________ _
[ i] Tips
The vehicle jack mode is switched off automatically at speeds](/manual-img/6/57618/w960_57618-193.png)
....... _A_ d_ a --=- p_t_ i_v _e_ A_ ir_ S_u_ s_,_ p_e_ n_ s_io _ n _____________________________________________ _
[ i] Tips
The vehicle jack mode is switched off automatically at speeds above
9 mph (15 km/h). •
Towing a Trailer
Automatic lowering is not desirable when towing a trailer.
Fig. 214 MMI display :
Activate towing opera
tion
If you are going to tow a trailer, you must activate the trailer
towing mode.
Switching the trailer towing mode on and off
manually
- Press the ICAR)function button. The main menu
Adaptive Air Suspension appears.
- Press the !SETUP] function button. The menu
Adaptive
Air Suspension
appears ~ fig. 214.
- Select
Trailer towing mode on or off as desired.
Level Adjustment when Towing a Trailer
The following applies to vehicles with Adaptive Air Suspension: • Before
hitching up the trailer
and before adjusting the tongue
weight at the trailer, the automatic or standard mode
must be
selected, so that the vehicle is at normal level=>
page 191, "Setting
the Driving Modes".
• If driving in dynamic mode is desired, this mode
must be
selected before hitching up the trailer and before adjusting the
tongue weight . However, note that your vehicle is lowered and
ground clearance is reduced.
• If you have to drive under difficult road conditions, you can
select lift mode after hitching up the trailer or after adjusting the
tongue weight .
The following applies to vehicles with
sport suspension Adaptive Air
Suspension -Sport*:
• Before hitching up the trailer
and before adjusting the tongue
weight at the trailer, the automatic, standard or dynamic mode
must
be selected, so that the vehicle is at normal level=> page 191,
"Setting the Driving Modes".
• If you have to drive under difficult road conditions , you can
select lift mode after hitching up the trailer or after adjusting the
tongue weight .
Restrictions when Operating with a Trailer
When operating with a trailer, the lift mode can only be selected up
to about 25 mph (40 km/h). The system automatically goes out of lift
mode when speed exceeds about 31 mph (50 km/hl.
If the vehicle is in automatic, standard or lift mode before the trailer
towing mode is activated, the dynamic mode cannot be activated -
except on vehicles with
sport suspension Adaptive Air Suspension -
Sport*.
If the vehicle is in dynamic mode before towing operation is acti
vated, it can be driven in this mode. If the suspension is shifted from
this mode to automatic mode, dynamic mode cannot be re-selected.~
Page 195 of 408
____________________________________________ A_ d_a--' p=-- t_iv _e_ A_ ir_ S_u_ s-=- p_e _ n_ s _ io_ n __ lllll
[ i ] Tips
T he v ehicle w il l no t lower to the dynam ic leve l when operati ng in the
trai ler towing mode .•
Controls and equip
ment
I • •
Page 196 of 408

• .___H_ o_ m _ e _L_i _ n _k _® ____________________________________________________ _
Homelink®
Universal remote control
Applies to vehic les: w ith Home link ® universal remote cont ro l
General information
The HomeLink® fe ature can le arn up to th ree r adio
fre quency codes for m ost c urrent transmitters used for
operating garage doors, es tate gates , home or outdoor
ligh ting sy stems, and other devices .
You m ust first pro gram the H omel in k® trans mitter befor e you can
use the system=>
page 195, "Programm ing th e Homelink® trans
m itter".
In order to pro gram t he Homelink® transmitter fo r devices utilizing
ro lling code, a second person on a ladder who can safe ly reach the
ga rage door o pene r m oto r is rec omm ended . It is also necessa ry to
locate the "learn" button on your garage door opener motor. Refer
to t he op era ting instructions for the opene r, as the loca tion and
co lor of this button may vary by manufacturer .
Y ou can still use the o rigina l remote c ontrol fo r th e dev ice at any
time.
& WARNING
• Never use the Homelinkl1JI transmitter with any garage door
opener that does have not the safety stop and reverse feature as
requ ired by federal safety standards . This in cludes any garage
door opener model manufactured before April 1, 1982.
• A garage door opener which cannot detect an object , signaling
the door to stop and reverse does not meet current federal safety
standards . Using a garage door opener without these features
increases risk of serious injury or death .
& WARNING (continued)
• For safety reasons never release the parking brake or start the
engine while anyone is standing in front of the vehicle.
• A garage door or an estate gate may sometimes be set in
motion when the Homelink ® remote control is being
programmed . If the devi ce is repeatedly activated , this can over
strain motor and damage its electrical components -an over
heated motor is a fire hazard!
• To avoid possible injuries or property damage , please always
make absolutely certain that no persons or objects are located in
the range of motion of any equipment being operated.
[ i ] Tips
• I f you wou ld l ik e mor e infor mation o n Hom elink®, w here to
purchase the Homelink ® compatib le products, or wou ld li k e to
pu rchase the Homeli nk® Home Ligh ting Package, please call t oll
free: 1 -8 0 0 -355 -3515.
• F or Dec lara tion of Compliance to U nite d Sta tes FCC an d Indu stry
C anada regulations=>
page 385 . •
Page 197 of 408

___________________________________________________ H_ o_m _ e_ L_ i_ n _k_ @_R _ __.111
Ap plies to vehic les: with Hom elin k® un iversal remote contro l
Programming the Homelink ® transmitter
The transmitter is programmed in two phases. For rolling
code transmitters, a third phase is also necessary.
~------------ ~ ~--~--------~--- J, iii
Fig. 215 Overhead
console: HomeLink®
keypad
Fig . 216 Front bumper,
driver side: location of
transmitter unit
Phase 1: programming the overhead keypad
1. Make sure your vehicle is within operating range of the
remote controlled ga rage door opener .
2. Set the parking brake==>
& in "General information" on
page 194.
3. Turn the ignition on. Do not start the eng ine!
Con tro ls and eq uip
ment
4. Press and hold the two outside Homelink® buttons 0
and @for approximately 20 seconds until ind icator
light @==> fig.
215 begins to flash. Then release both
buttons. Do not hold the buttons for longer than 30
seconds.
- This procedure only needs to be performed
once. It
erases the factory-set default codes and does not have to
be repeated to program additional remote controls.
5. Press and hold the Homelink® button
0 ,@ or @ until
the indicator l ight @starts flashing slowly. Release the
button.
- The system will remain in programming mode for 5
minutes.
Go to the front of the vehicle and proceed with
phase 2.
Phase 2:
programming the bumper mounted transmitter
6. Hold the original remote control at a distance between
0-
6 in. (0-15 cm ) from the bumper below the appropriate
headlight for your vehicle=:> fig .
216 (use the shortest
distance possible) .
7. Aim the remote control just below the
driver side head
light.
8. Press and hold the activation button on the remote control.
- May be different in Canada. If so, press and re-press
(cycle) the activation button on your remote control every
two seconds. .,_
Vehicle care I I irechnical data
Page 198 of 408

• .___H_ o_m_ e_ L_ i _n_ k_ ® __________________________________________________ _
9 . The emergency flashers will flash
thre e tim es (after
about 15-60 seconds) when the programming is
successful. Release the button on the remote control.
- To program more devices, repeat steps 4 to 9.
10. Press and hold the trained Homelink® button and
observe the indicator light @=>
page 195, fig. 215.
- If the indicator light is solid/continuous, programming is
complete and your device should act ivate when you
press and release the trained Homelink® button.
- If the indicator light b links rapidly for 2 seconds and is
then a solid/continuous light, proceed with phase 3 to
program a rolling code device .
Phas e 3: rollin g code pro gra mming
- A second person on a ladder who can safely reach the garage door opener motor is recommended.
11. Locate the "learn" button on the garage door opener
motor (refer to the operating instructions for the opener,
as the location of this button may vary by manufacturer).
1 2. Press and release the learn button on the garage door
opener motor.
- Note: once the button is pressed, the re are 3 0 seconds in
which to initiate the next step.
1 3 . On the Homelink® keypad inside the vehicle, firmly
press and hold the Homelink® button previously
programmed in phases 1 and 2 for two seconds and
release. Repeat this sequence
tw ice.
- Some vehicles may require the press/ho ld/release
sequence up to three times to comple te the tra ining
process .
-Homelink® should now activate your rolling code
equipped device.
If the 5 minute time limit is exceeded, the em erge ncy flas hers will
fl as h one time
to indicate that the process has been terminated. In
this case, repeat steps 4 through 9.
If the emergency flashers do not flash
three times (after about 15 -
60 seconds), programming was not successful. In this case, repeat
steps 4 through 9.
Remote control units for garage door openers in Canada are set to
stop transmitting radio frequency s ignals after two seconds. This
time may not be sufficient for the HomeLink® system to learn the
radio frequency signal. Perform a ll other s teps as described
above. •
Applies to vehicles: with Homelink® unive rsa l remote contro l
Operating the Homelink ® transmitter
The Homelink® transmitter works in the same manner as
the original handheld remote control that came with the
system.
,..
"' N
-
~
F ig . 2 17 C lose- up:
H omelink® keypad
Page 199 of 408

___________________________________________________ H_ o_m....:..: e:..; L::. i;,,;. n.;,,; k;,,;. ®.:. R __ ,n
- Press the appropriate programmed button G),@ or @
to activate the desired remote control function~
& in
"General information" on
page 194. •
Applies t o ve hicl es: wit h Hom elin k® universal re mote co nt ro l
Reprogramming a single button
A Homelink ® button can be reprogrammed individually
without affecting the other button a/locations.
Programming the overhead keypad
- Press the appropriate Homelink® button unt il the indi
cator light begins flashing slowly.
Programming the bumper mounted transmitter
1. Hold the original remote control at a distance between 0-
5 in. (0-13 cm) from the bumper below the appropriate
headlight for your vehicle (use the sho rtest distance
possible) .
2. Aim the remote control just below the
driver side head
light.
3. Press and hold the activation button on the remote control.
4. The emergency flashers will flash
three times (after
about
15-60 seconds) when the programm ing is
successful. Now release the button on the remote
control.
- If the device ut ilizes a rolling code, please follow phase 3
of ~
page 195, "Programming the Homelink® trans
mitter" for rolling code programming.
Controls and equip
ment This procedure
will cause
the existing programming on the
Homelink ® button to be erased! •
App lies t o ve hicles : with Homeli nk® universa l re m ote contro l
Erasing the programming of the Homelink ®
transmitter
When you erase the programming , the programming on
all three of the transmitter channels with be lost!
- Perform steps 1 to 4 as descr ibed on~ page 195, "Phase
1: programm ing the overhead keypad ".
When completed , the Homelin k® system will be in the program
ming mode and is then ready to learn the cod es for remote
controlled devices.
(I) Tips
• Programmed buttons cannot be erased individually.
• For security reasons you ar e advis ed to erase the programming
of the Homelink ® system befo re you sell your vehicle. •
I • •
Page 200 of 408