2008 NISSAN TEANA headlamp
[x] Cancel search: headlampPage 3217 of 5121
CHASSIS MAINTENANCE
MA-29
< ON-VEHICLE MAINTENANCE >
C
D
E
F
G
H
I
J
K
L
MB
MAN
OA
HEADLAMP AIMING ADJUSTMENT (HALOGEN TYPE) : Aiming Adjustment Proce-
dure (Low Beam)
INFOID:0000000003862424
1. Place the screen.
NOTE:
Stop the vehicle at the perpendicular angle to the wall.
Set the screen so that it is perpendicular to a level load surface.
2. Face the vehicle squarely toward the screen and make the distance between the headlamp center and
the screen 10 m (32.8 ft).
3. Start the engine and illuminate the headlamp (LO).
NOTE:
Block light from the headlamp that is not being adjusted with a thick fabric or another object, so that it
does not reach the adjustment screen.
CAUTION:
Do not cover lens surface with tape, etc. because it is made from plastic.
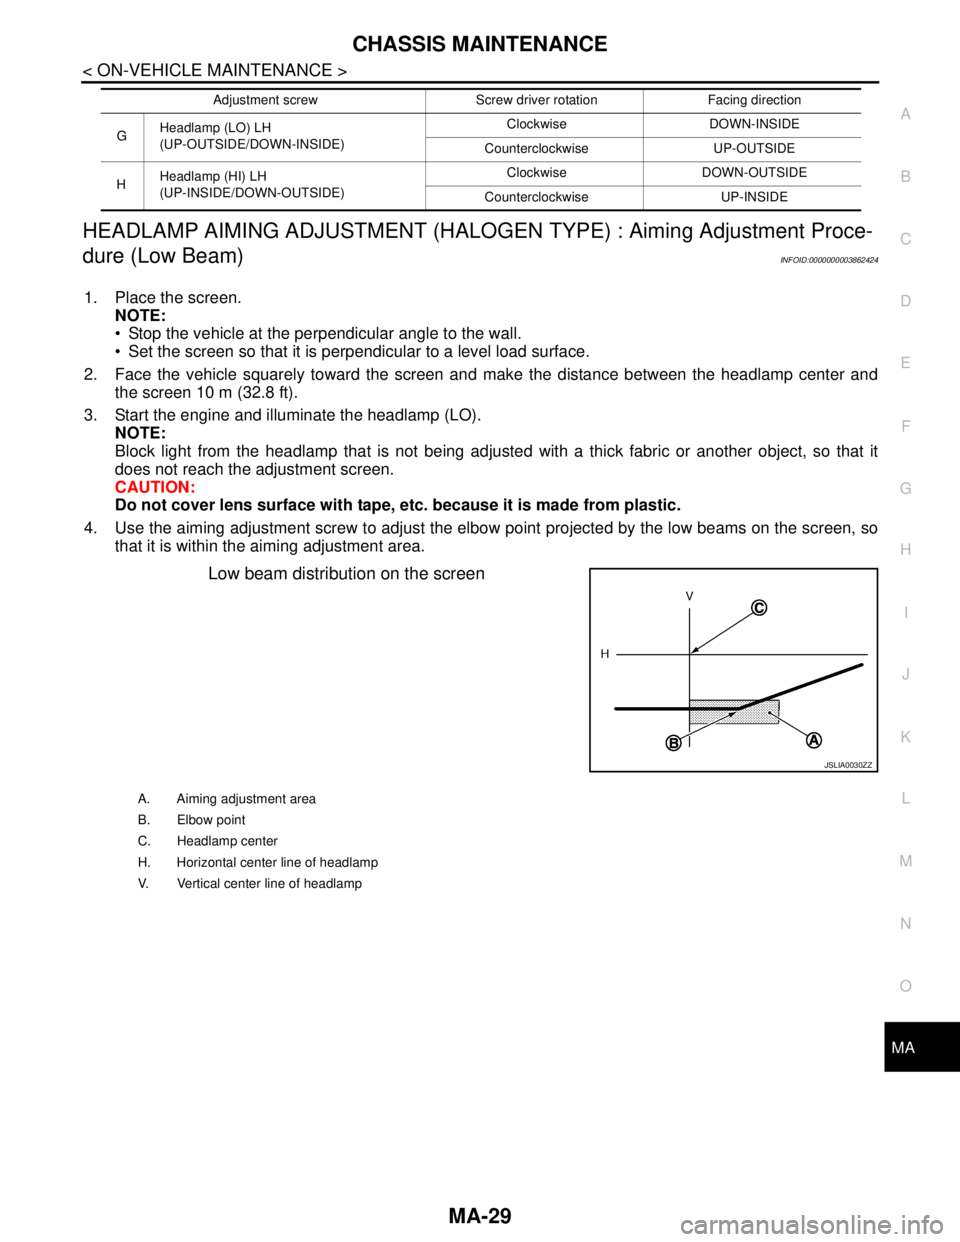
4. Use the aiming adjustment screw to adjust the elbow point projected by the low beams on the screen, so
that it is within the aiming adjustment area.
Low beam distribution on the screen
GHeadlamp (LO) LH
(UP-OUTSIDE/DOWN-INSIDE)Clockwise DOWN-INSIDE
Counterclockwise UP-OUTSIDE
HHeadlamp (HI) LH
(UP-INSIDE/DOWN-OUTSIDE)Clockwise DOWN-OUTSIDE
Counterclockwise UP-INSIDE Adjustment screw Screw driver rotation Facing direction
JSLIA0030ZZ
A. Aiming adjustment area
B. Elbow point
C. Headlamp center
H. Horizontal center line of headlamp
V. Vertical center line of headlamp
Page 3218 of 5121
MA-30
< ON-VEHICLE MAINTENANCE >
CHASSIS MAINTENANCE
Unit: mm (in)
HEADLAMP AIMING ADJUSTMENT (HALOGEN TYPE) : Aiming Adjustment Proce-
dure (High Beam)
INFOID:0000000003862425
1. Place the screen.
NOTE:
Stop the vehicle at the perpendicular angle to the wall.
Set the screen so that it is perpendicular to a level load surface.
2. Face the vehicle squarely toward the screen and make the distance between the headlamp center and
the screen 10 m (32.8 ft).
3. Start the engine and illuminate the headlamp (HI).
NOTE:
Block light from the headlamp that is not being adjusted with a thick fabric or another object, so that it
does not reach the adjustment screen.
CAUTION:
Do not cover lens surface with tape, etc. because it is made from plastic.
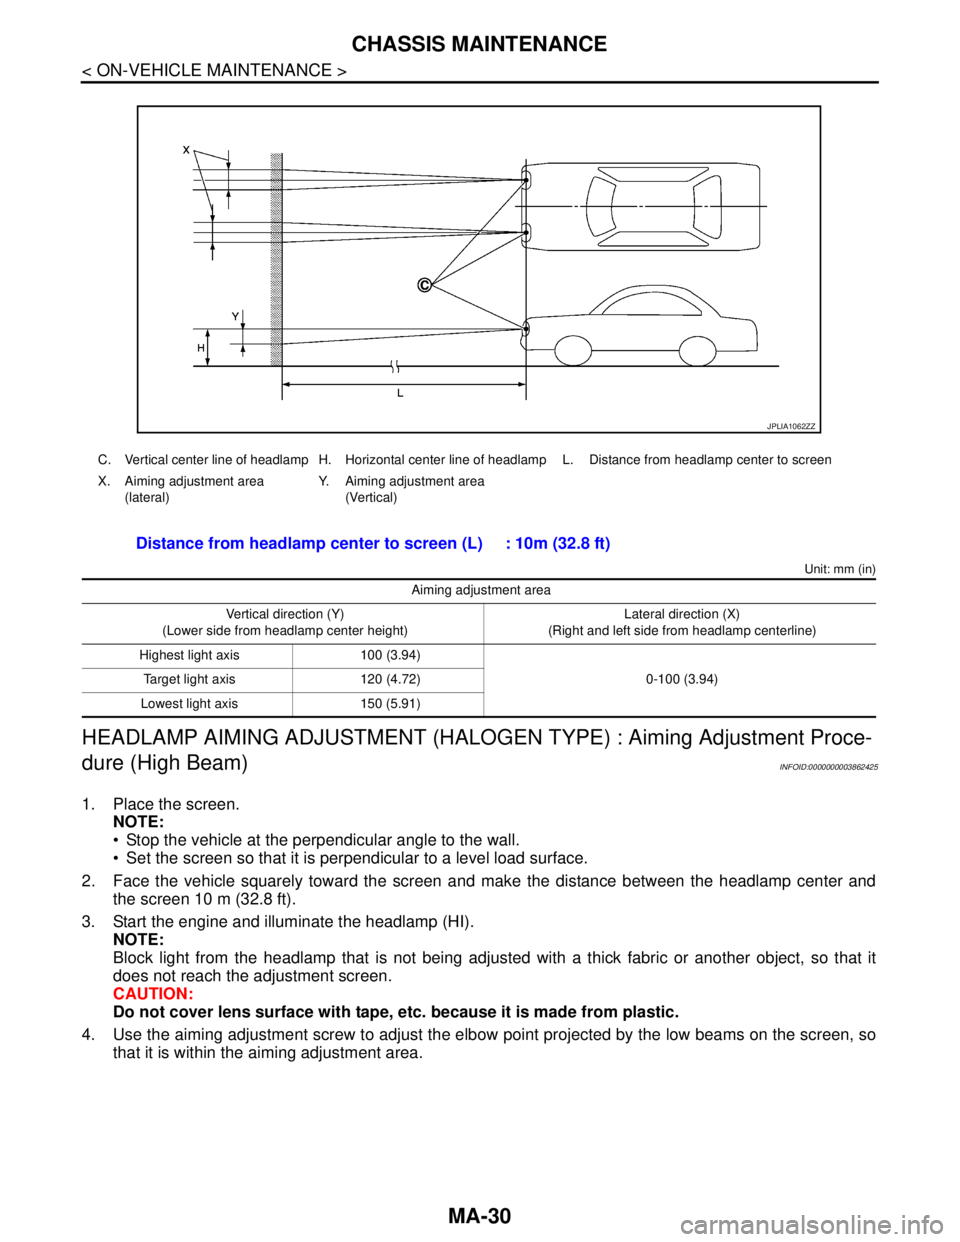
4. Use the aiming adjustment screw to adjust the elbow point projected by the low beams on the screen, so
that it is within the aiming adjustment area.
C. Vertical center line of headlamp H. Horizontal center line of headlamp L. Distance from headlamp center to screen
X. Aiming adjustment area
(lateral)Y. Aiming adjustment area
(Vertical)
Distance from headlamp center to screen (L) : 10m (32.8 ft)
Aiming adjustment area
Vertical direction (Y)
(Lower side from headlamp center height)Lateral direction (X)
(Right and left side from headlamp centerline)
Highest light axis 100 (3.94)
0-100 (3.94) Target light axis 120 (4.72)
Lowest light axis 150 (5.91)
JPLIA1062ZZ
Page 3219 of 5121
CHASSIS MAINTENANCE
MA-31
< ON-VEHICLE MAINTENANCE >
C
D
E
F
G
H
I
J
K
L
MB
MAN
OA
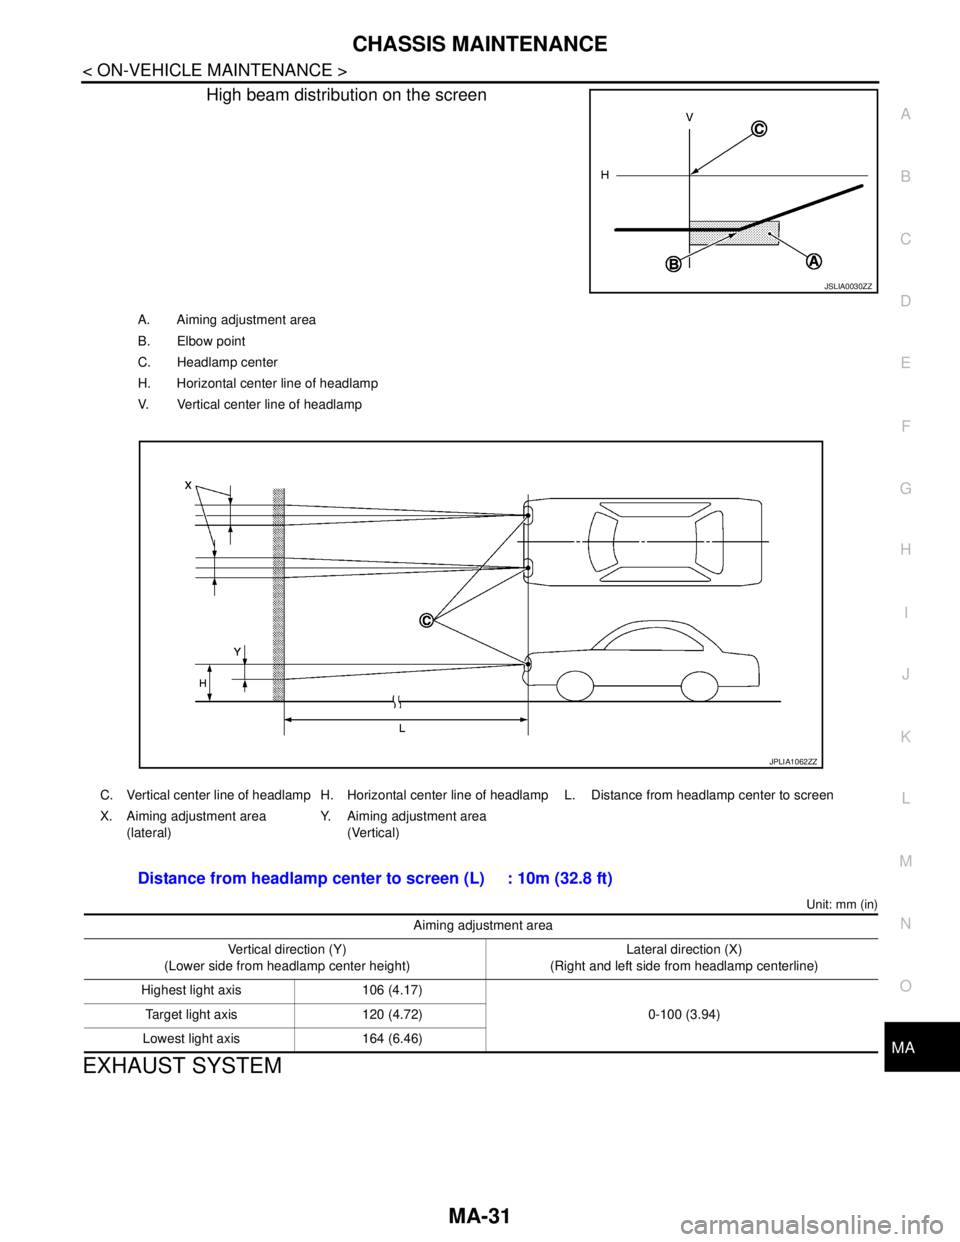
High beam distribution on the screen
Unit: mm (in)
EXHAUST SYSTEM
JSLIA0030ZZ
A. Aiming adjustment area
B. Elbow point
C. Headlamp center
H. Horizontal center line of headlamp
V. Vertical center line of headlamp
C. Vertical center line of headlamp H. Horizontal center line of headlamp L. Distance from headlamp center to screen
X. Aiming adjustment area
(lateral)Y. Aiming adjustment area
(Vertical)
Distance from headlamp center to screen (L) : 10m (32.8 ft)
Aiming adjustment area
Vertical direction (Y)
(Lower side from headlamp center height)Lateral direction (X)
(Right and left side from headlamp centerline)
Highest light axis 106 (4.17)
0-100 (3.94) Target light axis 120 (4.72)
Lowest light axis 164 (6.46)
JPLIA1062ZZ
Page 3357 of 5121

MWI
IPDM E/R (INTELLIGENT POWER DISTRIBUTION MODULE ENGINE ROOM)
MWI-103
< ECU DIAGNOSIS >
C
D
E
F
G
H
I
J
K
L
MB A
O
P
ST/INHI RLYIgnition switch ON Off
At engine cranking INHI → ST
The status of starter relay or starter control relay cannot be recognized by
the battery voltage malfunction, etc. when the starter relay is ON and the
starter control relay is OFFUNKWN
DETENT SWIgnition switch ON Press the selector button with se-
lector lever in P position
Selector lever in any position oth-
er than POff
Release the selector button with selector lever in P position On
S/L RLY -REQNone of the conditions below are present Off
Open the driver door after the ignition switch is turned OFF (for a few
seconds)
Press the push-button ignition switch when the steering lock is activat-
edOn
S/L STATESteering lock is activated LOCK
Steering lock is deactivated UNLOCK
[DTC: B210A] is detected UNKWN
DTRL REQNOTE:
The item is indicated, but not monitored.Off
OIL P SWIgnition switch OFF, ACC or engine running Open
Ignition switch ON Close
HOOD SWClose the hood Off
Open the hood On
HL WASHER REQNot operating Off
Headlamp washer operating On
THFT HRN REQNot operating Off
Horn is activated with vehicle security (theft warning) system On
HORN CHIRPNot operating Off
Door locking with Intelligent Key (horn chirp mode)
Door locking with key fob (horn chirp mode)On
CRNRNG LMP REQNOTE:
The item is indicated, but not monitored.Off Monitor Item Condition Value/Status
Page 3359 of 5121
MWI
IPDM E/R (INTELLIGENT POWER DISTRIBUTION MODULE ENGINE ROOM)
MWI-105
< ECU DIAGNOSIS >
C
D
E
F
G
H
I
J
K
L
MB A
O
P
11
(P)GroundSteering lock unit power
supplyOutputIgnition
switch
OFFA few seconds after open-
ing the driver doorBattery voltage
Ignition
switch
LOCKPress the push-button ig-
nition switchBattery voltage
Ignition switch ACC or ON 0 V
12
(B/W)Ground Ground — Ignition switch ON 0 V
13
(SB)Ground Fuel pump power supply OutputApproximately 1 second or more after
turning the ignition switch ON0 V
Approximately 1 second after turning
the ignition switch ON
Engine runningBattery voltage
15
(W)Ground Ignition relay power supply OutputIgnition switch OFF 0 V
Ignition switch ON Battery voltage
16
(R)Ground Front wiper auto stop InputIgnition
switch ONFront wiper stop position 0 V
Any position other than
front wiper stop positionBattery voltage
17
(V)GroundHeadlamp washer relay
controlInputIgnition
switch ONHeadlamp washer deacti-
vatedBattery voltage
Headlamp washer activat-
ed0 V
19
(Y)Ground Ignition relay power supply OutputIgnition switch OFF 0 V
Ignition switch ON Battery voltage
20
(B)Ground Ambient sensor ground Output Ignition switch ON 0 V
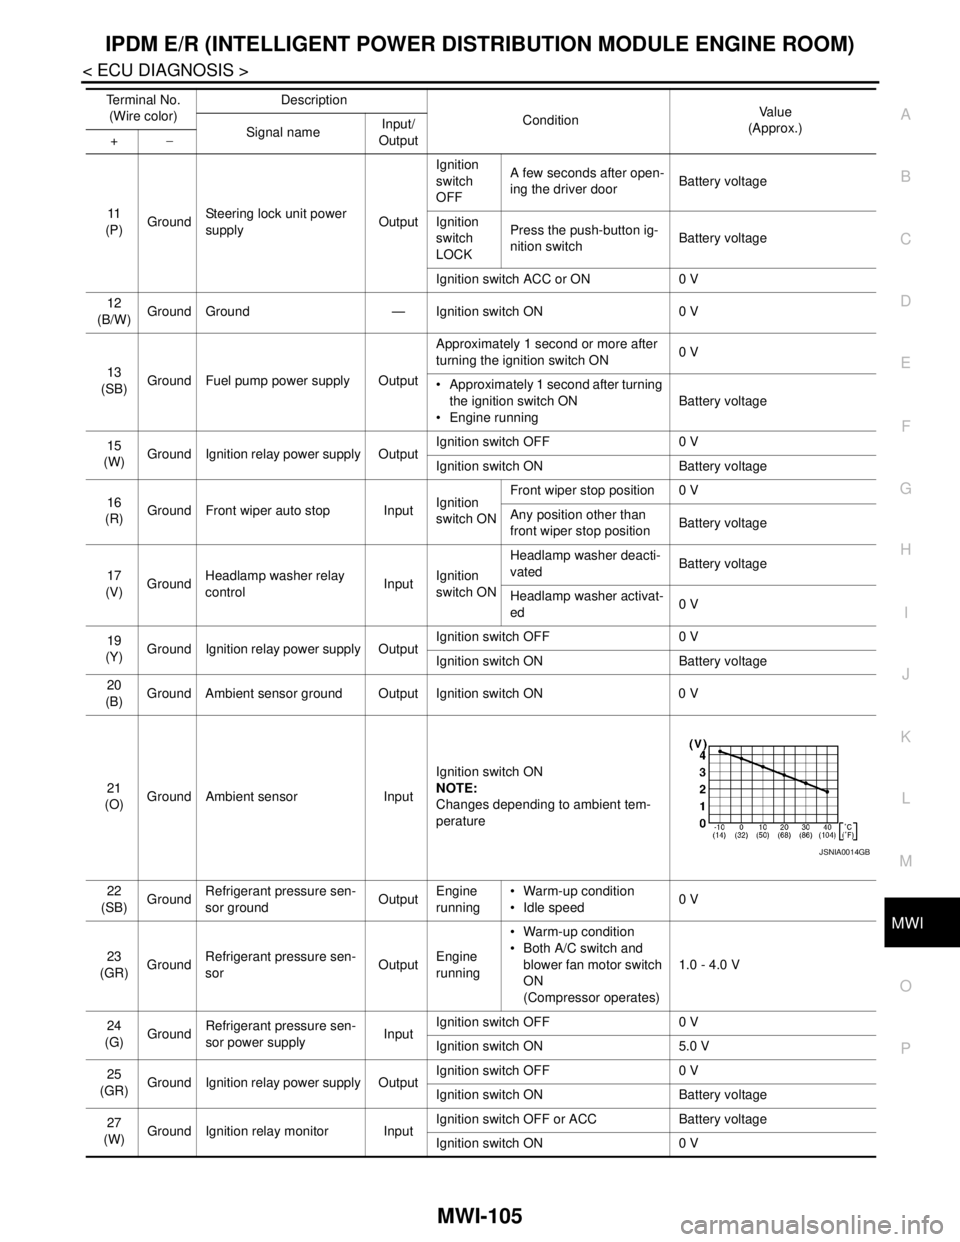
21
(O)Ground Ambient sensor InputIgnition switch ON
NOTE:
Changes depending to ambient tem-
perature
22
(SB)GroundRefrigerant pressure sen-
sor groundOutputEngine
running Warm-up condition
Idle speed0 V
23
(GR)GroundRefrigerant pressure sen-
sorOutputEngine
running Warm-up condition
Both A/C switch and
blower fan motor switch
ON
(Compressor operates)1.0 - 4.0 V
24
(G)
GroundRefrigerant pressure sen-
sor power supplyInputIgnition switch OFF 0 V
Ignition switch ON 5.0 V
25
(GR)Ground Ignition relay power supply OutputIgnition switch OFF 0 V
Ignition switch ON Battery voltage
27
(W)Ground Ignition relay monitor InputIgnition switch OFF or ACC Battery voltage
Ignition switch ON 0 V Te r m i n a l N o .
(Wire color)Description
ConditionVa l u e
(Approx.)
Signal nameInput/
Output +−
JSNIA0014GB
Page 3362 of 5121
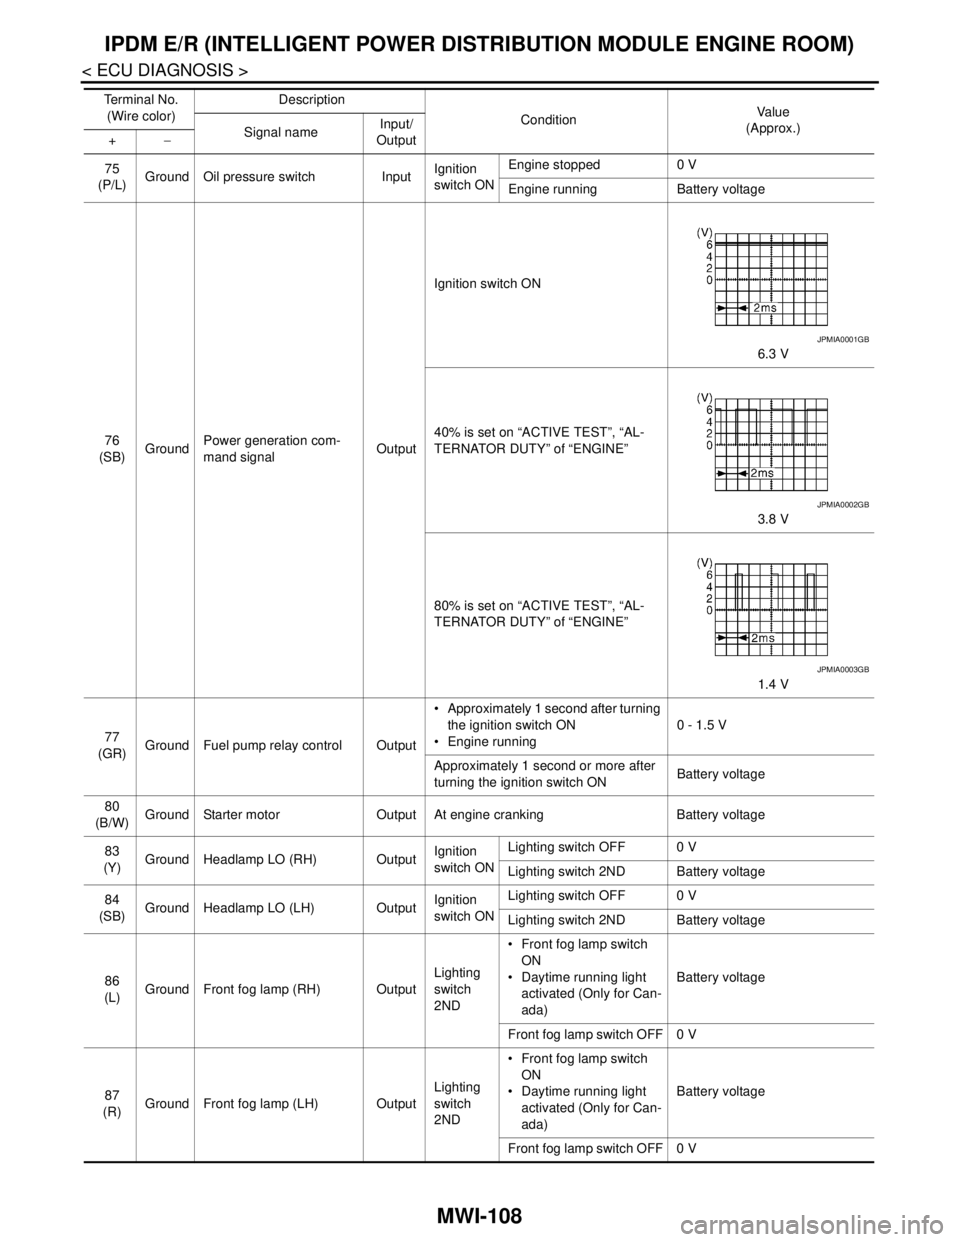
MWI-108
< ECU DIAGNOSIS >
IPDM E/R (INTELLIGENT POWER DISTRIBUTION MODULE ENGINE ROOM)
75
(P/L)Ground Oil pressure switch InputIgnition
switch ONEngine stopped 0 V
Engine running Battery voltage
76
(SB)GroundPower generation com-
mand signalOutputIgnition switch ON
6.3 V
40% is set on “ACTIVE TEST”, “AL-
TERNATOR DUTY” of “ENGINE”
3.8 V
80% is set on “ACTIVE TEST”, “AL-
TERNATOR DUTY” of “ENGINE”
1.4 V
77
(GR)Ground Fuel pump relay control Output Approximately 1 second after turning
the ignition switch ON
Engine running0 - 1.5 V
Approximately 1 second or more after
turning the ignition switch ONBattery voltage
80
(B/W)Ground Starter motor Output At engine cranking Battery voltage
83
(Y)Ground Headlamp LO (RH) OutputIgnition
switch ONLighting switch OFF 0 V
Lighting switch 2ND Battery voltage
84
(SB)Ground Headlamp LO (LH) OutputIgnition
switch ONLighting switch OFF 0 V
Lighting switch 2ND Battery voltage
86
(L)Ground Front fog lamp (RH) OutputLighting
switch
2ND Front fog lamp switch
ON
Daytime running light
activated (Only for Can-
ada)Battery voltage
Front fog lamp switch OFF 0 V
87
(R)Ground Front fog lamp (LH) OutputLighting
switch
2ND Front fog lamp switch
ON
Daytime running light
activated (Only for Can-
ada)Battery voltage
Front fog lamp switch OFF 0 V Te r m i n a l N o .
(Wire color)Description
ConditionVa l u e
(Approx.)
Signal nameInput/
Output +−
JPMIA0001GB
JPMIA0002GB
JPMIA0003GB
Page 3363 of 5121
MWI
IPDM E/R (INTELLIGENT POWER DISTRIBUTION MODULE ENGINE ROOM)
MWI-109
< ECU DIAGNOSIS >
C
D
E
F
G
H
I
J
K
L
MB A
O
P
88
(P)GroundWasher pump power sup-
plyOutput Ignition switch ON Battery voltage
89
(W)Ground Headlamp HI (RH) OutputIgnition
switch ON Lighting switch HI
Lighting switch PASSBattery voltage
Lighting switch OFF 0 V
90
(O)Ground Headlamp HI (LH) OutputIgnition
switch ON Lighting switch HI
Lighting switch PASSBattery voltage
Lighting switch OFF 0 V
91
(O)Ground Parking lamp (RH) OutputIgnition
switch ONLighting switch 1ST Battery voltage
Lighting switch OFF 0 V
92
(L)Ground Parking lamp (LH) OutputIgnition
switch ONLighting switch 1ST Battery voltage
Lighting switch OFF 0 V
93
(BR)GroundHeadlamp aiming motor
(RH)OutputIgnition
switch ONLighting switch 1ST Battery voltage
Lighting switch OFF 0 V
94
(Y)GroundHeadlamp aiming motor
(LH)OutputIgnition
switch ONLighting switch 1ST Battery voltage
Lighting switch OFF 0 V
99
(W)Ground Ambient sensor ground Input Ignition switch ON 0 V
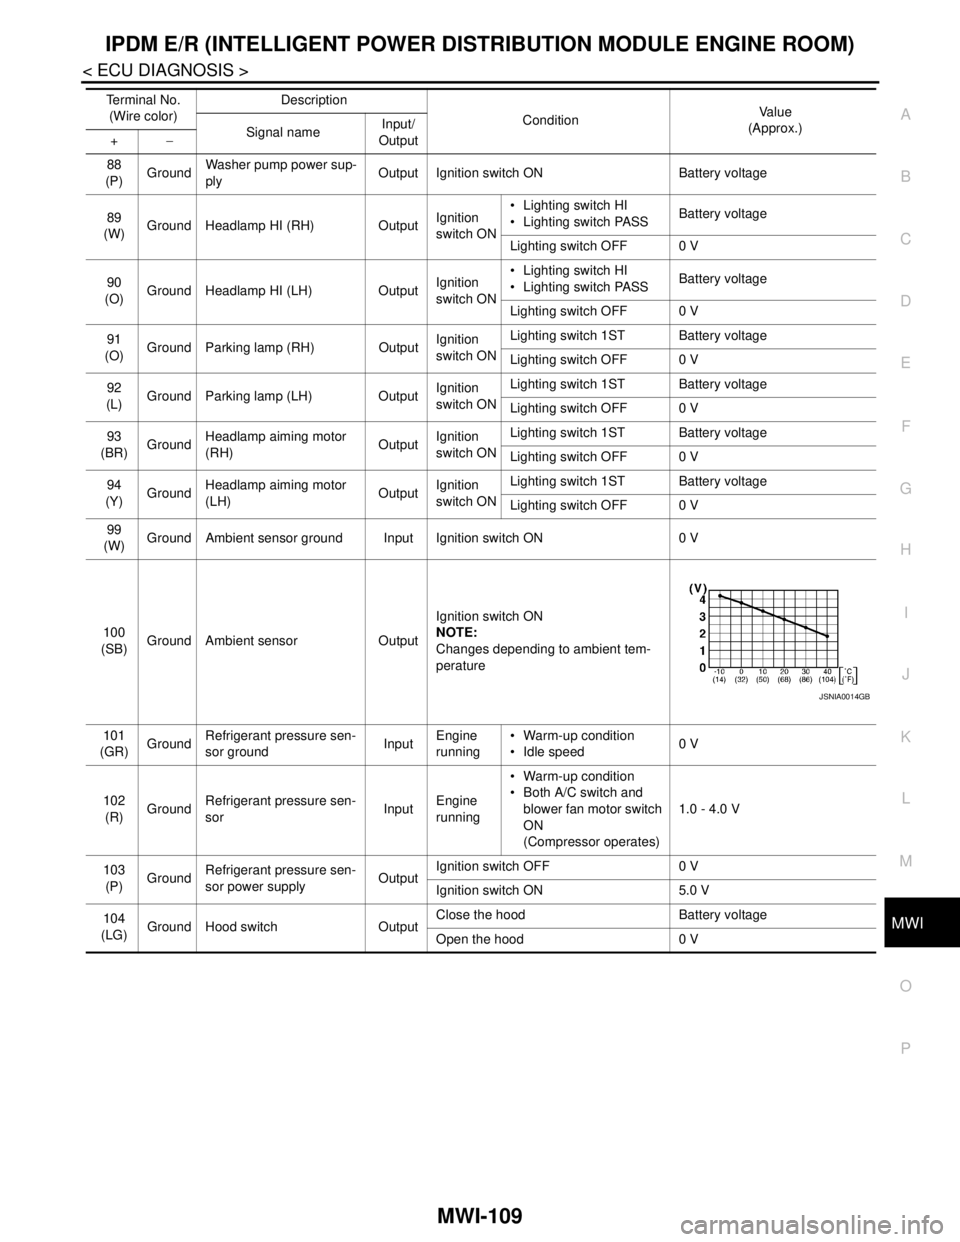
100
(SB)Ground Ambient sensor OutputIgnition switch ON
NOTE:
Changes depending to ambient tem-
perature
101
(GR)GroundRefrigerant pressure sen-
sor groundInputEngine
running Warm-up condition
Idle speed0 V
102
(R)GroundRefrigerant pressure sen-
sorInputEngine
running Warm-up condition
Both A/C switch and
blower fan motor switch
ON
(Compressor operates)1.0 - 4.0 V
103
(P)GroundRefrigerant pressure sen-
sor power supplyOutputIgnition switch OFF 0 V
Ignition switch ON 5.0 V
104
(LG)
Ground Hood switch OutputClose the hood Battery voltage
Open the hood 0 V Te r m i n a l N o .
(Wire color)Description
ConditionVa l u e
(Approx.)
Signal nameInput/
Output +−
JSNIA0014GB
Page 3368 of 5121

MWI-114
< ECU DIAGNOSIS >
IPDM E/R (INTELLIGENT POWER DISTRIBUTION MODULE ENGINE ROOM)
If No CAN Communication Is Available With BCM
IGNITION RELAY MALFUNCTION DETECTION FUNCTION
IPDM E/R monitors the voltage at the contact circuit and excitation coil circuit of the ignition relay inside it.
IPDM E/R judges the ignition relay error if the voltage differs between the contact circuit and the excitation
coil circuit.
If the ignition relay cannot turn OFF due to contact seizure, it activates the tail lamp relay for 10 minutes to
alert the user to the ignition relay malfunction when the ignition switch is turned OFF.
FRONT WIPER CONTROL
IPDM E/R detects front wiper stop position by a front wiper auto stop signal.
When a front wiper auto stop signal is in the conditions listed below, IPDM E/R stops power supply to wiper
after repeating a front wiper 10 seconds activation and 20 seconds stop five times.
Control part Fail-safe operation
Cooling fan Turns ON the cooling fan relay-2 and the cooling fan relay-3 when ignition switch is
turned ON (Cooling fan operates at HI)
Turns OFF the cooling fan relay-1, the cooling fan relay-2 and the cooling fan relay-3
when the ignition switch is turned OFF (Cooling fan does not operate)
A/C compressor A/C relay OFF
Alternator Outputs the power generation command signal (PWM signal) 0%
Control part Fail-safe operation
Headlamp Turns ON the headlamp low relay when the ignition switch is turned ON
Turns OFF the headlamp low relay when the ignition switch is turned OFF
Headlamp high relay OFF
Parking lamps
License plate lamps
Illuminations
Tail lamps Turns ON the tail lamp relay when the ignition switch is turned ON
Turns OFF the tail lamp relay when the ignition switch is turned OFF
Front wiper The status just before activation of fail-safe control is maintained until the ignition
switch is turned OFF while the front wiper is operating at LO or HI speed.
The wiper is operated at LO speed until the ignition switch is turned OFF if the fail-
safe control is activated while the front wiper is set in the INT mode and the front wiper
motor is operating.
Front fog lamps Front fog lamp relay OFF
Horn Horn OFF
Ignition relay The status just before activation of fail-safe is maintained.
Starter motor Starter control relay OFF
Steering lock unit Steering lock relay OFF
Headlamp washer relay Headlamp washer relay OFF
Voltage judgment
IPDM E/R judgment Operation
Ignition relay contact sideIgnition relay excitation coil
side
ON ON Ignition relay ON normal —
OFF OFF Ignition relay OFF normal —
ON OFF Ignition relay ON stuck Detects DTC “B2098: IGN RELAY ON”
Turns ON the tail lamp relay for 10 min-
utes
OFF ON Ignition relay OFF stuck Detects DTC “B2099: IGN RELAY OFF”