2008 NISSAN TEANA water pump
[x] Cancel search: water pumpPage 1124 of 5121
CO-1
ENGINE
C
DE
F
G H
I
J
K L
M
SECTION CO
A
CO
N
O P
CONTENTS
ENGINE COOLING SYSTEM
FUNCTION DIAGNOSIS .. .............................2
DESCRIPTION ............................................... .....2
Engine Cooling System ..................................... ......2
Engine Cooling System Schematic .........................2
SYMPTOM DIAGNOSIS ...............................3
OVERHEATING CAUSE ANALYSIS ............. .....3
Troubleshooting Chart ........................................ ......3
PRECAUTION ...............................................5
PRECAUTIONS .............................................. .....5
Precaution for Supplemental Restraint System
(SRS) "AIR BAG" and "SEAT BELT PRE-TEN-
SIONER" ............................................................. ......
5
Liquid Gasket ...........................................................5
PREPARATION ............................................7
PREPARATION .............................................. .....7
Special Service Tool ........................................... ......7
Commercial Service Tools .......................................7
ON-VEHICLE MAINTENANCE .....................8
ENGINE COOLANT ....................................... .....8
Inspection ............................................................ ......8
Draining .....................................................................8
Refilling .....................................................................9
Flushing ...................................................................10
RADIATOR .........................................................12
RADIATOR CAP .................................................... ....12
RADIATOR CAP : Inspection ..................................12
RADIATOR ............................................................ ....12
RADIATOR : Inspection ..........................................12
ON-VEHICLE REPAIR .................................13
RADIATOR ....... ................................ .................13
Exploded View ..................................................... ....13
Removal and Installation .........................................13
Inspection ................................................................15
COOLING FAN ..................................................16
Exploded View .........................................................16
Removal and Installation .........................................16
Disassembly and Assembly .....................................17
Inspection ................................................................17
WATER PUMP ..................................................18
Exploded View .........................................................18
Removal and Installation .........................................18
Inspection ................................................................21
WATER INLET AND THERMOSTAT ASSEM-
BLY ....................................................................
23
Exploded View .........................................................23
Removal and Installation .........................................23
Inspection ................................................................24
WATER OUTLET AND WATER PIPING ..........25
Exploded View .........................................................25
Removal and Installation .........................................25
Inspection ................................................................26
SERVICE DATA AND SPECIFICATIONS
(SDS) ............... .............................................
27
SERVICE DATA AND SPECIFICATIONS
(SDS) .................................................................
27
Periodical Maintenance Specification .................. ....27
Radiator ...................................................................27
Thermostat ..............................................................27
Page 1126 of 5121
OVERHEATING CAUSE ANALYSIS
CO-3
< SYMPTOM DIAGNOSIS >
C
D
E
F
G
H
I
J
K
L
MA
CO
N
P O
SYMPTOM DIAGNOSIS
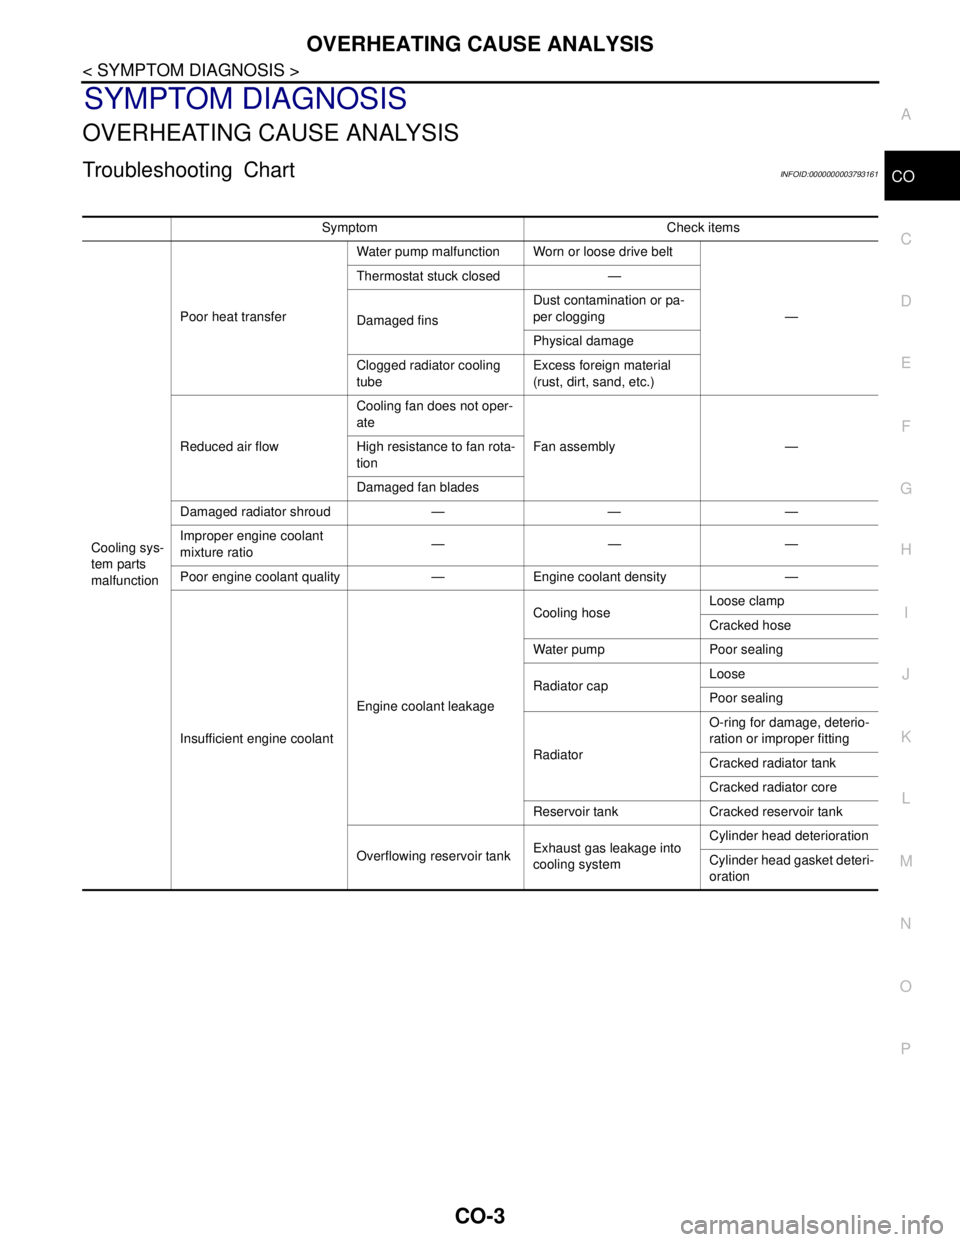
OVERHEATING CAUSE ANALYSIS
Troubleshooting ChartINFOID:0000000003793161
Symptom Check items
Cooling sys-
tem parts
malfunctionPoor heat transferWater pump malfunction Worn or loose drive belt
— Thermostat stuck closed —
Damaged finsDust contamination or pa-
per clogging
Physical damage
Clogged radiator cooling
tubeExcess foreign material
(rust, dirt, sand, etc.)
Reduced air flowCooling fan does not oper-
ate
Fan assembly — High resistance to fan rota-
tion
Damaged fan blades
Damaged radiator shroud — — —
Improper engine coolant
mixture ratio———
Poor engine coolant quality — Engine coolant density —
Insufficient engine coolantEngine coolant leakageCooling hoseLoose clamp
Cracked hose
Water pump Poor sealing
Radiator capLoose
Poor sealing
RadiatorO-ring for damage, deterio-
ration or improper fitting
Cracked radiator tank
Cracked radiator core
Reservoir tank Cracked reservoir tank
Overflowing reservoir tankExhaust gas leakage into
cooling systemCylinder head deterioration
Cylinder head gasket deteri-
oration
Page 1130 of 5121
PREPARATION
CO-7
< PREPARATION >
C
D
E
F
G
H
I
J
K
L
MA
CO
N
P O
PREPARATION
PREPARATION
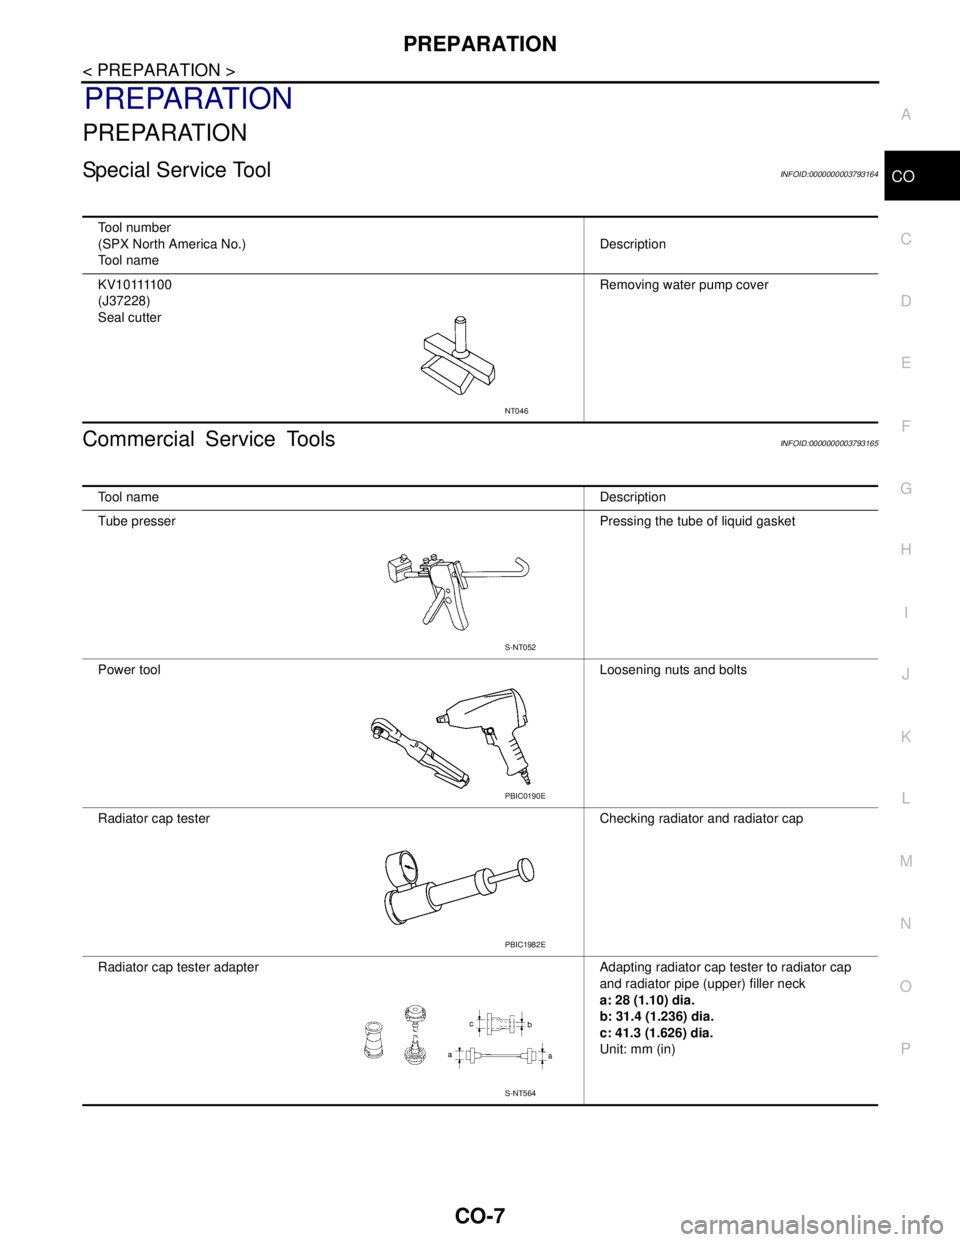
Special Service ToolINFOID:0000000003793164
Commercial Service ToolsINFOID:0000000003793165
Tool number
(SPX North America No.)
Tool nameDescription
K V 1 0 1111 0 0
(J37228)
Seal cutterRemoving water pump cover
NT046
Tool nameDescription
Tube presser Pressing the tube of liquid gasket
Power toolLoosening nuts and bolts
Radiator cap tester Checking radiator and radiator cap
Radiator cap tester adapter Adapting radiator cap tester to radiator cap
and radiator pipe (upper) filler neck
a: 28 (1.10) dia.
b: 31.4 (1.236) dia.
c: 41.3 (1.626) dia.
Unit: mm (in)
S-NT052
PBIC0190E
PBIC1982E
S-NT564
Page 1141 of 5121
CO-18
< ON-VEHICLE REPAIR >
WATER PUMP
WATER PUMP
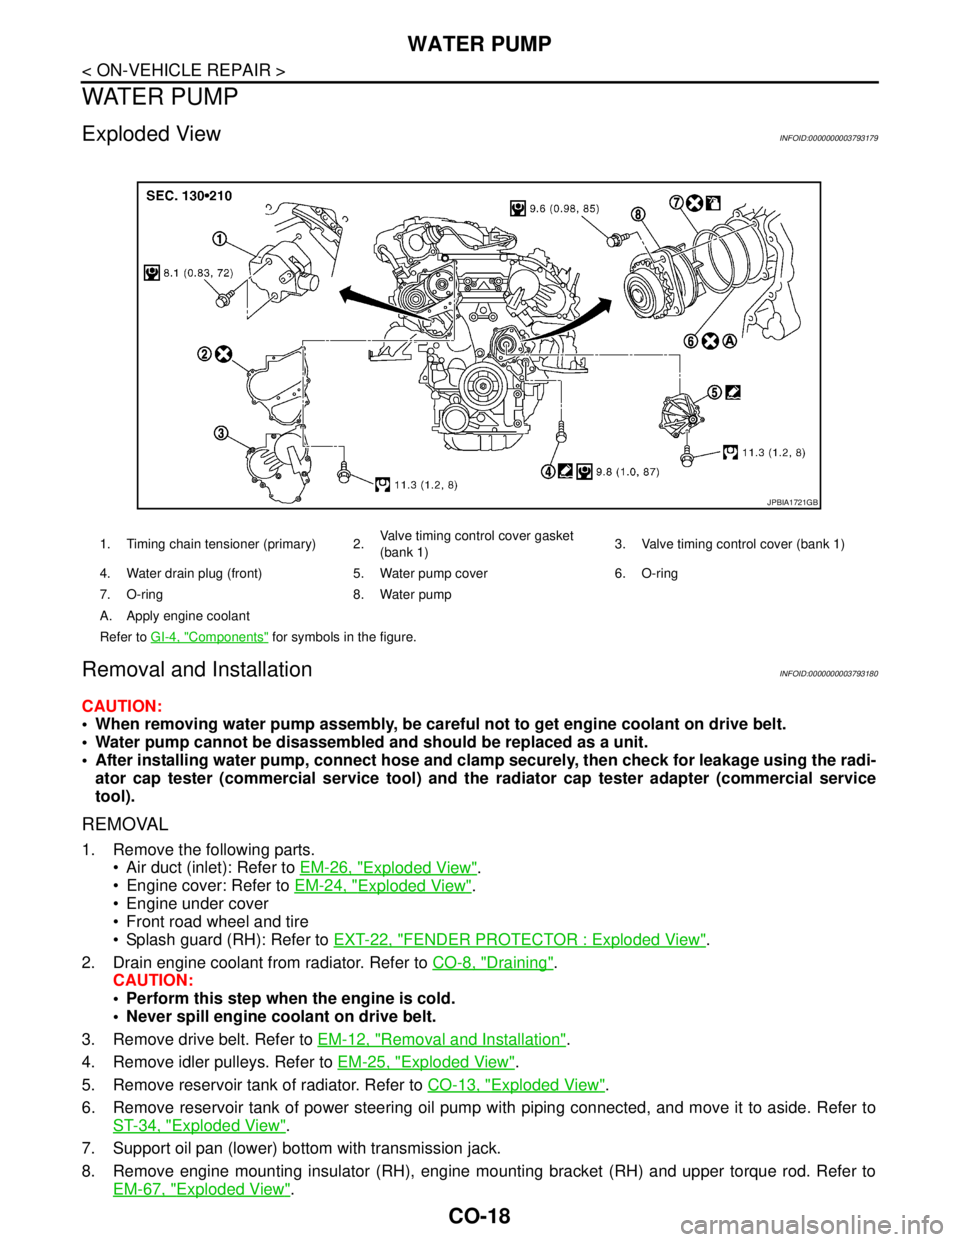
Exploded ViewINFOID:0000000003793179
Removal and InstallationINFOID:0000000003793180
CAUTION:
When removing water pump assembly, be careful not to get engine coolant on drive belt.
Water pump cannot be disassembled and should be replaced as a unit.
After installing water pump, connect hose and clamp securely, then check for leakage using the radi-
ator cap tester (commercial service tool) and the radiator cap tester adapter (commercial service
tool).
REMOVAL
1. Remove the following parts.
Air duct (inlet): Refer to EM-26, "
Exploded View".
Engine cover: Refer to EM-24, "
Exploded View".
Engine under cover
Front road wheel and tire
Splash guard (RH): Refer to EXT-22, "
FENDER PROTECTOR : Exploded View".
2. Drain engine coolant from radiator. Refer to CO-8, "
Draining".
CAUTION:
Perform this step when the engine is cold.
Never spill engine coolant on drive belt.
3. Remove drive belt. Refer to EM-12, "
Removal and Installation".
4. Remove idler pulleys. Refer to EM-25, "
Exploded View".
5. Remove reservoir tank of radiator. Refer to CO-13, "
Exploded View".
6. Remove reservoir tank of power steering oil pump with piping connected, and move it to aside. Refer to
ST-34, "
Exploded View".
7. Support oil pan (lower) bottom with transmission jack.
8. Remove engine mounting insulator (RH), engine mounting bracket (RH) and upper torque rod. Refer to
EM-67, "
Exploded View".
1. Timing chain tensioner (primary) 2.Valve timing control cover gasket
(bank 1)3. Valve timing control cover (bank 1)
4. Water drain plug (front) 5. Water pump cover 6. O-ring
7. O-ring 8. Water pump
A. Apply engine coolant
Refer to GI-4, "
Components" for symbols in the figure.
JPBIA1721GB
Page 1142 of 5121
WATER PUMP
CO-19
< ON-VEHICLE REPAIR >
C
D
E
F
G
H
I
J
K
L
MA
CO
N
P O
9. Remove water drain plug (front) on water pump side of cylinder block to drain engine coolant from engine
inside.
10. Remove valve timing control cover (bank 1) and water pump cover from front timing chain case.
Use the seal cutter [SST: KV10111100 (J37228)] to cut liquid gasket for removal.
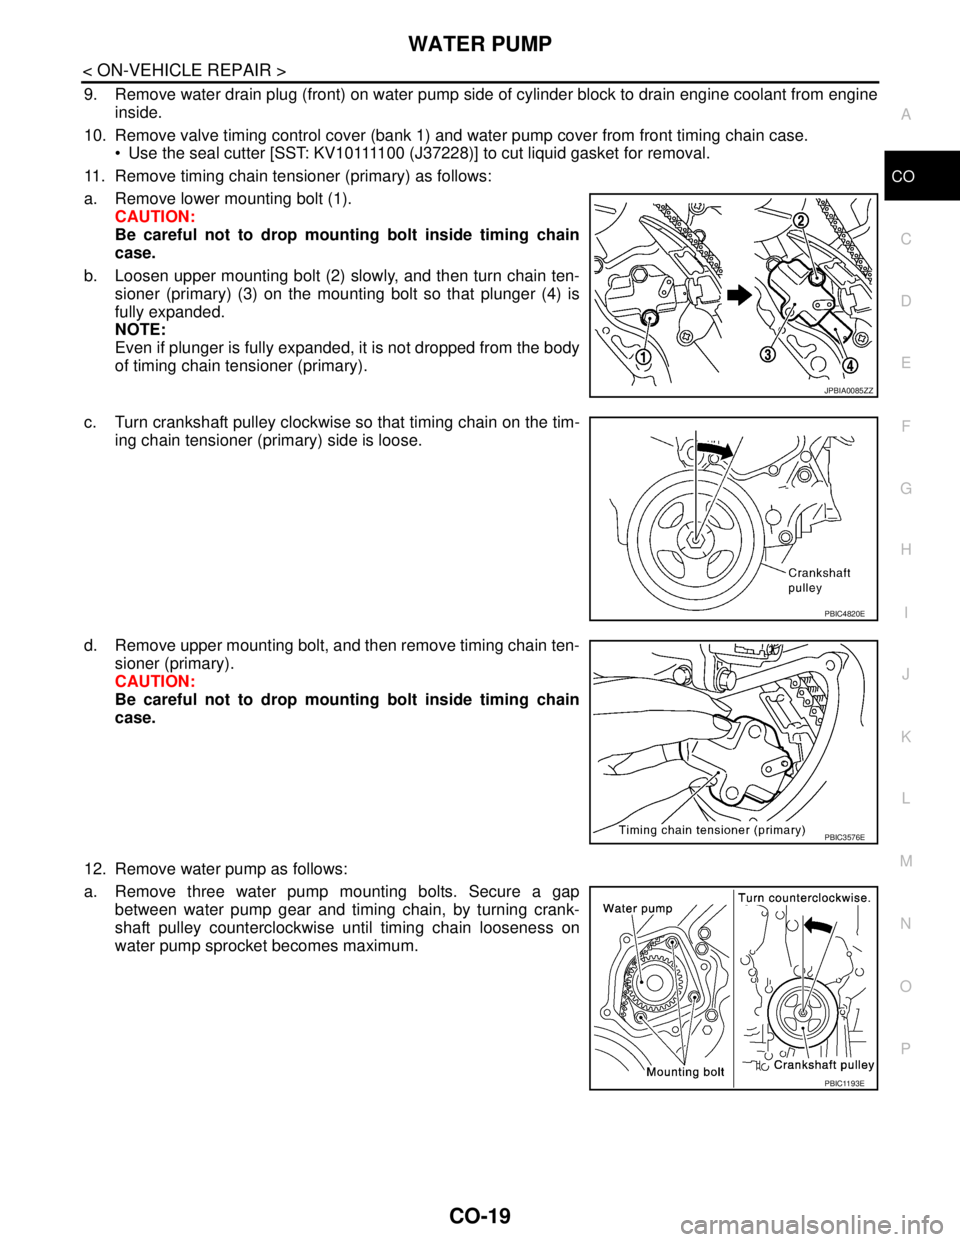
11. Remove timing chain tensioner (primary) as follows:
a. Remove lower mounting bolt (1).
CAUTION:
Be careful not to drop mounting bolt inside timing chain
case.
b. Loosen upper mounting bolt (2) slowly, and then turn chain ten-
sioner (primary) (3) on the mounting bolt so that plunger (4) is
fully expanded.
NOTE:
Even if plunger is fully expanded, it is not dropped from the body
of timing chain tensioner (primary).
c. Turn crankshaft pulley clockwise so that timing chain on the tim-
ing chain tensioner (primary) side is loose.
d. Remove upper mounting bolt, and then remove timing chain ten-
sioner (primary).
CAUTION:
Be careful not to drop mounting bolt inside timing chain
case.
12. Remove water pump as follows:
a. Remove three water pump mounting bolts. Secure a gap
between water pump gear and timing chain, by turning crank-
shaft pulley counterclockwise until timing chain looseness on
water pump sprocket becomes maximum.
JPBIA0085ZZ
PBIC4820E
PBIC3576E
PBIC1193E
Page 1143 of 5121
![NISSAN TEANA 2008 Service Manual CO-20
< ON-VEHICLE REPAIR >
WATER PUMP
b. Screw M8 bolts [pitch: 1.25 mm (0.0492 in) length: approxi-
mately 50 mm (1.97 in)] into water pumps upper and lower
mounting bolt holes until they reach timi NISSAN TEANA 2008 Service Manual CO-20
< ON-VEHICLE REPAIR >
WATER PUMP
b. Screw M8 bolts [pitch: 1.25 mm (0.0492 in) length: approxi-
mately 50 mm (1.97 in)] into water pumps upper and lower
mounting bolt holes until they reach timi](/manual-img/5/57391/w960_57391-1142.png)
CO-20
< ON-VEHICLE REPAIR >
WATER PUMP
b. Screw M8 bolts [pitch: 1.25 mm (0.0492 in) length: approxi-
mately 50 mm (1.97 in)] into water pumps upper and lower
mounting bolt holes until they reach timing chain case. Then,
alternately tighten each bolt for a half turn, and pull out water
pump.
CAUTION:
Pull straight out while preventing vane from contacting
socket in installation area.
Remove water pump without causing sprocket to contact
timing chain.
c. Remove M8 bolts and O-rings from water pump.
CAUTION:
Never disassemble water pump.
INSTALLATION
1. Install new O-rings to water pump.
Apply engine oil and engine coolant to O-rings as shown in the
figure.
Locate O-ring with white paint mark to engine front side.
2. Install water pump.
CAUTION:
Never allow cylinder block to nip O-rings when installing
water pump.
Check that timing chain and water pump sprocket are
engaged.
Insert water pump by tightening mounting bolts alternately and
evenly.
3. Install timing chain tensioner (primary) as follows:
a. Turn crankshaft pulley clockwise so that timing chain on the tim-
ing chain tensioner (primary) side is loose.
JLC357B
PBIC1397E
SLC031B
PBIC4820E
Page 1144 of 5121
WATER PUMP
CO-21
< ON-VEHICLE REPAIR >
C
D
E
F
G
H
I
J
K
L
MA
CO
N
P O
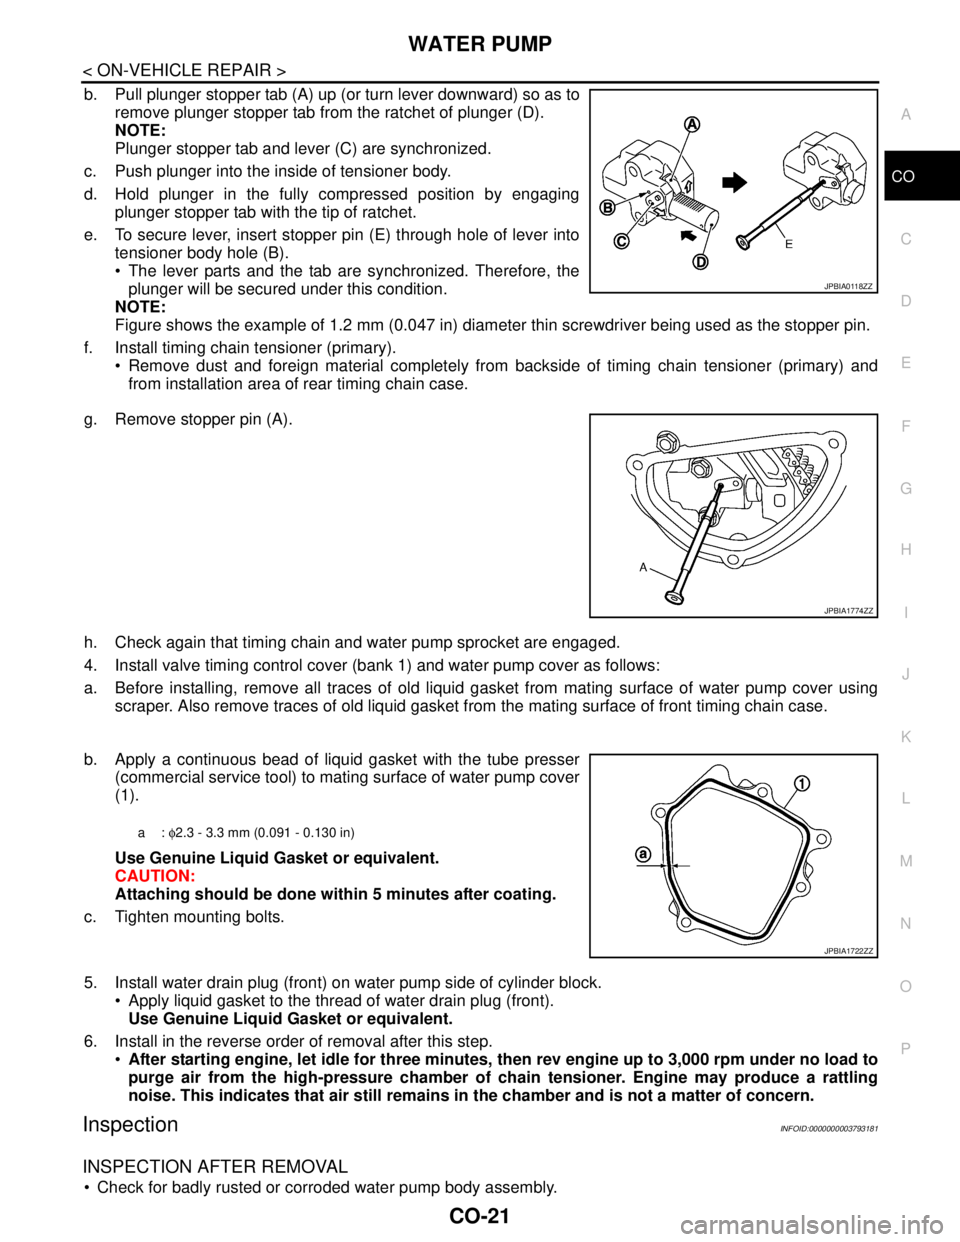
b. Pull plunger stopper tab (A) up (or turn lever downward) so as to
remove plunger stopper tab from the ratchet of plunger (D).
NOTE:
Plunger stopper tab and lever (C) are synchronized.
c. Push plunger into the inside of tensioner body.
d. Hold plunger in the fully compressed position by engaging
plunger stopper tab with the tip of ratchet.
e. To secure lever, insert stopper pin (E) through hole of lever into
tensioner body hole (B).
The lever parts and the tab are synchronized. Therefore, the
plunger will be secured under this condition.
NOTE:
Figure shows the example of 1.2 mm (0.047 in) diameter thin screwdriver being used as the stopper pin.
f. Install timing chain tensioner (primary).
Remove dust and foreign material completely from backside of timing chain tensioner (primary) and
from installation area of rear timing chain case.
g. Remove stopper pin (A).
h. Check again that timing chain and water pump sprocket are engaged.
4. Install valve timing control cover (bank 1) and water pump cover as follows:
a. Before installing, remove all traces of old liquid gasket from mating surface of water pump cover using
scraper. Also remove traces of old liquid gasket from the mating surface of front timing chain case.
b. Apply a continuous bead of liquid gasket with the tube presser
(commercial service tool) to mating surface of water pump cover
(1).
Use Genuine Liquid Gasket or equivalent.
CAUTION:
Attaching should be done within 5 minutes after coating.
c. Tighten mounting bolts.
5. Install water drain plug (front) on water pump side of cylinder block.
Apply liquid gasket to the thread of water drain plug (front).
Use Genuine Liquid Gasket or equivalent.
6. Install in the reverse order of removal after this step.
After starting engine, let idle for three minutes, then rev engine up to 3,000 rpm under no load to
purge air from the high-pressure chamber of chain tensioner. Engine may produce a rattling
noise. This indicates that air still remains in the chamber and is not a matter of concern.
InspectionINFOID:0000000003793181
INSPECTION AFTER REMOVAL
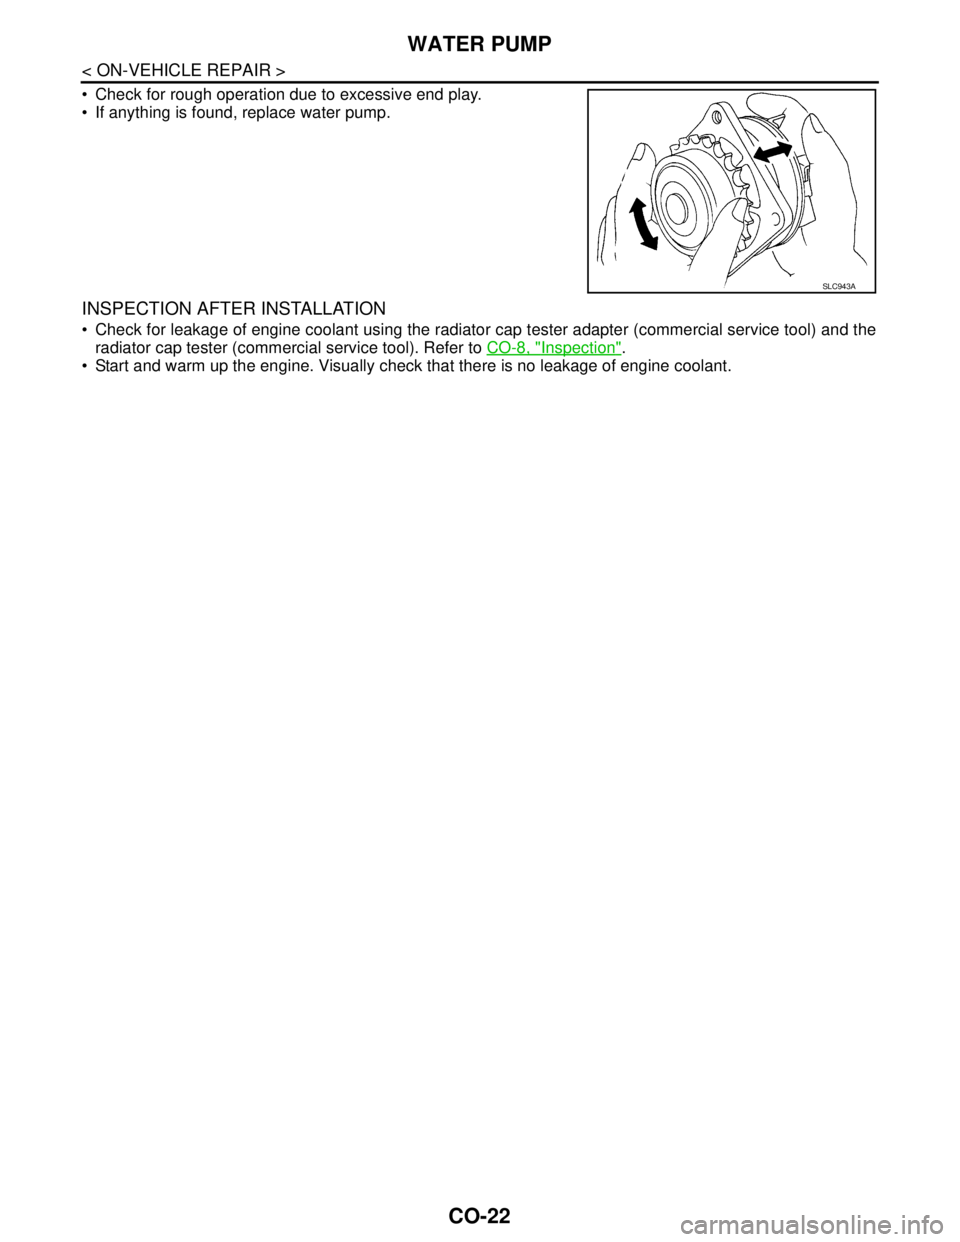
Check for badly rusted or corroded water pump body assembly.
JPBIA0118ZZ
JPBIA1774ZZ
a: φ2.3 - 3.3 mm (0.091 - 0.130 in)
JPBIA1722ZZ
Page 1145 of 5121
CO-22
< ON-VEHICLE REPAIR >
WATER PUMP
Check for rough operation due to excessive end play.
If anything is found, replace water pump.
INSPECTION AFTER INSTALLATION
Check for leakage of engine coolant using the radiator cap tester adapter (commercial service tool) and the
radiator cap tester (commercial service tool). Refer to CO-8, "
Inspection".
Start and warm up the engine. Visually check that there is no leakage of engine coolant.
SLC943A