2008 INFINITI FX35 ECU
[x] Cancel search: ECUPage 3109 of 3924
HEADLAMP - XENON TYPE -LT-7
< SERVICE INFORMATION >
C
DE
F
G H
I
J
L
M A
B
LT
N
O P
Exterior lamp battery saver control mode can be changed by the function setting of CONSULT-III.
AUTO LIGHT OPERATION (IF EQUIPPED)
Refer to LT-47, "System Description".
VEHICLE SECURITY SYSTEM
The vehicle security system will flash the high beams if the system is triggered. Refer to BL-163.
XENON HEADLAMP
Xenon type lamps are used for to the low beam headlamps . Xenon bulbs do not use a filament. Instead, they
produce light when a high voltage current is passed between two tungsten electrodes through a mixture of
xenon (an inert gas) and certain other metal halides. In addition to strong lighting power, electronic control of
the power supply gives the headlamps stable quality and tone color.
Followings are some advantages of the xenon type headlamp.
The light produced by the headlamps is white color si milar to sunlight that is easy to the eyes.
Light output is nearly double that of halogen headl amps, affording increased area of illumination.
Counter-reflected luminance increases and the contrast enhances on the wet road in the rain. That makes
visibility go up more than the increase of the light volume.
Power consumption is approximately 25 percent less than halogen headlamps, reducing battery load.
CAN Communication System DescriptionINFOID:0000000001328267
CAN (Controller Area Network) is a serial communication li ne for real time application. It is an on-vehicle mul-
tiplex communication line with high data communication speed and excellent error detection ability. Many elec-
tronic control units are equipped onto a vehicle, and each control unit shares information and links with other
control units during operation (not independent). In CAN communication, control units are connected with 2
communication lines (CAN H line, CAN L line) allowing a high rate of information transmission with less wiring.
Each control unit transmits/receives data but selectively reads required data only.
CAN Communication UnitINFOID:0000000001328268
Refer to LAN-43, "CAN System Specification Chart".
3AA93ABC3ACD3AC03ACA3AC03AC63AC53A913A773A893A873A873A8E3A773A983AC73AC93AC03AC3
3A893A873A873A8F3A773A9D3AAF3A8A3A8C3A863A9D3AAF3A8B3A8C
Page 3132 of 3924
LT-30
< SERVICE INFORMATION >
HEADLAMP - XENON TYPE -
After installing bulb, be sure to install plastic cap and bulb socket securely to insure watertight-
ness.
Removal and InstallationINFOID:0000000001328289
REMOVAL
1. Disconnect the battery cable from the negative terminal or remove power fuse.
2. Remove front bumper fascia assembly. Refer to EI-14, "
Compo-
nent Parts Location".
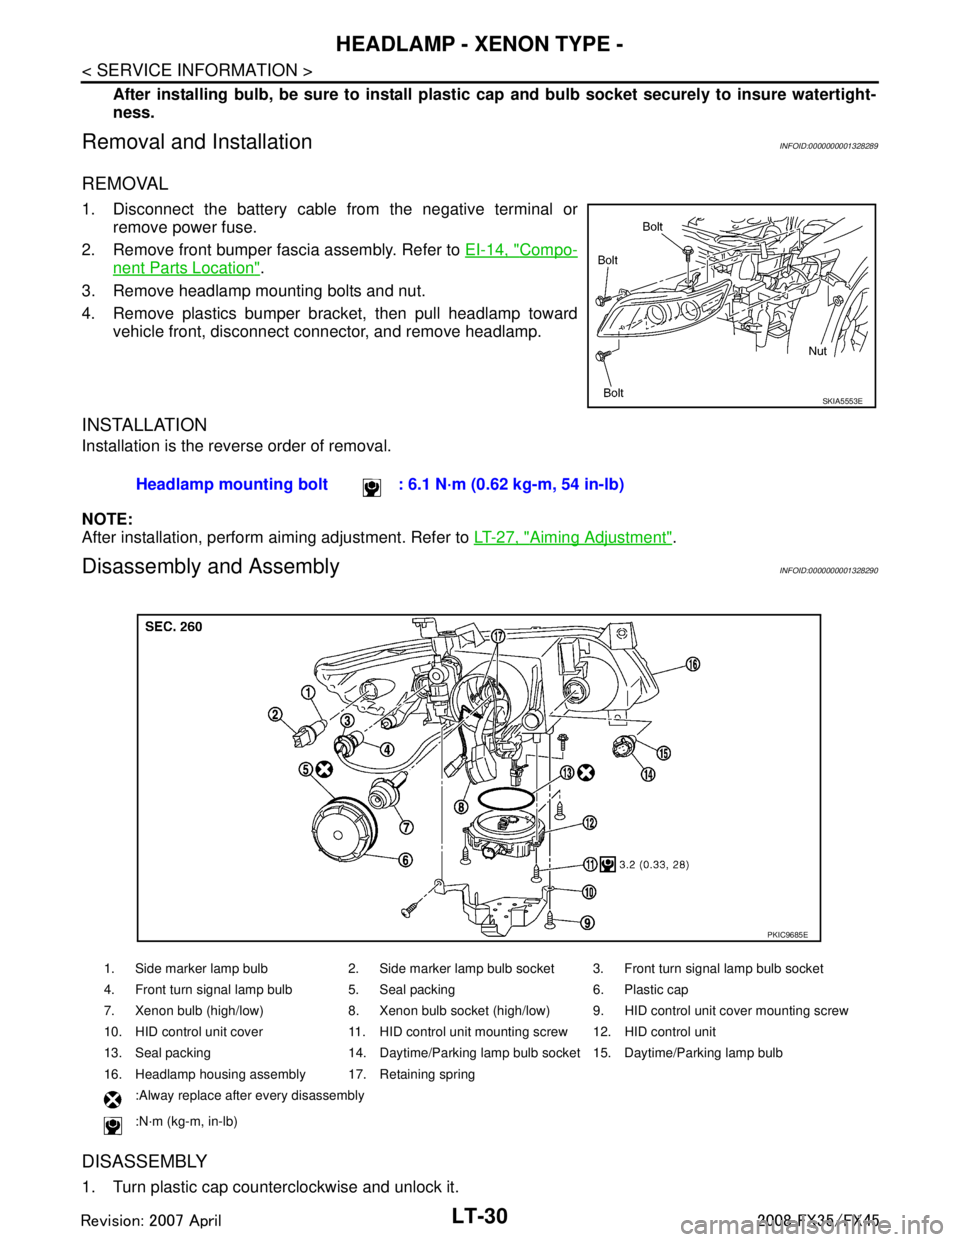
3. Remove headlamp mounting bolts and nut.
4. Remove plastics bumper bracket, then pull headlamp toward vehicle front, disconnect connector, and remove headlamp.
INSTALLATION
Installation is the reverse order of removal.
NOTE:
After installation, perform aiming adjustment. Refer to LT-27, "
Aiming Adjustment".
Disassembly and AssemblyINFOID:0000000001328290
DISASSEMBLY
1. Turn plastic cap counterclockwise and unlock it.
SKIA5553E
Headlamp mounting bolt : 6.1 N·m (0.62 kg-m, 54 in-lb)
1. Side marker lamp bulb 2. Side marker lamp bulb socket 3. Front turn signal lamp bulb socket
4. Front turn signal lamp bulb 5. Seal packing 6. Plastic cap
7. Xenon bulb (high/low) 8. Xenon bulb socket (high/low) 9. HID control unit cover mounting screw
10. HID control unit cover 11. HID control unit mounting screw 12. HID control unit
13. Seal packing 14. Daytime/Parking lamp bulb socket 15. Daytime/Parking lamp bulb
16. Headlamp housing assembly 17. Retaining spring
:Alway replace after every disassembly
:N·m (kg-m, in-lb)
PKIC9685E
3AA93ABC3ACD3AC03ACA3AC03AC63AC53A913A773A893A873A873A8E3A773A983AC73AC93AC03AC3
3A893A873A873A8F3A773A9D3AAF3A8A3A8C3A863A9D3AAF3A8B3A8C
Page 3133 of 3924
HEADLAMP - XENON TYPE -LT-31
< SERVICE INFORMATION >
C
DE
F
G H
I
J
L
M A
B
LT
N
O P
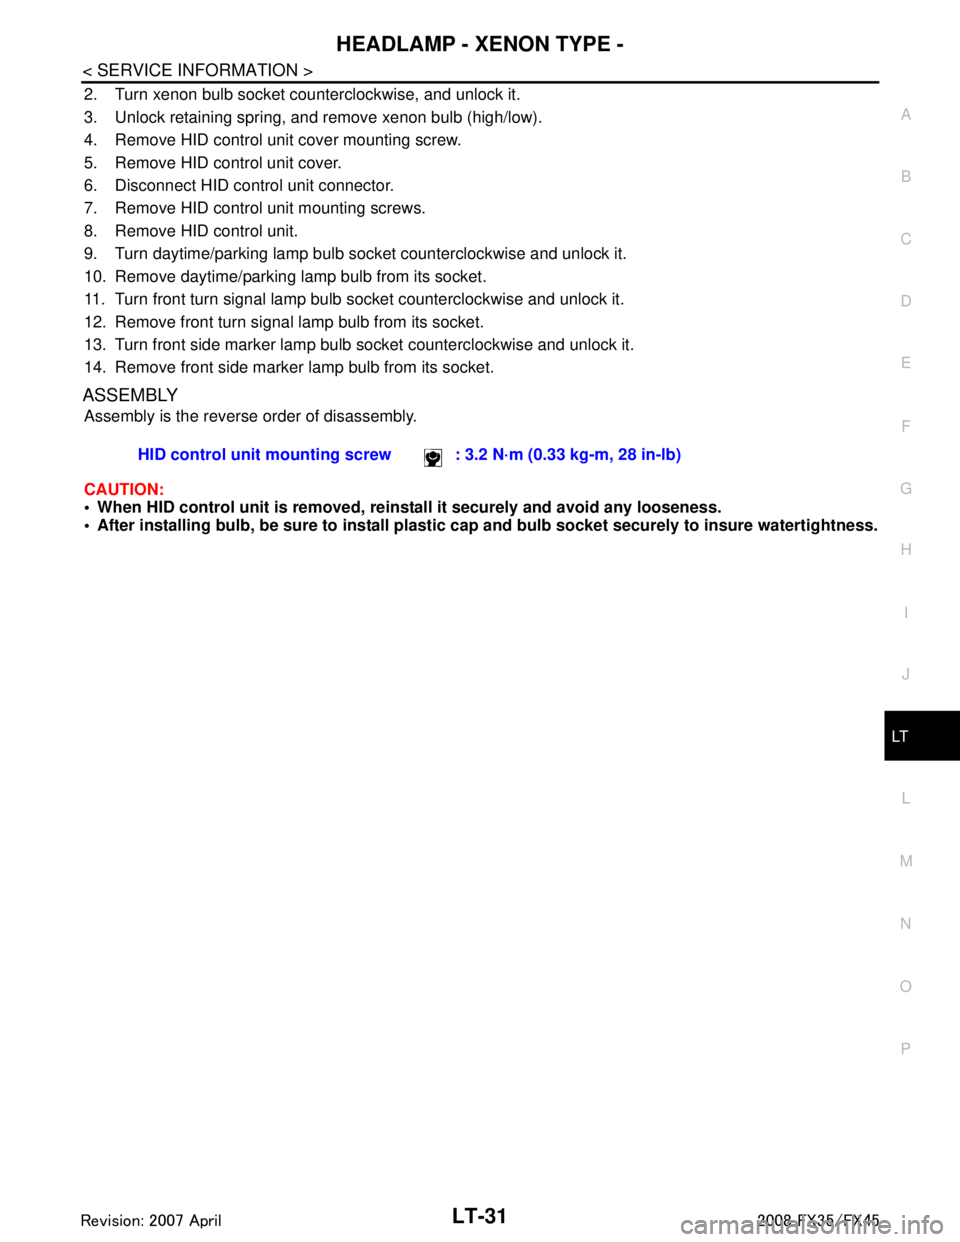
2. Turn xenon bulb socket count erclockwise, and unlock it.
3. Unlock retaining spring, and remove xenon bulb (high/low).
4. Remove HID control unit cover mounting screw.
5. Remove HID control unit cover.
6. Disconnect HID control unit connector.
7. Remove HID control unit mounting screws.
8. Remove HID control unit.
9. Turn daytime/parking lamp bulb socket counterclockwise and unlock it.
10. Remove daytime/parking lamp bulb from its socket.
11. Turn front turn signal lamp bulb socket counterclockwise and unlock it.
12. Remove front turn signal lamp bulb from its socket.
13. Turn front side marker lamp bulb socket counterclockwise and unlock it.
14. Remove front side marker lamp bulb from its socket.
ASSEMBLY
Assembly is the reverse order of disassembly.
CAUTION:
When HID control unit is removed, rein stall it securely and avoid any looseness.
After installing bulb, be sure to install plastic cap and bulb socket securely to insure watertightness.
HID control unit mounting screw
: 3.2 N·m (0.33 kg-m, 28 in-lb)
3AA93ABC3ACD3AC03ACA3AC03AC63AC53A913A773A893A873A873A8E3A773A983AC73AC93AC03AC3
3A893A873A873A8F3A773A9D3AAF3A8A3A8C3A863A9D3AAF3A8B3A8C
Page 3156 of 3924
LT-54
< SERVICE INFORMATION >
AUTO LIGHT SYSTEM
NOTE:
Optical sensor must be securely subjected to work lamp light. If optical sensor is insufficiently illuminated, the measured value may not
satisfy standard.
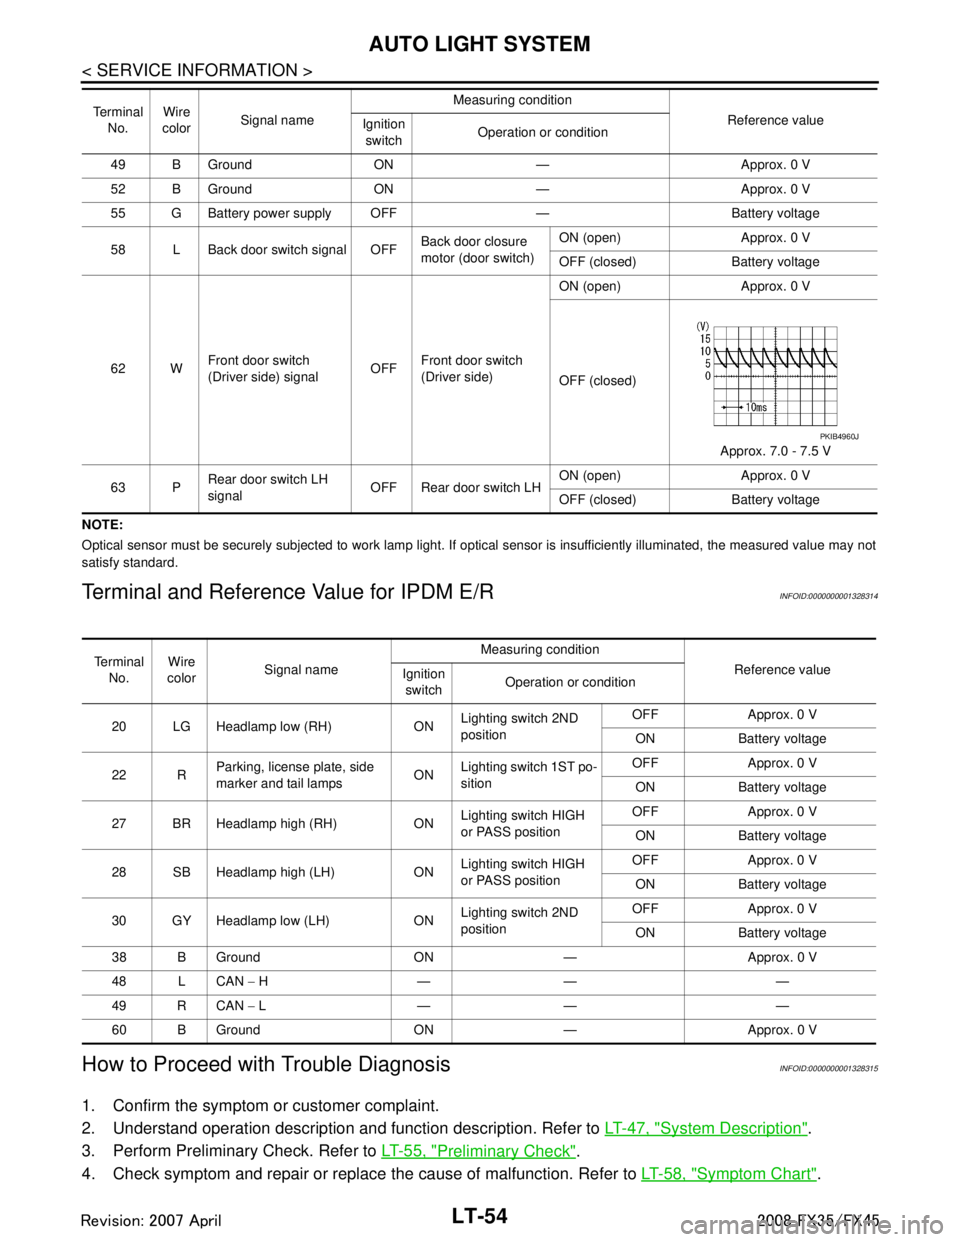
Terminal and Reference Value for IPDM E/RINFOID:0000000001328314
How to Proceed with Trouble DiagnosisINFOID:0000000001328315
1. Confirm the symptom or customer complaint.
2. Understand operation description and function description. Refer to LT-47, "
System Description".
3. Perform Preliminary Check. Refer to LT-55, "
Preliminary Check".
4. Check symptom and repair or replace the cause of malfunction. Refer to LT-58, "
Symptom Chart".
49 B Ground ON — Approx. 0 V
52 B Ground ON — Approx. 0 V
55 G Battery power supply OFF — Battery voltage
58 L Back door switch signal OFF Back door closure
motor (door switch)ON (open) Approx. 0 V
OFF (closed) Battery voltage
62 W Front door switch
(Driver side) signal OFFFront door switch
(Driver side) ON (open) Approx. 0 V
OFF (closed)
Approx. 7.0 - 7.5 V
63 P Rear door switch LH
signal OFF Rear door switch LH ON (open) Approx. 0 V
OFF (closed) Battery voltage
Te r m i n a l
No. Wire
color Signal name Measuring condition
Reference value
Ignition
switch Operation or condition
PKIB4960J
Te r m i n a l
No. Wire
color Signal name Measuring condition
Reference value
Ignition
switch Operation or condition
20 LG Headlamp low (RH) ON Lighting switch 2ND
positionOFF Approx. 0 V
ON Battery voltage
22 R Parking, license plate, side
marker and tail lamps ON
Lighting switch 1ST po-
sition OFF Approx. 0 V
ON Battery voltage
27 BR Headlamp high (RH) ON Lighting switch HIGH
or PASS positionOFF Approx. 0 V
ON Battery voltage
28 SB Headlamp high (LH) ON Lighting switch HIGH
or PASS positionOFF Approx. 0 V
ON Battery voltage
30 GY Headlamp low (LH) ON Lighting switch 2ND
positionOFF Approx. 0 V
ON Battery voltage
38 B Ground ON — Approx. 0 V
48 L CAN − H—— —
49 R CAN − L—— —
60 B Ground ON — Approx. 0 V
3AA93ABC3ACD3AC03ACA3AC03AC63AC53A913A773A893A873A873A8E3A773A983AC73AC93AC03AC3
3A893A873A873A8F3A773A9D3AAF3A8A3A8C3A863A9D3AAF3A8B3A8C
Page 3161 of 3924
AUTO LIGHT SYSTEMLT-59
< SERVICE INFORMATION >
C
DE
F
G H
I
J
L
M A
B
LT
N
O P
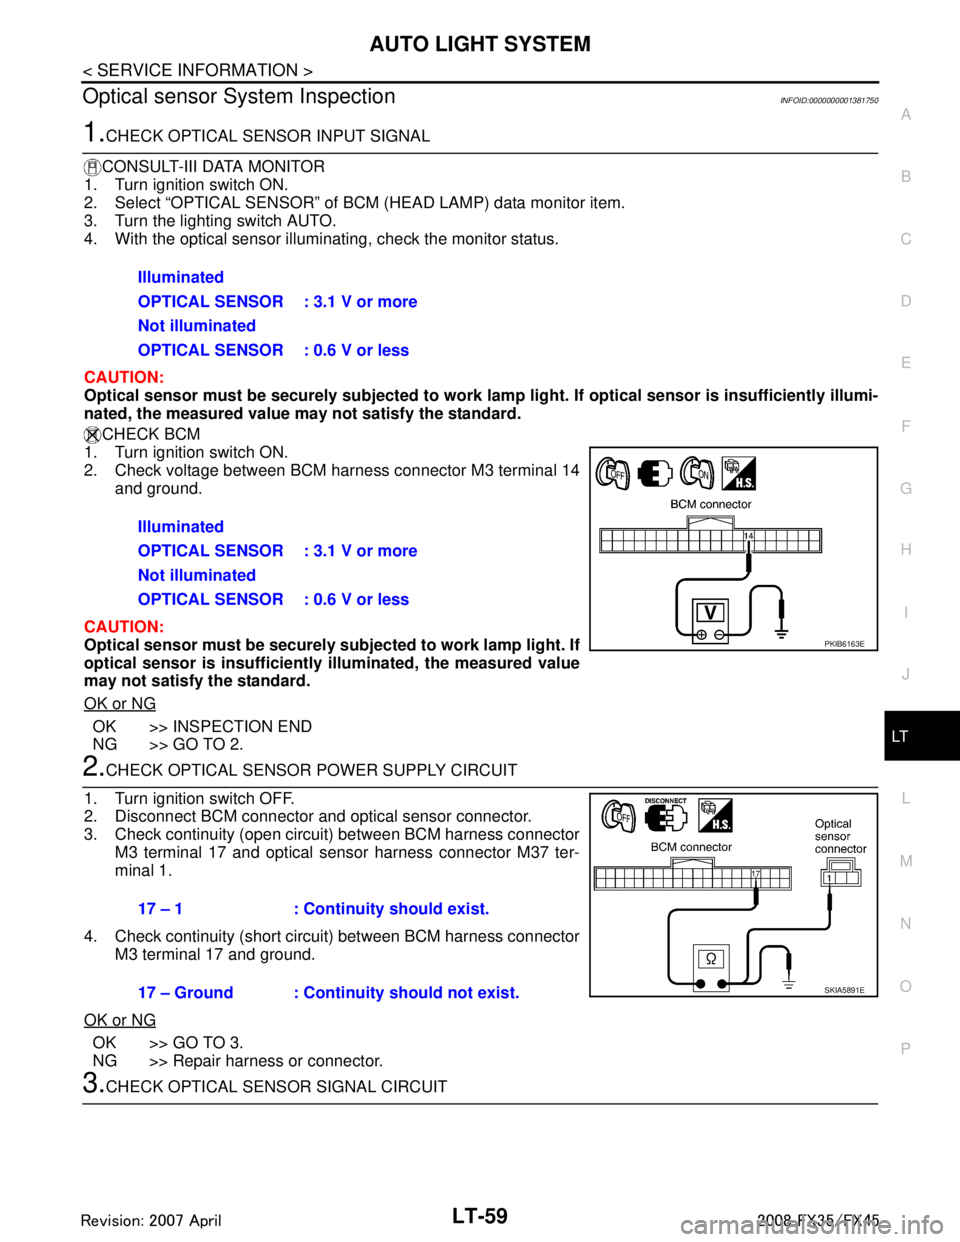
Optical sensor System InspectionINFOID:0000000001381750
1.CHECK OPTICAL SENSOR INPUT SIGNAL
CONSULT-III DATA MONITOR
1. Turn ignition switch ON.
2. Select “OPTICAL SENSOR” of BC M (HEAD LAMP) data monitor item.
3. Turn the lighting switch AUTO.
4. With the optical sensor illuminat ing, check the monitor status.
CAUTION:
Optical sensor must be securely subject ed to work lamp light. If optical sensor is insufficiently illumi-
nated, the measured value may not satisfy the standard.
CHECK BCM
1. Turn ignition switch ON.
2. Check voltage between BCM harness connector M3 terminal 14
and ground.
CAUTION:
Optical sensor must be securely su bjected to work lamp light. If
optical sensor is insufficiently illuminated, the measured value
may not satisfy the standard.
OK or NG
OK >> INSPECTION END
NG >> GO TO 2.
2.CHECK OPTICAL SENSOR POWER SUPPLY CIRCUIT
1. Turn ignition switch OFF.
2. Disconnect BCM connector and optical sensor connector.
3. Check continuity (open circuit) between BCM harness connector M3 terminal 17 and optical sensor harness connector M37 ter-
minal 1.
4. Check continuity (short circuit) between BCM harness connector M3 terminal 17 and ground.
OK or NG
OK >> GO TO 3.
NG >> Repair harness or connector.
3.CHECK OPTICAL SENS OR SIGNAL CIRCUIT
Illuminated
OPTICAL SENSOR : 3.1 V or more
Not illuminated
OPTICAL SENSOR : 0.6 V or less
Illuminated
OPTICAL SENSOR : 3.1 V or more
Not illuminated
OPTICAL SENSOR : 0.6 V or less
PKIB6163E
17 – 1 : Continui
ty should exist.
17 – Ground : Continuity should not exist.
SKIA5891E
3AA93ABC3ACD3AC03ACA3AC03AC63AC53A913A773A893A873A873A8E3A773A983AC73AC93AC03AC3
3A893A873A873A8F3A773A9D3AAF3A8A3A8C3A863A9D3AAF3A8B3A8C
Page 3320 of 3924

GENERAL MAINTENANCEMA-3
< SERVICE INFORMATION >
C
DE
F
G H
I
J
K
M A
B
MA
N
O P
GENERAL MAINTENANCE
Explanation of Gene ral MaintenanceINFOID:0000000001328893
General maintenance includes those items which shoul d be checked during the normal day-to-day operation
of the vehicle. They are essential if the vehicle is to continue operating properly. The owners can perform
checks and inspections themselves or have their INFINITI dealers do them.
OUTSIDE THE VEHICLE
The maintenance items listed here should be performed from time to time, unless otherwise specified.
INSIDE THE VEHICLE The maintenance items listed here should be checked on a regular basis, such as when performing periodic maintenance, cleaning the vehicle,
etc.
Item Reference page
Tires Check the pressure with a gauge, including the spare, at least once a month
and always prior to a long distance trips. Adjust to the specified pressure if nec-
essary. Check carefully for damage, cuts or excessive wear. —
Wheel nuts When checking the tires, make sure no nuts are missing, and check for any
loose nuts. Tighten if necessary. —
Windshield Clean the windshield on a regular basis. Check the windshield at least every six
months for cracks or other damage. Repair as necessary. —
Tire rotation Tires should be rotated every 12,000 km (7,500 miles). MA-31
Transmitter compo-
nents in tire pressure
monitoring system
(TPMS)Replace grommet seal, valve core and cap of the transmitter in TPMS every tire
replacement by reaching wear limit of tire.
WT-10
Wheel alignment and
balanceIf the vehicle pulls to either side while driving on a straight and level road, or if
you detect uneven or abnormal tire wear, there may be a need for wheel align-
ment. If the steering wheel or seat vibrates at normal highway speeds, wheel
balancing may be needed. MA-30
,
FSU-5
Windshield wiper
blades Check for cracks or wear if they do not wipe properly. —
Doors and engine
hood Check that all doors and the engine hood operate smoothly as well as the trunk
lid and back hatch. Also make sure that all latches lock securely. Lubricate if
necessary. Make sure that the secondary latch keeps the hood from opening
when the primary latch is released.
When driving in areas using road salt or other corrosive materials, check lubri-
cation frequently. MA-35
Lamps
Make sure that the headlamps, stop lamps, tail lamps, turn signal lamps, and
other lamps are all operating properly and installed securely. Also check head-
lamp aim. Clean the headlamps on a regular basis. —
Item
Reference page
Warning lamps and
chimes Make sure that all warning lamps and chimes are operating properly. —
Windshield wiper and
washer Check that the wipers and washer operate properly and that the wipers do not
streak.
—
Windshield defroster Check that the air comes out of the defroster outlets properly and in sufficient
quantity when operating the heater or air conditioner. —
Steering wheel Check that it has the specified play. Be sure to check for changes in the steering
condition, such as excessive play, hard steering or strange noises.
Free play: Less than 35 mm (1.38 in) —
Seats Check seat position controls such as seat adjusters, seatback recliner, etc. to
make sure they operate smoothly and that all latches lock securely in every po-
sition. Check that the head restrains move up and down smoothly and that the
locks (if equipped) hold securely in all latched positions. Check that the latches
lock securely for folding-down rear seatbacks. —
Seat belts Check that all parts of the seat belt system (e.g. buckles, anchors, adjusters
and retractors) operate properly and smoothly, and are installed securely.
Check the belt webbing for cuts, fraying, wear or damage. MA-35
3AA93ABC3ACD3AC03ACA3AC03AC63AC53A913A773A893A873A873A8E3A773A983AC73AC93AC03AC3
3A893A873A873A8F3A773A9D3AAF3A8A3A8C3A863A9D3AAF3A8B3A8C
Page 3321 of 3924

MA-4
< SERVICE INFORMATION >
GENERAL MAINTENANCE
UNDER THE HOOD AND VEHICLE
The maintenance items listed here should be checked periodically (e.g. each time you check the engine oil or refuel).
Accelerator pedalCheck the pedal for smooth operation and make sure the pedal does not catch
or require uneven effort. Keep the floor mats away from the pedal. —
Brakes Check that the brake does not pull the vehicle to one side when applied. —
Brake pedal and
booster Check the pedal for smooth operation and make sure it has the proper distance
under it when depressed fully. Check the brake booster function. Be sure to
keep the floor mats away from the pedal. BR-5
,
BR-14
Parking brake Check that the pedal has the proper travel and make sure that the vehicle is
held securely on a fairly steep hill when only the parking brake is applied. PB-3
Automatic transmis-
sion "Park" mecha-
nismCheck that the lock release button on the selector lever operates properly and
smoothly. On a fairly steep hill check that the vehicle is held securely with the
selector lever in the P (Park) position without applying any brakes.
—
Item
Reference page
Item Reference page
Windshield washer
fluid Check that there is adequate fluid in the tank. —
Engine coolant level Check the coolant level when the engine is cold. MA-12
, MA-19
Radiator and hoses Check the front of the radiator and clean off any dirt, insects, leaves, etc., that
may have accumulated. Make sure the hoses have no cracks, deformation, de-
terioration or loose connections. —
Brake fluid level Make sure that the brake fluid level is between the “MAX” and “MIN” lines on the
reservoir. MA-32
Battery Check the fluid level in each cell. It should be between the “MAX” and “MIN”
lines. Vehicles operated in high temperatures or under severe conditions re-
quire frequent checks of the battery fluid level. SC-4
Engine drive belts
Make sure that no belt is frayed, worn, cracked or oily. MA-11, MA-19
Engine oil level Check the level on the oil level gauge after parking the vehicle on a level spot
and turning off the engine. MA-15,
MA-22
Power steering fluid
level and lines Check the level on the dipstick with the engine off. Check the lines for improper
attachment, leaks, cracks, etc.
MA-33
Exhaust system
Make sure there are no loose supports, cracks or holes. If the sound of the ex-
haust seems unusual or there is a smell of exhaust fumes, immediately locate
the trouble and correct it. MA-26
Underbody
The underbody is frequently exposed to corrosive substances such as those
used on icy roads or to control dust. It is very important to remove these sub-
stances, otherwise rust will form on the floor pan, frame, fuel lines and around
the exhaust system. At the end of winter, the underbody should be thoroughly
flushed with plain water, being careful to clean those areas where mud and dirt
can easily accumulate. —
Fluid leaks Check under the vehicle for fuel, oil, water or other fluid leaks after the vehicle
has been parked for a while. Water dripping from the air conditioner after use is
normal. If you should notice any leaks or gasoline fumes are evident, check for
the cause and correct it immediately. —
3AA93ABC3ACD3AC03ACA3AC03AC63AC53A913A773A893A873A873A8E3A773A983AC73AC93AC03AC3
3A893A873A873A8F3A773A9D3AAF3A8A3A8C3A863A9D3AAF3A8B3A8C
Page 3361 of 3924
PB-6
< SERVICE INFORMATION >
PARKING BRAKE SHOE
PARKING BRAKE SHOE
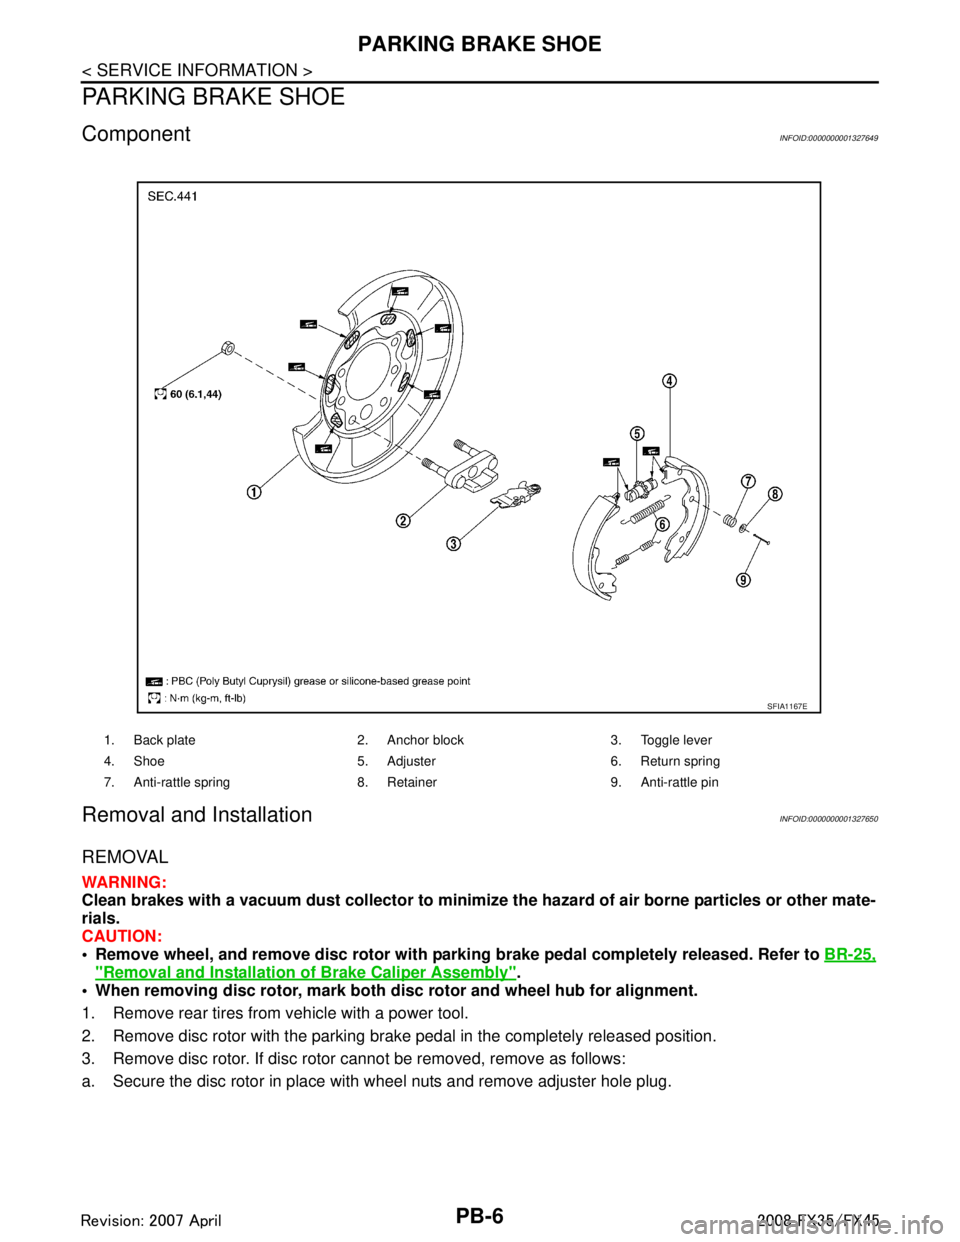
ComponentINFOID:0000000001327649
Removal and InstallationINFOID:0000000001327650
REMOVAL
WARNING:
Clean brakes with a vacuum dust collector to minimize the hazard of air borne particles or other mate-
rials.
CAUTION:
• Remove wheel, and remove disc rotor with parki ng brake pedal completely released. Refer to BR-25,
"Removal and Installation of Brake Caliper Assembly".
When removing disc rotor, mark both disc rotor and wheel hub for alignment.
1. Remove rear tires from vehicle with a power tool.
2. Remove disc rotor with the parking brake pedal in the completely released position.
3. Remove disc rotor. If disc rotor cannot be removed, remove as follows:
a. Secure the disc rotor in place with wheel nuts and remove adjuster hole plug.
1. Back plate 2. Anchor block 3. Toggle lever
4. Shoe 5. Adjuster 6. Return spring
7. Anti-rattle spring 8. Retainer 9. Anti-rattle pin
SFIA1167E
3AA93ABC3ACD3AC03ACA3AC03AC63AC53A913A773A893A873A873A8E3A773A983AC73AC93AC03AC3
3A893A873A873A8F3A773A9D3AAF3A8A3A8C3A863A9D3AAF3A8B3A8C