2008 INFINITI FX35 ECU
[x] Cancel search: ECUPage 2902 of 3924
GI-40
< SERVICE INFORMATION >
TOW TRUCK TOWING
TOW TRUCK TOWING
Tow Truck TowingINFOID:0000000001325684
CAUTION:
All applicable state or Provincial (in Canada) laws and local laws regarding the towing operation
must be obeyed.
It is necessary to use proper towi ng equipment to avoid possible damage to the vehicle during tow-
ing operation. To wing is in accordance with Towing Procedure Manual at dealer.
Always attach safety chains before towing.
When towing, make sure that the transmission, steering system and powertrain are in good order. If
any unit is damaged, dollies must be used.
Never tow an automatic transmission model from the rear (that is backward) with four wheels on the
ground. This may cause serious and exp ensive damage to the transmission.
2WD MODELS
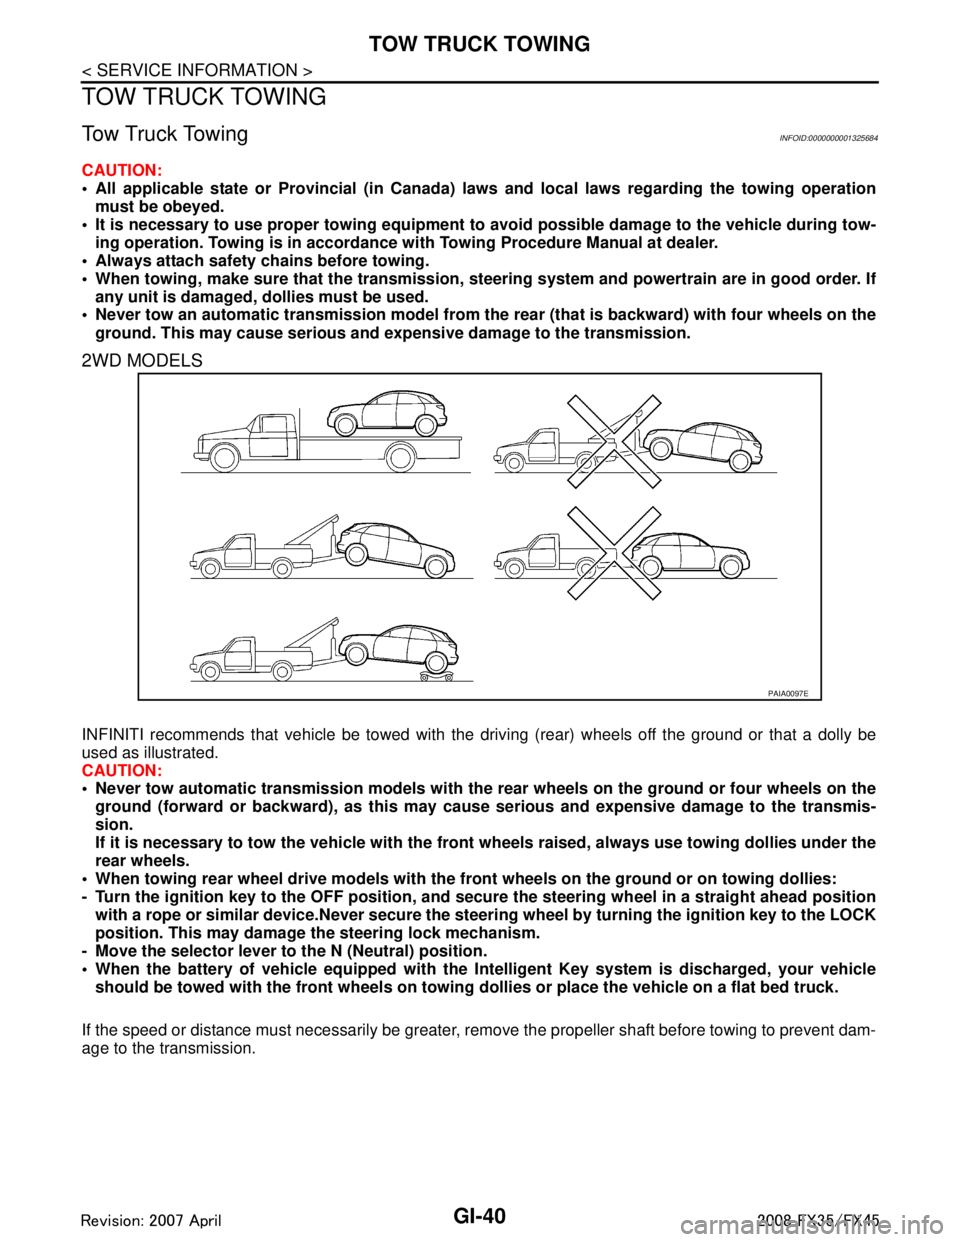
INFINITI recommends that vehicle be towed with the dr iving (rear) wheels off the ground or that a dolly be
used as illustrated.
CAUTION:
Never tow automatic transmission models with the r ear wheels on the ground or four wheels on the
ground (forward or backward), as this may cause serious and expensive damage to the transmis-
sion.
If it is necessary to tow the vehicle with the fron t wheels raised, always use towing dollies under the
rear wheels.
When towing rear wheel drive mo dels with the front wheels on the ground or on towing dollies:
- Turn the ignition key to the OFF position, and secure the steering wh eel in a straight ahead position
with a rope or similar device.Never secure the st eering wheel by turning the ignition key to the LOCK
position. This may damage the steering lock mechanism.
- Move the selector lever to the N (Neutral) position.
When the battery of vehicle equipped with the Intelligent Key system is discharged, your vehicle
should be towed with the front wh eels on towing dollies or place the vehicle on a flat bed truck.
If the speed or distance must necessarily be greater, re move the propeller shaft before towing to prevent dam-
age to the transmission.
PAIA0097E
3AA93ABC3ACD3AC03ACA3AC03AC63AC53A913A773A893A873A873A8E3A773A983AC73AC93AC03AC3
3A893A873A873A8F3A773A9D3AAF3A8A3A8C3A863A9D3AAF3A8B3A8C
Page 2903 of 3924
TOW TRUCK TOWINGGI-41
< SERVICE INFORMATION >
C
DE
F
G H
I
J
K L
M B
GI
N
O P
AWD MODELS
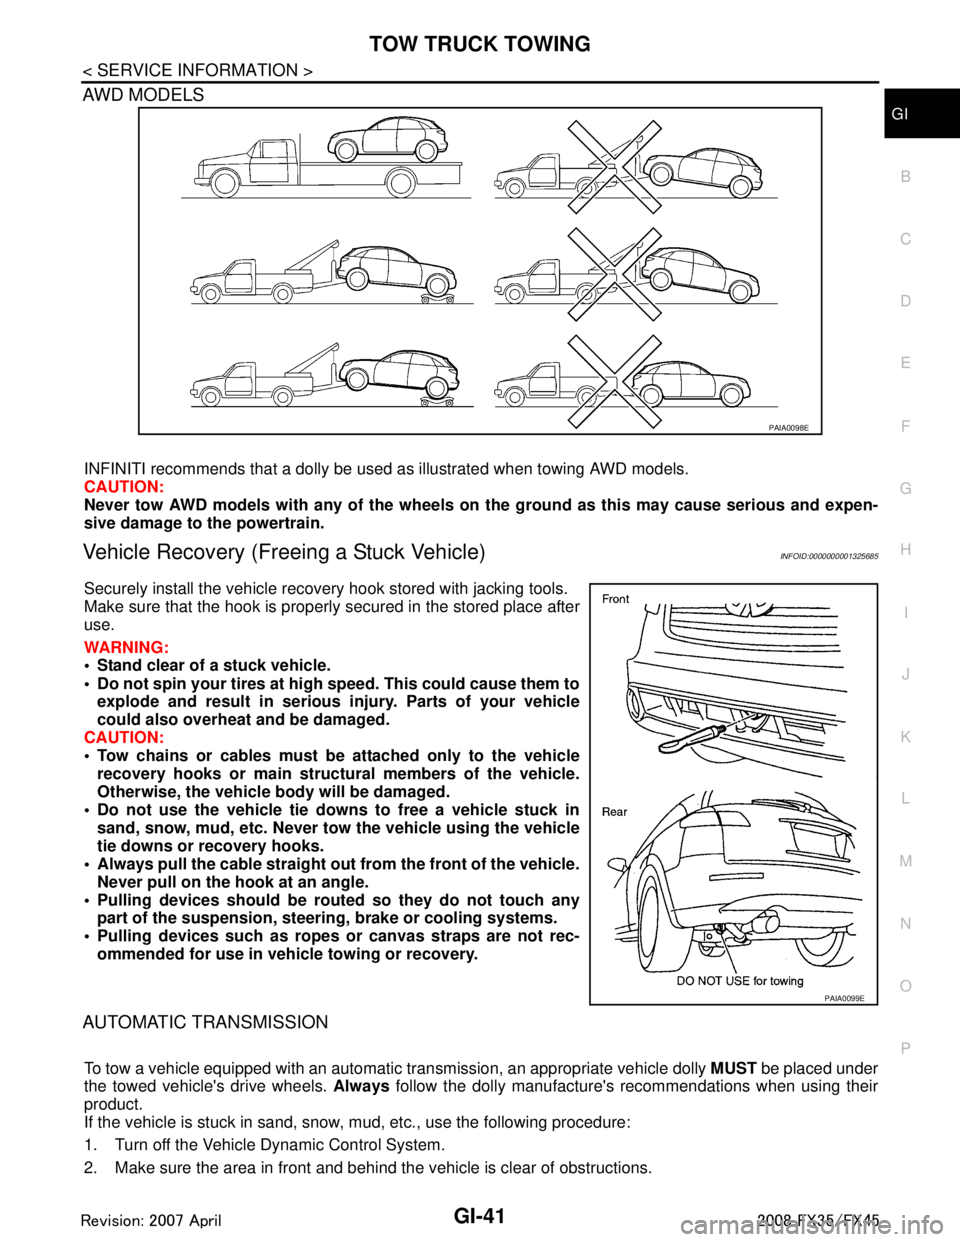
INFINITI recommends that a dolly be used as illustrated when towing AWD models.
CAUTION:
Never tow AWD models with any of the wheels on the ground as this may cause serious and expen-
sive damage to the powertrain.
Vehicle Recovery (Freeing a Stuck Vehicle)INFOID:0000000001325685
Securely install the vehicle recovery hook stored with jacking tools.
Make sure that the hook is properly secured in the stored place after
use.
WARNING:
Stand clear of a stuck vehicle.
Do not spin your tires at high speed. This could cause them to
explode and result in serious injury. Parts of your vehicle
could also overheat and be damaged.
CAUTION:
Tow chains or cables must be attached only to the vehicle recovery hooks or main struct ural members of the vehicle.
Otherwise, the vehicle body will be damaged.
Do not use the vehicle tie downs to free a vehicle stuck in
sand, snow, mud, etc. Never to w the vehicle using the vehicle
tie downs or recovery hooks.
Always pull the cable straight out from the front of the vehicle.
Never pull on the hook at an angle.
Pulling devices should be rout ed so they do not touch any
part of the suspension, steer ing, brake or cooling systems.
Pulling devices such as ropes or canvas straps are not rec- ommended for use in vehicle towing or recovery.
AUTOMATIC TRANSMISSION
To tow a vehicle equipped with an automatic tr ansmission, an appropriate vehicle dolly MUST be placed under
the towed vehicle's drive wheels. Always follow the dolly manufacture's recommendations when using their
product.
If the vehicle is stuck in sand, snow , mud, etc., use the following procedure:
1. Turn off the Vehicle Dynamic Control System.
2. Make sure the area in front and behind the vehicle is clear of obstructions.
PAIA0098E
PAIA0099E
3AA93ABC3ACD3AC03ACA3AC03AC63AC53A913A773A893A873A873A8E3A773A983AC73AC93AC03AC3
3A893A873A873A8F3A773A9D3AAF3A8A3A8C3A863A9D3AAF3A8B3A8C
Page 2919 of 3924

GW-6
< SERVICE INFORMATION >
SQUEAK AND RATTLE TROUBLE DIAGNOSES
If the noise can be duplicated easily during the test drive, to helpidentify the source of the noise, try to dupli-
cate the noise with the vehiclestopped by doing one or all of the following:
1) Close a door.
2) Tap or push/pull around the area where the noise appears tobe coming from.
3) Rev the engine.
4) Use a floor jack to recreate vehicle “twist”.
5) At idle, apply engine load (electrical load, half-cl utch on M/T models, drive position on A/T models).
6) Raise the vehicle on a hoist and hit a tire with a rubber hammer.
Drive the vehicle and attempt to duplicate the conditi ons thecustomer states exist when the noise occurs.
If it is difficult to duplicate the noise, drive the v ehicle slowlyon an undulating or rough road to stress the vehi-
cle body.
CHECK RELATED SERVICE BULLETINS
After verifying the customer concern or symptom, check ASIST for Technica lService Bulletins (TSBs) related
to that concern or symptom.
If a TSB relates to the symptom, fo llow the procedure to repair thenoise.
LOCATE THE NOISE AND IDENTIFY THE ROOT CAUSE
1. Narrow down the noise to a general area. To help pi npoint the source of the noise, use a listening tool
(Chassis Ear: J39570, Engine Ear and mechanics stethoscope).
2. Narrow down the noise to a more specific area and identify the causeof the noise by:
removing the components in the area that you suspect the noiseis coming from. Do not use too much force when removing clips and fasteners, otherwiseclips and fastener can be broken or
lost during the repair, resulting in thecreation of new noise.
tapping or pushing/pulling the component t hat you suspect is causingthe noise.
Do not tap or push/pull the component with excessive force, otherwisethe noise will be eliminated only tem-
porarily.
feeling for a vibration with your hand by touching t he component(s)that you suspect is (are) causing the
noise.
placing a piece of paper between components that you suspect arecausing the noise.
looking for loose components and contact marks. Refer to GW-7, "
Generic Squeak and Rattle Troubleshooting".
REPAIR THE CAUSE
If the cause is a loose component, tighten the component securely.
If the cause is insufficient clearance between components:
- separate components by repositioning or l oosening and retighteningthe component, if possible.
- insulate components with a suitable insulator such as urethane pads, foam blocks, felt cloth tape or urethane
tape. A Nissan Squeak and Rattle Kit (J43980) is av ailable through your authorized Nissan Parts Depart-
ment.
CAUTION:
Do not use excessive force as many components are constructed of plasticand may be damaged.
NOTE:
Always check with the Parts Departm ent for the latest parts information.
The following materials are contained in the Nissan Squeak and Rattle Kit (J43980). Each item can be ordered
separately as needed.
URETHANE PADS [1.5 mm (0.059 in) thick]
Insulates connectors, harness, etc.
76268-9E005: 100 ×135 mm (3.94 ×5.31 in)/76884-71L01: 60 ×85 mm (2.36 ×3.35 in)/76884-
71L02: 15 ×25 mm (0.59 ×0.98 in)
INSULATOR (Foam blocks)
Insulates components from contact. Can be used to fill space behind a panel.
73982-9E000: 45 mm (1.77 in) thick, 50 ×50 mm (1.97 ×1.97 in)/73982-
50Y00: 10 mm (0.39 in) thick, 50 ×50 mm (1.97 ×1.97 in)
INSULATOR (Light foam block)
80845-71L00: 30 mm (1.18 in) thick, 30 ×50 mm (1.18 ×1.97 in)
FELT CLOTHTAPE
Used to insulate where movement does not occu r. Ideal for instrument panel applications.
68370-4B000: 15 ×25 mm (0.59 ×0.98 in) pad/68239-13E00: 5 mm (0.20 in) wide tape roll. The following
materials, not found in the kit, can al so be used to repair squeaks and rattles.
UHMW (TEFLON) TAPE
3AA93ABC3ACD3AC03ACA3AC03AC63AC53A913A773A893A873A873A8E3A773A983AC73AC93AC03AC3
3A893A873A873A8F3A773A9D3AAF3A8A3A8C3A863A9D3AAF3A8B3A8C
Page 2921 of 3924

GW-8
< SERVICE INFORMATION >
SQUEAK AND RATTLE TROUBLE DIAGNOSES
Most of these incidents can be repaired by adjusting, securing or insulatingthe item(s) or component(s) caus-
ing the noise.
SUNROOF/HEADLINING
Noises in the sunroof/headlining area c an often be traced to one of the following:
1. Sunroof lid, rail, linkage or seals making a rattle or light knockingnoise
2. Sunvisor shaft shaking in the holder
3. Front or rear windshield touching headlining and squeaking
Again, pressing on the components to stop the noise while duplicatingthe conditions can isolate most of these
incidents. Repairs usually consistof insulating with felt cloth tape.
SEATS
When isolating seat noise it's important to note the pos ition the seatis in and the load placed on the seat when
the noise is present. These conditionsshould be duplic ated when verifying and isolating the cause of the
noise.
Cause of seat noise include:
1. Headrest rods and holder
2. A squeak between the seat pad cushion and frame
3. The rear seatback lock and bracket
These noises can be isolated by moving or pressing on the suspectedcomponents while duplicating the condi-
tions under which the noise occurs.Most of these incidents can be repaired by repositioning the component
orapplying urethane tape to the contact area.
UNDERHOOD
Some interior noise may be caused by components under the hood or onthe engine wall. The noise is then
transmitted into the passenger compartment.
Causes of transmitted underhood noise include:
1. Any component mounted to the engine wall
2. Components that pass through the engine wall
3. Engine wall mounts and connectors
4. Loose radiator mounting pins
5. Hood bumpers out of adjustment
6. Hood striker out of adjustment
These noises can be difficult to isolate since they cannot be reached from the interior of the vehicle. The best
method is to secure, move or insulate one component at a time and test drive the \
vehicle. Also, engine RPM
or load can be changed to isolate the noise. Repairs can usually be made by moving, adjusting, securing, or
insulating the component causing the noise.
3AA93ABC3ACD3AC03ACA3AC03AC63AC53A913A773A893A873A873A8E3A773A983AC73AC93AC03AC3
3A893A873A873A8F3A773A9D3AAF3A8A3A8C3A863A9D3AAF3A8B3A8C
Page 2925 of 3924
GW-12
< SERVICE INFORMATION >
WINDSHIELD GLASS
CAUTION:
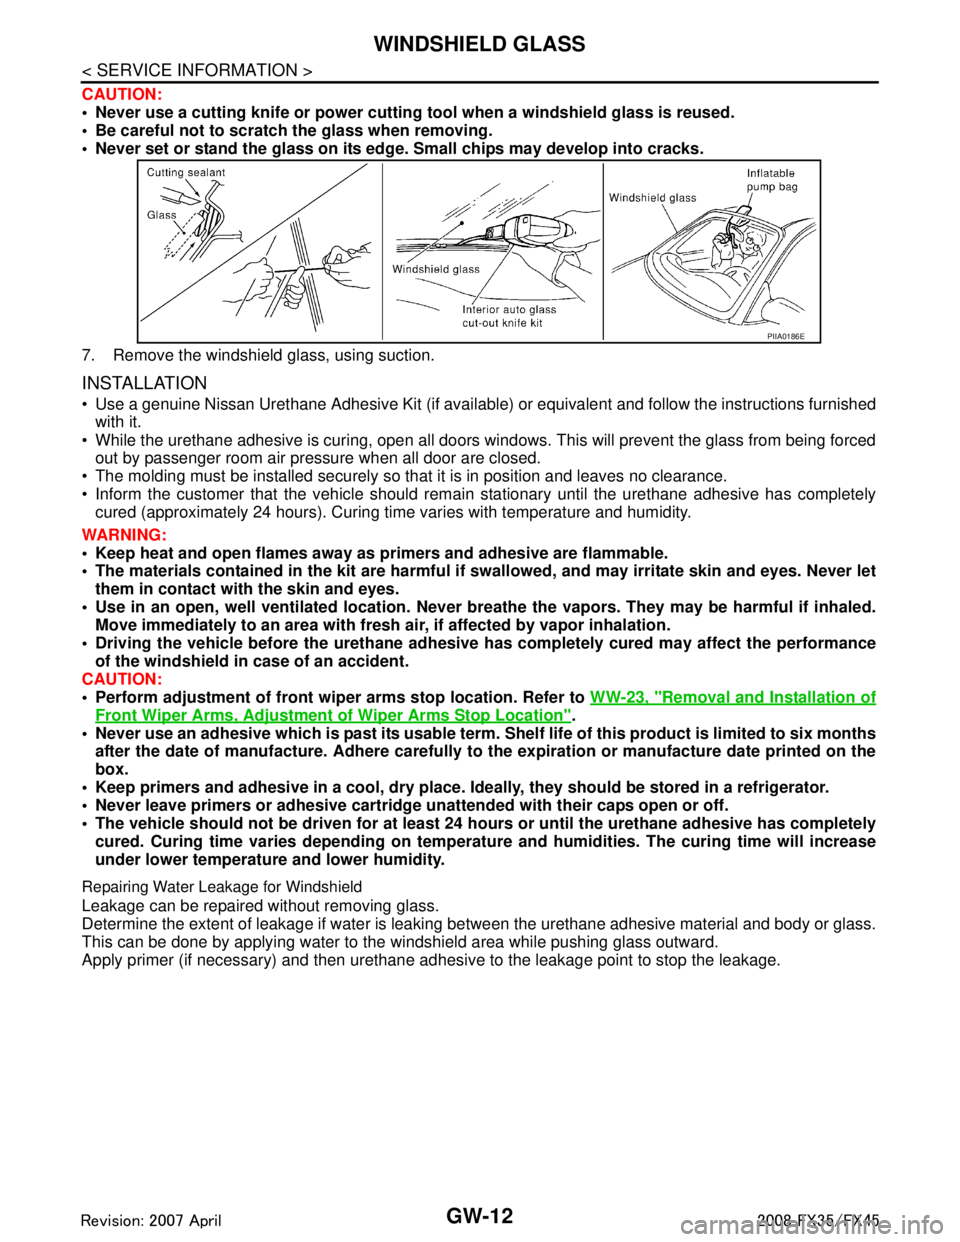
Never use a cutting knife or power cutting tool when a windshield glass is reused.
Be careful not to scratch the glass when removing.
Never set or stand the glass on its edge. Small chips may develop into cracks.
7. Remove the windshield glass, using suction.
INSTALLATION
Use a genuine Nissan Urethane Adhesive Kit (if available) or equivalent and follow the instructions furnished
with it.
While the urethane adhesive is curing, open all doors windows. This will prevent the glass from being forced out by passenger room air pressure when all door are closed.
The molding must be installed securely so that it is in position and leaves no clearance.
Inform the customer that the vehicle should rema in stationary until the urethane adhesive has completely
cured (approximately 24 hours). Curing time varies with temperature and humidity.
WARNING:
Keep heat and open flames away as primers and adhesive are flammable.
The materials contained in the ki t are harmful if swallowed, and may irritate skin and eyes. Never let
them in contact with the skin and eyes.
Use in an open, well ventilated location. Never br eathe the vapors. They may be harmful if inhaled.
Move immediately to an area with fresh ai r, if affected by vapor inhalation.
Driving the vehicle before the urethane adhesive has completely cured may affect the performance
of the windshield in case of an accident.
CAUTION:
Perform adjustment of front wipe r arms stop location. Refer to WW-23, "
Removal and Installation of
Front Wiper Arms, Adjustment of Wiper Arms Stop Location".
Never use an adhesive which is past its usable term. Shelf life of this product is limited to six months
after the date of manufacture. Adhere carefully to the expiration or manufacture date printed on the
box.
Keep primers and adhesive in a c ool, dry place. Ideally, they should be stored in a refrigerator.
Never leave primers or adhesive cartridge un attended with their caps open or off.
The vehicle should not be driven for at least 24 hours or until the urethane adhesive has completely
cured. Curing time varies depending on temperat ure and humidities. The curing time will increase
under lower temperature and lower humidity.
Repairing Water Leakage for Windshield
Leakage can be repaired without removing glass.
Determine the extent of leakage if water is leaki ng between the urethane adhesive material and body or glass.
This can be done by applying water to the windshield area while pushing glass outward.
Apply primer (if necessary) and then urethane adhesiv e to the leakage point to stop the leakage.
PIIA0186E
3AA93ABC3ACD3AC03ACA3AC03AC63AC53A913A773A893A873A873A8E3A773A983AC73AC93AC03AC3
3A893A873A873A8F3A773A9D3AAF3A8A3A8C3A863A9D3AAF3A8B3A8C
Page 2927 of 3924
GW-14
< SERVICE INFORMATION >
BACK DOOR WINDOW GLASS
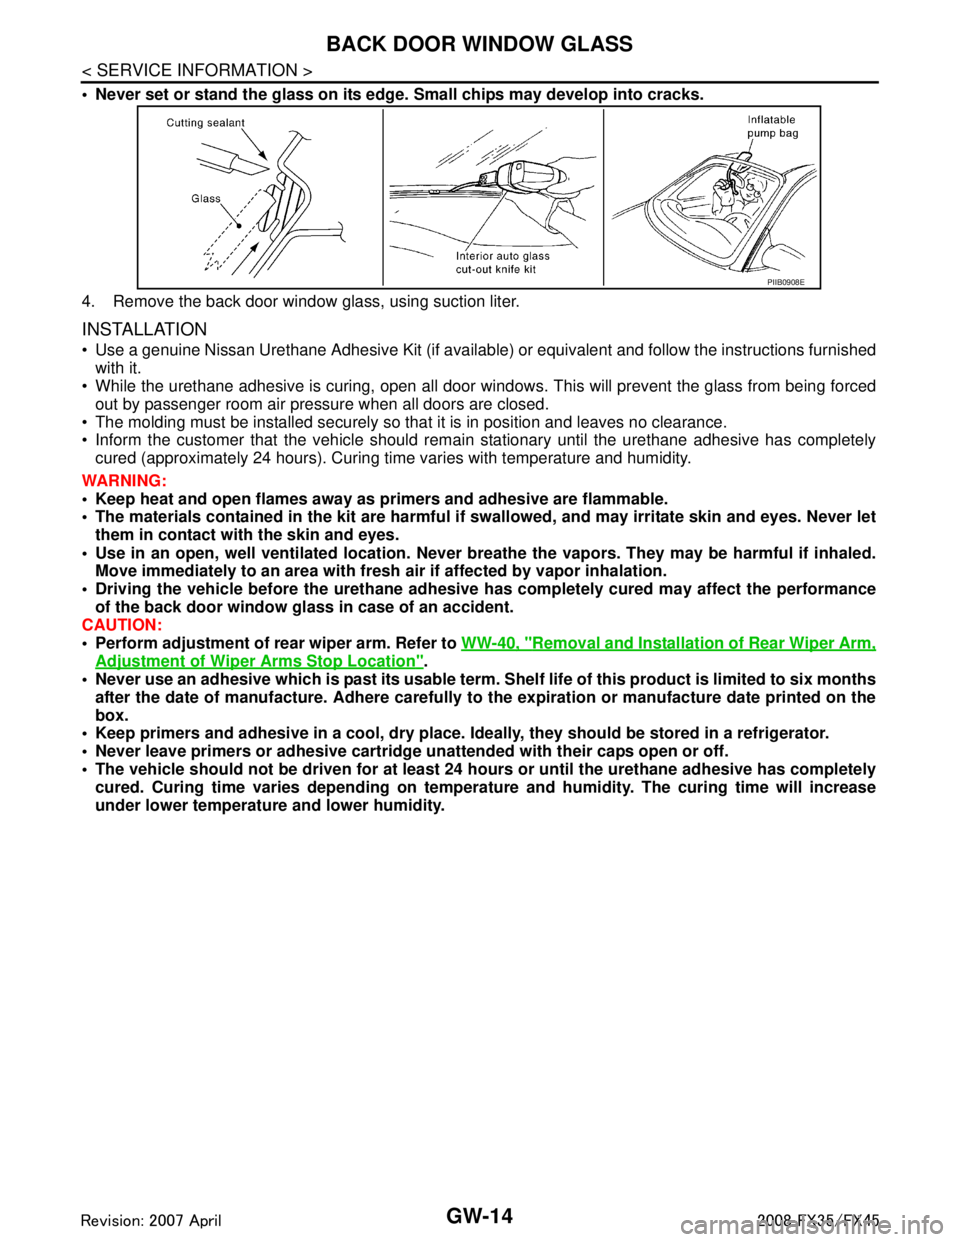
Never set or stand the glass on its edge. Small chips may develop into cracks.
4. Remove the back door window glass, using suction liter.
INSTALLATION
Use a genuine Nissan Urethane Adhesive Kit (if available) or equivalent and follow the instructions furnished
with it.
While the urethane adhesive is curing, open all door window s. This will prevent the glass from being forced
out by passenger room air pressure when all doors are closed.
The molding must be installed securely so that it is in position and leaves no clearance.
Inform the customer that the vehicle should rema in stationary until the urethane adhesive has completely
cured (approximately 24 hours). Curing time varies with temperature and humidity.
WARNING:
Keep heat and open flames away as primers and adhesive are flammable.
The materials contained in the ki t are harmful if swallowed, and may irritate skin and eyes. Never let
them in contact with the skin and eyes.
Use in an open, well ventilated location. Never br eathe the vapors. They may be harmful if inhaled.
Move immediately to an area with fresh air if affected by vapor inhalation.
Driving the vehicle before the urethane adhesive has completely cured may affect the performance
of the back door window gl ass in case of an accident.
CAUTION:
Perform adjustment of rear wiper arm. Refer to WW-40, "
Removal and Installation of Rear Wiper Arm,
Adjustment of Wiper Arms Stop Location".
Never use an adhesive which is past its usable term. Shelf life of this product is limited to six months
after the date of manufacture. Adhere carefully to the expiration or manufacture date printed on the
box.
Keep primers and adhesive in a c ool, dry place. Ideally, they should be stored in a refrigerator.
Never leave primers or adhesive cartridge un attended with their caps open or off.
The vehicle should not be driven for at least 24 hours or until the urethane adhesive has completely
cured. Curing time varies depe nding on temperature and humidity . The curing time will increase
under lower temperature and lower humidity.
PIIB0908E
3AA93ABC3ACD3AC03ACA3AC03AC63AC53A913A773A893A873A873A8E3A773A983AC73AC93AC03AC3
3A893A873A873A8F3A773A9D3AAF3A8A3A8C3A863A9D3AAF3A8B3A8C
Page 2962 of 3924

SIDE WINDOW GLASSGW-49
< SERVICE INFORMATION >
C
DE
F
G H
J
K L
M A
B
GW
N
O P
While the urethane adhesive is curing, open all door window s. This will prevent the glass from being forced
out by passenger room air pressure when all doors are closed.
The molding must be installed securely so that it is in position and leaves no clearance.
Inform the customer that the v ehicle should remain stationary until the urethane adhesive has completely
cured (approximately 24 hours). Curing time varies with temperature and humidity.
WARNING:
Keep heat and open flames away as primers and adhesive are flammable.
The materials contained in the ki t are harmful if swallowed, and may irritate skin and eyes. Never let
them in contact with the skin and eyes.
Use in an open, well ventilated location. Never breathe the vapors. They may be harmful if inhaled.
Move immediately to an area with fresh air if affected by vapor inhalation.
Driving the vehicle before the urethane adhesive has completely cured may affect the performance
of the side window in case of an accident.
CAUTION:
Never use an adhesive which is past its usable term. Shelf life of this product is limited to six months
after the date of manufacture. Adhere carefully to the expiration or manufacture date printed on the
box.
Keep primers and adhesive in a cool, dry place. Id eally, they should be stored in a refrigerator.
Never leave primers or adhesive cartridge un attended with their caps open or off.
The vehicle should not be driven for at least 24 hours or until the urethane adhesive has completely
cured. Curing time varies depend ing on temperature and humidities. The curing time will increase
under lower temperature and lower humidity.
Repairing Water Leakage for side window glass
Leakage can be repaired without removing glass.
Determine the extent of leakage if water is leaki ng between the urethane adhesive material and body or glass.
This can be done by applying water to the side window area while pushing glass outward.
Apply primer (if necessary) and then urethane adhes ive to the leakage point to stop the leakage.
3AA93ABC3ACD3AC03ACA3AC03AC63AC53A913A773A893A873A873A8E3A773A983AC73AC93AC03AC3
3A893A873A873A8F3A773A9D3AAF3A8A3A8C3A863A9D3AAF3A8B3A8C
Page 2965 of 3924
GW-52
< SERVICE INFORMATION >
FRONT DOOR GLASS AND REGULATOR
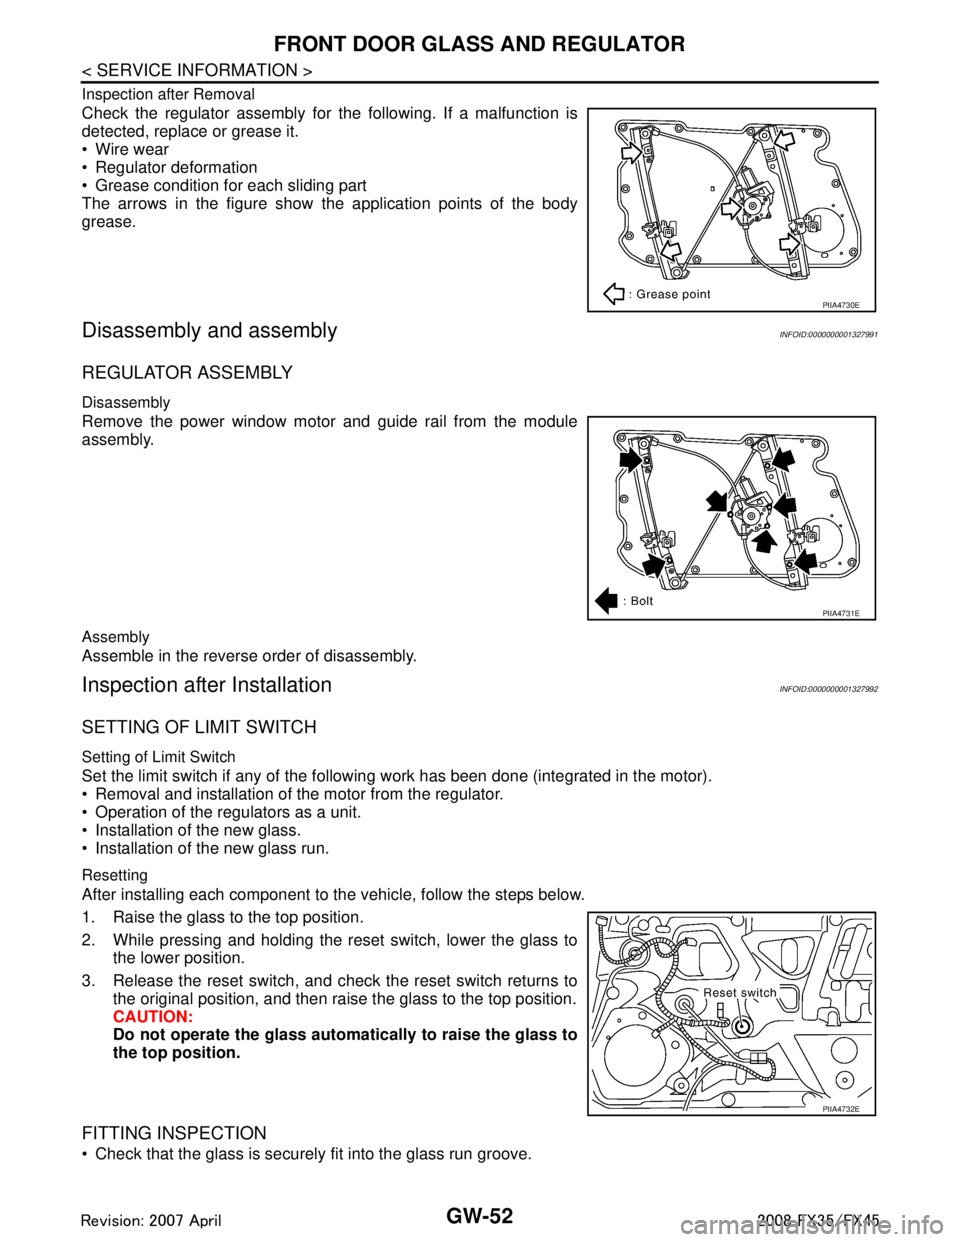
Inspection after Removal
Check the regulator assembly for the following. If a malfunction is
detected, replace or grease it.
Wire wear
Regulator deformation
Grease condition for each sliding part
The arrows in the figure show the application points of the body
grease.
Disassembly and assemblyINFOID:0000000001327991
REGULATOR ASSEMBLY
Disassembly
Remove the power window motor and guide rail from the module
assembly.
Assembly
Assemble in the reverse order of disassembly.
Inspection after InstallationINFOID:0000000001327992
SETTING OF LIMIT SWITCH
Setting of Limit Switch
Set the limit switch if any of the following work has been done (integrated in the motor).
Removal and installation of the motor from the regulator.
Operation of the regulators as a unit.
Installation of the new glass.
Installation of the new glass run.
Resetting
After installing each component to the vehicle, follow the steps below.
1. Raise the glass to the top position.
2. While pressing and holding the reset switch, lower the glass to the lower position.
3. Release the reset switch, and check the reset switch returns to the original position, and then rais e the glass to the top position.
CAUTION:
Do not operate the glass automa tically to raise the glass to
the top position.
FITTING INSPECTION
Check that the glass is securely fit into the glass run groove.
PIIA4730E
PIIA4731E
PIIA4732E
3AA93ABC3ACD3AC03ACA3AC03AC63AC53A913A773A893A873A873A8E3A773A983AC73AC93AC03AC3
3A893A873A873A8F3A773A9D3AAF3A8A3A8C3A863A9D3AAF3A8B3A8C