2007 TOYOTA SIENNA check engine
[x] Cancel search: check enginePage 1804 of 3000

AX–12U151F AUTOMATIC TRANSAXLE – AUTOMATIC TRANSAXLE SYSTEM
AX
(d) 2 position test:
Shift into the 2 position and fully depress the
accelerator pedal and check the following points.
(1) Check up-shift operation.
Check that the 1
2 up-shift takes place and
that the shift point conforms to the automatic
shift schedule (See page SS-31).
HINT:
There is no 3rd up-shift and lock-up in the 2
position.
(2) Check engine braking.
While running in the 2 position and 2nd gear,
release the accelerator pedal and check the
engine braking effect.
(3) Check for abnormal noise during acceleration
and deceleration, and for shock at up-shift and
down-shift.
(e) L position test:
Shift into the L position and fully depress the
accelerator pedal and check the following points.
(1) Check no up-shift.
While running in the L position, check that there
is no up-shift to 2nd gear.
HINT:
There is no lock-up in the L position.
(2) Check engine braking.
While running in the L position, release the
accelerator pedal and check the engine braking
effect.
(3) Check for abnormal noise during acceleration
and deceleration.
(f) R position test:
Shift into the R position and fully depress the
accelerator pedal and check for slipping.
CAUTION:
Before conducting this test ensure that the test
area is free from people and obstruction.
(g) P position test:
Stop the vehicle on the grade (more than 5
) and
after shifting into the P position, release the parking
brake. Then, check that the parking lock pawl holds
the vehicle in place.
(h) Uphill/downhill control function test:
(1) Check that the gear does not up-shift to the 4th
or 5th gear while the vehicle is driving uphill.
(2) Check that the gear automatically down-shifts
from 5th to 4th or from the 4th to 3rd gear when
brake is applied while the vehicle is driving
downhill.
Page 1805 of 3000

U151F AUTOMATIC TRANSAXLE – AUTOMATIC TRANSAXLE FLUIDAX–123
AX
AUTOMATIC TRANSAXLE FLUID
ON-VEHICLE INSPECTION
1. CHECK FLUID LEVEL
HINT:
Drive the vehicle so that the engine and transaxle are at
normal operating temperature.
Fluid temperature:
70 to 80
C (158 to 176F)
(a) Park the vehicle on a level surface and set the
parking brake.
(b) With the engine idling and the brake pedal
depressed, move the shift lever to all positions from
P to L and return to the P position.
(c) Take out the dipstick and wipe it clean.
(d) Put the dipstick back all the way.
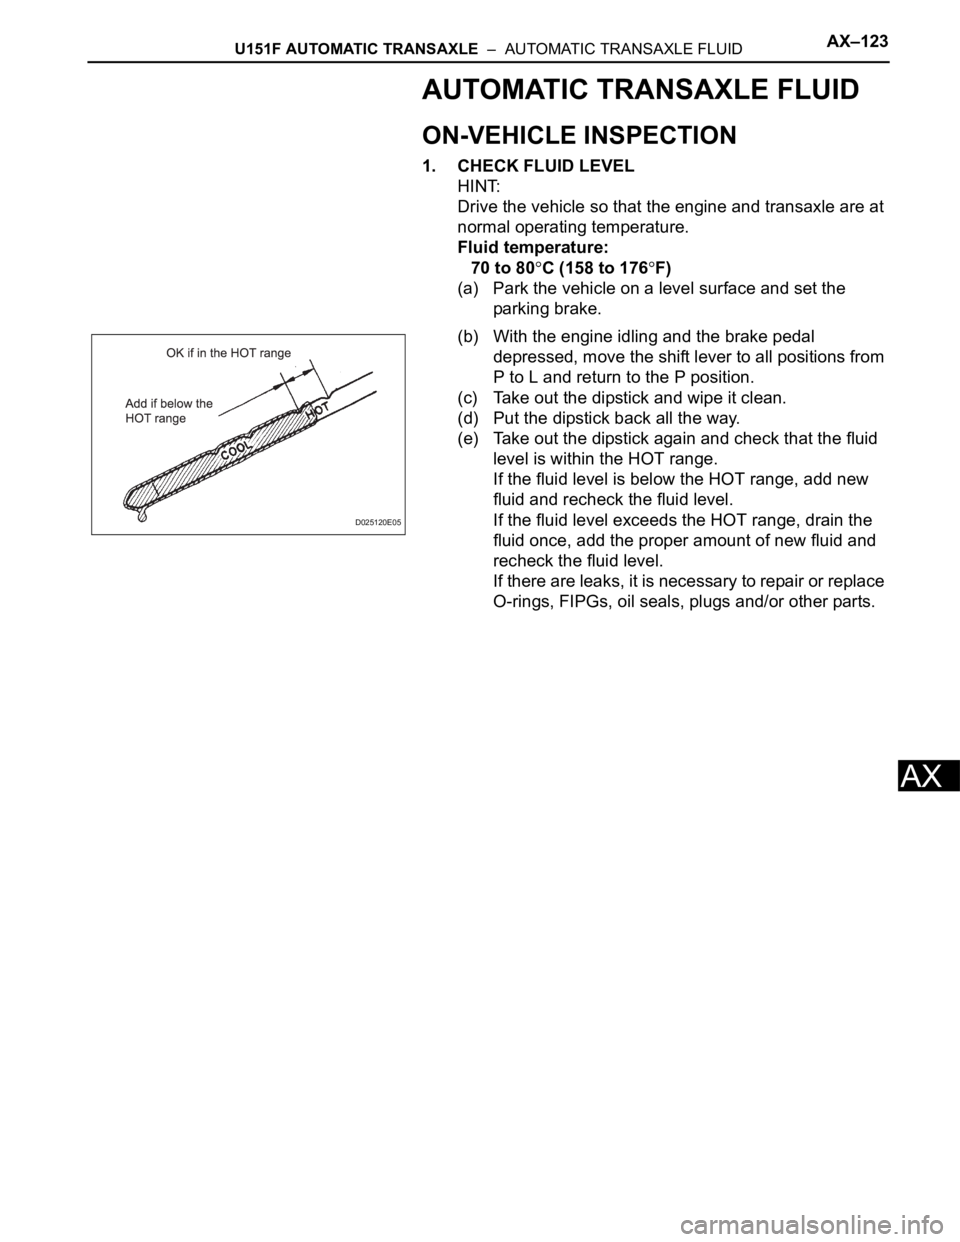
(e) Take out the dipstick again and check that the fluid
level is within the HOT range.
If the fluid level is below the HOT range, add new
fluid and recheck the fluid level.
If the fluid level exceeds the HOT range, drain the
fluid once, add the proper amount of new fluid and
recheck the fluid level.
If there are leaks, it is necessary to repair or replace
O-rings, FIPGs, oil seals, plugs and/or other parts.
D025120E05
Page 1806 of 3000

U151F AUTOMATIC TRANSAXLE – AUTOMATIC TRANSAXLE SYSTEMAX–13
AX
MECHANICAL SYSTEM TESTS
1. PERFORM MECHANICAL SYSTEM TESTS
(a) Measure the stall speed.
The object of this test is to check the overall
performance of the transaxle and engine by
measuring the stall speeds in the D position.
NOTICE:
• Driving test should be done on a paved road
(a nonskid road).
• Perform the test at the normal operating ATF
(Automatic Transmission Fluid) temperature
50 to 80
C (122 to 176F).
• Do not continuously run this test for longer
than 10 seconds.
• To ensure safety, do this test in a wide, clear
level area which provides good traction.
• The stall test should always be carried out in
pairs. One technician should observe the
conditions of wheels or wheel stoppers
outside the vehicle while the other is doing
the test.
(1) Chock the 4 wheels.
(2) Connect the intelligent tester together with the
CAN VIM (controller area network vehicle
interface module) to the DLC3.
(3) Fully apply the parking brake.
(4) Keep your left foot pressed firmly on the brake
pedal.
(5) Start the engine.
(6) Shift into the D position. Press all the way down
on the accelerator pedal with your right foot.
(7) Quickly read the stall speed at this time.
Stall speed:
2,600 +- 150 rpm
Evaluation:
Problem Possible cause
(a) Stall engine speed is low in D position• Engine power output may be insufficient
• Stator one-way clutch not operating properly
HINT:
If the value is less than the specified value by 600 rpm or more, the
torque converter could be faulty.
(b) Stall engine speed is high in D position• Line pressure is too low
• Forward clutch slipping
• U/D (Underdrive) brake slipping
• U/D (Underdrive) one-way clutch is not operating properly
• No.1 one-way clutch not operating properly
• Improper fluid level
Page 1807 of 3000

AX–14U151F AUTOMATIC TRANSAXLE – AUTOMATIC TRANSAXLE SYSTEM
AX
(b) Measure the time lag.
(1) When the shift lever is shifted while the engine is
idling, there will be a certain time lapse or lag
before the shock can be felt. This is used for
checking the condition of the clutch and brake.
NOTICE:
• Perform the test at the normal operating
ATF (Automatic Transmission Fluid)
temperature: 50 to 80
C (122 to 176F).
• Be sure to allow 1 minute interval between
tests.
• Perform the test three times, and measure
the time lags. Calculate the average value
of the three time lags.
• When conducting stall test, do not
continue more than 10 seconds.
(2) Connect the intelligent tester together with the
CAN VIM (controller area network vehicle
interface module) to the DLC3.
(3) Fully apply the parking brake.
(4) Start and warm up the engine and check idle
speed.
Idle speed:
approx. 700 rpm (In N position and A/C
OFF)
(5) Shift the lever from N to D position. Using a stop
watch, measure the time from when the lever is
shifted until the shock is felt.
Time lag:
N
D less than 1.2 seconds
(6) In the same way, measure the time lag for N
R.
Time lag:
N
R less than 1.5 seconds
Evaluation (If N
D or N R time lag is longer than the specified):
Problem Possible cause
N
D time lag is longer• Line pressure is too low
• Forward clutch worn
• No.1 one-way clutch is not operating properly
• U/D (Underdrive) one-way clutch is not operating
• U/D (Underdrive) brake worn
N
R time lag is longer• Line pressure is too low
• Reverse clutch worn
• 1st and reverse brake worn
• U/D (Underdrive) brake worn
Page 1808 of 3000

U151F AUTOMATIC TRANSAXLE – AUTOMATIC TRANSAXLE SYSTEMAX–15
AX
HYDRAULIC TEST
1. PERFORM HYDRAULIC TEST
(a) Measure the line pressure.
NOTICE:
• Perform the test at the normal operating ATF
(Automatic Transmission Fluid) temperature:
50 to 80
C (122 to 176F).
• The line pressure test should always be
carried out in pairs. One technician should
observe the conditions of wheels or wheel
stoppers outside the vehicle while the other
is performing the test.
• Be careful to prevent SST hose from
interfering with the exhaust pipe.
• This Check must be conducted after checking
and adjusting engine.
• Perform under condition that A/C is OFF.
• When conducting stall test, do not continue
more than 10 seconds.
(1) Warm up the ATF (Automatic Transmission
Fluid).
(2) Lift the vehicle up.
(3) Remove the engine under cover.
(4) Connect the intelligent tester together with the
CAN VIM (controller area network vehicle
interface module) to the DLC3.
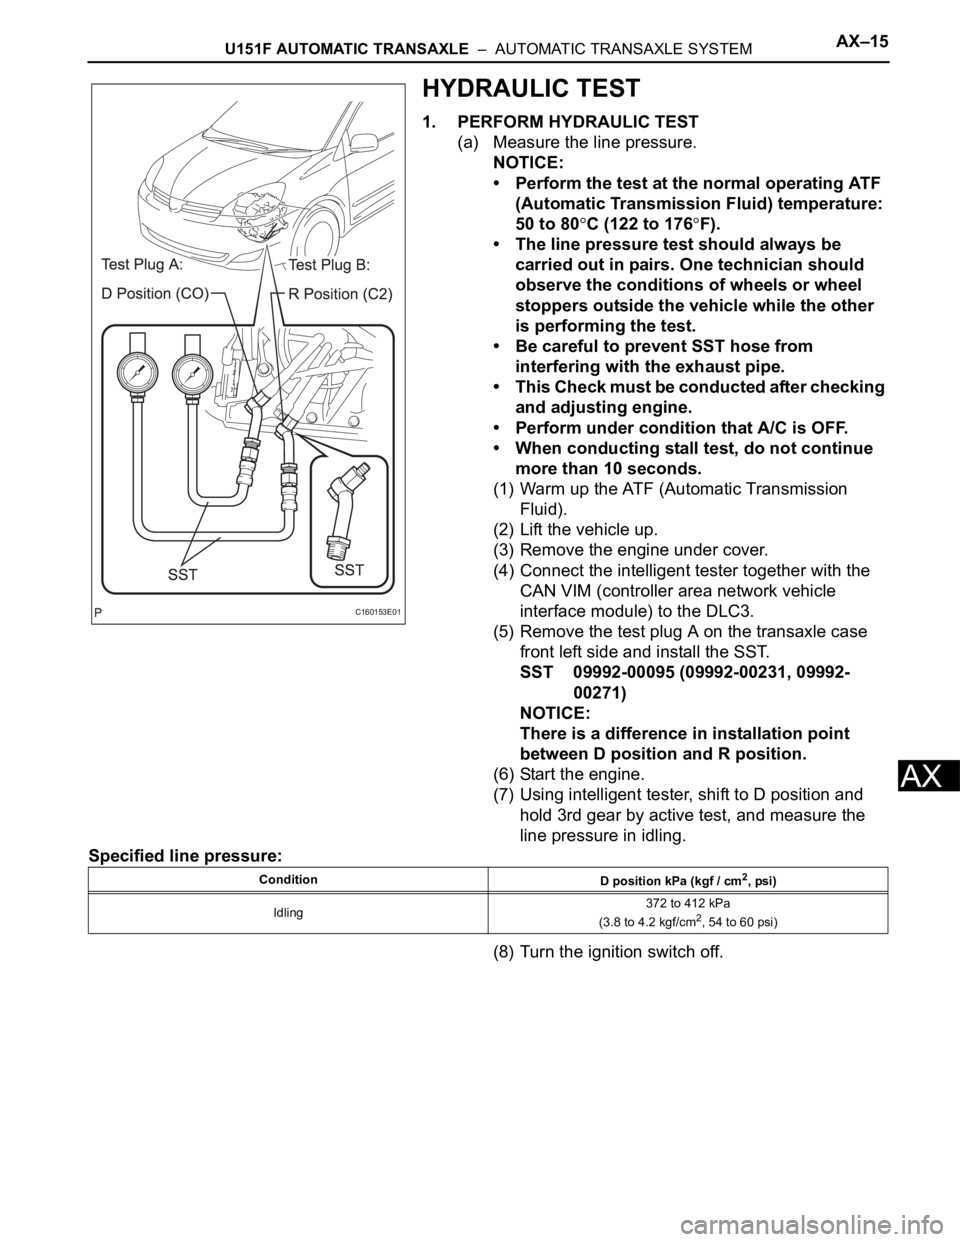
(5) Remove the test plug A on the transaxle case
front left side and install the SST.
SST 09992-00095 (09992-00231, 09992-
00271)
NOTICE:
There is a difference in installation point
between D position and R position.
(6) Start the engine.
(7) Using intelligent tester, shift to D position and
hold 3rd gear by active test, and measure the
line pressure in idling.
Specified line pressure:
(8) Turn the ignition switch off.
C160153E01
Condition
D position kPa (kgf / cm2, psi)
Idling372 to 412 kPa
(3.8 to 4.2 kgf/cm
2, 54 to 60 psi)
Page 1809 of 3000

AX–16U151F AUTOMATIC TRANSAXLE – AUTOMATIC TRANSAXLE SYSTEM
AX
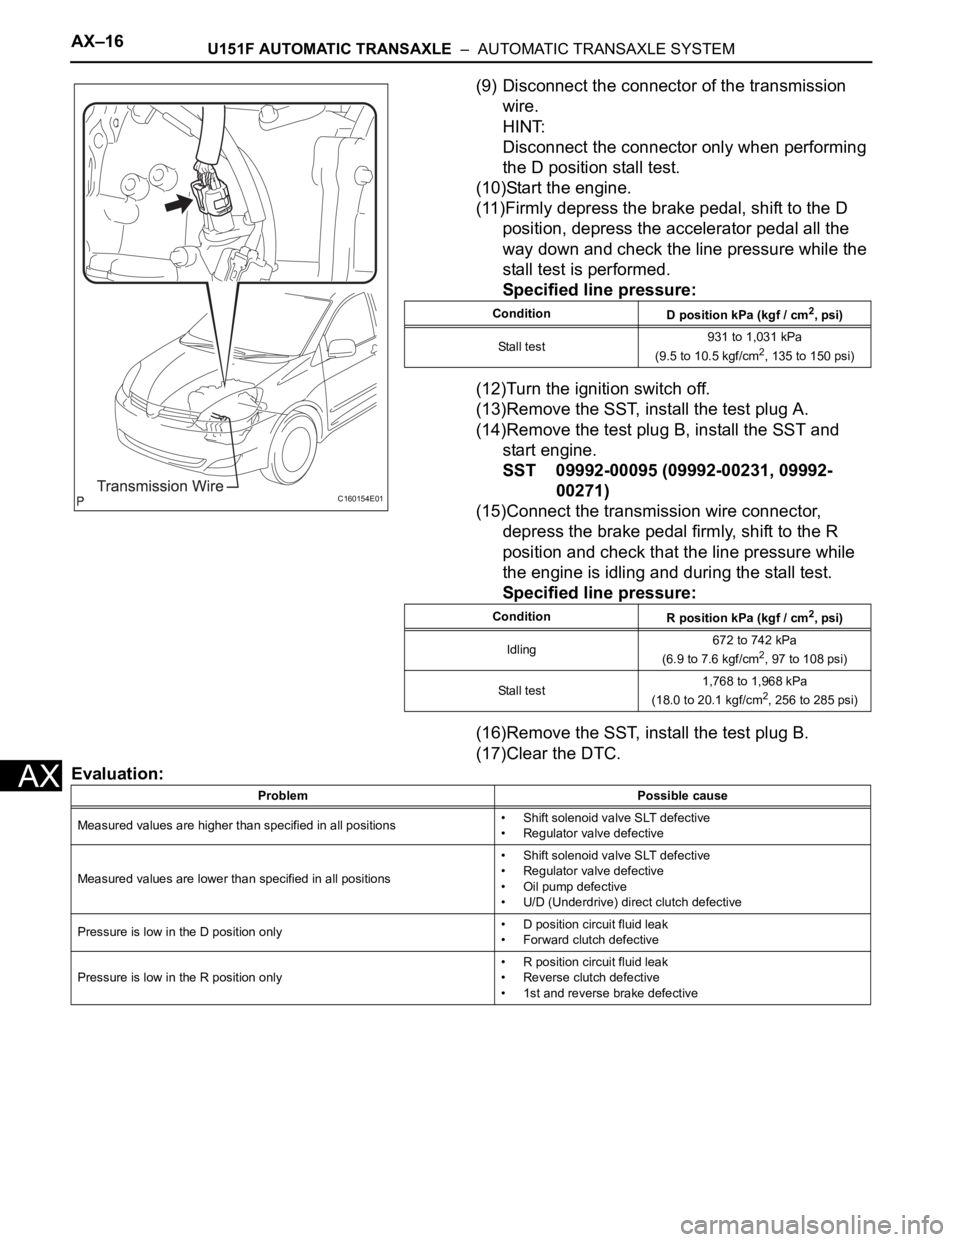
(9) Disconnect the connector of the transmission
wire.
HINT:
Disconnect the connector only when performing
the D position stall test.
(10)Start the engine.
(11)Firmly depress the brake pedal, shift to the D
position, depress the accelerator pedal all the
way down and check the line pressure while the
stall test is performed.
Specified line pressure:
(12)Turn the ignition switch off.
(13)Remove the SST, install the test plug A.
(14)Remove the test plug B, install the SST and
start engine.
SST 09992-00095 (09992-00231, 09992-
00271)
(15)Connect the transmission wire connector,
depress the brake pedal firmly, shift to the R
position and check that the line pressure while
the engine is idling and during the stall test.
Specified line pressure:
(16)Remove the SST, install the test plug B.
(17)Clear the DTC.
Evaluation:
C160154E01
Condition
D position kPa (kgf / cm2, psi)
Stall test931 to 1,031 kPa
(9.5 to 10.5 kgf/cm
2, 135 to 150 psi)
Condition
R position kPa (kgf / cm
2, psi)
Idling672 to 742 kPa
(6.9 to 7.6 kgf/cm
2, 97 to 108 psi)
Stall test1,768 to 1,968 kPa
(18.0 to 20.1 kgf/cm
2, 256 to 285 psi)
Problem Possible cause
Measured values are higher than specified in all positions• Shift solenoid valve SLT defective
• Regulator valve defective
Measured values are lower than specified in all positions• Shift solenoid valve SLT defective
• Regulator valve defective
• Oil pump defective
• U/D (Underdrive) direct clutch defective
Pressure is low in the D position only• D position circuit fluid leak
• Forward clutch defective
Pressure is low in the R position only• R position circuit fluid leak
• Reverse clutch defective
• 1st and reverse brake defective
Page 1810 of 3000

U151F AUTOMATIC TRANSAXLE – PARK / NEUTRAL POSITION SWITCHAX–127
AX
INSPECTION
1. INSPECT PARK/NEUTRAL POSITION SWITCH
ASSEMBLY OPERATION
(a) Apply the parking brake and turn the ignition switch
to the ON position.
(b) Depress the brake pedal and check that the engine
starts only when the shift lever is in the N or P
position and the engine does not start when the shift
lever is in other positions.
(c) Check that the back up light comes on and the
reverse warning buzzer sounds only when the shift
lever is in the R position and the light and buzzer do
not operate when the shift lever is in other positions.
(d) If a failure is found, check the park/neutral position
switch for continuity.
2. INSPECT PARK/NEUTRAL POSITION SWITCH
ASSEMBLY
(a) Jack up the vehicle.
(b) Disconnect the park/neutral position switch
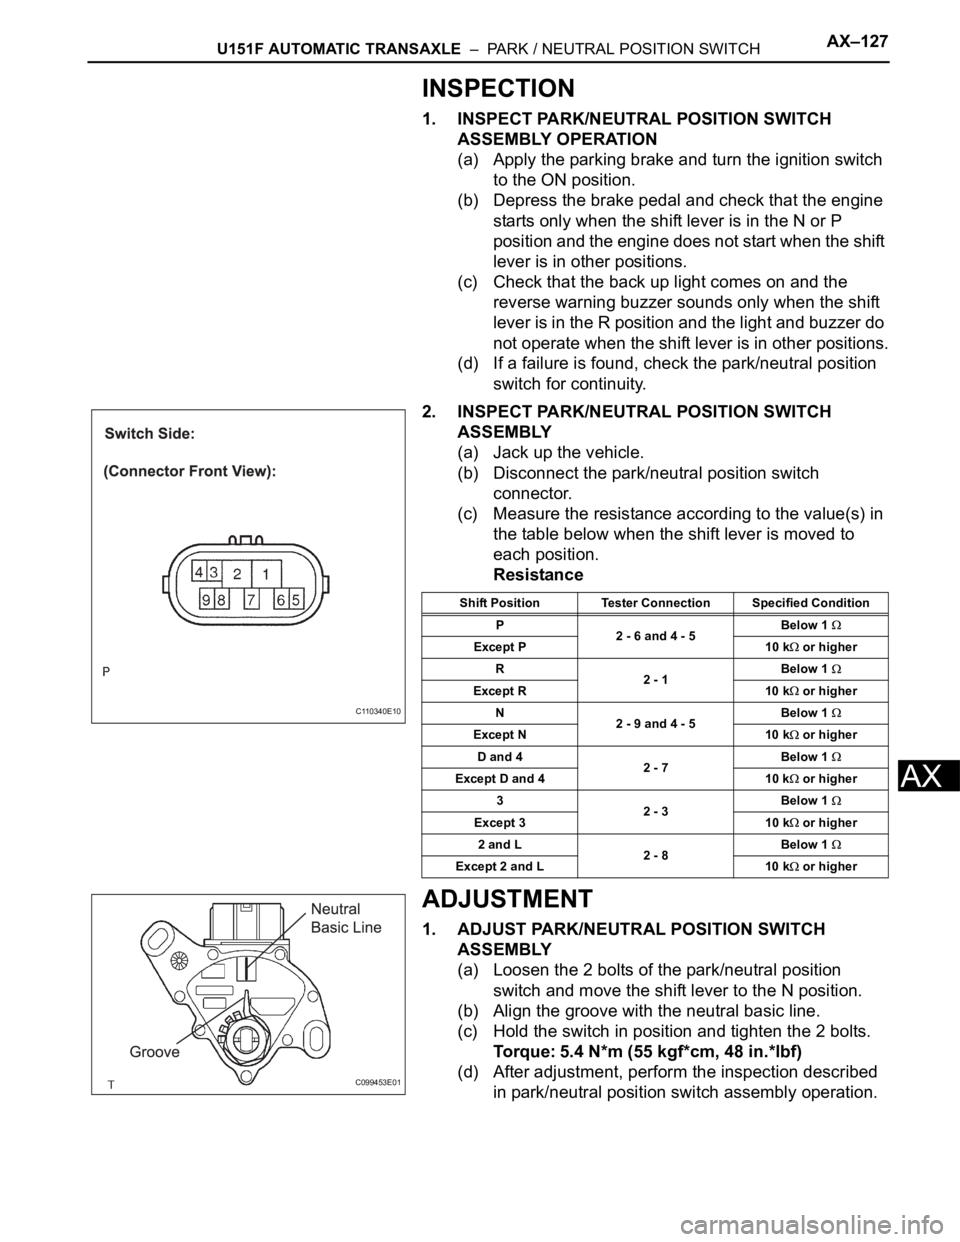
connector.
(c) Measure the resistance according to the value(s) in
the table below when the shift lever is moved to
each position.
Resistance
ADJUSTMENT
1. ADJUST PARK/NEUTRAL POSITION SWITCH
ASSEMBLY
(a) Loosen the 2 bolts of the park/neutral position
switch and move the shift lever to the N position.
(b) Align the groove with the neutral basic line.
(c) Hold the switch in position and tighten the 2 bolts.
Torque: 5.4 N*m (55 kgf*cm, 48 in.*lbf)
(d) After adjustment, perform the inspection described
in park/neutral position switch assembly operation.
C110340E10
Shift Position Tester Connection Specified Condition
P
2 - 6 and 4 - 5Below 1
Except P 10 k or higher
R
2 - 1Below 1
Except R 10 k or higher
N
2 - 9 and 4 - 5Below 1
Except N 10 k or higher
D and 4
2 - 7Below 1
Except D and 4 10 k or higher
3
2 - 3Below 1
Except 3 10 k or higher
2 and L
2 - 8Below 1
Except 2 and L 10 k or higher
C099453E01
Page 1820 of 3000

AX–20U151F AUTOMATIC TRANSAXLE – AUTOMATIC TRANSAXLE SYSTEM
AX
MONITOR DRIVE PATTERN
1. MONITOR DRIVE PATTERN FOR ECT TEST
(a) Perform this drive pattern as one method to
simulate the detection conditions of the ECT
malfunctions. (The DTCs may not be detected due
the actual driving conditions. And some codes may
not be detected through this drive pattern.)
HINT:
Preparation for driving
• Warm up the engine sufficiently. (Engine coolant
temperature is 60
C (140F) or higher)
• Drive the vehicle when the atmospheric
temperature is -10
C (14F) or higher.
(Malfunction is not detected when the
atmospheric temperature is less than -10
C
(14
F))
Driving note
• Drive the vehicle through all gears.
Stop
1st 2nd 3rd 4th 5th 5th
(lock-up ON).
• Repeat the above driving pattern three times or
more.
NOTICE:
• The monitor status can be checked using the
OBD II scan tool or intelligent tester. When
using the intelligent tester, monitor status
can be found in the "ENHANCED OBD II /
DATA LIST" or under "CARB OBD II".
• In the event that the drive pattern must be
interrupted (possibly due to traffic conditions
or other factors), the drive pattern can be
resumed and, in most cases, the monitor can
be completed.
• Perform this drive pattern on a level road as
much as possible and strictly observe the
posted speed limits and traffic laws while
driving.