2007 TOYOTA SIENNA check engine
[x] Cancel search: check enginePage 1763 of 3000

U151F AUTOMATIC TRANSAXLE – AUTOMATIC TRANSAXLE SYSTEMAX–91
AX
ON malfunction (A):
ON malfunction (B):
ON malfunction (C):
INSPECTION PROCEDURE
HINT:
Using the intelligent tester to perform ACTIVE TEST allows relays, VSVs, actuators and other items to be
operated without removing any parts. This non-intrusive functional inspection can be very useful because
intermittent operation may be discovered before parts or wiring is disturbed. Performing ACTIVE TEST
early in troubleshooting is one way to save diagnostic time. DATA LIST information can be displayed while
performing ACTIVE TEST.
1. PERFORM ACTIVE TEST
(a) Warm up the engine.
(b) Turn the ignition switch off.
(c) Connect the intelligent tester together with the CAN VIM (controller area network vehicle
interface module) to the DLC3.
(d) Turn the ignition switch to the ON position.
(e) Turn on the tester.
(f) Select the item "DIAGNOSIS / ENHANCED OBD II / ACTIVE TEST / SHIFT".
(g) According to the display on the tester, perform the "ACTIVE TEST".
HINT:
While driving, the shift position can be forcibly changed with the intelligent tester.
Comparing the shift position commanded by the ACTIVE TEST with the actual shift position enables you
to confirm the problem (See page AX-30).
HINT:
• This test can be conducted when the vehicle speed is 50 km/h (31 mph) or less.
• The shift position commanded by the ECM is shown in the DATA LIST/SHIFT display on the intelligent
tester.
(a) Connect the intelligent tester together with the CAN VIM
(controller area network vehicle interface module) to the
DLC3.
(b) Turn the ignition switch to the ON position and turn the
OBD II scan tool or the intelligent tester main switch ON.
(c) When you use intelligent tester:
Input (turbine) speed/Intermediate shaft speed 2.72 to 2.86
Input (turbine) speed - Intermediate shaft speed 700 rpm or more
Input (turbine) speed - Intermediate shaft speedLess than -500 rpm
or
700 rpm or more
Tester Display Test Part Control Range Diagnostic Note
SHIFT[Test Details]
Operate the shift solenoid valve and set the each
shift position by yourself.
[Vehicle Condition]
• IDL: ON
• Less than 50 km/h (31 mph)
[Others]
• Press "
" button: Shift up
• Press "
" button: Shift down1st/2nd/3rd/4th/5thPossible to check the
operation of the shift
solenoid valves.
1CHECK OTHER DTCS OUTPUT (IN ADDITION TO DTC P0776)
Page 1770 of 3000

AX–98U151F AUTOMATIC TRANSAXLE – AUTOMATIC TRANSAXLE SYSTEM
AX
DESCRIPTION
This sensor detects the rotation speed of the counter gear. By comparing the counter gear speed signal
(NC) with the direct clutch speed sensor signal (NT), the ECM detects the shift timing of the gears and
appropriately controls the engine torque and hydraulic pressure according to various conditions. Thus
smooth gear shifting is performed.
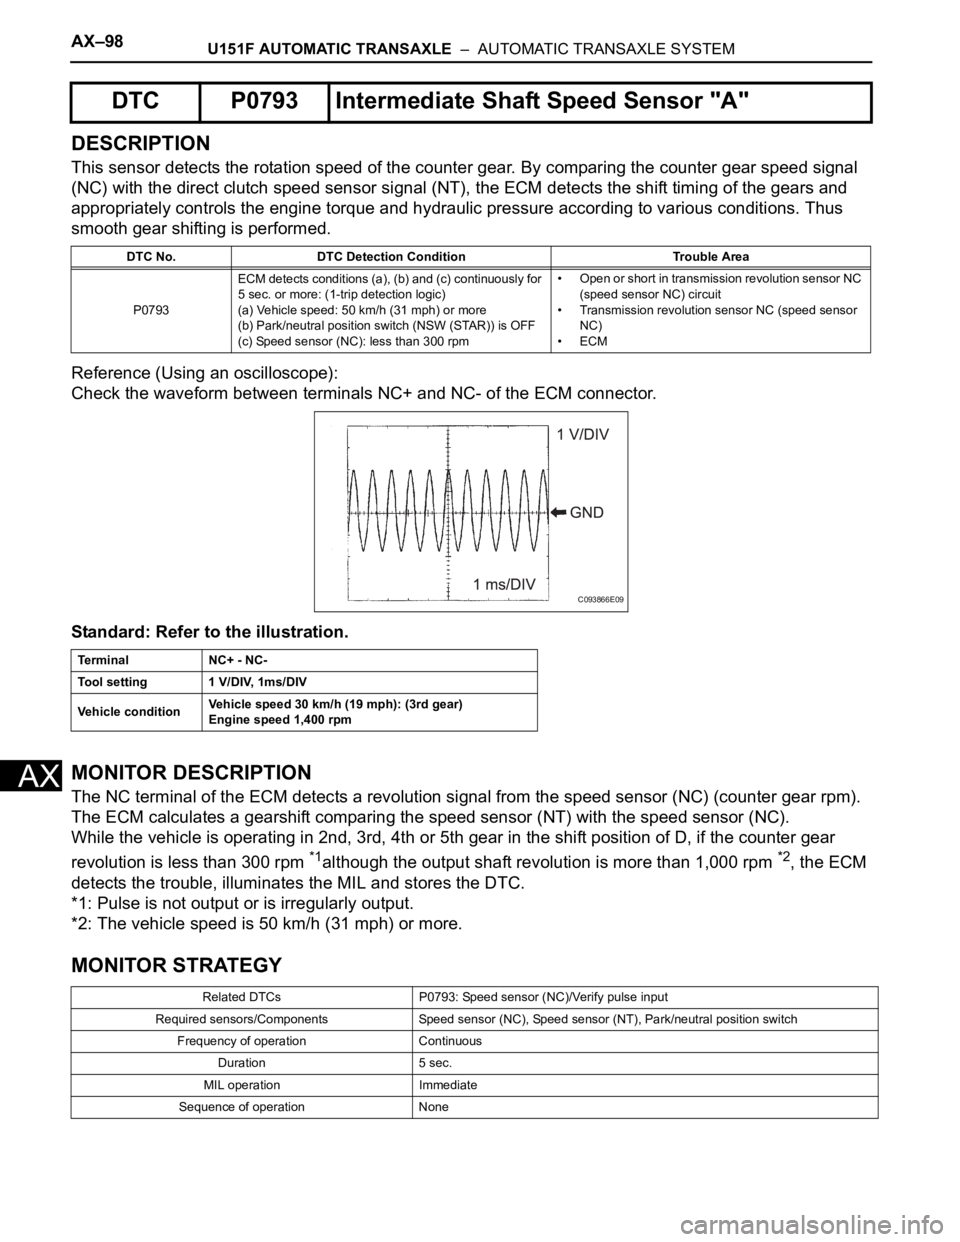
Reference (Using an oscilloscope):
Check the waveform between terminals NC+ and NC- of the ECM connector.
Standard: Refer to the illustration.
MONITOR DESCRIPTION
The NC terminal of the ECM detects a revolution signal from the speed sensor (NC) (counter gear rpm).
The ECM calculates a gearshift comparing the speed sensor (NT) with the speed sensor (NC).
While the vehicle is operating in 2nd, 3rd, 4th or 5th gear in the shift position of D, if the counter gear
revolution is less than 300 rpm
*1although the output shaft revolution is more than 1,000 rpm *2, the ECM
detects the trouble, illuminates the MIL and stores the DTC.
*1: Pulse is not output or is irregularly output.
*2: The vehicle speed is 50 km/h (31 mph) or more.
MONITOR STRATEGY
DTC P0793 Intermediate Shaft Speed Sensor "A"
DTC No. DTC Detection Condition Trouble Area
P0793ECM detects conditions (a), (b) and (c) continuously for
5 sec. or more: (1-trip detection logic)
(a) Vehicle speed: 50 km/h (31 mph) or more
(b) Park/neutral position switch (NSW (STAR)) is OFF
(c) Speed sensor (NC): less than 300 rpm• Open or short in transmission revolution sensor NC
(speed sensor NC) circuit
• Transmission revolution sensor NC (speed sensor
NC)
•ECM
Te r m i n a l N C + - N C -
Tool setting 1 V/DIV, 1ms/DIV
Vehicle conditionVehicle speed 30 km/h (19 mph): (3rd gear)
Engine speed 1,400 rpm
Related DTCs P0793: Speed sensor (NC)/Verify pulse input
Required sensors/Components Speed sensor (NC), Speed sensor (NT), Park/neutral position switch
Frequency of operation Continuous
Duration 5 sec.
MIL operation Immediate
Sequence of operation None
C093866E09
Page 1772 of 3000

AX–100U151F AUTOMATIC TRANSAXLE – AUTOMATIC TRANSAXLE SYSTEM
AX
(g) According to the display on the tester, read the "DATA LIST".
HINT:
• SPD (NC) is always 0 while driving:
Open or short in the sensor or circuit.
• SPD (NC) is always more than 0 and less than 300 rpm while driving the vehicle at 50 km/h (31 mph)
or more:
Sensor trouble, improper installation, or intermittent connection trouble of the circuit.
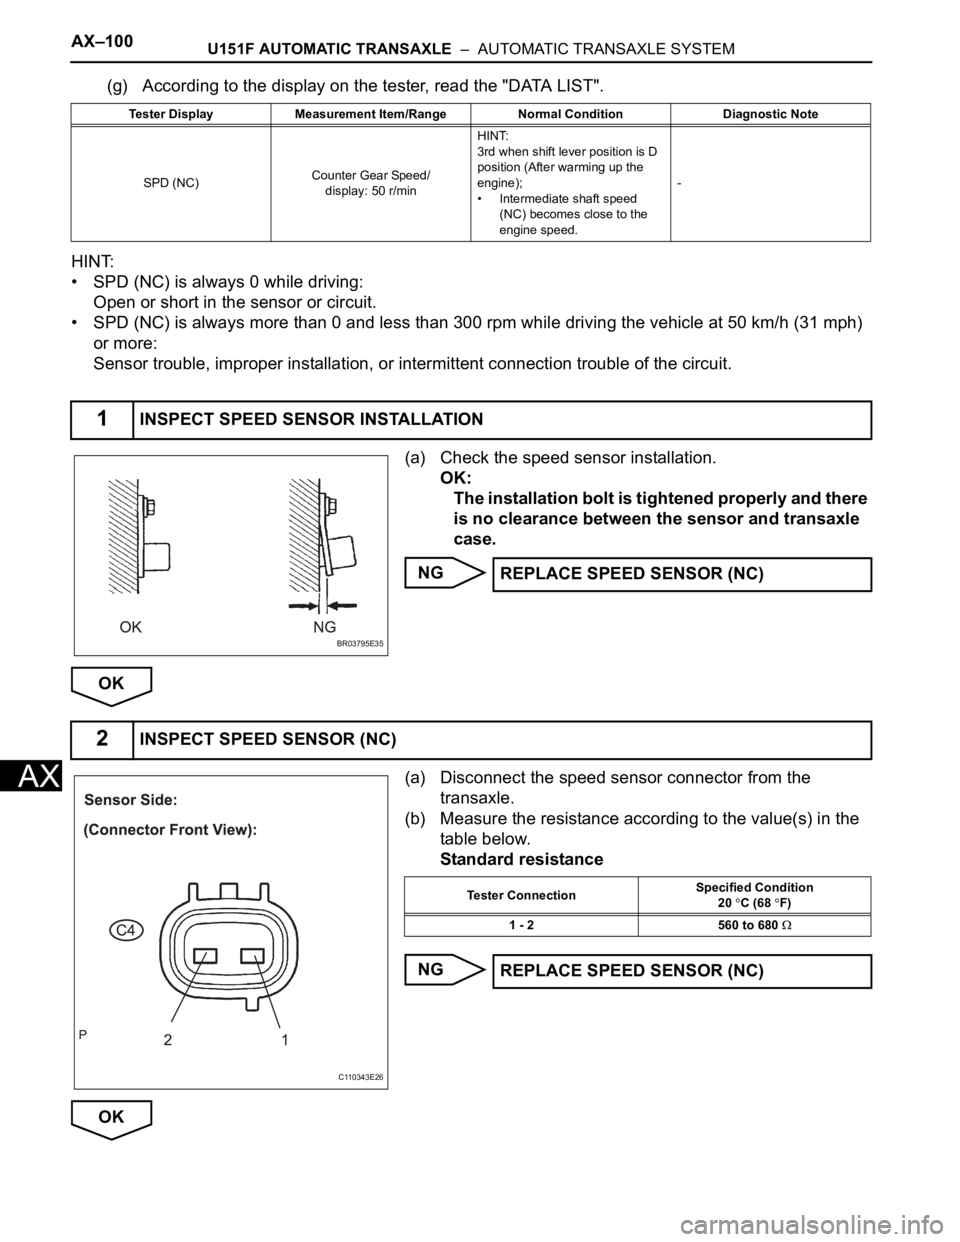
(a) Check the speed sensor installation.
OK:
The installation bolt is tightened properly and there
is no clearance between the sensor and transaxle
case.
NG
OK
(a) Disconnect the speed sensor connector from the
transaxle.
(b) Measure the resistance according to the value(s) in the
table below.
Standard resistance
NG
OK
Tester Display Measurement Item/Range Normal Condition Diagnostic Note
SPD (NC)Counter Gear Speed/
display: 50 r/minHINT:
3rd when shift lever position is D
position (After warming up the
engine);
• Intermediate shaft speed
(NC) becomes close to the
engine speed.-
1INSPECT SPEED SENSOR INSTALLATION
BR03795E35
REPLACE SPEED SENSOR (NC)
2INSPECT SPEED SENSOR (NC)
C110343E26
Tester ConnectionSpecified Condition
20 C (68 F)
1 - 2 560 to 680
REPLACE SPEED SENSOR (NC)
Page 1776 of 3000

AX–104U151F AUTOMATIC TRANSAXLE – AUTOMATIC TRANSAXLE SYSTEM
AX
INSPECTION PROCEDURE
HINT:
Using the intelligent tester to perform ACTIVE TEST allows relays, VSVs, actuators and other items to be
operated without removing any parts. This non-intrusive functional inspection can be very useful because
intermittent operation may be discovered before parts or wiring is disturbed. Performing ACTIVE TEST
early in troubleshooting is one way to save diagnostic time. DATA LIST information can be displayed while
performing ACTIVE TEST.
1. PERFORM ACTIVE TEST
(a) Warm up the engine.
(b) Turn the ignition switch off.
(c) Connect the intelligent tester together with the CAN VIM (controller area network vehicle
interface module) to the DLC3.
(d) Turn the ignition switch to the ON position.
(e) Turn on the tester.
(f) Select the item "DIAGNOSIS / ENHANCED OBD II / ACTIVE TEST / SHIFT".
(g) According to the display on the tester, perform the "ACTIVE TEST".
HINT:
While driving, the shift position can be forcibly changed with the intelligent tester.
Comparing the shift position commanded by the ACTIVE TEST with the actual shift position enables you
to confirm the problem (See page AX-30).
HINT:
• This test can be conducted when the vehicle speed is 50 km/h (31 mph) or less.
• The shift position commanded by the ECM is shown in the DATA LIST/SHIFT display on the intelligent
tester.
(a) Connect the intelligent tester together with the CAN VIM
(controller area network vehicle interface module) to the
DLC3.
(b) Turn the ignition switch to the ON position and turn the
OBD II scan tool or the intelligent tester main switch ON.
(c) When you use intelligent tester:
Select the item "DIAGNOSIS / ENHANCED OBD II /
DTC INFO / CURRENT CODES".
(d) Read the DTCs using the OBD II scan tool or the
intelligent tester.
Result
Tester Display Test Part Control Range Diagnostic Note
SHIFT[Test Details]
Operate the shift solenoid valve and set the each
shift position by yourself.
[Vehicle Condition]
• IDL: ON
• Less than 50 km/h (31 mph)
[Others]
•Press "
" button: Shift up
•Press "" button: Shift down1st/2nd/3rd/4th/5thPossible to check the
operation of the shift
solenoid valves.
1CHECK OTHER DTCS OUTPUT (IN ADDITION TO DTC P0796)
Result Proceed to
P0796 A
P0796 and other DTCs B
Page 1795 of 3000

U151F AUTOMATIC TRANSAXLE – AUTOMATIC TRANSAXLE SYSTEMAX–123
AX
DESCRIPTION
The linear solenoid valve (SLT) controls the transmission line pressure for smooth transmission operation
based on signals from the throttle position sensor and the vehicle speed sensor. The ECM adjusts the
duty cycle of the SLT solenoid valve to control hydraulic line pressure coming from the primary regulator
valve. Appropriate line pressure assures smooth shifting with varying engine outputs.
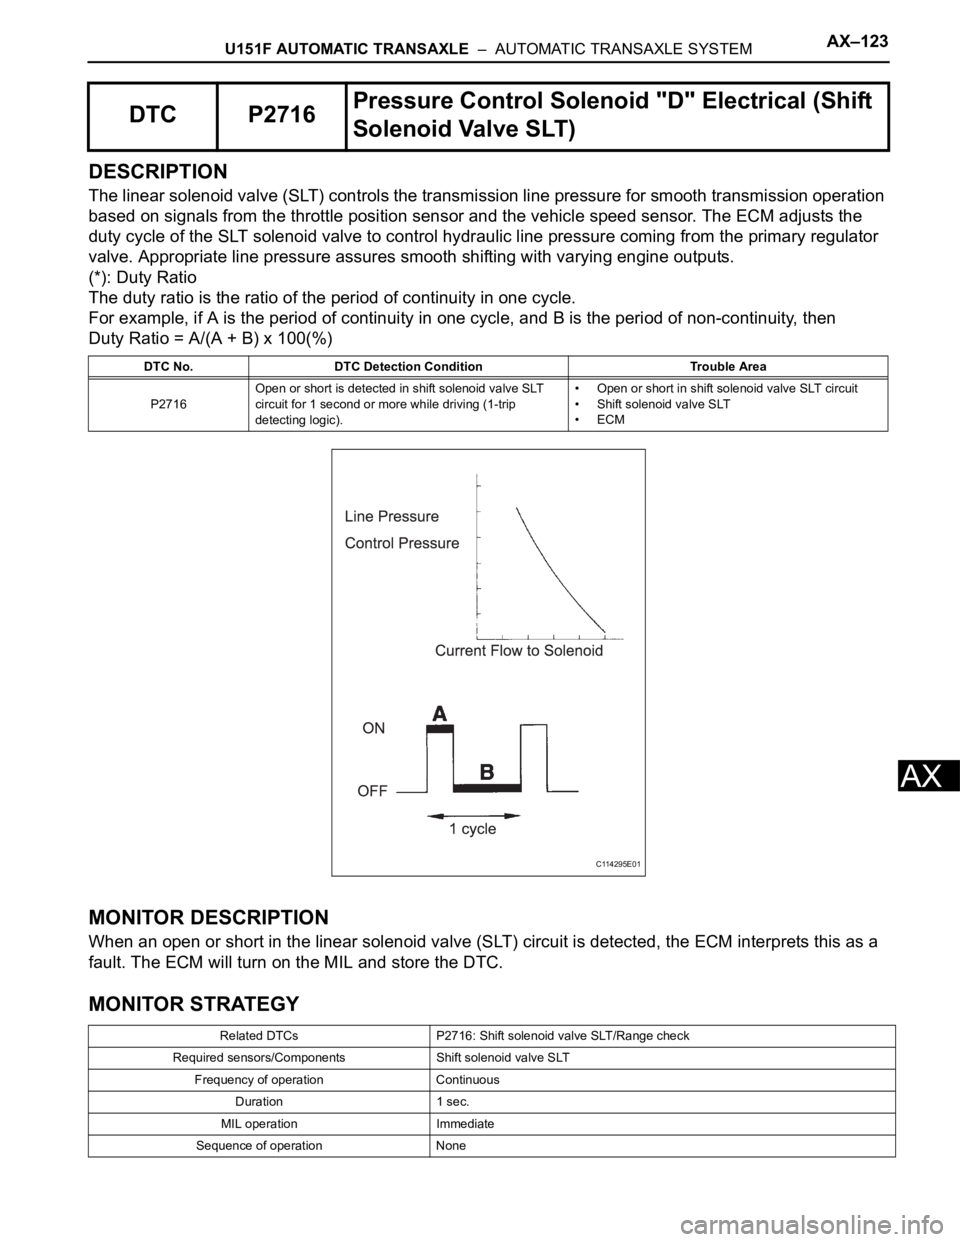
(*): Duty Ratio
The duty ratio is the ratio of the period of continuity in one cycle.
For example, if A is the period of continuity in one cycle, and B is the period of non-continuity, then
Duty Ratio = A/(A + B) x 100(%)
MONITOR DESCRIPTION
When an open or short in the linear solenoid valve (SLT) circuit is detected, the ECM interprets this as a
fault. The ECM will turn on the MIL and store the DTC.
MONITOR STRATEGY
DTC P2716Pressure Control Solenoid "D" Electrical (Shift
Solenoid Valve SLT)
DTC No. DTC Detection Condition Trouble Area
P2716Open or short is detected in shift solenoid valve SLT
circuit for 1 second or more while driving (1-trip
detecting logic).• Open or short in shift solenoid valve SLT circuit
• Shift solenoid valve SLT
•ECM
Related DTCs P2716: Shift solenoid valve SLT/Range check
Required sensors/Components Shift solenoid valve SLT
Frequency of operation Continuous
Duration 1 sec.
MIL operation Immediate
Sequence of operation None
C114295E01
Page 1799 of 3000

U151F AUTOMATIC TRANSAXLE – AUTOMATIC TRANSAXLE SYSTEMAX–127
AX
DESCRIPTION
The shift solenoid valve DSL is turned "ON" and "OFF" by signals from the ECM in order to control the
hydraulic pressure operation, the lock-up relay valve, which then controls operation of the lock-up clutch.
MONITOR DESCRIPTION
Torque converter lock-up is controlled by the ECM based on engine rpm, engine load, engine
temperature, vehicle speed, transmission temperature, and shift range selection. The ECM determines
the lock-up status of the torque converter by comparing the engine rpm (NE) to the input turbine rpm (NT).
The ECM calculates the actual transmission gear by comparing input turbine rpm (NT) to counter gear
rpm (NC). When conditions are appropriate, the ECM requests "lock-up" by applying control voltage to the
shift solenoid DSL. When the DSL is opened, it applies pressure to the lock-up relay valve and locks the
torque converter clutch. If the ECM detects an open or short in the DSL solenoid circuit, the ECM
interprets this as a fault in the DSL solenoid or circuit. The ECM will turn on the MIL and store the DTC.
MONITOR STRATEGY
TYPICAL ENABLING CONDITIONS
P2769: Range check (Low resistance):
P2770: Range check (High resistance):
DTC P2769Torque Converter Clutch Solenoid Circuit Low
(Shift Solenoid Valve DSL)
DTC P2770Torque Converter Clutch Solenoid Circuit High
(Shift Solenoid Valve DSL)
DTC No. DTC Detection Condition Trouble Area
P2769ECM detects short in solenoid valve DSL circuit (0.1
sec.) when solenoid valve DSL is operated (2-trip
detection logic)• Short in shift solenoid valve DSL circuit
• Shift solenoid valve DSL
•ECM
P2770ECM detects open in solenoid valve DSL circuit (0.1
sec.) when solenoid valve DSL is not operated (2-trip
detection logic)• Open in shift solenoid valve DSL circuit
• Shift solenoid valve DSL
•ECM
Related DTCsP2769: Shift solenoid valve DSL/Range check (Low resistance)
P2770: Shift solenoid valve DSL/Range check (High resistance)
Required sensors/Components Shift solenoid valve DSL
Frequency of operation Continuous
Duration 0.064 sec. or more
MIL operation 2 driving cycles
Sequence of operation None
The monitor will run whenever this DTC is not present. None
Shift solenoid valve DSLON
Solenoid current cut status Not cut
Battery voltage8 V or more
Ignition switchON
Sta r t e rOFF
The monitor will run whenever this DTC is not present. None
Shift solenoid valve DSLON
Battery voltage8 V or more
Ignition switchON
Page 1802 of 3000

AX–10U151F AUTOMATIC TRANSAXLE – AUTOMATIC TRANSAXLE SYSTEM
AX
ROAD TEST
1. PROBLEM SYMPTOM CONFIRMATION
(a) Based on the result of the customer problem
analysis, try to reproduce the symptoms. If the
problem is that the transaxle does not shift up, shift
down, or the shift point is too high or too low,
conduct the following road test referring to the
automatic shift schedule and simulate the problem
symptoms.
2. ROAD TEST
NOTICE:
Perform the test at the ATF temperature 50 to 80
C
(122 to 176
F) in the normal operation.
(a) D position test:
Shift into the D position and fully depress the
accelerator pedal and check the following points.
(1) Check up-shift operation.
Check that 1
2, 2 3, 3 4 and 4 5th up-
shifts take place, and that the shift points
conform to the automatic shift schedule (See
page SS-31).
HINT:
5th Gear Up-shift Prohibition Control
• Engine coolant temperature is 55
C (131F)
or less and vehicle speed is at 80 km/h (176
mph) or less.
• ATF temperature is -2
C (28F) or less.
4th Gear Up-shift Prohibition Control
• Coolant temperature is 47
C (117F) or less
and vehicle speed is at 55 km/h (34 mph) or
less.
5th and 4th Gear Lock-up Prohibition Control
• Brake pedal is depressed.
• Accelerator pedal is released.
• Coolant temperature is 60
C (140F) or less.
(2) Check for shift shock and slip.
Check for shock and slip at the 1
2, 2 3, 3
4 and 4 5th up-shifts.
(3) Check for abnormal noise and vibration.
Drive in the D position lock-up or 5th gear, and
check for abnormal noises and vibration.
HINT:
The check for the cause of abnormal noise and
vibration must be done very thoroughly as it
could also be due to loss of balance in the
differential, torque converter clutch, etc.
(4) Check kick-down operation.
Check that the possible kick-down vehicle speed
limits for 2nd to 1st, 3rd to 2nd, 4th to 3rd, 5th to
4th kick-downs conform to those indicated on
the automatic shift schedule while driving
through all gears with the shift lever in the D
position (See page SS-31).
(5) Check abnormal shock and slip at kick-down.
Page 1803 of 3000

U151F AUTOMATIC TRANSAXLE – AUTOMATIC TRANSAXLE SYSTEMAX–11
AX
(6) Check the lock-up mechanism.
• Drive in D position (5th gear), at a steady
speed (lock-up ON).
• Lightly depress the accelerator pedal and
check that the engine speed does not change
abruptly.
HINT:
• There is no lock-up in the 1st and 2nd gear.
• 4th lock-up operates while uphill-downhill
control is active in D position.
• 3rd lock-up operates while uphill-downhill
control is active in D position.
• ATF temperature is 120
C (248F) or more.
• If there is a big jump in engine speed, there is
no lock-up.
(b) 4 (O/D OFF) position test:
Shift into the 4 position and fully depress the
accelerator pedal and check the following points.
(1) Check up-shift operation.
Check that the 1
2, 2 3 and 3 4 up-shift
take place and that the shift point conforms to
the automatic shift schedule (See page SS-31).
HINT:
There is no 5th up-shift in the 4 position.
(2) Check engine braking.
While driving in the 4 position and 4th gear,
release the accelerator pedal and check the
engine braking effect.
(3) Check for abnormal noise during acceleration
and deceleration, and for shock at up-shift and
down-shift.
(c) 3 position test:
Shift into the 3 position and fully depress the
accelerator pedal and check the following points.
(1) Check up-shift operation.
Check that the 1
2 and 2 3 up-shift take
place and that the shift point conforms to the
automatic shift schedule (See page SS-31).
HINT:
There is no 4th up-shift and lock-up in the 3
position.
(2) Check engine braking.
While running in the 3 position and 3rd gear,
release the accelerator pedal and check the
engine braking effect.
(3) Check for abnormal noise during acceleration
and deceleration, and for shock at up-shift and
down-shift.