2007 TOYOTA SIENNA check engine
[x] Cancel search: check enginePage 1507 of 3000
U151E AUTOMATIC TRANSAXLE – PARK / NEUTRAL POSITION SWITCHAX–127
AX
INSPECTION
1. INSPECT PARK/NEUTRAL POSITION SWITCH
ASSEMBLY OPERATION
(a) Apply the parking brake and turn the ignition switch
to the ON position.
(b) Depress the brake pedal and check that the engine
starts only when the shift lever is in the N or P
position and the engine does not start when the shift
lever is in other positions.
(c) Check that the back up light comes on and the
reverse warning buzzer sounds only when the shift
lever is in the R position and the light and buzzer do
not operate when the shift lever is in other positions.
(d) If a failure is found, check the park/neutral position
switch for continuity.
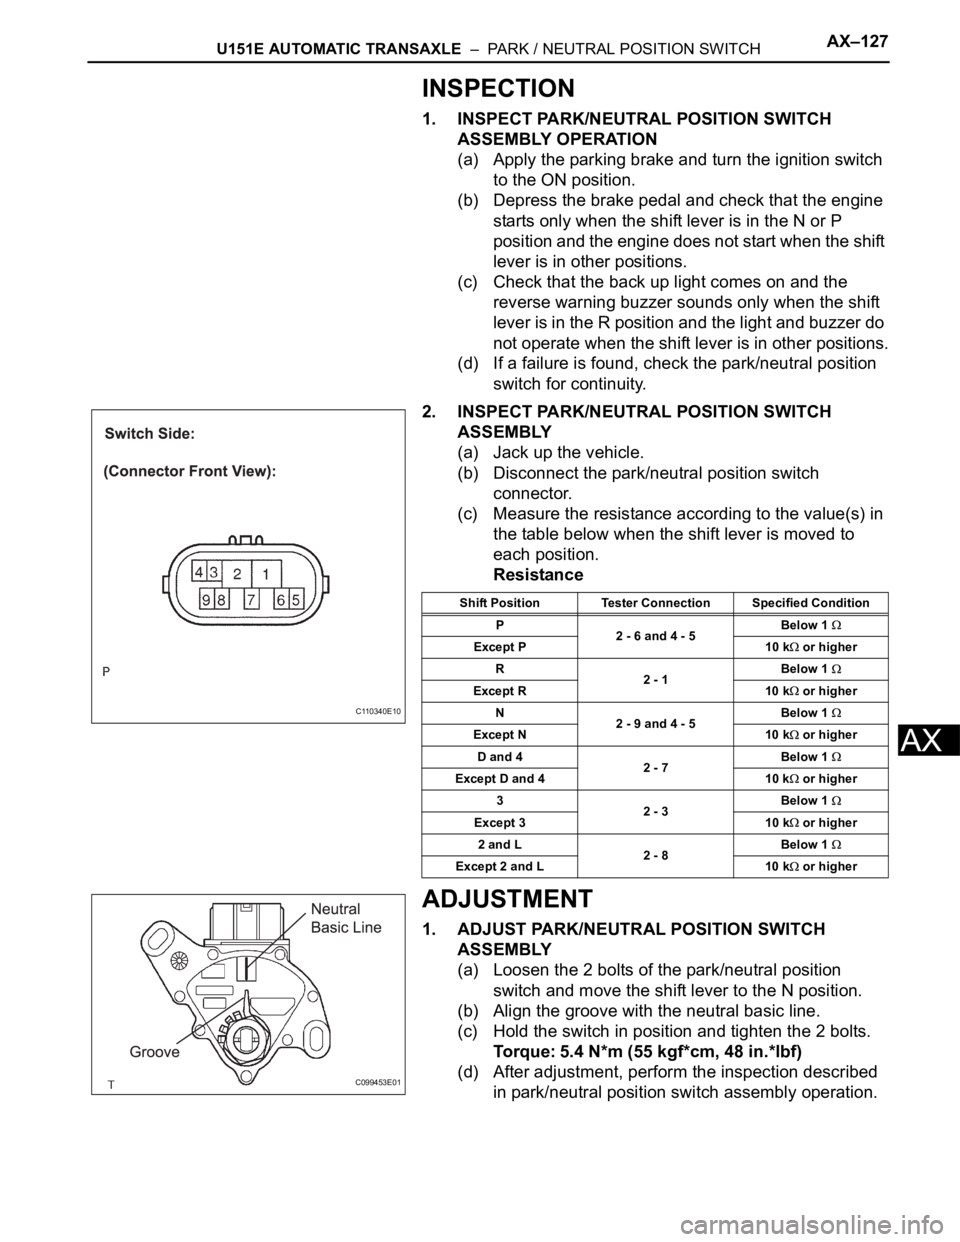
2. INSPECT PARK/NEUTRAL POSITION SWITCH
ASSEMBLY
(a) Jack up the vehicle.
(b) Disconnect the park/neutral position switch
connector.
(c) Measure the resistance according to the value(s) in
the table below when the shift lever is moved to
each position.
Resistance
ADJUSTMENT
1. ADJUST PARK/NEUTRAL POSITION SWITCH
ASSEMBLY
(a) Loosen the 2 bolts of the park/neutral position
switch and move the shift lever to the N position.
(b) Align the groove with the neutral basic line.
(c) Hold the switch in position and tighten the 2 bolts.
Torque: 5.4 N*m (55 kgf*cm, 48 in.*lbf)
(d) After adjustment, perform the inspection described
in park/neutral position switch assembly operation.
C110340E10
Shift Position Tester Connection Specified Condition
P
2 - 6 and 4 - 5Below 1
Except P 10 k or higher
R
2 - 1Below 1
Except R 10 k or higher
N
2 - 9 and 4 - 5Below 1
Except N 10 k or higher
D and 4
2 - 7Below 1
Except D and 4 10 k or higher
3
2 - 3Below 1
Except 3 10 k or higher
2 and L
2 - 8Below 1
Except 2 and L 10 k or higher
C099453E01
Page 1517 of 3000

AX–20U151E AUTOMATIC TRANSAXLE – AUTOMATIC TRANSAXLE SYSTEM
AX
MONITOR DRIVE PATTERN
1. MONITOR DRIVE PATTERN FOR ECT TEST
(a) Perform this drive pattern as one method to
simulate the detection conditions of the ECT
malfunctions. (The DTCs may not be detected due
the actual driving conditions. And some codes may
not be detected through this drive pattern.)
HINT:
Preparation for driving
• Warm up the engine sufficiently. (Engine coolant
temperature is 60
C (140F) or higher)
• Drive the vehicle when the atmospheric
temperature is -10
C (14F) or higher.
(Malfunction is not detected when the
atmospheric temperature is less than -10
C
(14
F))
Driving note
• Drive the vehicle through all gears.
Stop
1st 2nd 3rd 4th 5th 5th
(lock-up ON).
• Repeat the above driving pattern three times or
more.
NOTICE:
• The monitor status can be checked using the
OBD II scan tool or intelligent tester. When
using the intelligent tester, monitor status
can be found in the "ENHANCED OBD II /
DATA LIST" or under "CARB OBD II".
• In the event that the drive pattern must be
interrupted (possibly due to traffic conditions
or other factors), the drive pattern can be
resumed and, in most cases, the monitor can
be completed.
• Perform this drive pattern on a level road as
much as possible and strictly observe the
posted speed limits and traffic laws while
driving.
Page 1524 of 3000
U151E AUTOMATIC TRANSAXLE – VALVE BODY ASSEMBLYAX–141
AX
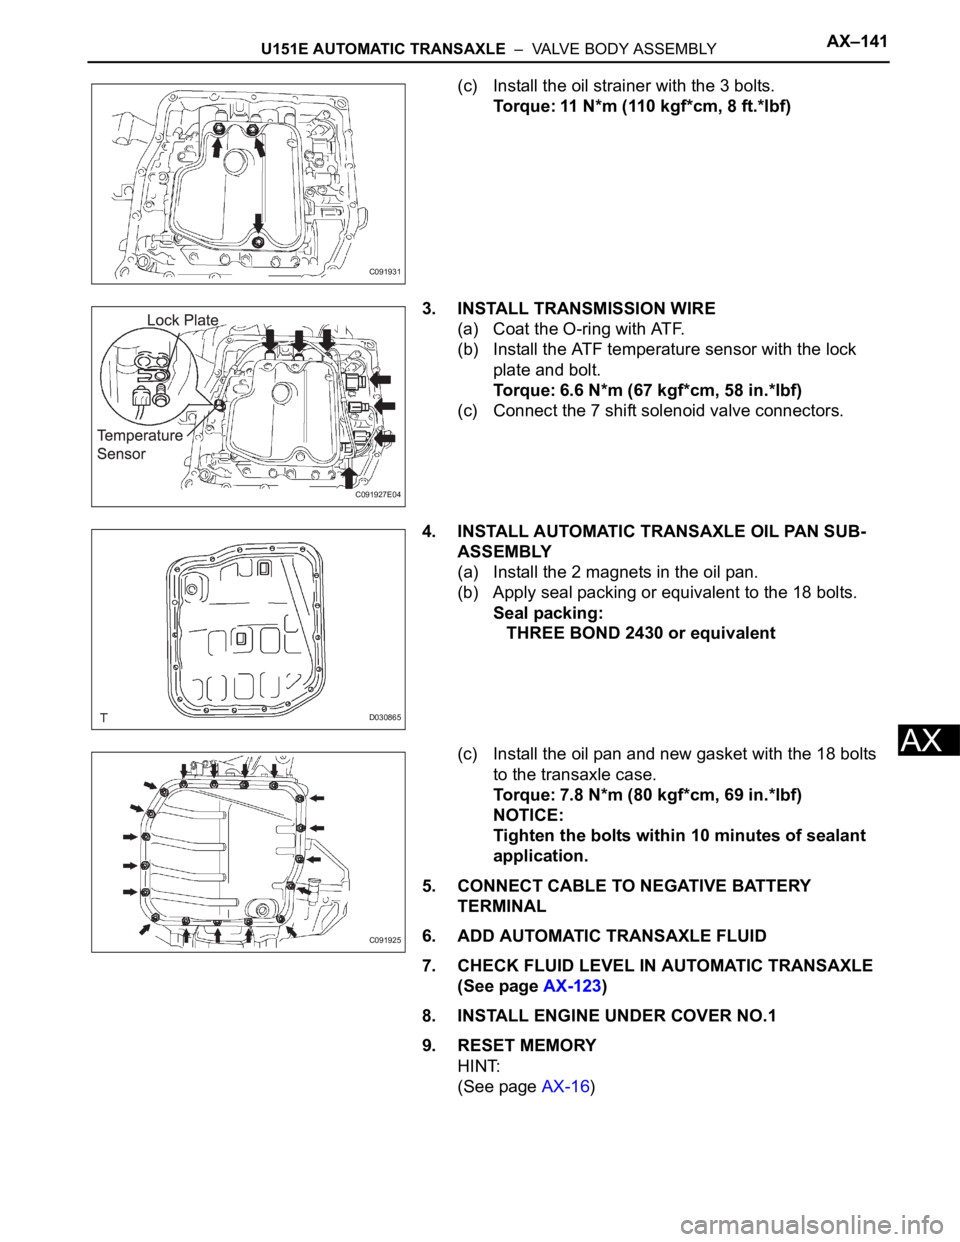
(c) Install the oil strainer with the 3 bolts.
Torque: 11 N*m (110 kgf*cm, 8 ft.*lbf)
3. INSTALL TRANSMISSION WIRE
(a) Coat the O-ring with ATF.
(b) Install the ATF temperature sensor with the lock
plate and bolt.
Torque: 6.6 N*m (67 kgf*cm, 58 in.*lbf)
(c) Connect the 7 shift solenoid valve connectors.
4. INSTALL AUTOMATIC TRANSAXLE OIL PAN SUB-
ASSEMBLY
(a) Install the 2 magnets in the oil pan.
(b) Apply seal packing or equivalent to the 18 bolts.
Seal packing:
THREE BOND 2430 or equivalent
(c) Install the oil pan and new gasket with the 18 bolts
to the transaxle case.
Torque: 7.8 N*m (80 kgf*cm, 69 in.*lbf)
NOTICE:
Tighten the bolts within 10 minutes of sealant
application.
5. CONNECT CABLE TO NEGATIVE BATTERY
TERMINAL
6. ADD AUTOMATIC TRANSAXLE FLUID
7. CHECK FLUID LEVEL IN AUTOMATIC TRANSAXLE
(See page AX-123)
8. INSTALL ENGINE UNDER COVER NO.1
9. RESET MEMORY
HINT:
(See page AX-16)
C091931
C091927E04
D030865
C091925
Page 1525 of 3000
AX–22U151E AUTOMATIC TRANSAXLE – AUTOMATIC TRANSAXLE SYSTEM
AX
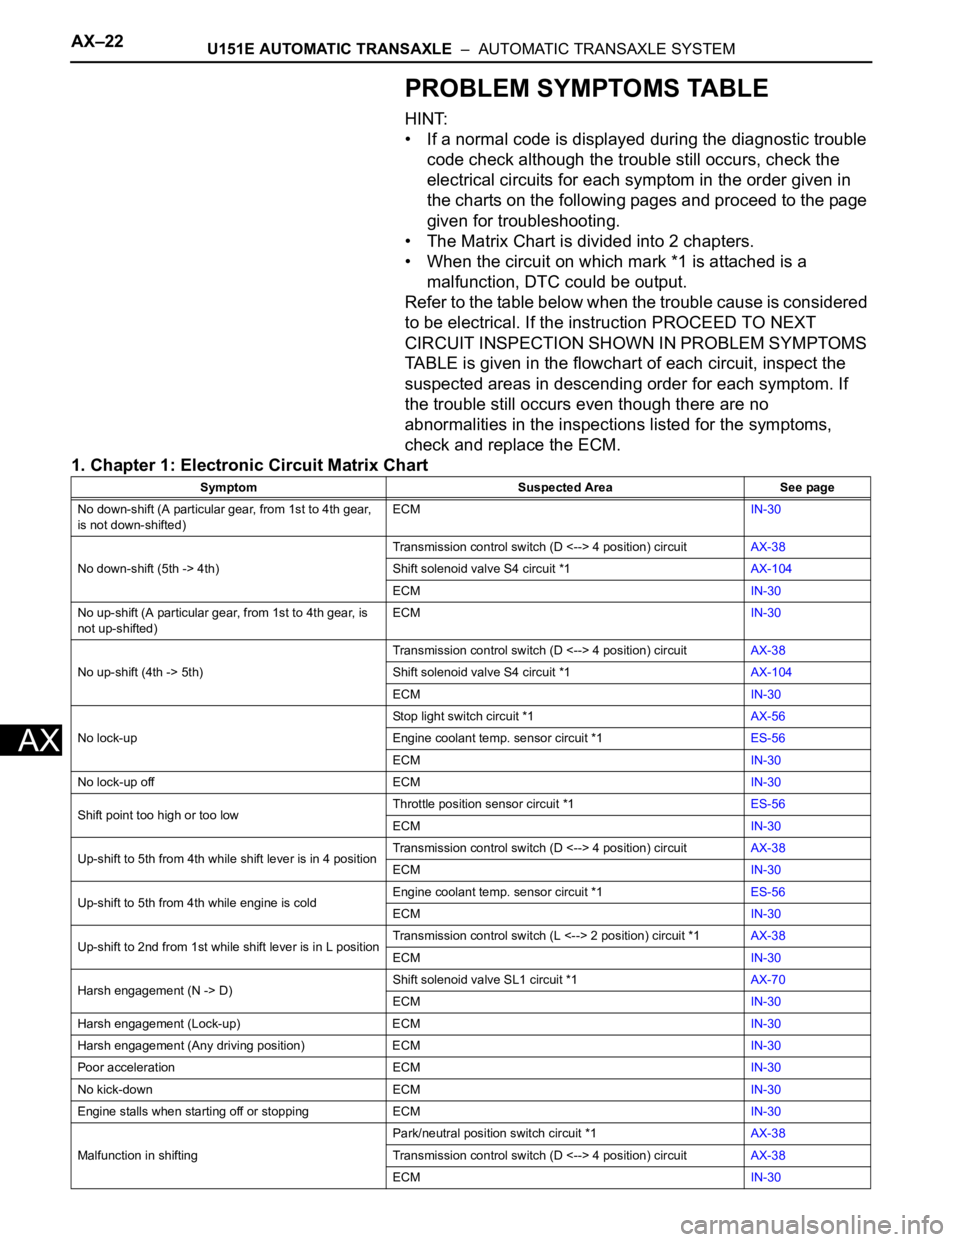
PROBLEM SYMPTOMS TABLE
HINT:
• If a normal code is displayed during the diagnostic trouble
code check although the trouble still occurs, check the
electrical circuits for each symptom in the order given in
the charts on the following pages and proceed to the page
given for troubleshooting.
• The Matrix Chart is divided into 2 chapters.
• When the circuit on which mark *1 is attached is a
malfunction, DTC could be output.
Refer to the table below when the trouble cause is considered
to be electrical. If the instruction PROCEED TO NEXT
CIRCUIT INSPECTION SHOWN IN PROBLEM SYMPTOMS
TABLE is given in the flowchart of each circuit, inspect the
suspected areas in descending order for each symptom. If
the trouble still occurs even though there are no
abnormalities in the inspections listed for the symptoms,
check and replace the ECM.
1. Chapter 1: Electronic Circuit Matrix Chart
Symptom Suspected Area See page
No down-shift (A particular gear, from 1st to 4th gear,
is not down-shifted)ECMIN-30
No down-shift (5th -> 4th)Transmission control switch (D <--> 4 position) circuitAX-38
Shift solenoid valve S4 circuit *1AX-104
ECMIN-30
No up-shift (A particular gear, from 1st to 4th gear, is
not up-shifted)ECMIN-30
No up-shift (4th -> 5th)Transmission control switch (D <--> 4 position) circuitAX-38
Shift solenoid valve S4 circuit *1AX-104
ECMIN-30
No lock-upStop light switch circuit *1AX-56
Engine coolant temp. sensor circuit *1ES-56
ECMIN-30
No lock-up off ECMIN-30
Shift point too high or too lowThrottle position sensor circuit *1ES-56
ECMIN-30
Up-shift to 5th from 4th while shift lever is in 4 positionTransmission control switch (D <--> 4 position) circuitAX-38
ECMIN-30
Up-shift to 5th from 4th while engine is coldEngine coolant temp. sensor circuit *1ES-56
ECMIN-30
Up-shift to 2nd from 1st while shift lever is in L positionTransmission control switch (L <--> 2 position) circuit *1AX-38
ECMIN-30
Harsh engagement (N -> D)Shift solenoid valve SL1 circuit *1AX-70
ECMIN-30
Harsh engagement (Lock-up) ECMIN-30
Harsh engagement (Any driving position) ECMIN-30
Poor acceleration ECMIN-30
No kick-down ECMIN-30
Engine stalls when starting off or stopping ECMIN-30
Malfunction in shiftingPark/neutral position switch circuit *1AX-38
Transmission control switch (D <--> 4 position) circuitAX-38
ECMIN-30
Page 1542 of 3000
U151E AUTOMATIC TRANSAXLE – AUTOMATIC TRANSAXLE SYSTEMAX–29
AX
DIAGNOSIS SYSTEM
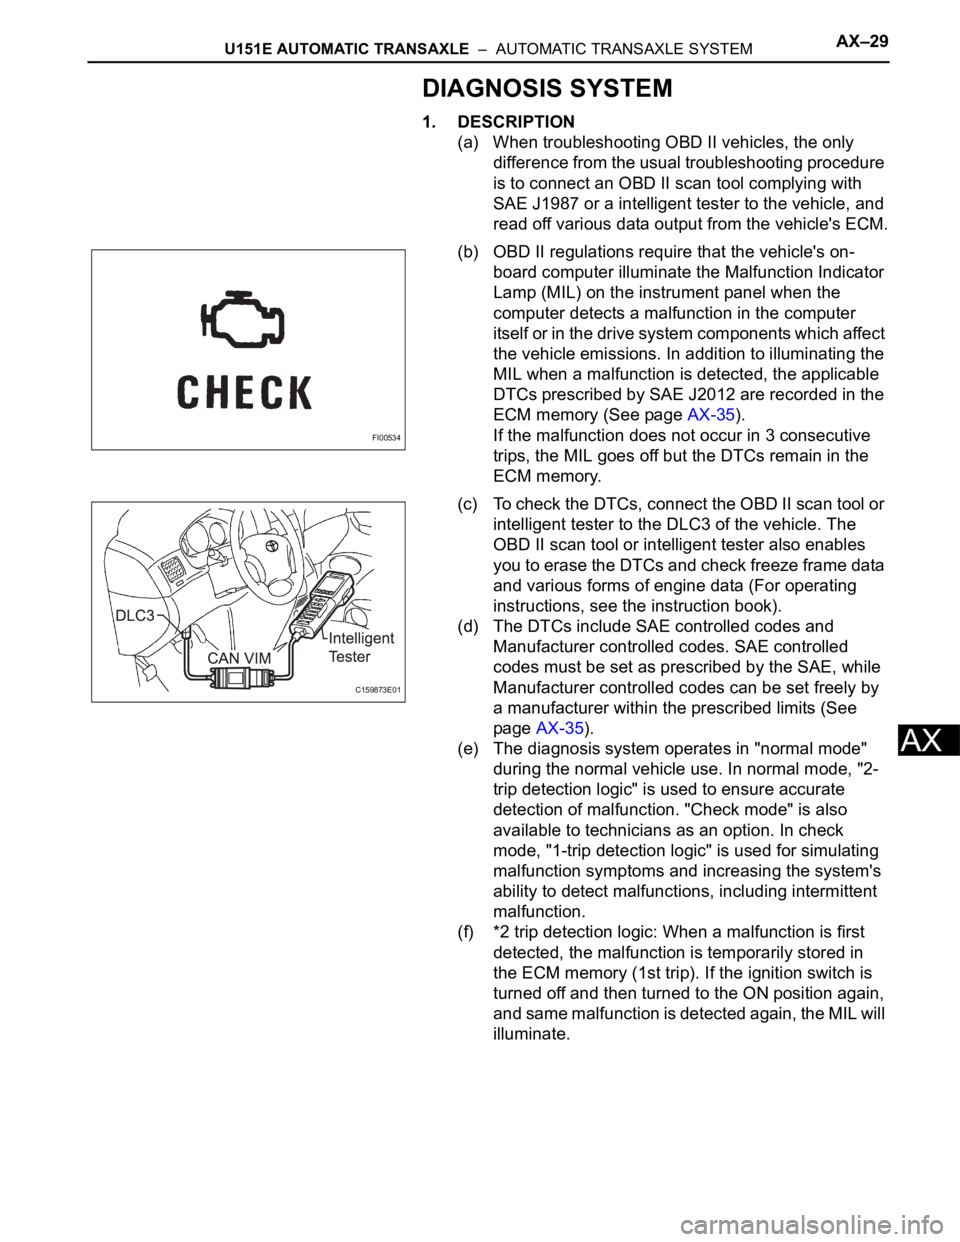
1. DESCRIPTION
(a) When troubleshooting OBD II vehicles, the only
difference from the usual troubleshooting procedure
is to connect an OBD II scan tool complying with
SAE J1987 or a intelligent tester to the vehicle, and
read off various data output from the vehicle's ECM.
(b) OBD II regulations require that the vehicle's on-
board computer illuminate the Malfunction Indicator
Lamp (MIL) on the instrument panel when the
computer detects a malfunction in the computer
itself or in the drive system components whic h affect
the vehicle emissions. In addition to illuminating the
MIL when a malfunction is detected, the applicable
DTCs prescribed by SAE J2012 are recorded in the
ECM memory (See page AX-35).
If the malfunction does not occur in 3 consecutive
trips, the MIL goes off but the DTCs remain in the
ECM memory.
(c) To check the DTCs, connect the OBD II scan tool or
intelligent tester to the DLC3 of the vehicle. The
OBD II scan tool or intelligent tester also enables
you to erase the DTCs and check freeze frame data
and various forms of engine data (For operating
instructions, see the instruction book).
(d) The DTCs include SAE controlled codes and
Manufacturer controlled codes. SAE controlled
codes must be set as prescribed by the SAE, while
Manufacturer controlled codes can be set freely by
a manufacturer within the prescribed limits (See
page AX-35).
(e) The diagnosis system operates in "normal mode"
during the normal vehicle use. In normal mode, "2-
trip detection logic" is used to ensure accurate
detection of malfunction. "Check mode" is also
available to technicians as an option. In check
mode, "1-trip detection logic" is used for simulating
malfunction symptoms and increasing the system's
ability to detect malfunctions, including intermittent
malfunction.
(f) *2 trip detection logic: When a malfunction is first
detected, the malfunction is temporarily stored in
the ECM memory (1st trip). If the ignition switch is
turned off and then turned to the ON position again,
and same malfunction is detected again, the MIL will
illuminate.
FI00534
C159873E01
Page 1544 of 3000

U151E AUTOMATIC TRANSAXLE – AUTOMATIC TRANSAXLE SYSTEMAX–31
AX
HINT:
If your display shows UNABLE TO CONNECT TO
VEHICLE when you have connected the cable of
the OBD II scan tool or intelligent tester to the
DLC3, turned the ignition switch to the ON position
and operated the scan tool, there is a problem on
the vehicle side or tool side.
• If the communication is normal when the tool is
connected to another vehicle, inspect the DLC3
on the original vehicle.
• If the communication is still impossible when the
tool is connected to another vehicle, the problem
is probably in the tool itself, so consult the
Service Department listed in the tool's instruction
manual.
3. CHECK BATTERY VOLTAGE
(a) Measure the battery voltage.
Battery voltage:
11 to 14 V
If voltage is below 11 V, replace the battery before
proceeding.
4. CHECK MIL
(a) The MIL comes on when the ignition switch is
turned to the ON position and the engine is not
running.
HINT:
If the MIL does not light up, troubleshoot the
combination meter.
(b) When the engine is started, the MIL should go off. If
the lamp remains on, it means that the diagnosis
system has detected a malfunction or abnormality in
the system.
Page 1555 of 3000
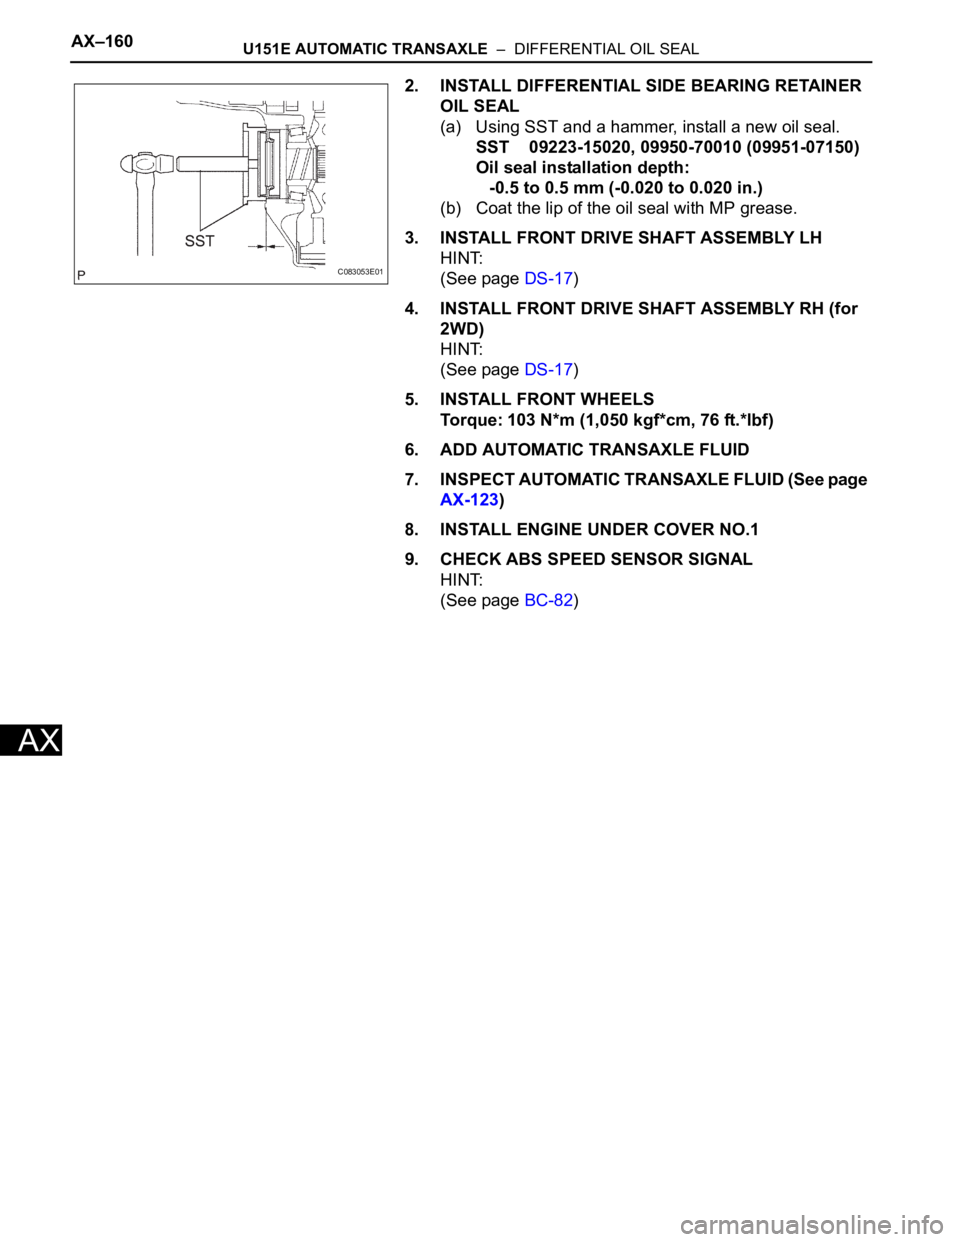
AX–160U151E AUTOMATIC TRANSAXLE – DIFFERENTIAL OIL SEAL
AX
2. INSTALL DIFFERENTIAL SIDE BEARING RETAINER
OIL SEAL
(a) Using SST and a hammer, install a new oil seal.
SST 09223-15020, 09950-70010 (09951-07150)
Oil seal installation depth:
-0.5 to 0.5 mm (-0.020 to 0.020 in.)
(b) Coat the lip of the oil seal with MP grease.
3. INSTALL FRONT DRIVE SHAFT ASSEMBLY LH
HINT:
(See page DS-17)
4. INSTALL FRONT DRIVE SHAFT ASSEMBLY RH (for
2WD)
HINT:
(See page DS-17)
5. INSTALL FRONT WHEELS
Torque: 103 N*m (1,050 kgf*cm, 76 ft.*lbf)
6. ADD AUTOMATIC TRANSAXLE FLUID
7. INSPECT AUTOMATIC TRANSAXLE FLUID (See page
AX-123)
8. INSTALL ENGINE UNDER COVER NO.1
9. CHECK ABS SPEED SENSOR SIGNAL
HINT:
(See page BC-82)
C083053E01
Page 1583 of 3000

AX–166U151E AUTOMATIC TRANSAXLE – AUTOMATIC TRANSAXLE ASSEMBLY
AX
INSTALLATION
1. INSTALL TORQUE CONVERTER CLUTCH
ASSEMBLY
(a) Install the torque converter clutch to the automatic
transaxle.
(b) Using vernier calipers and a straight edge, measure
the dimension "A" between the transaxle fitting part
of the engine and the converter fitting part of the
drive plate (*1).
(c) Using vernier calipers and a straight edge, measure
the dimension "B" shown in the illustration and
check that "B" is greater than "A" (measured in step
(*1)).
Standard:
A + 1 mm (0.03937 in.) or more
NOTICE:
Remember to minus the thickness of the
straight edge.
2. INSTALL AUTOMATIC TRANSAXLE ASSEMBLY
(a) Install the automatic transaxle to the engine with the
10 bolts.
Torque: Bolt A
64 N*m (650 kgf*cm, 47 ft.*lbf)
Bolt B
46 N*m (470 kgf*cm, 34 ft.*lbf)
Bolt C
43 N*m (439 kgf*cm, 32 ft.*lbf)
(b) Apply a few drops of adhesive to each of 2 threads
on the tip of the 6 torque converter clutch mounting
bolts.
Adhesive:
Part No. 08833-00070, THREE BOND 1324
or equivalent
(c) Install the 6 torque converter clutch mounting bolts.
Torque: 41 N*m (413 kgf*cm, 30 ft.*lbf)
NOTICE:
First install the black colored bolt, and then the
remaining 5 bolts.
D031087E01
C065911E01
C163046E01
D030472