Page 65 of 274

2-9 FEATURES AND CONTROLS
78J00-03E
will go all the way down. To stop the win-
dow from lowering, lift the switch all the
way up and release it.
Window Lockout
The driver’s window switches also include
a lockout switch. Press the left side of the
switch to prevent rear passengers from
using their window switches. The driver
can still control all the windows with the
lockout on. Press the right side of the win-
dow lockout switch to return to normal win-
dow operation.Sun VisorsTo block out glare, swing the sun visor
down. You can also detach the driver’s sun
visor from the center mount and slide it
along the rod from side-to-side for greater
coverage.
Visor Vanity Mirrors
Your vehicle has covered visor vanity mir-
rors on both the driver’s and passenger’s
side.
Theft-Deterrent SystemsVehicle theft is big business, especially in
some cities. Although your vehicle has a
number of theft-deterrent features, we
know that nothing we put on it can make it
impossible to steal.
Content Theft-Deterrent
To activate the theft-deterrent system:
1) Open the door.
2) Lock the door with the power door lock
switch or the remote keyless entry
transmitter. If you are using the remote
keyless entry transmitter, the door does
not need to be open.
3) Close all doors.
Once armed, the alarm will go off if some-
one tries to enter the vehicle without using
the remote keyless entry transmitter or a
key or turns the ignition on with an incor-
rect key. The horn will sound and the turn
signal lamps will flash for approximately
two minutes.
When the alarm is armed, the trunk may
be opened with the remote keyless entry
transmitter. The power door lock switches
are disabled and the doors remain locked.
You must use your remote keyless entry
transmitter or your key to unlock the doors
when the system is armed.Arming with the Power Lock Switch
The alarm system will arm when you use
either power lock switch to lock the doors
while any door or the trunk is open and the
key is removed from the ignition.
Arming with the Remote Keyless Entry
Transmitter
The alarm system will arm when you use
your remote keyless entry transmitter to
lock the doors, if the key is not in the igni-
tion.
Disarming with the Remote Keyless
Entry Transmitter
The alarm system will disarm when you
use your remote keyless entry transmitter
to unlock the doors.
The first time a remote unlock command is
received, three flashes will be seen and
three horn chirps heard to indicate an
alarm condition has occurred since last
arming.
Disarming with Your Key
The alarm system will disarm when you
use your key to unlock the doors or insert
your key in ignition and turn it from the
LOCK position.
Page 66 of 274

2-10 FEATURES AND CONTROLS
78J00-03E
PASS-Key
® III+
The PASS-Key
® III+ system operates on a
radio frequency subject to Federal Com-
munications Commission (FCC) Rules and
with Industry Canada.
This device complies with Part 15 of the
FCC Rules. Operation is subject to the fol-
lowing two conditions:
1) This device may not cause harmful
interference.
2) This device must accept any interfer-
ence received, including interference
that may cause undesired operation.
This device complies with RSS-210 of
Industry Canada. Operation is subject to
the following two conditions:
1) This device may not cause interfer-
ence.
2) This device must accept any interfer-
ence received, including interference
that may cause undesired operation of
the device.
Changes or modifications to this system by
other than an authorized service facility
could void authorization to use this equip-
ment.
PASS-Key
® III+ uses a radio frequency
transponder in the key that matches a
decoder in your vehicle.PASS-Key
® III+ Operation
Your vehicle has PASS-Key
® III+ (Person-
alized Automotive Security System) theft-
deterrent system. PASS-Key® III+ is a pas-
sive theft-deterrent system. This means
you do not have to do anything special to
arm or disarm the system. It works when
you transition the key to RUN, ACC or
START from the LOCK position.
When the PASS-Key
® III+ system senses
that someone is using the wrong key, it
prevents the vehicle from starting. Anyone
using a trial-and-error method to start the
vehicle will be discouraged because of the
high number of electrical key codes.
If the engine does not start and the secu-
rity light on the instrument panel comes on
when trying to start the vehicle, the key
may have a damaged transponder. Turn
the ignition off and try again.
If the engine still does not start, and the
key appears to be undamaged, try another
ignition key. At this time, you may also
want to check the fuse, refer to “Fuses and
Circuit Breakers” in “Electrical System” in
the “Service and Appearance Care” sec-
tion. If the engine still does not start with
the other key, your vehicle needs service.
If your vehicle does start, the first key may
be faulty. See your dealer who can service
the PASS-Key
® III+ to have a new key
made. In an emergency, contact Roadside
Assistance.It is possible for the PASS-Key
® III+
decoder to “learn” the transponder value of
a new or replacement key. Up to nine addi-
tional keys may be programmed for the
vehicle. The following procedure is for pro-
gramming additional keys only. If all the
currently programmed keys are lost or do
not operate, you must see your dealer or a
locksmith who can service PASS-Key® III+
to have keys made and programmed to the
system.
See your dealer or a locksmith who can
service PASS-Key
® III+ to get a new key
blank that is cut exactly as the ignition key
that operates the system.
To program the new additional key do the
following:
1) Verify that the new key has a
stamped on it.
2) Insert the original, already pro-
grammed, key in the ignition and start
the engine. If the engine will not start,
see your dealer for service.
3) After the engine has started, turn the
key to LOCK, and remove the key.
4) Insert the new key to be programmed
and turn it to the RUN position within
five seconds of removing the original
key.
5) The security light will turn off once the
key has been programmed.
6) Repeat Steps 1 through 5 if additional
keys are to be programmed.
Page 67 of 274

2-11 FEATURES AND CONTROLS
78J00-03E
If you are driving and the security light
comes on and stays on, you may be able
to restart your engine. Your PASS-Key
®
III+ system, however, may not be working
properly and must be serviced by your
dealer.
If you lose or damage your PASS-Key
®
III+ key, see your dealer or a locksmith
who can service PASS-Key
® III+ to have a
new key made.
Daily Inspection ChecklistBefore Driving1) Make sure that windows, mirrors, lights
and reflectors are clean and unob-
structed.
2) Visually check the tires for the following
points:
– the depth of the tread groove
– abnormal wear, cracks and damage
– loose wheel nuts
– existence of foreign material such as
nails, stones, etc.
Refer to “Tires” in the “SERVICE AND
APPEARANCE CARE” section for details.
3) Look for oil or other fluid leaks.
NOTE:
It is normal for water to drip from the air
conditioning system after use.
4) Make sure the hood is fully closed and
latched.
5) Check the headlights, turn signal lights,
brake lights and horn for proper opera-
tion.
6) Lock all doors.
7) Adjust the seat and adjustable head
restraints (if equipped).
8) Check the brake pedal.
9) Adjust the mirrors.
10)Make sure that you and all passengers
have properly fastened your safety
belts.11)Make sure that all warning lights come
on as the key is turned to the “ON” or
“START” position.
12)Check all gauges.
13)Make sure that the BRAKE light turns
off when the parking brake is released.
Once a week, or each time you fill your fuel
tank, perform the following under-hood
checks:
1) Engine oil level
2) Coolant level
3) Brake fluid level
4) Power steering (if equipped) fluid level
5) Windshield washer fluid level
6) Hood latch operation
Pull the hood release handle inside the
vehicle. Make sure that you cannot
open the hood all the way without
releasing the secondary latch. Be sure
to close the hood securely after check-
ing for proper latch operation. Refer to
“Lubricate body components” under
“Scheduled Maintenance” in the
“Maintenance Schedule” section for the
lubrication schedule.
WARNING
Make sure the hood is fully closed
and latched before driving. If it is not,
it can fly up unexpectedly during
driving, obstructing your view and
resulting in an accident.
Page 68 of 274

2-12 FEATURES AND CONTROLS
78J00-03E
Starting and Operating Your
VehicleNew Vehicle Break-InIgnition Positions
1410037
With the key in the ignition switch, you can
turn it to four different positions. A warning
tone will sound if you open the driver’s
door when the key has not been removed
from the ignition. (LOCK):
You will only be able to remove your key
when the ignition is turned to LOCK.
The ignition switch cannot be turned to
LOCK unless the shift lever is in PARK (P).
ACC (Accessory):
This position operates some of your elec-
trical accessories.
(RUN):
This is the position the switch returns to
after you start your engine and release the
switch. The switch stays in the RUN posi-
tion when the engine is running. But even
when the engine is not running, you can
use RUN to operate your electrical acces-
sories and to display some warning and
indicator lights.
The battery could be drained if you leave
the key in the ACC or RUN position with
the engine off. You may not be able to start
your vehicle if the battery is allowed to
drain for an extended period of time.
(START):
This position starts the engine. When the
engine starts, release the key. The ignition
switch will return to RUN for normal driv-
ing.
Key In the Ignition
Never leave your vehicle with the keys
inside, as it is an easy target for joy riders
or thieves. If you leave the key in the igni-
CAUTION
Your vehicle does not need an elabo-
rate break-in. But it will perform bet-
ter in the long run if you follow these
guidelines:
Do not drive at any one constant
speed, fast or slow, for the first 500
miles (805 km). Do not make full-
throttle starts. Avoid downshifting
to brake, or slow, the vehicle.
Avoid making hard stops for the
first 200 miles (322 km) or so. Dur-
ing this time your new brake linings
are not yet broken in. Hard stops
with new linings can mean prema-
ture wear and earlier replacement.
Follow this breaking-in guideline
every time you get new brake lin-
ings.
Do not tow a trailer during break-in.
Refer to “Towing a Trailer” in “Tow-
ing” in the “Driving Your Vehicle”
section for the trailer towing capa-
bilities of your vehicle and more
information.
Following break-in, engine speed and
load can be gradually increased.
CAUTION
Using a tool to force the key from the
ignition switch could cause damage
or break the key. Use the correct key
and turn the key only with your hand.
Make sure the key is in all the way. If
none of this works, then your vehicle
needs service.
Page 69 of 274

2-13 FEATURES AND CONTROLS
78J00-03E
tion and park your vehicle, a chime will
sound, when you open the driver’s door.
Always remember to remove your key from
the ignition and take it with you. This will
lock your ignition and transaxle. Also,
always remember to lock the doors.
The battery could be drained if you leave
the key in the ignition while your vehicle is
parked. You may not be able to start your
vehicle after it has been parked for an
extended period of time.Retained Accessory Power (RAP)The vehicle has Retained Accessory
Power (RAP), which will allow your vehi-
cle’s radio and windows to work when the
ignition key is in RUN or ACC. Once the
key is turned from RUN to LOCK the radio
will continue to work 10 minutes or until the
driver’s door is opened. Also, the power
windows will continue to work for up to 10
minutes or until any door is opened.
Starting the EnginePlace the transaxle in the proper gear.
Move your shift lever to PARK (P) or NEU-
TRAL (N). Your engine will not start in any
other position -- this is a safety feature. To
restart when you are already moving, use
NEUTRAL (N) only.
Starting Procedure
1) With your foot off the accelerator pedal,
turn the ignition key to START. When
the engine starts, let go of the key. The
idle speed will go down as your engine
gets warm. Do not race the engine
immediately after starting it. Operate
the engine and transaxle gently to allow
the oil to warm up and lubricate all mov-
ing parts.
Your vehicle has a Computer-Con-
trolled Cranking System. This feature
assists in starting the engine and pro-
tects components. If the ignition key is
turned to the START position, and then
released when the engine begins
cranking, the engine will continue
cranking for a few seconds or until the
vehicle starts. If the engine does not
start and the key is held in START for
many seconds, cranking will be stoppedafter 15 seconds to prevent cranking
motor damage. To prevent gear dam-
age, this system also prevents cranking
if the engine is already running. Engine
cranking can be stopped by turning the
ignition switch to the ACC or LOCK
position.
2) If the engine does not start after 5-10
seconds, especially in very cold
weather (below 0°F –18°C), it could be
flooded with too much gasoline. Try
pushing the accelerator pedal all the
way to the floor and holding it there as
you hold the key in START for up to a
maximum of 15 seconds. Wait at least
15 seconds between each try, to allow
the cranking motor to cool down. When
the engine starts, let go of the key and
accelerator. If the vehicle starts briefly
but then stops again, do the same
thing. This clears the extra gasoline
from the engine. Do not race the engine
immediately after starting it. Operate
the engine and transaxle gently until
CAUTION
Shifting into PARK (P) with the vehi-
cle moving could damage the tran-
saxle. Shift into PARK (P) only when
your vehicle is stopped.
CAUTION
Cranking the engine for long periods
of time, by returning the key to the
START position immediately after
cranking has ended, can overheat
and damage the cranking motor, and
drain the battery. Wait at least 15 sec-
onds between each try, to allow the
cranking motor to cool down.
Page 70 of 274

2-14 FEATURES AND CONTROLS
78J00-03E
the oil warms up and lubricates all mov-
ing parts.
Engine Coolant HeaterIf your vehicle has this feature, in very cold
weather 0°F (–18°C) or colder, the engine
coolant heater can help. You will get easier
starting and better fuel economy during
engine warm-up. Usually, the coolant
heater should be plugged in a minimum of
four hours prior to starting your vehicle. At
temperatures above 32°F (0°C), use of the
coolant heater is not required. Your vehicle
may also have an internal thermostat in
the plug end of the cord. This will prevent
operation of the engine coolant heater
when the temperature is at or above 0°F (–
18°C) as noted on the cord.
To Use the Engine Coolant Heater
1) Turn off the engine.
2) Open the hood and unwrap the electri-
cal cord. The cord is located on thepassenger’s side of the engine com-
partment, near the radiator.
3) Plug it into a normal, grounded 110-volt
AC outlet.
4) Before starting the engine, be sure to
unplug and store the cord as it was
before to keep it away from moving
engine parts. If you do not, it could be
damaged.
How long should you keep the coolant
heater plugged in? The answer depends
on the outside temperature, the kind of oil
you have, and some other things. Instead
of trying to list everything here, we ask that
you contact your dealer in the area where
you will be parking your vehicle. The
dealer can give you the best advice for that
particular area.
Automatic Transaxle OperationThe shift lever for the automatic transaxle
is located on the console between the
seats.
Maximum engine speed is limited when
the vehicle is in PARK (P) or NEUTRAL
(N) to protect driveline components from
improper operation.
1722684
There are several different positions for the
shift lever. When using the manual shift
mode a number will also appear on the tell-
tale line below the gear selections. For
more information on the manual shift
option see “Manual Shift Mode” in this sec-
tion.
PARK (P):
This position locks the front wheels. It is
the best position to use when the engine is
CAUTION
Your engine is designed to work with
the electronics in your vehicle. If you
add electrical parts or accessories,
you could change the way the engine
operates. Before adding electrical
equipment, check with your dealer. If
you do not, your engine might not
perform properly. Any resulting dam-
age would not be covered by your
vehicle’s warranty.
WARNING
Plugging the cord into an
ungrounded outlet could cause an
electrical shock. Also, the wrong kind
of extension cord could overheat and
cause a fire. You could be seriously
injured. Plug the cord into a properly
grounded three-prong 110-volt AC
outlet. If the cord will not reach, use a
heavy-duty three-prong extension
cord rated for at least 15 amps.
Page 71 of 274

2-15 FEATURES AND CONTROLS
78J00-03E
started because the vehicle cannot move
easily.
Make sure the shift lever is fully in PARK
(P) before starting the engine. The vehicle
has an automatic transaxle shift lock con-
trol system. You must fully apply your reg-
ular brakes first and then press the shift
lever button, before you can shift from
PARK (P) when the ignition is in RUN. If
you cannot shift out of PARK (P), ease
pressure on the shift lever and push the
shift lever all way into PARK (P) as you
maintain brake application. Then press the
shift lever button and move the shift leverinto another gear. Refer to “Shifting Out of
Park (P)” in this section.
REVERSE (R):
Use this gear to back up.
To rock the vehicle back and forth to get
out of snow, ice, or sand without damaging
the transaxle, refer to “If Your Vehicle is
Stuck in Sand, Mud, Ice, or Snow” in “Your
Driving, the Road, and Your Vehicle” in the
“Driving Your Vehicle” section.
NEUTRAL (N):
In this position, the engine does not con-
nect with the wheels. To restart when the
vehicle is already moving, use NEUTRAL
(N) only. Also, use NEUTRAL (N) when the
vehicle is being towed.DRIVE (D):
This position is for normal driving. It pro-
vides the best fuel economy for your vehi-
cle. If the vehicle needs more power for
passing, and it is:
Going less than 35 mph (55 km/h), push
the accelerator pedal about halfway
down.
Going about 35 mph (55 km/h) or more,
push the accelerator pedal all the way
down. The vehicle will shift down to the
next gear and have more power.
WARNING
It is dangerous to get out of your
vehicle if the shift lever is not fully in
PARK (P) with the parking brake
firmly set. Your vehicle can roll.
Do not leave your vehicle when the
engine is running unless you have to.
If you have left the engine running,
the vehicle can move suddenly. You
or others could be injured. To be sure
your vehicle will not move, even
when you are on fairly level ground,
always set your parking brake and
move the shift lever to PARK (P).
Refer to “Shifting Into Park (P)” in
this section. If you are pulling a
trailer, refer to “Towing a Trailer” in
“Towing” in the “Driving Your Vehi-
cle” section.
CAUTION
Shifting to REVERSE (R) while your
vehicle is moving forward could dam-
age the transaxle. The repairs would
not be covered by your warranty.
Shift to REVERSE (R) only after your
vehicle is stopped.
WARNING
Shifting into a drive gear while your
engine is running at high speed is
dangerous. Unless your foot is firmly
on the brake pedal, your vehicle
could move very rapidly. You could
lose control and hit people or
objects. Do not shift into a drive gear
while your engine is running at high
speed.
CAUTION
Shifting out of PARK (P) or NEUTRAL
(N) while the engine is running at
high speed may damage the tran-
saxle. The repairs would not be cov-
ered by your warranty. Be sure the
engine is not running at high speeds
when shifting your vehicle.
Page 72 of 274

2-16 FEATURES AND CONTROLS
78J00-03E
Downshifting the transaxle in slippery road
conditions could result in skidding, refer to
“Loss of Control” in “Your Driving, the
Road, and Your Vehicle” in the “Driving
Your Vehicle” section.
MANUAL SHIFT MODE (M):
This position, available on the models with
the Manual Shift Mode (MSM), allows you
to change gears similar to a manual tran-
saxle. If your vehicle has this feature, see
“Manual Shift Mode (MSM)”.
Manual Shift Mode (MSM)
(Automatic Transaxle)
1722685
To use this feature, do the following:
1) Move the shift lever from DRIVE (D) to
the left into the MANUAL SHIFT MODE
(M).
While driving in manual mode, the tran-
saxle will remain in the driver selected
gear.
When coming to a stop in the manual
position, the vehicle will automatically
shift into FIRST (1) gear.
– A shift is required to protect the engine
or transmission or
– The vehicle slows almost to a stop,
and then automatic downshift will
occur.
2) Press the shift lever forward to upshift
or rearward to downshift.A box with the current gear will display in
the middle of the telltale line below the
gear selection.
While using the Manual Shift Mode (MSM)
feature the vehicle will have firmer shifting
and increased performance. You can use
this for sport driving or when climbing hills
to stay in gear longer or to downshift for
more power or engine braking.
The transaxle will only allow you to shift
into gears appropriate for the vehicle
speed and engine revolutions per minute
(RPM):
The transaxle will not downshift to the
next lower gear if the engine RPM is too
high.
The transaxle will not automatically shift
to the next higher gear if the engine
RPM is too high.
When coming to a stop in the manual
mode, the vehicle will automatically
downshift to the proper gear based on
speed. Upon acceleration you will need
to manually upshift to the desired gear.
CAUTION
Spinning the tires or holding the
vehicle in one place on a hill using
only the accelerator pedal may dam-
age the transaxle. If you are stuck, do
not spin the tires. When stopping on
a hill, use the brakes to hold the vehi-
cle in place.
 1
1 2
2 3
3 4
4 5
5 6
6 7
7 8
8 9
9 10
10 11
11 12
12 13
13 14
14 15
15 16
16 17
17 18
18 19
19 20
20 21
21 22
22 23
23 24
24 25
25 26
26 27
27 28
28 29
29 30
30 31
31 32
32 33
33 34
34 35
35 36
36 37
37 38
38 39
39 40
40 41
41 42
42 43
43 44
44 45
45 46
46 47
47 48
48 49
49 50
50 51
51 52
52 53
53 54
54 55
55 56
56 57
57 58
58 59
59 60
60 61
61 62
62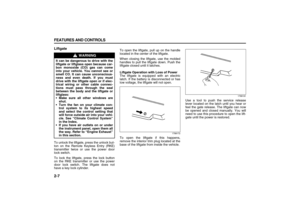 63
63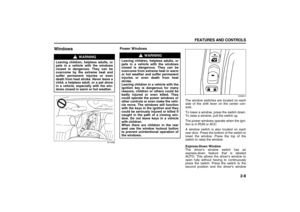 64
64 65
65 66
66 67
67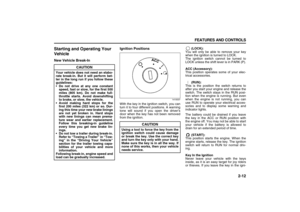 68
68 69
69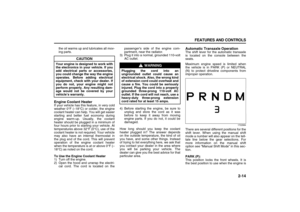 70
70 71
71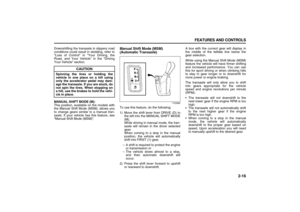 72
72 73
73 74
74 75
75 76
76 77
77 78
78 79
79 80
80 81
81 82
82 83
83 84
84 85
85 86
86 87
87 88
88 89
89 90
90 91
91 92
92 93
93 94
94 95
95 96
96 97
97 98
98 99
99 100
100 101
101 102
102 103
103 104
104 105
105 106
106 107
107 108
108 109
109 110
110 111
111 112
112 113
113 114
114 115
115 116
116 117
117 118
118 119
119 120
120 121
121 122
122 123
123 124
124 125
125 126
126 127
127 128
128 129
129 130
130 131
131 132
132 133
133 134
134 135
135 136
136 137
137 138
138 139
139 140
140 141
141 142
142 143
143 144
144 145
145 146
146 147
147 148
148 149
149 150
150 151
151 152
152 153
153 154
154 155
155 156
156 157
157 158
158 159
159 160
160 161
161 162
162 163
163 164
164 165
165 166
166 167
167 168
168 169
169 170
170 171
171 172
172 173
173 174
174 175
175 176
176 177
177 178
178 179
179 180
180 181
181 182
182 183
183 184
184 185
185 186
186 187
187 188
188 189
189 190
190 191
191 192
192 193
193 194
194 195
195 196
196 197
197 198
198 199
199 200
200 201
201 202
202 203
203 204
204 205
205 206
206 207
207 208
208 209
209 210
210 211
211 212
212 213
213 214
214 215
215 216
216 217
217 218
218 219
219 220
220 221
221 222
222 223
223 224
224 225
225 226
226 227
227 228
228 229
229 230
230 231
231 232
232 233
233 234
234 235
235 236
236 237
237 238
238 239
239 240
240 241
241 242
242 243
243 244
244 245
245 246
246 247
247 248
248 249
249 250
250 251
251 252
252 253
253 254
254 255
255 256
256 257
257 258
258 259
259 260
260 261
261 262
262 263
263 264
264 265
265 266
266 267
267 268
268 269
269 270
270 271
271 272
272 273
273


